

Introduction
Parts of the list
Hardware Side
- Arduino Uno
- Keypad
- Bread Board
- Hook-up wires
Software List
- Arduino IDE
- Python 3.5.2
Keypad
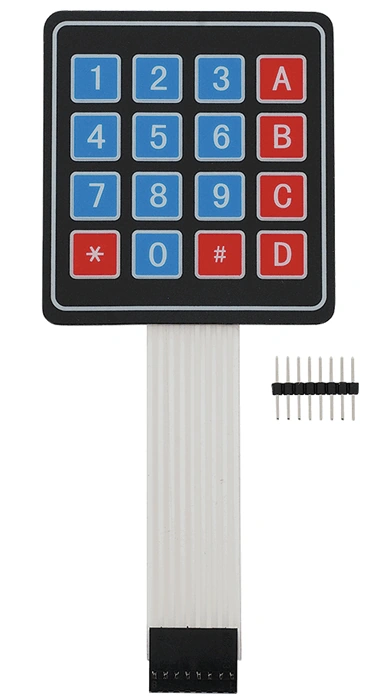
Figure 1: Keypad
-
It is a miniature keyboard.
-
This is the keypad of the 3*4 matrix.
-
It consists of buttons for operating a portable electronic device, telephone, or other equipment.
- The keypad consists of numeric numbers for the door password.
Arduino side
- /*Arduino Program Keypad Display pushed key in serial monitor*/
- const int numRows = 4; // Rows in keypad
- const int numCols = 3; // Columns in Tastatur
- const int debounceTime = 50; // Time in milliseconds to stabilize key signal
- // Keymap defines chars for each key
- const char keymap[numRows][numCols] = {
- {
- '1',
- '2',
- '3'
- },
- {
- '4',
- '5',
- '6'
- },
- {
- '7',
- '8',
- '9'
- },
- {
- '*',
- '0',
- '#'
- }
- };
- // Arrays definition for the Arduino Pins
- const int rowPins[numRows] = {
- 7,
- 2,
- 3,
- 5
- };
- const int colPins[numCols] = {
- 6,
- 8,
- 4
- };
- void setup() {
- Serial.begin(9600); // Open Serial Port
- for (int row = 0; row < numRows; row++) {
- pinMode(rowPins[row], INPUT); // Switch Pins for Rows as input
- digitalWrite(rowPins[row], HIGH); // Activate Pullups
- }
- for (int column = 0; column < numCols; column++) {
- pinMode(colPins[column], OUTPUT); // Switch Pins for Columns as input
- digitalWrite(colPins[column], HIGH); // Columns are inactive
- }
- }
- void loop() {
- char key = getKey();
- if (key != 0) {
- // if key was pushed
- Serial.println(key); // display key
- delay(10);
- // wait 10ms for next input
- }
- }
- // getKey() returns pushed key or 0 if no key was pushed
- char
- getKey() {
- char key = 0; // 0 means no key was pushed
- for (int column = 0; column < numCols; column++) {
- digitalWrite(colPins[column], LOW); // Activate column.
- for (int row = 0; row < numRows; row++) {
- // Test for all raws if key was pushed.
- if (digitalRead(rowPins[row]) == LOW) {
- // key pushed?
- delay(debounceTime); // Stabilize signal
- while (digitalRead(rowPins[row]) == LOW);
- // Wait for key to be released
- key = keymap[row][column]; // Put char of pushed key in variable key
- }
- }
- digitalWrite(colPins[column], HIGH);
- // Activate column
- }
- return key;
- // return key or 0
- }
Explanation
It is the connection code of the Arduino board and keypad when the keypad is connected in the form according to the row and the column. When the program is checked and uploaded to the board, the output will be displayed.
- const int rowPins[numRows] =
- {
- 7,
- 2,
- 3,
- 5
- };
- const int colPins[numCols] = {
- 6,
- 8,
- 4
- };
Python Side
Explanation
- # import the serial library
- import serial, time
- # Boolean variable that will represent whether or not the arduino is connected
- connected = False
- # open the serial port that your arduino is connected to.
- ser = serial.Serial("/dev/tty.usbmodem1411", 9600)
- print(ser.name)
- # loop until the arduino tells us the serial connection is ready
- while not connected:
- serin = ser.read()
- connected = True
- # if serial available save value in var, print value and clear it afterwards for new input
- while True:
- var=ser.read()
- print(var)
- del var
- # close the port and end the program
- ser.close()
Output
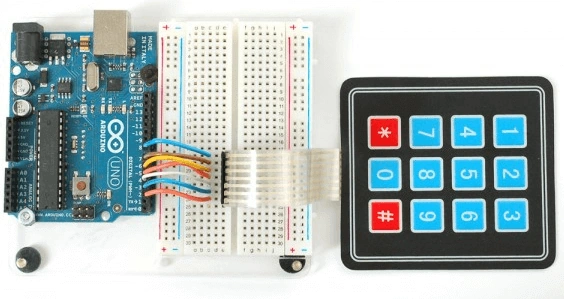
Figure 1: Output
RajaPosted Aug 17, 2016, 5:24 AM
Good one..
Anu VPosted Aug 5, 2016, 7:48 AM
Nice..
Vignesh ManiPosted Aug 5, 2016, 6:50 AM
Good One
Prasanna MuraliPosted Aug 4, 2016, 10:57 AM
Nice share..