

Here, in this write-up, we will try to create a sample application in React and will try to integrate Redux into it.
Redux offers the below components.
- Provider
- Store
- Action
- Dispatcher
The following diagram can give you a better understanding.
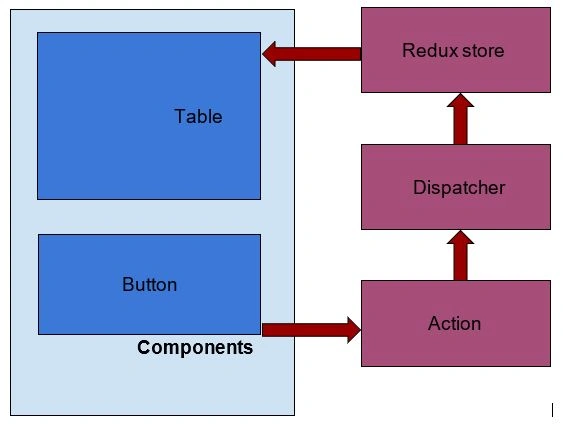
React and Redux manage unidirectional data flow. Let us create a sample application to understand this concept.
Create A React application first with the following command -
Now, open the application in Visual Studio Code. Remove the existing HTML code from app.js. Then, install the Redux component using this command.
Create a new sample component form in React application.
- import React, { Component } from 'react'
- import { connect } from 'react-redux'
- class Form extends Component {
- render(props) {
- return (
- <div>
- <h4>{this.props.name}</h4>
- <button>change data</button>
- </div>
- )
- }
- }
- function mapStateToProps(state) {
- return{
- name:state.name
- }
- }
- export default connect(mapStateToProps)(Form);
Add the Form component to app component.
- import React, { Component } from "react";
- import Form from "./form";
- import "./App.css";
- class App extends Component {
- render() {
- return (
- <div className="App">
- <header />
- <h1>testing application</h1>
- <Form />
- <footer />
- </div>
- );
- }
- }
- export default App;
Open index.js in the src folder and change as per the below code.
- import React from 'react'
- import { render } from 'react-dom'
- import { Provider } from 'react-redux'
- import { createStore } from 'redux'
- import App from './App'
- const initialSate = {
- name: "john"
- }
- const rootReducer = (state = initialSate, action) => {
- console.log('rootReducer', action);
- return state;
- }
- const store = createStore(rootReducer)
- render(
- <Provider store={store}>
- <App />
- </Provider>,
- document.getElementById('root')
- )
In the above code, we can initiate Redux into the React application, and get the default data from store to display in a component. Let us try to understand how to update the store on any event or an action.
Add a Form component mapDispatchToProps and call the method on button click. For details, please find the below code.
- import React, { Component } from 'react'
- import { connect } from 'react-redux'
- class Form extends Component {
- render(props) {
- return (
- <div>
- <h4>{this.props.name}</h4>
- <button onClick={this.props.onAddDataClick}>change data</button> <br />
- </div>
- )
- }
- }
- function mapStateToProps(state) {
- return{
- name:state.name
- }
- }
- function mapDispatchToProps(dispatch){
- return{
- onAddDataClick:()=>{
- console.log('onAddDataClick - onButtonClick');
- const action={type:'ADD_DATA'};
- dispatch(action);
- }
- }
- }
- export default connect(mapStateToProps , mapDispatchToProps)(Form);
Also, we need to modify the dispatcher method and add a switch case to get the action. According to that, we can modify the state.
- const rootReducer = (state = initialSate, action) => {
- console.log('rootReducer', action);
- switch(action.type){
- case 'ADD_DATA':
- return Object.assign({},state,{name: "danny"})
- }
- return state;
- }
One can create separate files for store, reducer, and actions so as to extend the application as per the requirement. This application gives you a simple idea of how to create a React application and integrate Redux.
Join the conversation! Your thoughts help the community grow.