

Introduction
In this article, I’m going to show you how to install and configure the network load balancing manager service on Windows Server 2019 in the proper method and easiest way.
What is network load balancing (NLB)?
Network Load Balancing (NLB) is a feature that distributes network traffic across multiple servers, enhancing the availability and scalability of critical applications. Let’s explore NLB in more detail.
Overview
- NLB operates at the TCP/IP networking protocol level.
- It combines two or more servers running applications into a single virtual cluster.
- The goal is to provide reliability and performance for web servers and other mission-critical servers.
How Does It Work?
- NLB clusters consist of hosts (servers), each running a separate copy of the server applications.
- Incoming client requests are distributed across these hosts.
- You can configure the load distribution for each host.
- Hosts can be added dynamically to handle the increased load.
- NLB can direct all traffic to a designated default host.
- Computers in the cluster share the same set of IP addresses, maintaining unique IPs for each host.
- Practical Applications.
High Availability
- NLB ensures minimal downtime for stateless applications (e.g., web servers).
- It allows scalability by adding servers as load increases.
- Manageability.
- NLB simplifies the management of clustered servers.
- When a host fails, the load is redistributed among operational computers.
- The offline host can rejoin the cluster transparently once ready.
Prerequisite
Here I have server one and server two on server one install ADDS and DHCP on your server two just set your IP address for the same range as server one after changing the computer name and connecting server two to server one as a domain connection below I mention given IP address with server’s computer name.
<table cellspacing="0">
    <tbody>
        <tr>
            <td>
                <p>Server One</p>
                <p>Computer Name: Server one (Without Space)</p>
                <p>IP Address: 192.168.1.200</p>
                <p>Default IP: 192.168.1.1</p>
            </td>
            <td>
                <p>Server Two</p>
                <p>Computer Name: Server two (Without Space)</p>
                <p>IP Address: 192.168.1.210</p>
                <p>Default IP: 192.168.1.1</p>
                <p>Preferred DNS Server: 192.168.1.200</p>
            </td>
        </tr>
    </tbody>
</table>
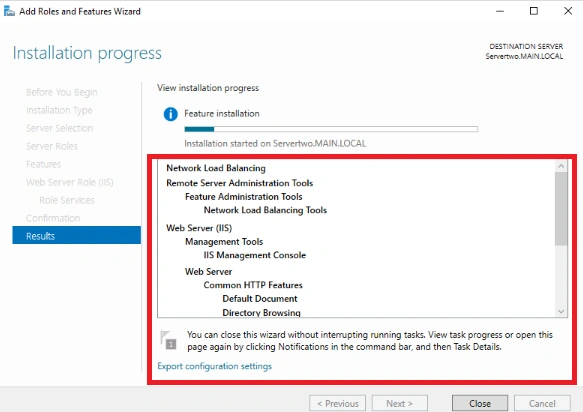
Step 1. On your server one and two install “Web Server” and “Network Lord Balancing”.
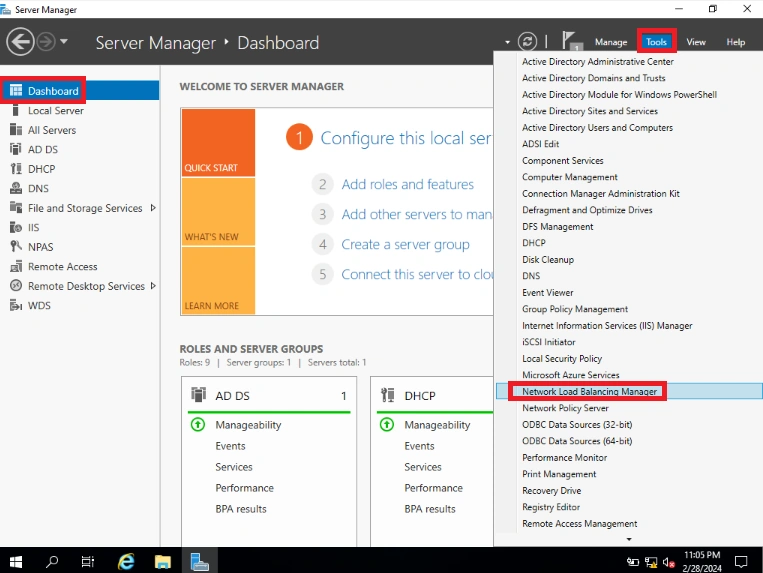
Step 2. After installed on your dashboard click “tools” then click “network load balancing”.
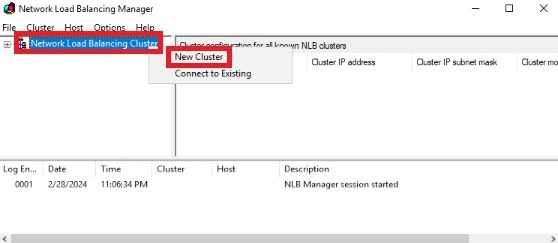
Step 3. Right-click the network load balancing cluster and click “new cluster”.
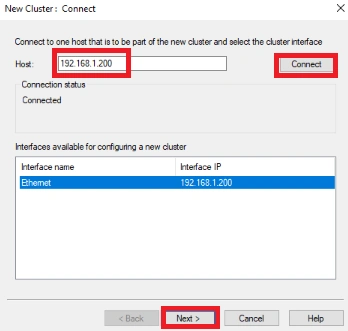
Step 4. Type your server one’s IP address and click “connect” after clicking “next”.
Step 5. Click “next”.
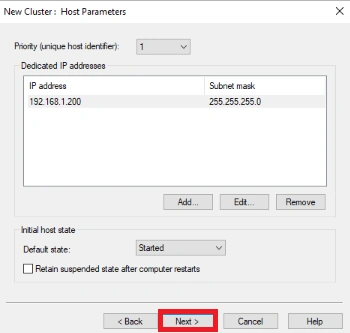
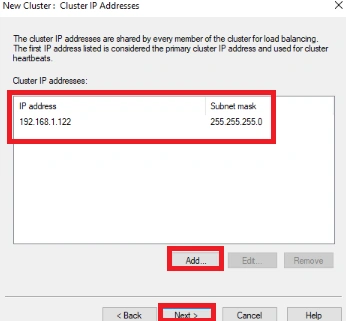
Step 6. Give your random IP address for your cluster server but make sure you have given your random IP address belonging to the same IP range by clicking “add” after clicking “next”.
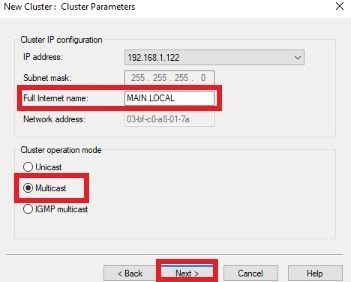
Step 7. Give your domain name in the internet name box then click “multicast” after clicking “next”.
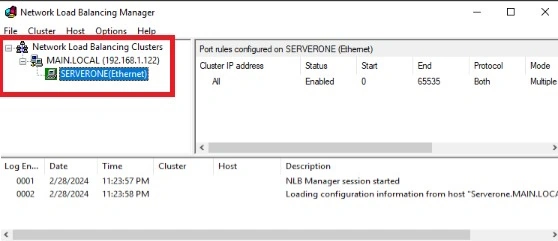
Step 8. After finishing the setup, you can see our cluster becoming green.
Step 9. Again, click on your created cluster, and after click “add a host to cluster”.
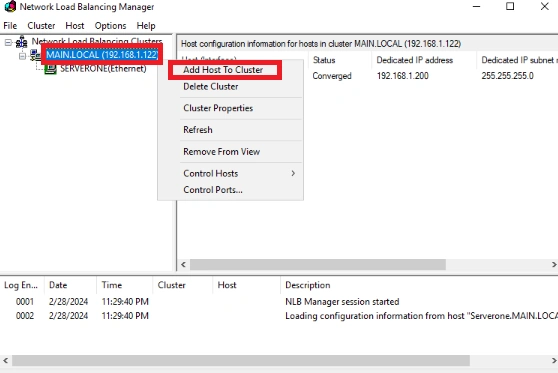
Step 10. Give your server two names with domain names after clicking “connect” and then clicking “next”.
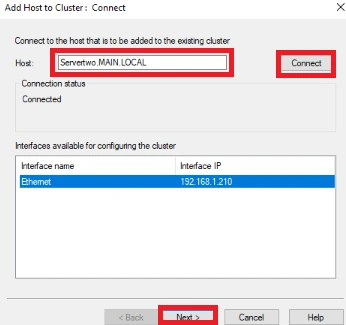
Step 11. Click “next”.
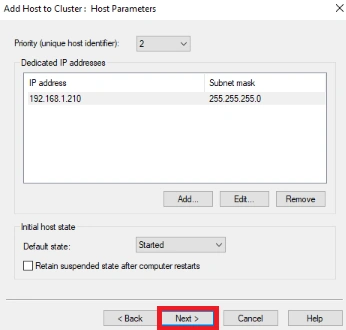
Step 12. Click “Finish”.
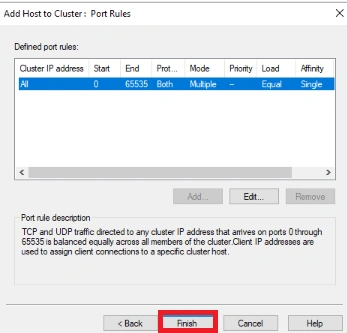
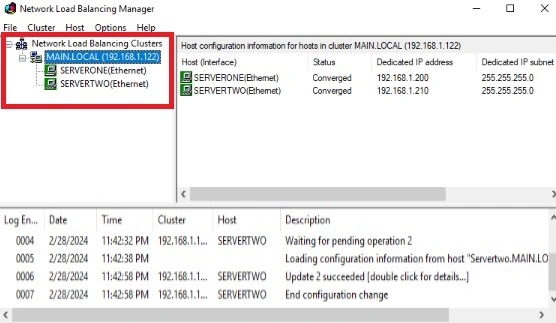
Note. Now you can see our two clusters are ready.
Conclusion
In this article, we all clearly understand how to install and configure the network load balancing manager service on Windows Server 2019 in the proper method and easiest way. If there is clarification regarding this topic, feel free to contact me.
Join the conversation! Your thoughts help the community grow.