

In this article, we are going to learn about caching and how we can implement Azure Redis cache in MVC web application to make the application faster.
Table of contents
- Introduction to Caching
- Understanding why
- Introduction to Redis Cache
- Creating a Redis Cache In Microsoft Azure
- Creating a Client MVC application to use Caching.
- Health Monitering in Caching
Introduction
Caching is a technique of storing the frequently used data or information in a small memory space, so that when the same data is needed next time, it can directly be retrieved from that memory instead of regenerating the data once again. Caching is extremely important for performance boosting in ASP.NET or MVC application.
Caching places the frequently used data in a small and quick storage, such as the random access memory of the computer.
The flow for how the caching will work is shown in the below diagram.
Caching is a technique of storing the frequently used data or information in a small memory space, so that when the same data is needed next time, it can directly be retrieved from that memory instead of regenerating the data once again. Caching is extremely important for performance boosting in ASP.NET or MVC application.
Caching places the frequently used data in a small and quick storage, such as the random access memory of the computer.
The flow for how the caching will work is shown in the below diagram.
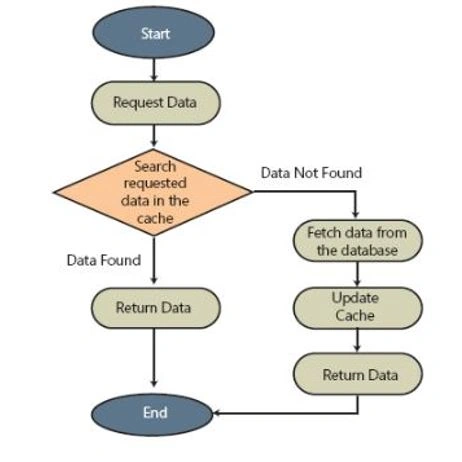
The working principles include the following steps,
- When a user requests a page from the server, first, it will check the cache memory and see if the page is present in cache or not.
- If the page is found in the Cache, the third step is to check its expiration time. If it's already expired, then again it will go for regenerating the page.
- If it's not expired, then the cached content is provided to the user.
- On the other hand, if the page or content is not found in this case, it will go with the manual process and generate the the page and store that in Cache Memory and then forwarded that to its client.
Here we will learn the Azure Redis Cache provided by the Redis Cache. Azure Redis Cache is based on the popular open-source Redis cache. It gives you access to a secure, dedicated Redis cache, managed by Microsoft, and accessible from any application within Azure.
To work with Azure Redis Cache we have to create a Redis cache in the Azure Portal. Please follow the following steps to create a Redis cache in the portal.
Why Caching is Fast??
A cache is a small storage area that is closer to the application needing it than the original source.
Accessing this cache is typically faster than accessing a typically stored in memory or on disk.
A memory cache is normally faster to read from than a disk cache, but a memory cache typically does not survive system restarts.
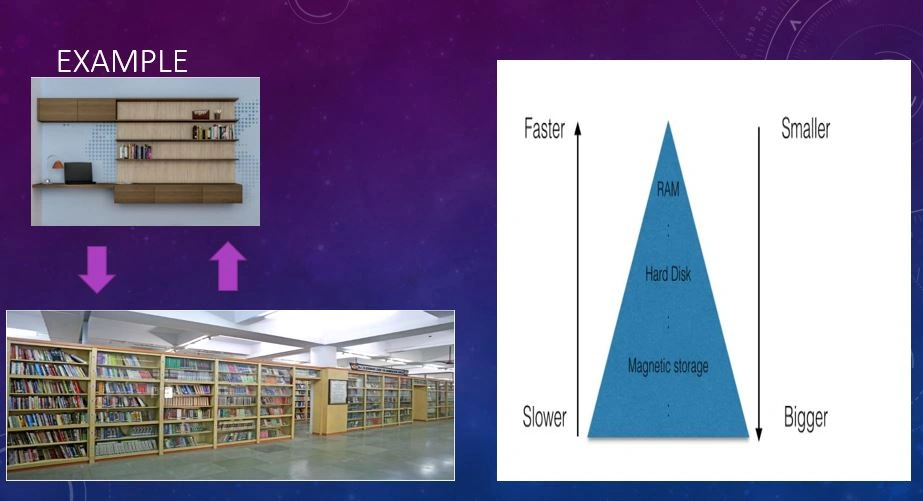
This is very much similar to a library(considered as a DB) and searching a book from this vast memory will be very difficult.so once any item is searched putting that in study table will be searched easily next time.
To use Azure Redis Cache Log in to your Azure portal with your UserId and Password. Once you are logged in it will forward you to the Dashbord.
From the Search menu, search for Database in the Portal as shown below.
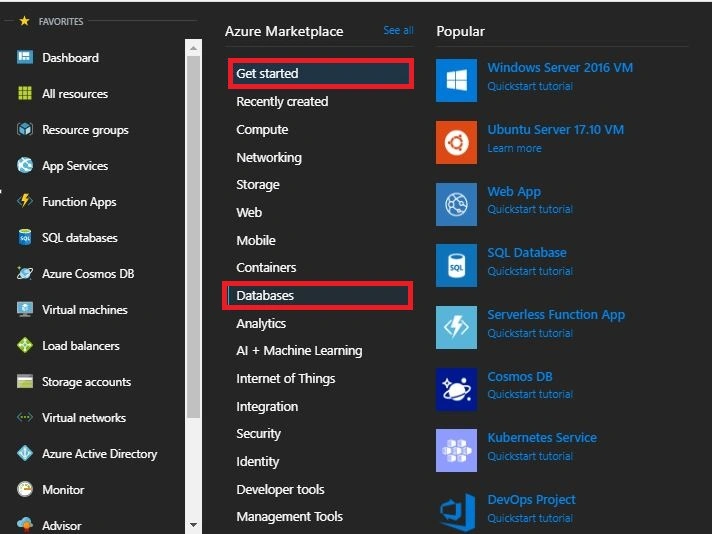
Once you select the Database option, under that you can search for Redis Cache as shown in the below picture.
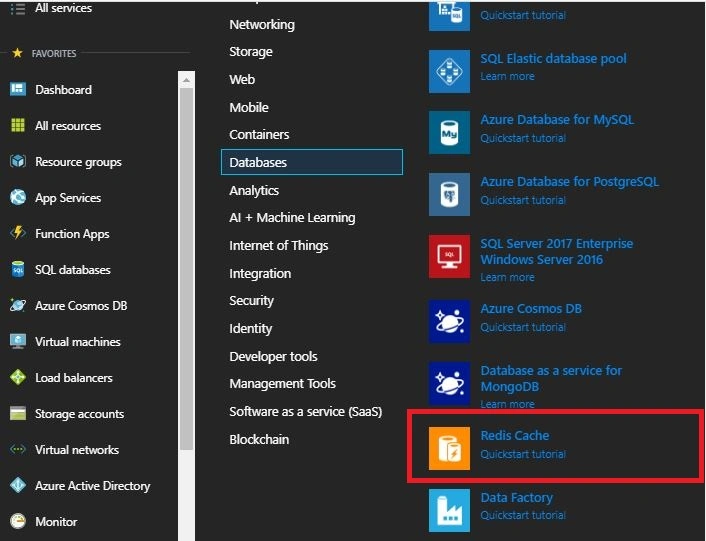
Select the Redis Cache and create and create a new Redis Cache in the Portal.
While creating Redis cache on the basic of Pricing tier, you will find 3 options:
- Basic – Single node. Multiple sizes up to 53 GB.
- Standard – Two-node Primary/Replica. Multiple sizes up to 53 GB. 99.9% SLA.
- Premium – Two-node Primary/Replica with up to 10 shards. Multiple sizes from 6 GB to 530 GB. All Standard tier features and more including support for Redis cluster, Redis persistence, and Azure Virtual Network. 99.9% SLA.
Here I have shown the Premium One with Redis Cluster in the below image.
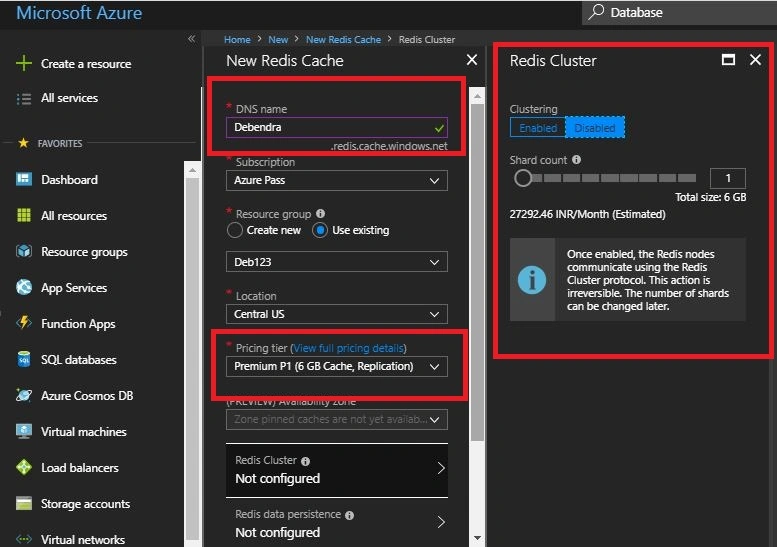
Once you create your Cache just pin it to the Dashbord, so that it will be easy to work on it. So in this way you are able to create a Redis Cache in the Azure Portal.
Now let's create a Client MVC application will use this cache to store and retrieve the data to boost the performance.
Now let's create a Client MVC application will use this cache to store and retrieve the data to boost the performance.
So Open Visual Studio and create a new MVC project as shown below.
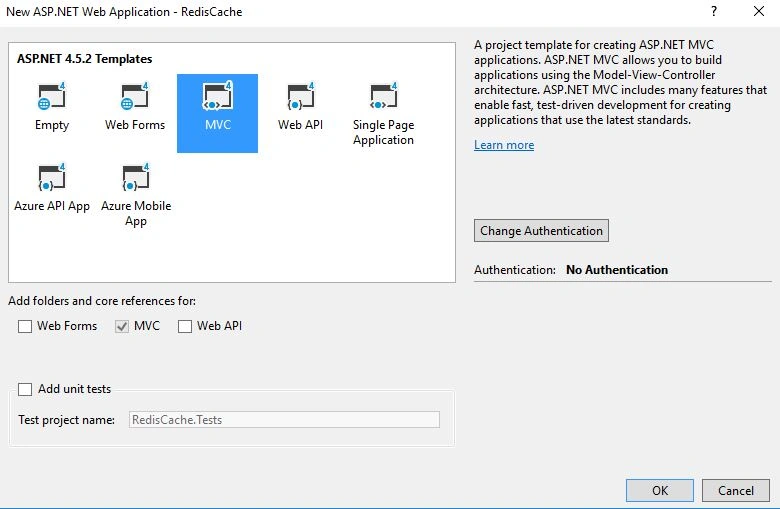
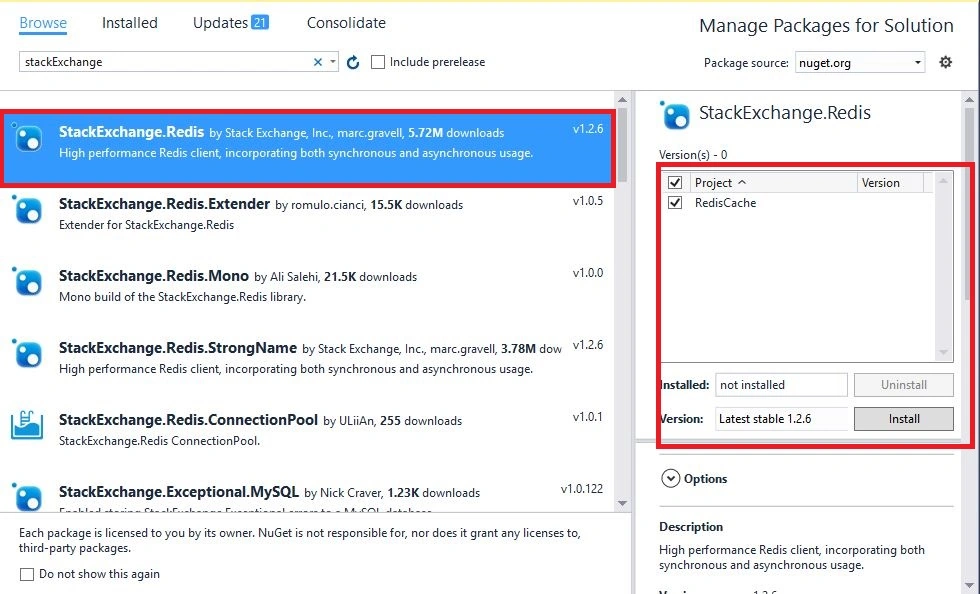
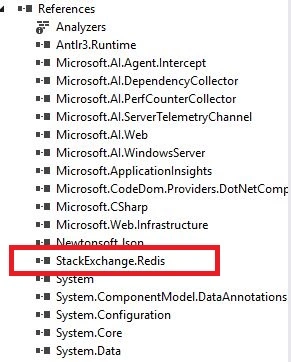
Once that is completed, you will find the references in Reference folder.
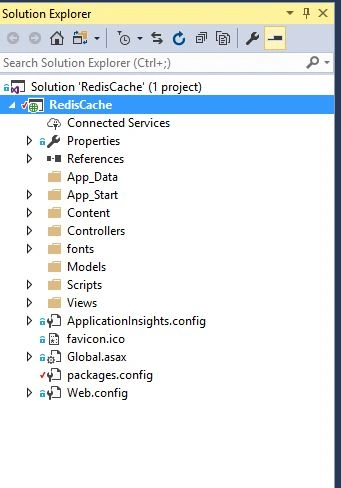
Here is my solution Explorer with all the settings.
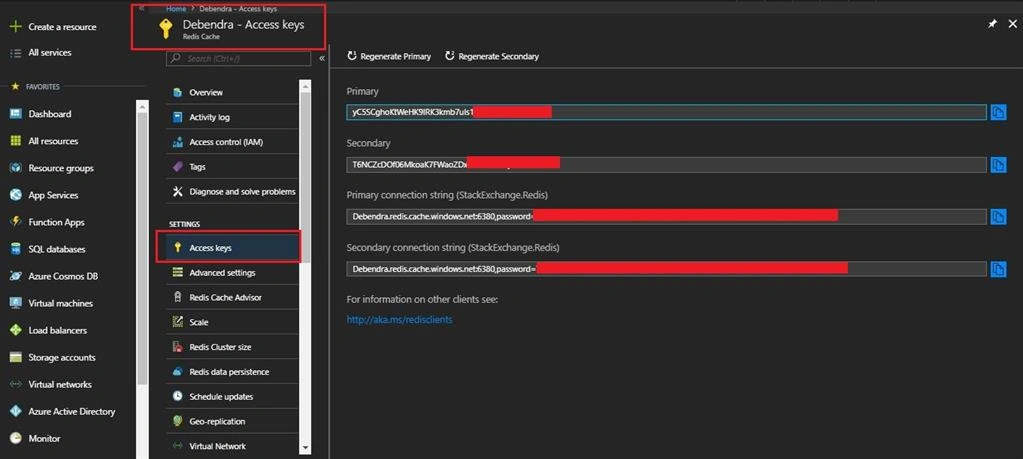
Once you get the connection string and Key, copy it and take it to the Configfile of your application.
- <appSettings>
- <add key="webpages:Version" value="3.0.0.0" />
- <add key="webpages:Enabled" value="false" />
- <add key="ClientValidationEnabled" value="true" />
- <add key="UnobtrusiveJavaScriptEnabled" value="true" />
- <add key="RedisCachekey" value="Debendra.redis.cache.windows.net:6980,password=###########KtWeHK9IRK3kmb7uIsdeben&&&&=,ssl=True,abortConnect=False" />
- </appSettings>
Here I have tempered my password. In the below section I have pasted the connection string; the database for this application is hosted in webAPP in the Azure.
- <connectionStrings>
- <add name="Connect" connectionString="Server=tcp:debendra.database.windows.net,1433;Initial Catalog=EmployeeDetails;User ID=Debendra;Password=Password#####;" providerName="System.Data.SqlClient"/>
- </connectionStrings>
- namespace RedisCache.Models
- {
- public class Employee
- {
- public int Id { get; set; }
- public string Name { get; set; }
- public string Address { get; set; }
- public string Company { get; set; }
- public string MobileNo { get; set; }
- }
- }
- public class DebendraContext:DbContext
- {
- public DebendraContext():base("Connect")
- {
- }
- public DbSet<Employee> Employee { get; set; }
- }

Now Create an Action Method to add some Employee Data in the same Index Controller.
- [HttpPost]
- public ActionResult AddEmployee(Employee model)
- {
- mydbcontext = new DebendraContext();
- mydbcontext.Employee.Add(model);
- mydbcontext.SaveChanges();
- return View();
- }
- [HttpGet]
- public ActionResult AddEmployee()
- {
- return View();
- }
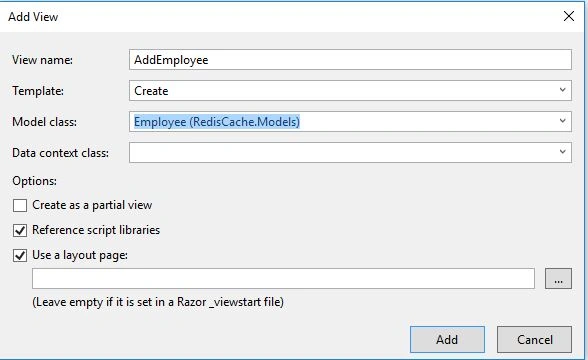
- @model RedisCache.Models.Employee
- @{
- Layout = null;
- }
- <!DOCTYPE html>
- <html>
- <head>
- <meta name="viewport" content="width=device-width" />
- <title>AddEmployee</title>
- </head>
- <body>
- @Scripts.Render("~/bundles/jquery")
- @Scripts.Render("~/bundles/jqueryval")
- @using (Html.BeginForm())
- {
- @Html.AntiForgeryToken()
- <div class="form-horizontal">
- <h4>Employee</h4>
- <hr />
- @Html.ValidationSummary(true, "", new { @class = "text-danger" })
- <div class="form-group">
- @Html.LabelFor(model => model.Name, htmlAttributes: new { @class = "control-label col-md-2" })
- <div class="col-md-10">
- @Html.EditorFor(model => model.Name, new { htmlAttributes = new { @class = "form-control" } })
- @Html.ValidationMessageFor(model => model.Name, "", new { @class = "text-danger" })
- </div>
- </div>
- <div class="form-group">
- @Html.LabelFor(model => model.Address, htmlAttributes: new { @class = "control-label col-md-2" })
- <div class="col-md-10">
- @Html.EditorFor(model => model.Address, new { htmlAttributes = new { @class = "form-control" } })
- @Html.ValidationMessageFor(model => model.Address, "", new { @class = "text-danger" })
- </div>
- </div>
- <div class="form-group">
- @Html.LabelFor(model => model.Company, htmlAttributes: new { @class = "control-label col-md-2" })
- <div class="col-md-10">
- @Html.EditorFor(model => model.Company, new { htmlAttributes = new { @class = "form-control" } })
- @Html.ValidationMessageFor(model => model.Company, "", new { @class = "text-danger" })
- </div>
- </div>
- <div class="form-group">
- @Html.LabelFor(model => model.MobileNo, htmlAttributes: new { @class = "control-label col-md-2" })
- <div class="col-md-10">
- @Html.EditorFor(model => model.MobileNo, new { htmlAttributes = new { @class = "form-control" } })
- @Html.ValidationMessageFor(model => model.MobileNo, "", new { @class = "text-danger" })
- </div>
- </div>
- <div class="form-group">
- <div class="col-md-offset-2 col-md-10">
- <input type="submit" value="Create" class="btn btn-default" />
- </div>
- </div>
- </div>
- }
- <div>
- @Html.ActionLink("Back to List", "Index")
- </div>
- </body>
- </html>
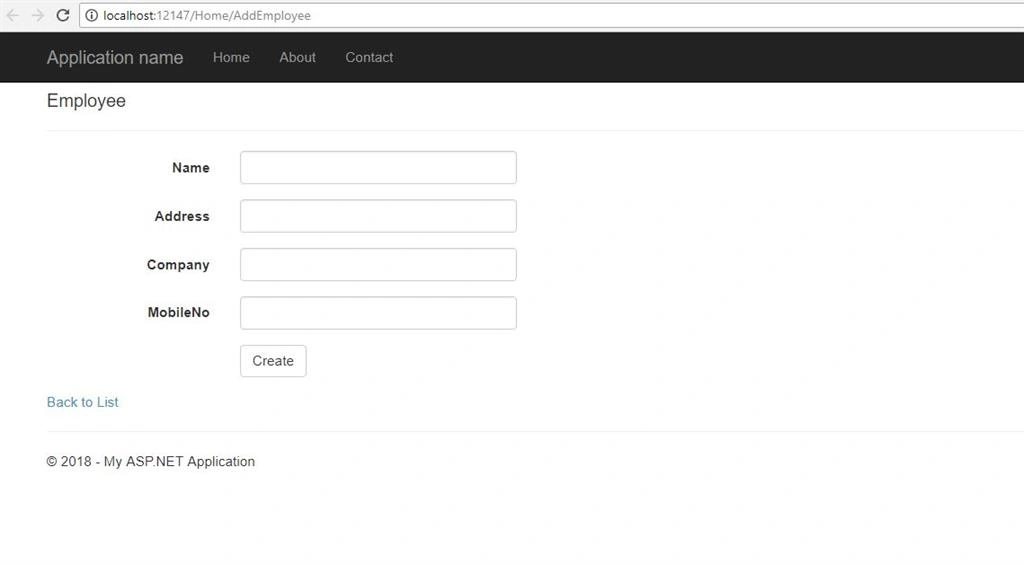
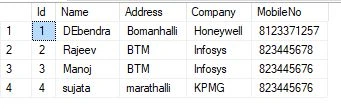
Now here is the Main logic to retrieve the data from DataBase and put it in Cache.
- public ActionResult Index()
- {
- var connect = ConnectionMultiplexer.Connect(cacheConnectionstring);
- mydbcontext = new DebendraContext();
- IDatabase Rediscache = connect.GetDatabase();
- if (string.IsNullOrEmpty(Rediscache.StringGet("EmployeeDetails")))
- {
- var liemp = mydbcontext.Employee.ToList();
- var emplist= JsonConvert.SerializeObject(liemp);
- Rediscache.StringSet("EmployeeDetails", emplist, TimeSpan.FromMinutes(2));
- return View(liemp);
- }
- else
- {
- var detail = JsonConvert.DeserializeObject<List<Employee>>(Rediscache.StringGet("EmployeeDetails"));
- return View(detail);
- }
- }
- As you know we have installed StackExchange.Redisfor using the Redis Cache in our client application.
- The central object in StackExchange.Redis is the ConnectionMultiplexer class in the StackExchange.
- The connection to the Azure Redis Cache is managed by the ConnectionMultiplexer class.
- This class should be shared and reused throughout your client application, and does not need to be created on a per operation basis.
- In these examples abortConnect is set to false, which means that the call succeeds even if a connection to the Azure Redis Cache is not established.
- <appSettings>
- <add key="RedisCachekey" value="Debendra.redis.cache.windows.net:6980,password=###########KtWeHK9IRK3kmb7uIsdeben&&&&=,ssl=True,abortConnect=False" />
- </appSettings>
- One key feature of ConnectionMultiplexer class is that it automatically restores connectivity to the cache once the network issue or other causes are resolved.
- Accessing a redis database is as simple as:
- IDatabase db = redis.GetDatabase();
- Once you have the IDatabase, it is simply a case of using the redis API. Note that all methods have both synchronous and asynchronous implementations.
- Here I have used two methods to store and retrieve data using StringGet and StringSet.
- Add and retrieve objects from the cache.
Where Rediscache is the object of IDatabase.- // If key1 exists, it is overwritten.
- Rediscache .StringSet("key1", "value1");
- string value = Rediscache .StringGet("key1");
- Here we are definging the expiration time while setting the data.
- Rediscache.StringSet("EmployeeDetails", emplist, TimeSpan.FromMinutes(2));
Now just run the Index method and check how it works:
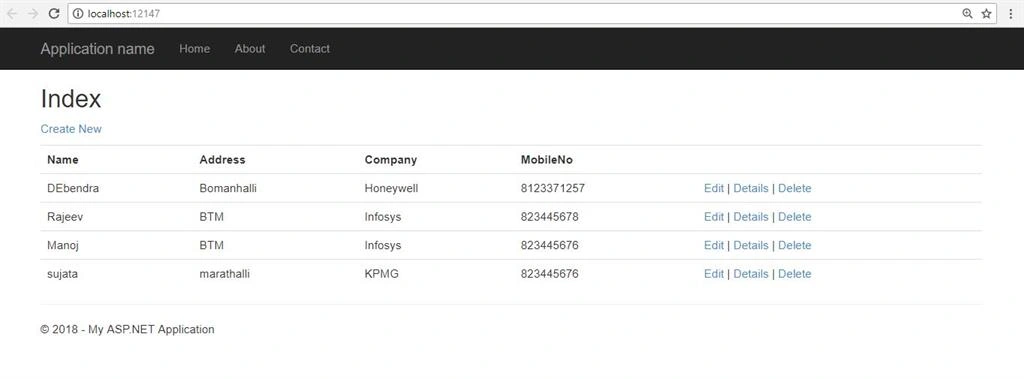
So let's request it again.
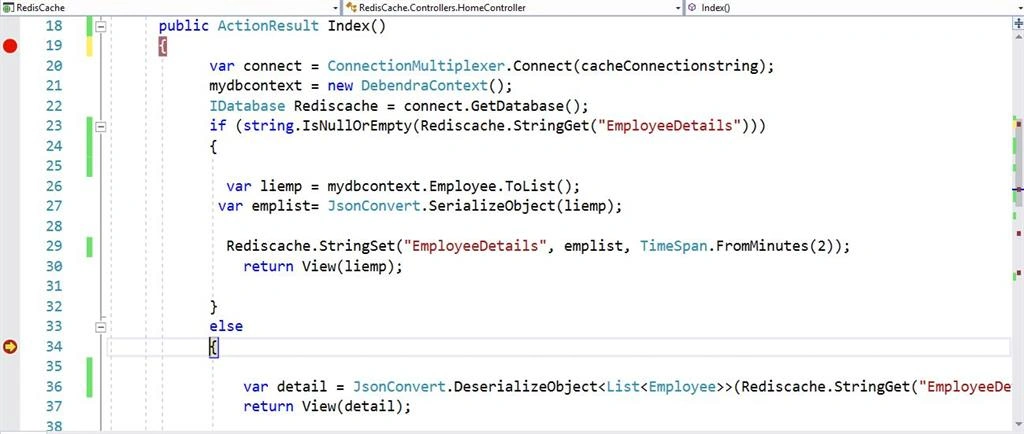
The second request is within two minutes, otherwise it will go inside the If statement again. Here is the complete Flow.
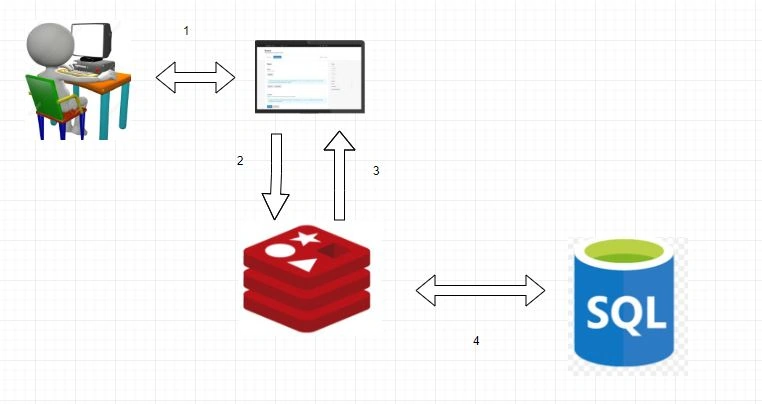
So we can avoid a lot of time using Caching.
You can also set rules to get email alerts when a particular threshold is reached for your cached object.
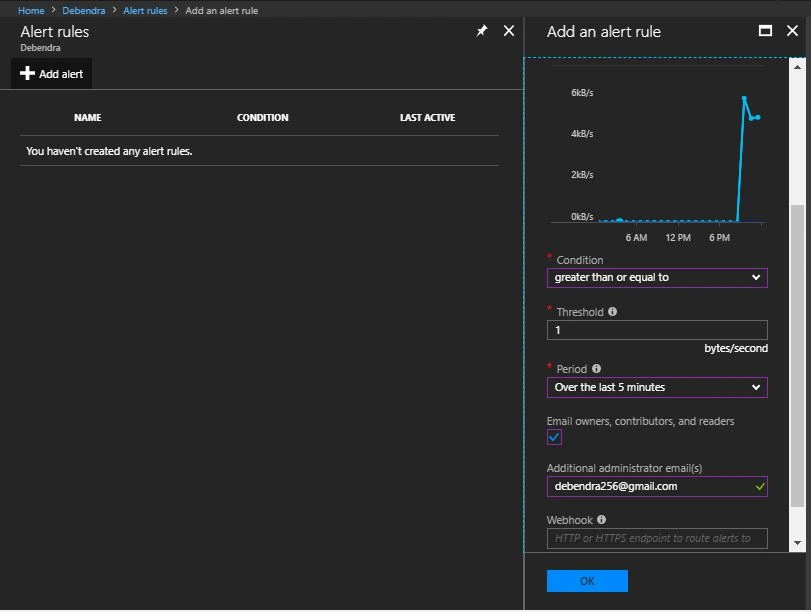
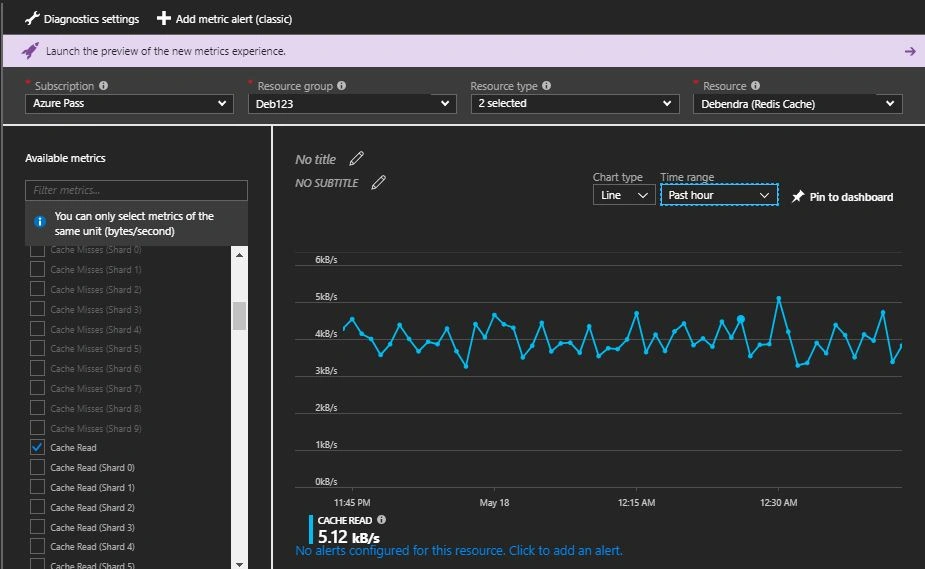
Similarly you can monitor your cache health here as follows.
Conclusion
In this way we can work on Azure Redis Cache and keep our web application maximized.
Please let me know if you have any doubts or if I made any mistakes so I can modify and learn from that.
Similarly you can monitor your cache health here as follows.
Conclusion
In this way we can work on Azure Redis Cache and keep our web application maximized.
Please let me know if you have any doubts or if I made any mistakes so I can modify and learn from that.
Satyaprakash SamantarayPosted Sep 7, 2018, 3:26 AM
Nice article and very interesting topic. Thanks for sharing
Hadshana KamalanathanPosted Jul 17, 2018, 6:26 PM
Thank you for sharing...
Tridip BhattacharjeePosted May 22, 2018, 4:38 AM
How to push data into redis cache ? if few data has been changed in cache then how could we invalidate cache and reload all data again or refresh only changed data?