
Introduction
In this article we will create an image overlay effect using jQuery. jQuery is already very popular because it is a fast and concise JavaScript library that simplifies HTML document traversing, event handling, animation, and AJAX interactions with very little code. With jQuery you can enjoy a new way of web development and image galleries are the best way to use it effectively.
First, we need to define which elements we want to apply the effect to. Now it's time to see how we will make it.
Step 1: First we have to create a web application.
- Go to Visual Studio 2010.
- New -> And select the web Application.
- Give it's a name whatever you want.
- Click OK.

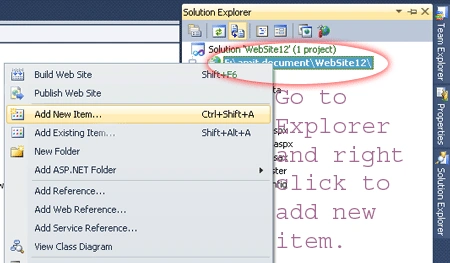
Step 2: Secondly you have to add a new page to the website.
- Go to the Solution Explorer.
- Right-click on the Project name.
- Select add new item.
- Add new web page and give it a name. Here "Akshay.aspx".
- Click OK.
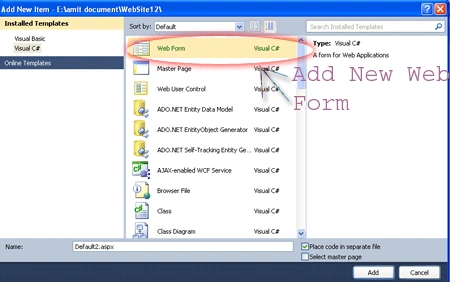
Step 3: In this step you add some images to the project; let us see how it will look. Basically, these are the images I used but you can use your own images; whatever you want to do.
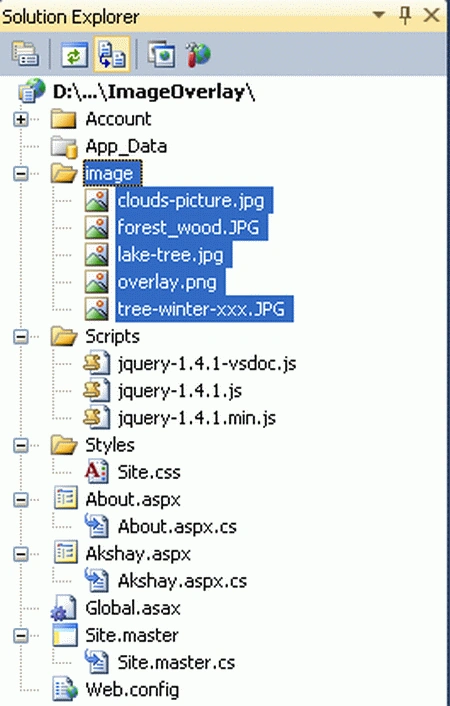
Step 4: In this step we will see how to add style sheet code. Whenever we write the style sheet code you have to care that it will be written inside the <style></style> code and you have to place it inside the head section.
<style type="text/css">
*{
margin:0;
padding:0;
}
img{
border: none;
}
body {
text-align: center;
background: #222;
}
h2{
color: #333;
font:italic 36px Georgia, serif;
padding: 20px;
border-bottom: dashed 1px #999;
clear: both;
}
#content{
width: 100%;
margin: 0px auto;
background: #fff;
text-align: center;
margin-bottom: 50px;
}
.row{ /*Container for each row of shirts*/
width: 495px;
margin: 0px auto;
clear:both;
padding: 20px 0;
}
.teebox{
overflow: hidden; /*Prevents excess of image from showing*/
position: relative;
margin: 0 10px;
width: 144px; /*Width and height define thumbnail size*/
height: 183px;
float: left;
clear: rightright;
z-index: 0;
}
.selected{
overflow: visible; /*Display part of image that not currently visible*/
z-index: 10;
}
.teebox img {
left:-84px; /*Use this to center your image when not hovered*/
position: absolute;
}
.teebox a{ /*Area that changes to selected class when hovered over*/
display:block;
position: relative;
float: left;
left: 84px; /*Use to line up the overlay image*/
z-index: 1;
}
.caption{
color: #2FB5FF;
font:14px Arial;
position: relative;
float: left;
left: 0px;
top: 146px;
padding: 10px;
background: #222;
z-index: 1;
}
</style>
Step 5: In this step we write the script reference to the aspx page; let us see from where you have to write the script code.
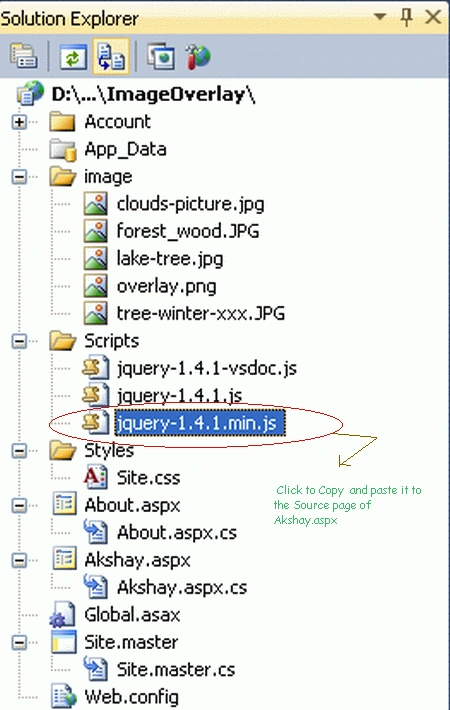
Step 6: Let us see the script code to add inside the <script></script> tags and that will be placed either in the head section or body section as you want.
<script type="text/javascript" src="Scripts/jquery-1.4.1.min.js"></script>
Step 7: In this step we have to write the jQuery code which is given below.
<script type="text/javascript">
$(document).ready(function () {
$(".teebox a").mouseover(function () {
$(this).parent().addClass("selected");
$(this).find('img').animate({ opacity: "0.0" }, 0); //Hides overlay
$(this).parent().find('.caption').hide(); //Hides Caption
}).mouseout(function () {
$(this).parent().removeClass("selected");
$(this).find('img').animate({ opacity: "1.0" }, 0); //Shows overlay
$(this).parent().find('.caption').show(); //Shows Caption
});
});
</script>
Step 8: In this code you will see that we have to add some images inside the Akshay.aspx page; now let us see how we will add it.
Body Code:
<body>
<div id="content">
<div class="row">
<div class="teebox">
<a href="#"><img src="image/overlay.png" /></a><img src="image/forest_wood.JPG" />
<div class="caption">$10</div>
</div>
</div>
</div>
</body>
Step 9: In this step we will see the complete code for the Akshay.aspx page; let us see the code given below.
<%@ Page Language="C#" AutoEventWireup="true" CodeFile="Akshay.aspx.cs" Inherits="Akshay" %>
<!DOCTYPE html PUBLIC "-//W3C//DTD XHTML 1.0 Transitional//EN" "http://www.w3.org/TR/xhtml1/DTD/xhtml1-transitional.dtd">
<html xmlns="http://www.w3.org/1999/xhtml">
<head runat="server">
<title>Image Overlay Using jQuery</title>
<script type="text/javascript" src="Scripts/jquery-1.4.1.min.js"></script>
<script type="text/javascript">
$(document).ready(function () {
$(".teebox a").mouseover(function () {
$(this).parent().addClass("selected");
$(this).find('img').animate({ opacity: "0.0" }, 0); //Hides overlay
$(this).parent().find('.caption').hide(); //Hides Caption
}).mouseout(function () {
$(this).parent().removeClass("selected");
$(this).find('img').animate({ opacity: "1.0" }, 0); //Shows overlay
$(this).parent().find('.caption').show(); //Shows Caption
});
});
</script>
<style type="text/css">
*{
margin:0;
padding:0;
}
img{
border: none;
}
body {
text-align: center;
background: #222;
}
h2{
color: #333;
font:italic 36px Georgia, serif;
padding: 20px;
border-bottom: dashed 1px #999;
clear: both;
}
#content{
width: 100%;
margin: 0px auto;
background: #fff;
text-align: center;
margin-bottom: 50px;
}
.row{ /*Container for each row of shirts*/
width: 495px;
margin: 0px auto;
clear:both;
padding: 20px 0;
}
.teebox{
overflow: hidden; /*Prevents excess of image from showing*/
position: relative;
margin: 0 10px;
width: 144px; /*Width and height define thumbnail size*/
height: 183px;
float: left;
clear: rightright;
z-index: 0;
}
.selected{
overflow: visible; /*Display part of image that not currently visible*/
z-index: 10;
}
.teebox img {
left:-84px; /*Use this to center your image when not hovered*/
position: absolute;
}
.teebox a{ /*Area that changes to selected class when hovered over*/
display:block;
position: relative;
float: left;
left: 84px; /*Use to line up the overlay image*/
z-index: 1;
}
.caption{
color: #2FB5FF;
font:14px Arial;
position: relative;
float: left;
left: 0px;
top: 146px;
padding: 10px;
background: #222;
z-index: 1;
}
</style>
</head>
<body>
<div id="content">
<div class="row">
<div class="teebox">
<a href="#"><img src="image/overlay.png" /></a><img src="image/forest_wood.JPG" />
<div class="caption">$10</div>
</div>
</div>
</div>
</body>
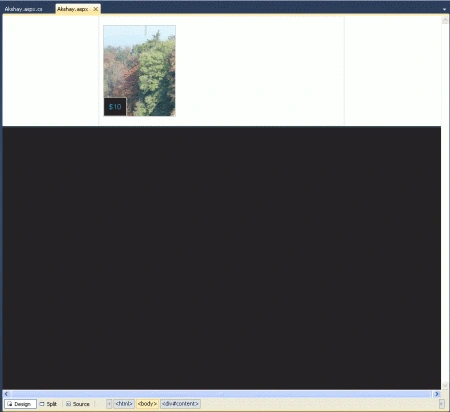
Step 10: In this step we will see the design of the Akshay.aspx page which is given below.
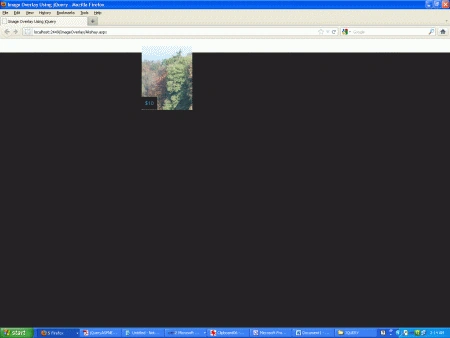
Step 11: In this step we are going to run the Akshay.aspx page by pressing F5.
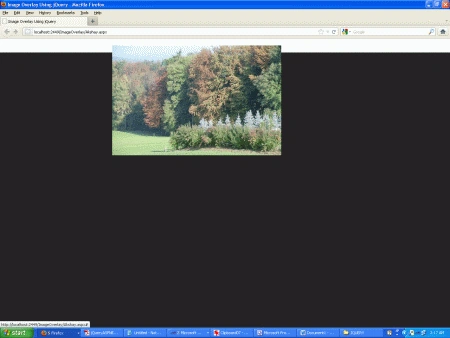
Now MouseOver the image; you will see:
Resources
Mukesh KumarPosted Oct 18, 2015, 1:49 AM
Good Article
Kakky BPosted Dec 31, 2014, 2:15 AM
really nice one
Monika AroraPosted Feb 9, 2012, 11:26 PM
Hi Sapna. You have presented your article very nicely.