

Introduction
The ability for users to share and keep various sorts of content is made possible by the essential element of file uploading in contemporary web development. File uploads may be handled in a stable environment thanks to Node.js's effective and event-driven architecture. The management of form submissions, the processing of file uploads, and the saving of files on the server are some of the several aspects of file uploading in Node.js that will be covered in this article. This tutorial will lead you through adding file-uploading support to your Node.js applications, whether you're a novice or a seasoned developer.
Setting Up a Node.js Project
Here we discuss how to set up a Node.js project.
Installing Node.js
- Download the correct Node.js version for your operating system by going to the official Node.js website (https://nodejs.org).
- To install Node.js on your computer, launch the installer and adhere to the directions.
- By launching a terminal or command prompt and entering node -v, you may confirm the installation. The Node.js version should be displayed on the terminal.
Initializing a Node.js project with npm
- For your project, either create a new directory or go to an existing one.
- Go to the project directory in a terminal or command prompt after opening it.
- To start a fresh Node.js project, execute the command below.
npm init
- Your project's name, version, description, entrance point, and other details will be requested of you. Pressing enter will allow you to enter new settings or accept the defaults.
- The package.json file, which contains the metadata and dependencies for your project, will be created by npm and placed in your project directory after you have provided the appropriate information.
Installing required dependencies
- We will require some more packages in order to manage file uploading in Node.js. Express is a well-liked package that offers a simple and adaptable web framework for Node.js
- Open a command window or a terminal in the project directory.
- Install Express and save it as a Project Dependency by running the following command
npm install express --save
-
To install the EJS (Embedded JavaScript) package in your Node.js project, you can run the following command in your command window or terminal.
npm install ejs --save
- Additionally, we'll make use of the middleware package multer, which manages data from multipart forms, including file uploads. Run the following command to install it.
npm install multer --save
-
With the help of these instructions, you can download the necessary packages and store them in your package.json file as dependencies.
Project Structure
After a successful project setup, we need to add some folders below the image of the project structure.
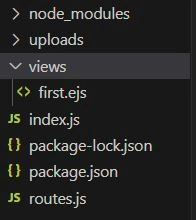
In this file structure, node_modules, package-lock.json, and package.json these files is created while you set up a project. We created index.js, routes.js, and views folder. Below attached all files used in this project.
index.js
const express = require('express');
const app = express();

const path = require('path');
const multer = require('multer');

// Require the routes file
const routes = require('./routes');

app.set('views', path.join(__dirname, 'views'));
app.set('view engine', 'ejs');

// Use the router middleware
app.use('/', routes);
const storage = multer.diskStorage({
    destination: path.join(__dirname, 'uploads'),
    filename: (req, file, cb) => {
      cb(null, file.originalname);
    }
  });

  const upload = multer({ storage });

  // Route handler for file upload
  app.post('/upload', upload.single('file'), (req, res) => {
    res.send('File uploaded successfully!');
    // res.redirect('/');
  });
app.listen(3000, () => {
  console.log('server is running on port 3000');
});
Explanation
This code configures a fundamental Express server with file upload capabilities. The required modules, including Express, path, and multer, are imported. It also sets the views directory and configures the server's view engine to use EJS templates. To process incoming requests, the routes module is necessary and employed as middleware. Multer is set up to manage file uploads, with the destination directory and filename being specified. When the server first starts up, it outputs a message and listens on port 3000. The '/upload' route accepts file uploads, saves them to the designated location, and then responds with an indication that the upload was successful.
routes.js
const express = require('express');
const router = express.Router();

router.get('/', (req, res) => {
  // Route handler logic for the GET request
  res.render('first');
});

module.exports = router;
Explanation
Using the Express Router module, this code configures a router. Express.Router() is used to build a new instance of the Router after importing the "express" module. A GET request to the root URL ("/") will be handled by the router. The callback function, which renders the 'first' view using res.render('first'), is called when this request is received.
The 'first' EJS template is rendered using the res.render() method and is a dynamic HTML file that can be filled with data before being sent as a response. The router is finally exported so that it can be mounted as middleware in the main application file or used by other modules. In an Express application, this enables the routes to be organized and modularized.
first.ejs
<!-- upload.ejs -->
<!DOCTYPE html>
<html>
<head>
  <title>File Upload Form</title>
  <style>
    body {
      font-family: Arial, sans-serif;
      margin: 0;
      padding: 20px;
      background-color: #f2f2f2;
    }

    h1 {
      text-align: center;
      color: #333;
    }

    form {
      width: 300px;
      margin: 0 auto;
      background-color: #fff;
      padding: 20px;
      border-radius: 5px;
      box-shadow: 0 2px 5px rgba(0, 0, 0, 0.3);
    }

    label {
      display: block;
      margin-bottom: 10px;
      color: #333;
    }

    input[type="file"] {
      margin-bottom: 20px;
    }

    input[type="submit"] {
      background-color: #4CAF50;
      color: #fff;
      border: none;
      padding: 10px 20px;
      border-radius: 5px;
      cursor: pointer;
    }
  </style>
</head>
<body>
  <h1>File Upload</h1>
  <form action="/upload" method="POST" enctype="multipart/form-data">
    <label for="file">Upload File:</label>
    <input type="file" name="file" id="file">
    <br>
    <input type="submit" value="Upload">
  </form>
</body>
</html>
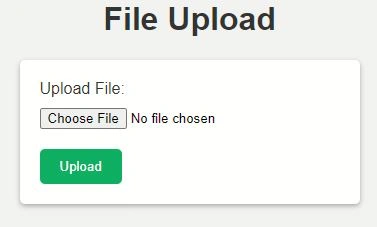
Output
Explanation
To render an HTML form for file uploads, an EJS (Embedded JavaScript) template file called "upload.ejs" is utilized. A title, style specifications, and a form element are all parts of the HTML structure. The form features a "Upload File" labeled file input field and a submit button. The uploaded file is included in a POST request to the "/upload" endpoint that is sent when the form is submitted.
The styling in the included CSS determines the font family, margin, padding, background color, and box shadow of the form. The submit button's background color is green, and the form's elements are styled with the proper spacing. A clean, basic, and centered arrangement characterizes the entire design.
Conclusion
A rudimentary implementation of file uploading capabilities in a Node.js application is provided by this code and project, in conclusion. It shows how to install Express, set up routes to handle requests, and use the multer middleware to handle file uploads. An EJS template that produces an HTML form for file uploads is also included in the code. Users can choose a file, submit it via the form, and have it uploaded to the server's specified directory with this implementation. This project can be modified and improved upon in accordance with the needs of certain applications and serves as a foundation for creating more sophisticated file-uploading functionalities.
FAQs
Q. How can I limit the size of uploaded files?
A. To limit the size of uploaded files, you can utilize the limits option provided by multer. For example, you can set the limits option in the upload middleware like this: const upload = multer({ storage, limits: { fileSize: 1024 * 1024 * 5 } }); This example limits the file size to 5 megabytes.
Q. How can I handle multiple file uploads at once?
A. To handle multiple file uploads, you can use the upload.array() method instead of upload.single() in your route handler. For example, app.post('/upload', upload.array('files', 3), (req, res) => { ... }); This allows multiple files to be uploaded simultaneously, and the files will be accessible in req.files array.
Q. How can I access the uploaded file's information in the route handler?
A. When using upload.single() middleware, the uploaded file information can be accessed through the req.file object in the route handler. For example, you can access the filename using req.file.filename or the original name using req.file.originalname.
Join the conversation! Your thoughts help the community grow.