

Prerequisites
- Visual Studio 2015
Now, let's get started with the following steps.
Step 1 - Create Windows Universal Project
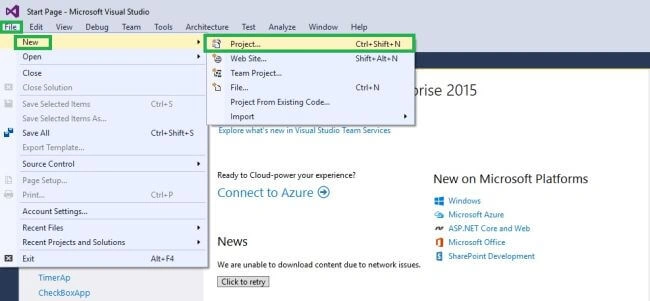
Open Visual Studio 2015 and Click File -> New -> Project Option for New Universal App.
Step 2 - Giving the Project Name
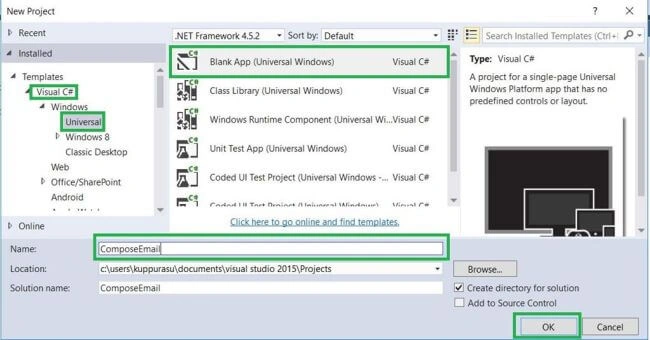
Then, New Project window will open. There, select Installed -> Template -> Visual C# -> Windows -> Universal and select a Blank App (Universal Windows).
Type the Project Name as ComposeEmail and click OK.
Step 3 - Setting the platform versions
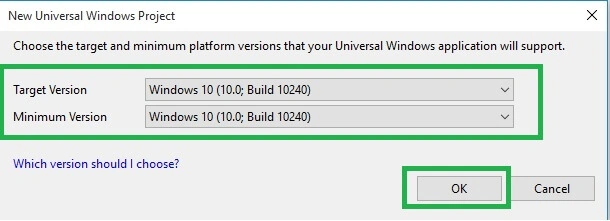
Here, we choose the Target Version and Minimum Version for our Universal Windows application, and click OK.
Step 4 - Choose Designer Window
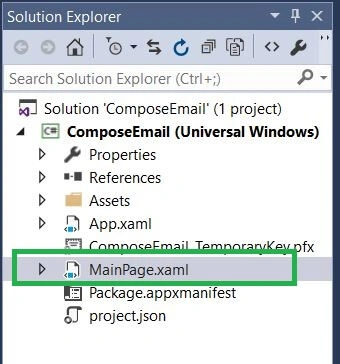
Now, go to the Solution Explorer and select MainPage.xaml.
Step 5 - Designing the App
In the MainPage.xaml designing page, to compose email app, we need 5 TextBlock, 4 Textbox, and one Command Button. So, add 5 TextBlocks and change the Text property in the Properties Window (See the below table).
| Control Name | Text Property |
| TextBlock1 | Compose Mail |
| TextBlock2 | To |
| TextBlock3 | CC |
| TextBlock4 | Subject |
| TextBlock5 | Body |
Next, add 4 Textboxes and one Button control, and change their Name property in the Properties Window (See the below table).
| Control Name | Name Property |
| Textbox1 | tomail |
| Textbox2 | ccmail |
| Textbox3 | Subject |
| Textbox4 | Body |
| Button1 | SendEmail |
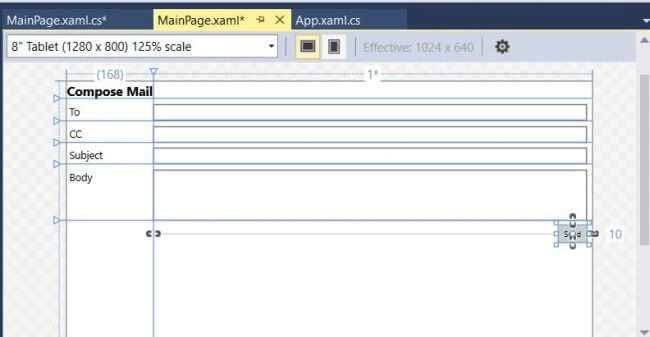
XAML code
- <Grid.ColumnDefinitions>
- <ColumnDefinition Width="Auto"></ColumnDefinition>
- <ColumnDefinition Width="*"></ColumnDefinition>
- </Grid.ColumnDefinitions>
- <Grid.RowDefinitions>
- <RowDefinition Height="Auto"></RowDefinition>
- <RowDefinition Height="Auto"></RowDefinition>
- <RowDefinition Height="Auto"></RowDefinition>
- <RowDefinition Height="Auto"></RowDefinition>
- <RowDefinition Height="Auto"></RowDefinition>
- <RowDefinition Height="Auto"></RowDefinition>
- </Grid.RowDefinitions>
- <TextBlock Text="Compose Mail" FontSize="25" Grid.Row="0" FontWeight="Bold"></TextBlock>
- <TextBlock Margin="5,10,0,0" Text="To" Grid.Row="1" FontSize="20"></TextBlock>
- <TextBox Margin="0,10,10,0" Name="tomail" Grid.Column="1" Grid.Row="1"></TextBox>
- <TextBlock Margin="5,10,0,0" Text="CC" Grid.Row="2" FontSize="20"></TextBlock>
- <TextBox Margin="0,10,10,0" Name="ccmail" Grid.Column="1" Grid.Row="2"></TextBox>
- <TextBlock Margin="5,10,0,0" Text="Subject" Grid.Row="3" FontSize="20"></TextBlock>
- <TextBox Margin="0,10,10,0" Name="subject" Grid.Column="1" Grid.Row="3"></TextBox>
- <TextBlock Margin="5,10,0,0" Text="Body" Grid.Row="4" FontSize="20"></TextBlock>
- <TextBox Margin="0,10,10,0" Name="body" Grid.Column="1" Grid.Row="4" Height="100" TextWrapping="Wrap"></TextBox>
- <Button Margin="0,10,10,0" HorizontalAlignment="Right" Content="Send" Name="sendEmail" Grid.Column="1" Grid.Row="5" Click="sendEmail_Click"></Button>
To add the coding, we need to add the following namespace in MainPage.xaml.cs page.
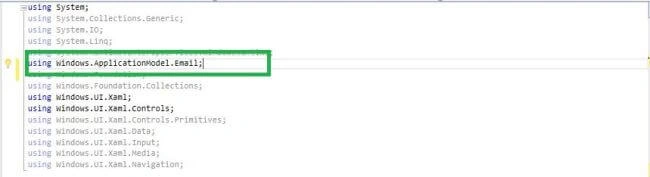
Then, write the below code for Save button.
- private async void sendEmail_Click(object sender, RoutedEventArgs e)
- {
- EmailMessage email = new EmailMessage();
- email.To.Add(new EmailRecipient(tomail.Text));
- email.CC.Add(new EmailRecipient(ccmail.Text));
- email.Subject = subject.Text;
- email.Body = body.Text;
- await EmailManager.ShowComposeNewEmailAsync(email);
- }
Now, we are ready to run our project. So, click the Local Machine for running the application.
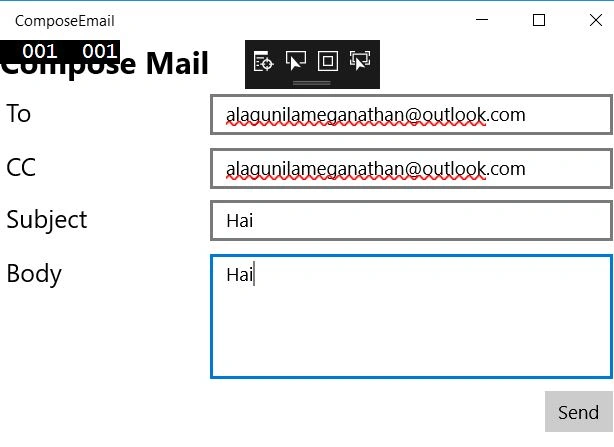
Conclusion - I hope you understood how to compose an email in Universal Windows Platform.
Connor PangPosted Aug 14, 2018, 6:16 PM
Anyone know how to make simple app button for activate wishlist for product selection? Thanks ??
Connor PangPosted Aug 14, 2018, 6:14 PM
Nice ?? ! Awesome. Work !
Karthik MPosted Jul 21, 2017, 9:35 AM
Hi, Nice Article, Is there any option to send mail programmatically without prompting , like smtpClient in C#
Ankur VermaPosted Sep 29, 2016, 6:32 AM
Good...
Mahesh ChandPosted Sep 18, 2016, 11:18 PM
Title is confusing. Title should be - Build Simple Email App in UWP. Cheers!