

Introduction
SharePoint has evolved into a powerful platform for building collaborative business solutions without heavy coding. One of its most useful modern features is List Formatting using JSON, which allows developers and power users to visually customize list views dynamically.
With JSON-based conditional formatting, you can highlight important data, change colors, add icons, and improve readability—all without using SharePoint Designer or complex custom development.
In this article, we’ll explore how to apply conditional formatting using JSON in SharePoint lists with practical examples.
What is JSON Formatting in SharePoint?
JSON formatting in SharePoint allows you to customize how list columns and views are displayed using a simple JSON schema.
It does not change the data, only the presentation layer.
You can use it to:
Highlight overdue tasks
Show status indicators (green/yellow/red)
Format priority levels
Add icons or emojis
Create progress bars
Where Can You Apply JSON Formatting?
You can apply JSON formatting in three main areas:
Column Formatting – Format individual columns
View Formatting – Format entire list views
Row Formatting (legacy concept via view formatting) – Highlight entire rows based on conditions
How to Apply JSON Formatting in SharePoint
Step 1: Open Your SharePoint List
Go to your SharePoint site
Open the target list (e.g., Task List, Employee List)
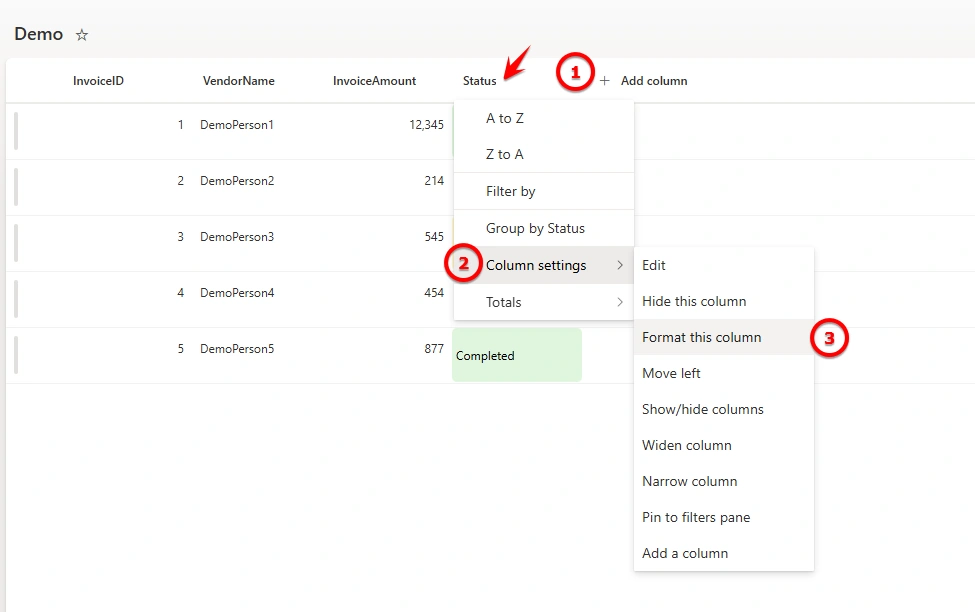
Step 2: Open Column Settings
Click the column header
Select Column settings
Click Format this column
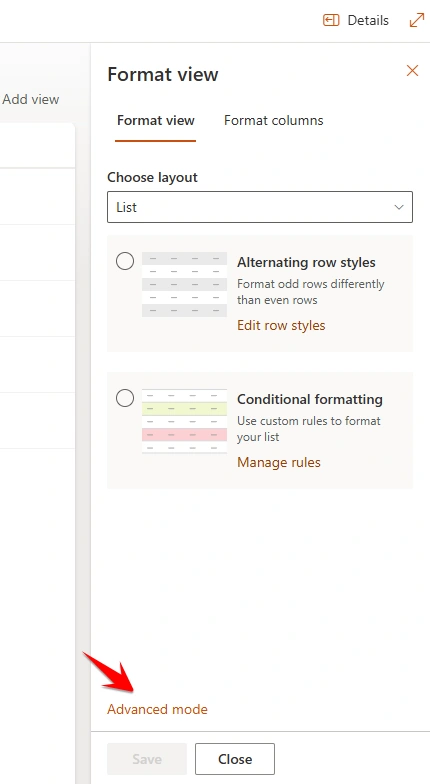
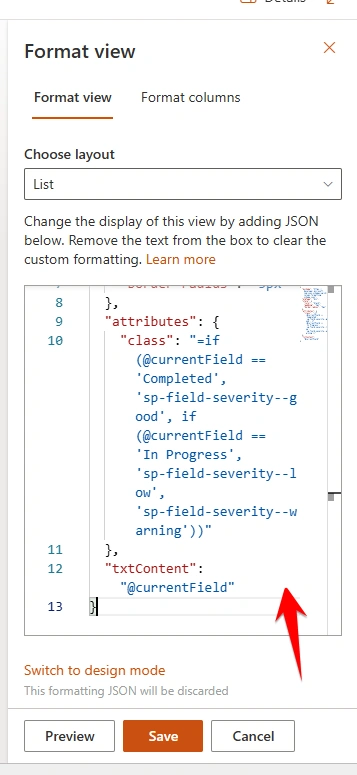
Step 3: Enter JSON Code
You will see a text editor where you can paste your JSON.
Basic Example: Highlight Status Column
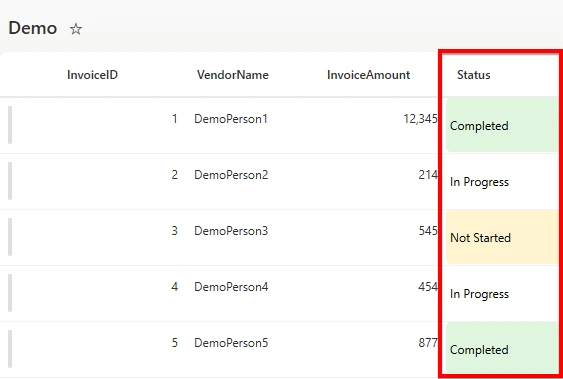
Let’s assume we have a column called Status with values:
Completed
In Progress
Not Started
JSON Code:
{
  "$schema": "https://developer.microsoft.com/json-schemas/sp/v2/column-formatting.schema.json",
  "elmType": "div",
  "style": {
    "color": "black",
    "padding": "4px",
    "border-radius": "5px"
  },
  "attributes": {
    "class": "=if(@currentField == 'Completed', 'sp-field-severity--good', if(@currentField == 'In Progress', 'sp-field-severity--low', 'sp-field-severity--warning'))"
  },
  "txtContent": "@currentField"
}
Output Behavior:
Completed → Green background
In Progress → Yellow/Blue highlight
Not Started → Red/Warning style
Example 2: Highlight Overdue Tasks
Assume a DueDate column exists.
{
  "$schema": "https://developer.microsoft.com/json-schemas/sp/v2/column-formatting.schema.json",
  "elmType": "div",
  "style": {
    "background-color": "=if(@now > @currentField, '#ffcccc', '')",
    "padding": "5px"
  },
  "txtContent": "@currentField"
}
Explanation:
If the current date is greater than the due date → background turns light red
Otherwise → default view
Example 3: Priority-Based Formatting
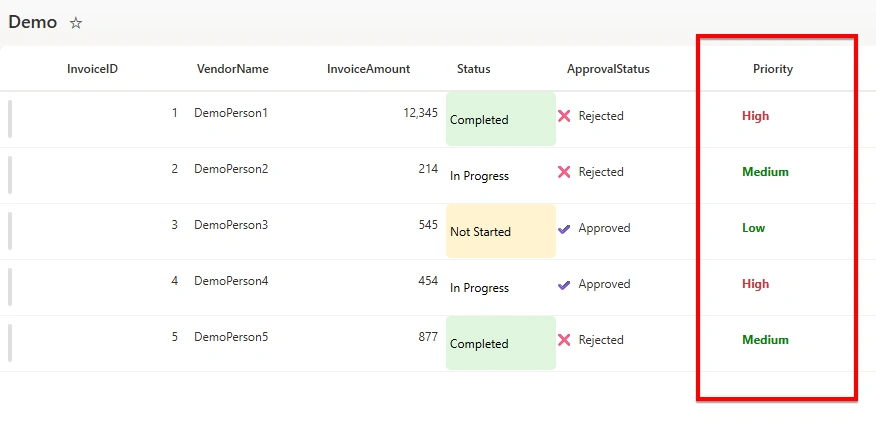
For a Priority column:
{
  "$schema": "https://developer.microsoft.com/json-schemas/sp/v2/column-formatting.schema.json",
  "elmType": "span",
  "style": {
    "font-weight": "bold",
    "color": "=if(@currentField == 'High', '#d13438', if(@currentField == 'Medium', '#ffb900', '#107c10'))"
  },
  "txtContent": "@currentField"
}
Output:
High → Red
Medium → Orange
Low → Green
Example 4: Add Icons Based on Status
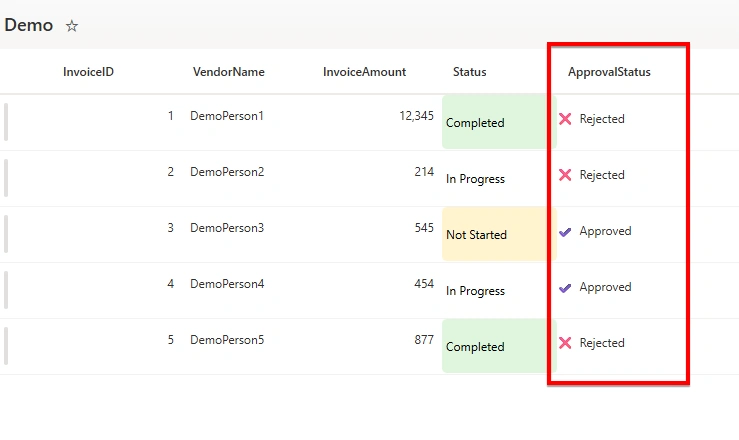
{
  "$schema": "https://developer.microsoft.com/json-schemas/sp/v2/column-formatting.schema.json",
  "elmType": "div",
  "children": [
    {
      "elmType": "span",
      "style": {
        "padding-right": "6px"
      },
      "txtContent": "=if(@currentField == 'Approved', '✔️', if(@currentField == 'Rejected', '❌', '⏳'))"
    },
    {
      "elmType": "span",
      "txtContent": "@currentField"
    }
  ]
}
Best Practices for SharePoint JSON Formatting
Keep JSON simple and readable
Always test in a sample list before production use
Use consistent color coding across lists
Avoid over-formatting (too many styles reduce usability)
Document your JSON templates for reuse
Common Mistakes to Avoid
Missing commas or brackets in JSON
Using incorrect field names
Applying formatting to unsupported column types
Overusing nested conditions
Conclusion
JSON-based conditional formatting in SharePoint is a powerful way to enhance user experience without writing backend code. It helps users quickly interpret data and improves decision-making efficiency.
By mastering simple conditional logic with JSON, you can transform plain SharePoint lists into dynamic, visually rich dashboards.
Join the conversation! Your thoughts help the community grow.