

Introduction
Hello everyone, I am going to show how to display Google AdMob Ads for Android and iOS applications for CSharp - Xamarin Mobile Development.
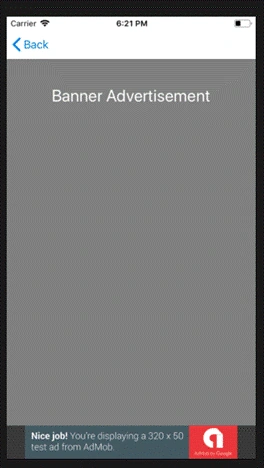
A banner Ad is like a ribbon. This is selected if our requirement is to provide an ad at the footer or at header part, this does not cover the entire region of the Page. It only uses a portion of the app page.
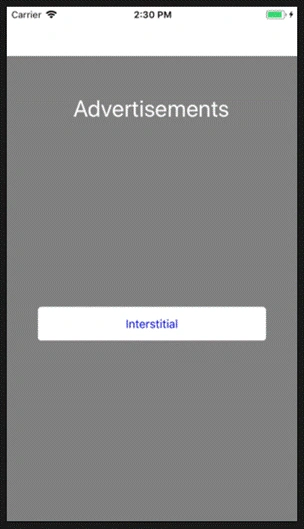
Interstitial Ads cover the entire page with the ad, so mostly this is displayed as a popup. This process is the same for displaying rewarded type ads.
Requirements
We need “App Id” and “Unit Id”, which are created in “AdMob by Google” available on this website,
- https://code.msdn.microsoft.com/Google-AdMob-in-Xamarinform-cd500224/https://www.google.com/admob/.
To create these follow the tutorial available here:
- @https://code.msdn.microsoft.com/Google-AdMob-in-Xamarinform-cd500224/https://code.msdn.microsoft.com/Google-AdMob-in-Xamarinform-cd500224/
- Or @http://allsoftwaredevelopments.blogspot.com/2018/09/google-admob-mobile-development_4.html
- Or @https://www.c-sharpcorner.com/article/getting-started-with-google-admob/
Steps in Brief,
- Adding required packages.
- Changes to be done in Manifest.xml file(only for Android)
- Creating Custom Renders to access Ads for Banner type Ads.
- Accessing Custom Renders in the code to display Banner type Ads.
- Creating Dependency Services to access Ads for Interstitial type Ads.
- Accessing Dependency Services in the code to display Interstitial type Ads.
Steps in Detail,
Adding required packages
Here, we are using Custom Renders so the packages are to be added in Xamarin.Android and Xamarin.iOS folders only. There is no need to add any package in PCL folder.
- For Android
Add “Xamarin.GooglePlayServices.Ads” package. - For iOS
Add “Xamarin.Firebase.iOS.AdMob” Package
Changes to be done in Manifest.xml file (only for Android)
Add Permissions for "INTERNET" and "ACCESS_NETWORK_STATE" and then add the following lines in the Manifest.xml file in Project->Android->Properties folder.
XML
- <?xml version="1.0" encoding="utf-8"?>
- <manifest xmlns:android="http://schemas.android.com/apk/res/android" android:versionCode="1" android:versionName="1.0" package="com.companyname.AdMob">
- <uses-sdk android:minSdkVersion="19" android:targetSdkVersion="27" />
- <uses-permission android:name="android.permission.INTERNET" />
- <uses-permission android:name="android.permission.ACCESS_NETWORK_STATE" />
- <application android:label="AdMob.Android">
- <activity android:name="com.google.android.gms.ads.AdActivity" android:configChanges="keyboard|keyboardHidden|orientation|screenLayout|uiMode|screenSize|smallestScreenSize" android:theme="@android:style/Theme.Translucent" />
- </application>
- </manifest>
Creating Custom Renders to access Banner type Ads
- In PCL,
While showing the Banner ad we have to set the size also. For this purpose we have to use custom renders as we can add nuget packages for AdMob by Google in native folders only.
Different sizes of banners available are,
Size in dp (WxH) Description Availability AdSize constant 320x50 Standard Banner Phones and Tablets BANNER 320x100 Large Banner Phones and Tablets LARGE_BANNER 300x250 IAB Medium Rectangle Phones and Tablets MEDIUM_RECTANGLE 468x60 IAB Full-Size Banner Tablets FULL_BANNER 728x90 IAB Leaderboard Tablets LEADERBOARD Screen width x 32|50|90 Smart Banner Phones and Tablets SMART_BANNER Now in PCL add the following class with name AdBanner.cs
C#
- using System;
- using Xamarin.Forms;
- namespace AdMob.CustomRenders
- {
- public class AdBanner : View
- {
- public enum Sizes { Standardbanner, LargeBanner, MediumRectangle, FullBanner, Leaderboard, SmartBannerPortrait }
- public Sizes Size { get; set; }
- public AdBanner()
- {
- this.BackgroundColor = Color.Accent;
- }
- }
- }
- In Android.
In Android we have to add the following class to create a view and use it in PCL with CustomRenders concept, let us create it here with name AdBanner_Droid.cs
C#At this line adView.AdUnitId = "Your Ad Unit id";- using System;
- using AdMob;
- using Android.Gms.Ads;
- using Xamarin.Forms;
- using Xamarin.Forms.Platform.Android;
- using AdMob.CustomRenders;
- using AdMob.Droid.CustomRenders;
- using Android.Content;
- [assembly: ExportRenderer(typeof(AdBanner), typeof(AdBanner_Droid))]
- namespace AdMob.Droid.CustomRenders
- {
- public class AdBanner_Droid : ViewRenderer
- {
- Context context;
- public AdBanner_Droid(Context _context) : base(_context)
- {
- context = _context;
- }
- protected override void OnElementChanged(ElementChangedEventArgs<View> e)
- {
- base.OnElementChanged(e);
- if (e.OldElement == null)
- {
- var adView = new AdView(Context);
- switch ((Element as AdBanner).Size)
- {
- case AdBanner.Sizes.Standardbanner:
- adView.AdSize = AdSize.Banner;
- break;
- case AdBanner.Sizes.LargeBanner:
- adView.AdSize = AdSize.LargeBanner;
- break;
- case AdBanner.Sizes.MediumRectangle:
- adView.AdSize = AdSize.MediumRectangle;
- break;
- case AdBanner.Sizes.FullBanner:
- adView.AdSize = AdSize.FullBanner;
- break;
- case AdBanner.Sizes.Leaderboard:
- adView.AdSize = AdSize.Leaderboard;
- break;
- case AdBanner.Sizes.SmartBannerPortrait:
- adView.AdSize = AdSize.SmartBanner;
- break;
- default:
- adView.AdSize = AdSize.Banner;
- break;
- }
- // TODO: change this id to your admob id
- adView.AdUnitId = "Your AdMob id";
- var requestbuilder = new AdRequest.Builder();
- adView.LoadAd(requestbuilder.Build());
- SetNativeControl(adView);
- }
- }
- }
- }
We have to place our AdMob Banner unit id.
- In iOS,
In iOS we have to add the following class to create a view and use it in PCL with CustomRenders concept, let us create it here with name AdBanner_iOS.cs
C#At this line adView.AdUnitId = "Your Ad Unit id";- using System;
- using AdMob.CustomRenders;
- using AdMob.iOS.CustomRenders;
- using CoreGraphics;
- using Google.MobileAds;
- using UIKit;
- using Xamarin.Forms;
- using Xamarin.Forms.Platform.iOS;
- //using GoogleAdMobAds;
- [assembly: ExportRenderer(typeof(AdBanner), typeof(AdBanner_iOS))]
- namespace AdMob.iOS.CustomRenders
- {
- public class AdBanner_iOS : ViewRenderer
- {
- protected override void OnElementChanged(ElementChangedEventArgs<View> e)
- {
- base.OnElementChanged(e);
- if (e.OldElement == null)
- {
- BannerView bannerView = null;
- switch ((Element as AdBanner).Size)
- {
- case AdBanner.Sizes.Standardbanner:
- bannerView = new BannerView(AdSizeCons.Banner, new CGPoint(0, 0));
- break;
- case AdBanner.Sizes.LargeBanner:
- bannerView = new BannerView(AdSizeCons.LargeBanner, new CGPoint(0, 0));
- break;
- case AdBanner.Sizes.MediumRectangle:
- bannerView = new BannerView(AdSizeCons.MediumRectangle, new CGPoint(0, 0));
- break;
- case AdBanner.Sizes.FullBanner:
- bannerView = new BannerView(AdSizeCons.FullBanner, new CGPoint(0, 0));
- break;
- case AdBanner.Sizes.Leaderboard:
- bannerView = new BannerView(AdSizeCons.Leaderboard, new CGPoint(0, 0));
- break;
- case AdBanner.Sizes.SmartBannerPortrait:
- bannerView = new BannerView(AdSizeCons.SmartBannerPortrait, new CGPoint(0, 0));
- break;
- default:
- bannerView = new BannerView(AdSizeCons.Banner, new CGPoint(0, 0));
- break;
- }
- // TODO: change this id to your admob id
- bannerView.AdUnitID = "Your AdMob Banner Ad Unit id";
- foreach (UIWindow uiWindow in UIApplication.SharedApplication.Windows)
- {
- if (uiWindow.RootViewController != null)
- {
- bannerView.RootViewController = uiWindow.RootViewController;
- }
- }
- var request = Request.GetDefaultRequest();
- bannerView.LoadRequest(request);
- SetNativeControl(bannerView);
- }
- }
- }
- }
We have to place our AdMob Banner unit id.
Accessing Custom Renders to Display Banner Type Ads
Now, the only task remaining in our current tutorial is using the created custom renders in our code.
UI design code in XAML, for examlple in BannerAdPage.xaml
Here, we have to create a local object as in the following code and call the custom render as <local:AdBanner />
XAML
- <?xml version="1.0" encoding="UTF-8"?>
- <ContentPage
- xmlns="http://xamarin.com/schemas/2014/forms"
- xmlns:x="http://schemas.microsoft.com/winfx/2009/xaml"
- xmlns:local="clr-namespace:AdMob.CustomRenders;assembly=AdMob"
- x:Class="AdMob.Views.BannerAdPage">
- <ContentPage.Padding>
- <OnPlatform x:TypeArguments="Thickness">
- <On Platform="iOS" Value="0,20,0,0"/>
- <On Platform="Android" Value="0,0,0,0"/>
- <On Platform="WinPhone" Value="0,0,0,0"/>
- </OnPlatform>
- </ContentPage.Padding>
- <ContentPage.Content>
- <StackLayout x:Name="stackLayout" BackgroundColor="Yellow" VerticalOptions="FillAndExpand" Padding="0,0,0,0">
- <Label Text="Banner Advertisement" HorizontalOptions="CenterAndExpand" TextColor="Green" FontSize="25" />
- <local:AdBanner Size="Standardbanner" VerticalOptions="EndAndExpand"/>
- </StackLayout>
- </ContentPage.Content>
- </ContentPage>
The Banner type ad is displayed at the bottom of the page, and this can be placed anywhere in the page. For this tutorial I have placed it at the lower/footer part of the page.
Creating Dependency Services to access Interstitial type Ads
- In PCL
Unlike Banner Ads, Interstitial Ads have only one kind of size; i.e., the full page of the application. We can show a popup to display our ad, but the popup is not created by us. It is done by the installed SDK itself. We only have to call the popup to appear when required, suppose on a button click here.
Now in PCL add the following Interface, for example, assume name IAdInterstitial.cs
C#- using System;
- namespace AdMob.DependencyServices
- {
- public interface IAdInterstitial
- {
- void ShowAd();
- }
- }
- In Android
In Android add the following class , Assume AdInterstitial_Droid.cs
C#At this line adView.AdUnitId = "Your Interstitial AdMob Unit id";- using System;
- using AdMob.DependencyServices;
- using AdMob.Droid.DependencyServices;
- using Android.Gms.Ads;
- using Xamarin.Forms;
- [assembly: Dependency(typeof(AdInterstitial_Droid))]
- namespace AdMob.Droid.DependencyServices
- {
- public class AdInterstitial_Droid : IAdInterstitial
- {
- InterstitialAd interstitialAd;
- public AdInterstitial_Droid()
- {
- interstitialAd = new InterstitialAd(Android.App.Application.Context);
- // TODO: change this id to your admob id
- interstitialAd.AdUnitId = "Your AdMob id";
- LoadAd();
- }
- void LoadAd()
- {
- var requestbuilder = new AdRequest.Builder();
- interstitialAd.LoadAd(requestbuilder.Build());
- }
- public void ShowAd()
- {
- if (interstitialAd.IsLoaded)
- interstitialAd.Show();
- LoadAd();
- }
- }
- }
We have to place our Your Interstitial AdMob Unit id.
- In iOS
In iOS add the following class, Assume AdInterstitial_iOS.cs
C#At this line adView.AdUnitId = "Your Interstitial AdMob Unit id";- using System;
- using AdMob.DependencyServices;
- using AdMob.iOS.DependencyServices;
- using Google.MobileAds;
- using UIKit;
- using Xamarin.Forms;
- [assembly: Dependency(typeof(AdInterstitial_iOS))]
- namespace AdMob.iOS.DependencyServices
- {
- public class AdInterstitial_iOS : IAdInterstitial
- {
- Interstitial interstitial;
- public AdInterstitial_iOS()
- {
- LoadAd();
- interstitial.ScreenDismissed += (s, e) => LoadAd();
- }
- void LoadAd()
- {
- // TODO: change this id to your admob id
- interstitial = new Interstitial("Your AdMob Interstitial Ad Unit id");
- var request = Request.GetDefaultRequest();
- request.TestDevices = new string[] {"Your Test Device ID", "GADSimulator" };
- interstitial.LoadRequest(request);
- }
- public void ShowAd()
- {
- if (interstitial.IsReady)
- {
- var viewController = GetVisibleViewController();
- interstitial.PresentFromRootViewController(viewController);
- }
- }
- UIViewController GetVisibleViewController()
- {
- var rootController = UIApplication.SharedApplication.KeyWindow.RootViewController;
- if (rootController.PresentedViewController == null)
- return rootController;
- if (rootController.PresentedViewController is UINavigationController)
- {
- return ((UINavigationController)rootController.PresentedViewController).VisibleViewController;
- }
- if (rootController.PresentedViewController is UITabBarController)
- {
- return ((UITabBarController)rootController.PresentedViewController).SelectedViewController;
- }
- return rootController.PresentedViewController;
- }
- }
- }
We have to place our Your Interstitial AdMob Unit id.
Note
To generate Interstitial Ad in iOS for testing purposes we have to add the following line with an array of test device ID's or else you won't get an ad to display.
- request.TestDevices = new string[] {"Your Test Device ID", "GADSimulator" };
For either simulator or for the physical device to test in debug mode we have to submit the device ID, and the above-presented line is to be removed while submitting the app in release mode.
To get the Device Id
- First, fill the entire code using the empty string for device Id.
- Allow it to run.
- Now click the button to open Interstitial Ad.
- Then Observe the Application Output console of IDE for the following line
"<Google> To get test ads on this device, call: request.testDevices = @[ @"07*******************************89" ];" - "07*******************************89" this will be your device Id. Copy this.
- Instead of empty string now paste the above Id and now run the program.
For Simulators the device Id need not be a number/numeric value It can also be a text like "IGADSimulator" or "GAD_SIMULATOR_ID" or "Simulator" or ...
Accessing Dependency Services to Display Interstitial type Ads :
UI design code in XAML, for example, in "BannerAdPage.xaml and we have to open the Interstitial Ad on button Click. So the button click event is handled in the backed page of the UI created for example in "BannerAdPage.xaml.cs".
In BannerAdPage.xaml
XAML
- <?xml version="1.0" encoding="UTF-8"?>
- <ContentPage xmlns="http://xamarin.com/schemas/2014/forms" xmlns:x="http://schemas.microsoft.com/winfx/2009/xaml" x:Class="AdMob.Views.InterstitialAdPage">
- <ContentPage.Padding>
- <OnPlatform x:TypeArguments="Thickness">
- <On Platform="iOS" Value="0,20,0,0"/>
- <On Platform="Android" Value="0,0,0,0"/>
- <On Platform="WinPhone" Value="0,0,0,0"/>
- </OnPlatform>
- </ContentPage.Padding>
- <ContentPage.Content>
- <StackLayout x:Name="stackLayout" VerticalOptions="FillAndExpand" Padding="0,0,0,0">
- <Label Text="Interstitial Advertisements" HorizontalOptions="CenterAndExpand" FontSize="30" TextColor="White" />
- <StackLayout VerticalOptions="CenterAndExpand" Padding="40,0,40,0">
- <Button Text="Interstitial" HorizontalOptions="FillAndExpand" TextColor="Blue" BackgroundColor="White" Clicked="InterstitialAdShowClick"/>
- </StackLayout>
- </StackLayout>
- </ContentPage.Content>
- </ContentPage>
In BannerAdPage.xaml.cs
C#
- using System;
- using System.Collections.Generic;
- using AdMob.DependencyServices;
- using Xamarin.Forms;
- namespace AdMob.Views
- {
- public partial class InterstitialAdPage : ContentPage
- {
- public InterstitialAdPage()
- {
- InitializeComponent();
- }
- void InterstitialAdShowClick(object sender, EventArgs e)
- {
- DependencyService.Get<IAdInterstitial>().ShowAd();
- }
- }
- }
To open the Interstitial Ad you have to click the button.
Result - Banner Type Ad
Interstitial Type Ad

Conclusion
This is how to create an ad in Xamarin.Forms using AdMob by Google.
References
- To download the current tutorial sample please visit,
https://code.msdn.microsoft.com/Google-AdMob-in-Xamarinform-cd500224/ - For more knowledge about Banner Ads visit the following links,
https://code.msdn.microsoft.com/Google-AdMob-in-Xamarinform-cd500224/
https://developers.google.com/admob/android/banner?hl=en-GB. - For more knowledge about Interstitial ads visit the following links,
https://developers.google.com/admob/android/interstitial?hl=en-GB. - To learn how to create API keys for your application in AdMob by Google visit,
https://code.msdn.microsoft.com/Google-AdMob-in-Xamarinform-cd500224/
Or http://allsoftwaredevelopments.blogspot.com/2018/09/google-admob-mobile-development_4.html
Or https://www.c-sharpcorner.com/article/getting-started-with-google-admob/ - To learn about more Xamarin tutorials please visit,
https://xamarindevelopers.blogspot.com/.
Or
https://code.msdn.microsoft.com/Google-AdMob-in-Xamarinform-cd500224/
https://www.c-sharpcorner.com/members/pvspreddy/articles. - To learn about other technologies/tutorials please visit,
https://code.msdn.microsoft.com/Google-AdMob-in-Xamarinform-cd500224/
https://allsoftwaredevelopments.blogspot.com/
Lamine AbedPosted May 22, 2021, 3:35 PM
Perfect explanation, works like a charm on xamarin for android. Now I need if it's possible to pass a specific AdID, say I want to show 3 different banners each one in a page.
Jason PurkissPosted Jan 20, 2021, 9:48 PM
Works on android and when I first tested this about 18 months ago worked for iphone but currently not. compiles without issue just doesn't load the add for Interstitial :(
Jesse knottPosted Nov 29, 2020, 2:27 AM
I'm having a problem where my app is running, I see the yellow and green text add container, but there is no add in the container. I am also receiving the following error in my Debug Output monitor 11-28 23:45:06.823 W/ConnectionTracker( 6737): Exception thrown while unbinding11-28 23:45:06.823 W/ConnectionTracker( 6737): java.lang.IllegalArgumentException: Service not registered: lp@4cf294b11-28 23:45:06.823 W/ConnectionTracker( 6737): at android.app.LoadedApk.forgetServiceDispatcher(LoadedApk.java:1562)11-28 23:45:06.823 W/ConnectionTracker( 6737): at android.app.ContextImpl.unbindService(ContextImpl.java:1692) 11-28 23:45:06.823 W/ConnectionTracker( 6737): at android.content.ContextWrapper.unbindService(ContextWrapper.java:717)
Martin SteinPosted Oct 21, 2019, 1:36 PM
Thank you for your article, I have tried to follow the instructions. My application is running, but not showing any ads. Do you have an idea why?
Yusuf AnwarPosted May 18, 2019, 12:03 AM
Thanks for the explanation, I searched for a long time but I couldn't create a Interstitial Ad, I just added a banner with static size, I'll try adding a banner ad as you explained.
Mario LopezPosted Jan 3, 2019, 10:34 PM
It doesn't work. If I don't want to use interstitial, how do I initialize my Ads App? I can't see the App Id used anywhere.
Viktor BylbasPosted Sep 26, 2018, 8:47 AM
Hello. I get this interstitialAd.IsLoaded = false and this interstitial.IsReady = false. What could be the problem?