

Globalization, Localization
To implementing a multilingual user interface, you design the user interface to open in the default UI language and offer the option to change to other languages.
Globalization is the first step in the process. A globalized application supports localized user interfaces and regional data for all users. Truly global applications should be culture-neutral and language-neutral. A globalized application can correctly accept, process, and display a worldwide assortment of scripts, data formats, and languages.
While your globalized application may possess such flexibility, ensure that you have separated the application's resources that require translation from the rest of the application's code. If you correctly test for localizability before proceeding to the localization step, you should not have to modify your application's source code during localization.
Globalization in .Net - CultureInfo, ResourceManager and Resgen
In .Net System.Globalization namespace contains classes that define culture-related information, including the language, the country/region, the calendars in use, the format patterns for dates, currency, and numbers, and the sort order for strings. There are around 20 classes in System.Globalization. Here we are only concern to CutureInfo class.
CutureInfo class represents information about a specific culture including the names of the culture, the writing system, and the calendar used, as well as access to culture-specific objects that provide information for common operations, such as formatting dates and sorting strings.
The System.Resources namespace provides classes and interfaces that allow developers to create, store, and manage various culture-specific resources used in an application. One of the most important classes of the System.Resources namespace is the ResourceManager class. The ResourceManager class allows the user to access and control resources stored in the main assembly or in resource satellite assemblies
The Resource File Generator (Resgen.exe) converts .txt files and .resx (XML-based resource format) files to common language runtime binary .resources files that can be embedded in a runtime binary executable or compiled into satellite assemblies.
Creating .resources files
To proceed with our example, let us first create the .resources files. Here I am using six languages English, French, German, Spanish, Italian and Portuguese (Thanks to Google for this and don''t blame me there is anything wrong in conversion). To create .resources files. Create the following six .txt files in any folder as follows.
resource.en-US.txt - which contains the below English text.
0001=Please Enter User Name
0002=Please Enter Password
0003=User Login
0004=Submit
0005=Cancel
0006=Welcome
0007=How are you today?
0008=Select Language
resource.fr-FR.txt - which contains the below French text.
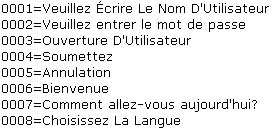
resource.de-DE.txt - which contains the below German text.
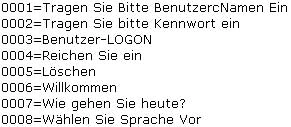
resource.es-ES.txt - which contains the below Spanish text.
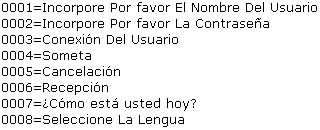
resource.it-IT.txt - which contains the below Italian text.
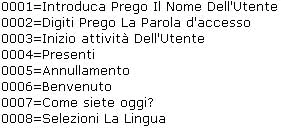
resource.pt-PT.txt - which contains the below Portuguese text.
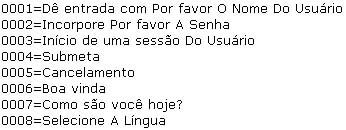
Now open the visual studio command prompt and run the resgen.exe with .txt file as parameter as shown in image below.
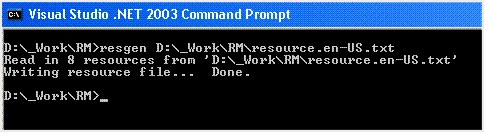
You will get resource.en-US.resources file after running the Resgen for resource.en-US.txt. Similarly you will get six .resources files for each .txt files.
Creating a Web Application to use .resources files.
Now open the visual studio and open the new c# web application. Add a new a web page Default.aspx. Now open the Default.aspx in HTML mode and paste the following code below the @ page directive.
<!DOCTYPE HTML PUBLIC "-//W3C//DTD HTML 4.0 Transitional//EN" >
<HTML>
<HEAD>
<title>Default</title>
<meta name="GENERATOR" Content="Microsoft Visual Studio .NET 7.1">
<meta name="CODE_LANGUAGE" Content="C#">
<meta name="vs_defaultClientScript" content="JavaScript">
<meta name="vs_targetSchema" content="http://schemas.microsoft.com/intellisense/ie5">
</HEAD>
<body MS_POSITIONING="GridLayout">
<form id="Form1" method="post" runat="server">
<asp:RadioButtonList id="rdoLanguage" style="Z-INDEX: 101; LEFT: 60px; POSITION: absolute; TOP: 24px"
runat="server" AutoPostBack="True" Font-Names="Verdana" Font-Size="Smaller">
<asp:ListItem Value="en-US" Selected="True">English</asp:ListItem>
<asp:ListItem Value="fr-FR">French</asp:ListItem>
<asp:ListItem Value="de-DE">German</asp:ListItem>
<asp:ListItem Value="es-ES">Spanish</asp:ListItem>
<asp:ListItem Value="it-IT">Italian</asp:ListItem>
<asp:ListItem Value="pt-PT">Portuguese</asp:ListItem>
</asp:RadioButtonList>
<asp:Button id="Button1" style="Z-INDEX: 102; LEFT: 76px; POSITION: absolute; TOP: 180px" runat="server"
Font-Names="Verdana" Width="68px" Height="24px" Text="-->" Font-Bold="True" Font-Size="8"></asp:Button>
</form>
</body>
</HTML>
See the values of List Item en-US for English, fr-FR for French, de-DE for German, es-ES for Spanish, it-IT for Italian and pt-PT for Portuguese. Resources Files will be read using these values, as you will see this later.
Now Switch to design mode, you will see the following output in design mode
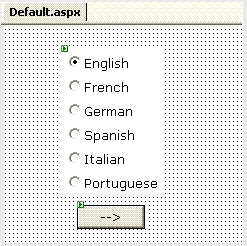
Now in design mode click on the (-->) button. Default.aspx.cs will be opened. Write the following code in Button1_Click event
private void Button1_Click(object sender, System.EventArgs e)
{
Server.Transfer("Login.aspx");
}
Add new Web Form to the project and rename it to Login.aspx. Now open the Login.aspx in HTML mode and paste the following code below the @ page directive.
<!DOCTYPE HTML PUBLIC "-//W3C//DTD HTML 4.0 Transitional//EN" >
<HTML>
<HEAD>
<title>Login</title>
<meta content="Microsoft Visual Studio .NET 7.1" name="GENERATOR">
<meta content="C#" name="CODE_LANGUAGE">
<meta content="JavaScript" name="vs_defaultClientScript">
<meta content="http://schemas.microsoft.com/intellisense/ie5" name="vs_targetSchema">
</HEAD>
<body MS_POSITIONING="GridLayout">
<form id="Form1" method="post" runat="server">
<TABLE id="Table1" style="Z-INDEX: 107; LEFT: 8px; WIDTH: 455px; POSITION: absolute; TOP: 8px; HEIGHT: 48px"
cellSpacing="1" cellPadding="1" width="455" border="0">
<TR>
<TD align="center" colspan="2"><asp:Label id="Label3" runat="server" Width="268px" Height="9px" Font-Names="Verdana" Font-Size="9pt"
Font-Bold="True">User Login</asp:Label></TD>
</TR>
<TR>
<TD align="right"><asp:Label id="Label1" runat="server" Width="272px" Height="8px" Font-Names="Verdana" Font-Size="8">Label</asp:Label></TD>
<TD><asp:TextBox id="TextBox1" runat="server" Width="166px" Height="22px" Font-Names="Verdana" Font-Size="8"></asp:TextBox></TD>
</TR>
<TR>
<TD align="right"><asp:Label id="Label2" runat="server" Width="268px" Height="9px" Font-Names="Verdana" Font-Size="8">Label</asp:Label></TD>
<TD><asp:TextBox id="Textbox3" runat="server" sWidth="166px" Height="24px" Font-Names="Verdana" Font-Size="8"
Width="164px"></asp:TextBox></TD>
</TR>
<TR>
<TD align="right">
<asp:Button id="Button1" runat="server" Text="Submit" Font-Names="Verdana" Font-Size="8"></asp:Button></TD>
<TD>
<asp:Button id="Button2" runat="server" Text="Cancel" Font-Names="Verdana" Font-Size="8"></asp:Button></TD>
</TR>
</TABLE>
</form>
</body>
</HTML>
Now Switch to design mode, you will see the following output in design mode
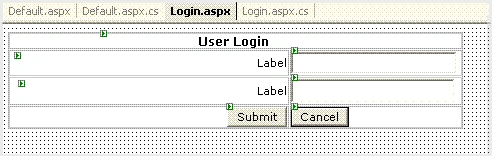
Now in design mode click on the submit button. Login.aspx.cs will be opened. Write the following code in Button1_Click event
private void Button1_Click(object sender, System.EventArgs e)
{
Server.Transfer("Welcome.aspx");
}
Similarly for the cancel button, add the following code.
private void Button2_Click(object sender, System.EventArgs e)
{
Server.Transfer("Default.aspx");
}
On the Page_Load event of the Login.aspx.cs add the following code
private void Page_Load(object sender, System.EventArgs e)
{
if(!Page.IsPostBack)
{
//Retrive the Language from Default page
string strCulture = Request.Params["rdoLanguage"].ToString();
//Set the Current culuture to session variable
Session["SelectCulture"]= strCulture;
//create the culture based upon session culuture
CultureInfo objCI = new CultureInfo(strCulture);
Thread.CurrentThread.CurrentCulture = objCI;
Thread.CurrentThread.CurrentUICulture = objCI;
//Read the rsources files
String strResourcesPath= Server.MapPath("bin");
ResourceManager rm = ResourceManager.CreateFileBasedResourceManager("resource", strResourcesPath, null);
//Set the values read from resources to contorls
Label1.Text=rm.GetString("0001")+": ";
Label2.Text=rm.GetString("0002")+": ";
Label3.Text=rm.GetString("0003");
Button1.Text=rm.GetString("0004");
Button2.Text=rm.GetString("0005");
}
}
Here you can see that how we have created the CulutureInfo object and passed the current selected culture string as a parameter to CulutureInfo. After that set the current page's culture to selected culture by using Thread.CurrentThread.CurrentCulture. Thread.CurrentThread.CurrentUICulture sets the current culture used by the Resource Manager to look up culture-specific resources at run time
Add new Web Form to the project and rename it to Welcome.aspx. Now open the welcome.aspx in HTML mode and paste the following code below the @ page directive.
<!DOCTYPE HTML PUBLIC "-//W3C//DTD HTML 4.0 Transitional//EN" >
<HTML>
<HEAD>
<title>Welcome</title>
<meta name="GENERATOR" Content="Microsoft Visual Studio .NET 7.1">
<meta name="CODE_LANGUAGE" Content="C#">
<meta name="vs_defaultClientScript" content="JavaScript">
<meta name="vs_targetSchema" content="http://schemas.microsoft.com/intellisense/ie5">
</HEAD>
<body MS_POSITIONING="GridLayout">
<form id="Form1" method="post" runat="server">
<asp:Button id="Button1" style="Z-INDEX: 101; LEFT: 20px; POSITION: absolute; TOP: 36px" runat="server"
Text="Select Another Language" Font-Size="8" Font-Names="Verdana" Width="152px"></asp:Button>
<asp:Label id="Label1" style="Z-INDEX: 102; LEFT: 20px; POSITION: absolute; TOP: 12px" runat="server"
Font-Size="8" Font-Names="Verdana" Width="392px">Label</asp:Label>
</form>
</body>
</HTML>
Now Switch to design mode, you will see the following output in design mode
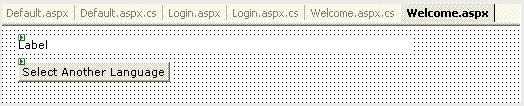
Now in design mode click on the (Select Another Language) button. Welcome.aspx.cs will be opened. Write the following code in Button1_Click event
private void Button1_Click(object sender, System.EventArgs e)
{
Server.Transfer("Default.aspx");
}
On the Page_Load event of the Welcome.aspx.cs add the following code
private void Page_Load(object sender, System.EventArgs e)
{
if(!Page.IsPostBack)
{
string strCulture = Session["SelectCulture"].ToString();
CultureInfo objCI = new CultureInfo(strCulture);
Thread.CurrentThread.CurrentCulture = objCI;
Thread.CurrentThread.CurrentUICulture = objCI;
//Read the rsources files
String strResourcesPath= Server.MapPath("bin");
ResourceManager rm = ResourceManager.CreateFileBasedResourceManager("resource", strResourcesPath, null);
string strUserName = Request.Params["TextBox1"].ToString();
Label1.Text=rm.GetString("0006")+", " + strUserName + "! " + rm.GetString("0007");
Button1.Text=rm.GetString("0008");
}
}
Now coding part is complete. Copy the all six .resources files created in first step to the bin directory of your web application.
In the solution explorer right click Default.aspx page and set it as start up page. Now run the application.If everything is right in its place, you will see the following out
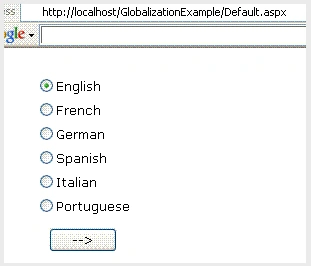
Select the language as English and click on the button. You will see the Login page
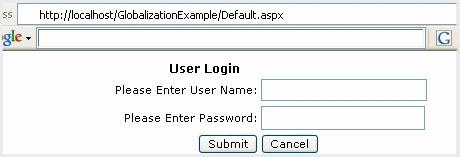
Enter Any User/Pass and click on submit button. You will see the following output.

Now click on Select Language and select French Language. You will see the Login page as follows
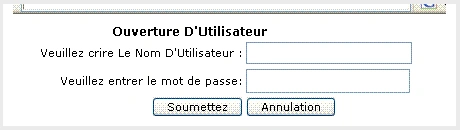
Enter Any User/Pass and click on submit button. You will see the following output in French
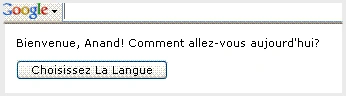
Similarly you can check for German, Spanish, Italian and Portuguese for this example.
Conclusion
Here we have seen that how System.Globalization helps us for localization the application without modify application's source code. You can also explore System.Globalization for more languages and objects like RegionInfo, DateFormats etc.
Sandeep SharmaPosted May 14, 2014, 11:41 AM
Thank you Anand Thakur !! this article is helpful to understand the concept of Globalization and Localization. CRISP
Ganeshwari ShitrePosted Jul 24, 2012, 6:48 AM
its not working with the windows application could you please explain how to do for windows application
Richa PalPosted Jun 14, 2012, 6:21 AM
A very gud article. Thanks.
Murugesan KumarasamyPosted Jun 10, 2011, 1:38 AM
Thanks a lot..Really a good article
Philippe DiotPosted Feb 28, 2011, 10:10 AM
LocalizNet is an easy-to-use localization toolkit for .Net projects. LocalizNet manages localization for WPF, Forms and program strings. Localiznet has very helpful tools for the translator, including dictionaries, incremental translation and identification of work to do. Localiznet is easy to deploy: just add localization files to your deployment package. There are no runtime fees: a software using LocalizNet can be freely deployed. Evaluation version at www.localiznet.com
charith wwickramasinghePosted Jul 30, 2010, 9:55 PM
Great Example worked For me on the First Go
Alexander NesterenkoPosted Sep 24, 2008, 8:30 AM
RGreatEx is a productivity plug-in for JetBrain ReSharper. Once installed, it adds a set of new refactorings and coding assistance features to Visual Studio, allowing developers to localize a project faster and more conveniently than before, improve coding with new time-saving abilities and generate safer code. RGreatEx integrates into Visual Studio seamlessly and works with it without errors. Supported languages are C#, VB.NET and ASP.NET. The power of RGreatEx lies in its pain-free way to add localization support to a .NET application. This can be achieved thanks to the new refactorings, such as “Move to resource” and “Rename resource”. The tool can automatically analyze strings, resources and their usage, detect strings that should be extracted to resources and resources that haven’t been localized yet. The use of RGreatEx helps to save up to 95% of development time as there’s no need to re-write the entire code to integrate localization support to a project. Adding localization support requires little efforts. Simply select a string and choose “Move string to resource” from the quick fixes, select a resource file where you want to extract and refactoring settings. Then you copy your resource file to a resource file for localization – for instance if you have Resources.resx you need to make a copy with the name – Resources.xx-xx.resx (where xx-xx – is your specific culture). The final step is to translate values in Resources.xx-xx.resx by using the Translate resource quick fix. In addition to localization, RGreatEx will help you make coding much easier and enjoyable. You’ll be able to manipulate strings on the fly thanks to the set of new context actions and highlighting options and produce safer resx code. Unique to RGreatEx is an opportunity to select strings from a file, folder, or a project, choose a resource file and keys for the selected strings and move them to resources – all in one go. Download RGreatEx from www.safedevelop.com.
aditya kumarPosted Mar 11, 2008, 11:11 AM
this code worked in first go, no compilation errors no run time errors
Toni CarlePosted Oct 10, 2007, 3:21 AM
Hi, Can anyone help me??? I am looking for the resource load code for a combox box. For instance the code for a label is: this.label5.Text = res.GetString("Component List"); Thanks,
murlidakharePosted Aug 13, 2006, 6:13 AM
hello, how r u, i need help. i have to apply multi language to site for dutch, english, german, whole content is coming from DB which is in english, but it should be displayed in languages selected language. how can i do it. thanx Murli Dakhare [email protected]
sheir alieditedPosted Jul 5, 2006, 11:16 AMEdited Dec 12, 2006, 11:23 AM
Hi, Is it not better to put the resourcemanager into the Application storage in the Global.aspx file in the Application_Start event. So the RM is created once for the entire life of the application and is just used afterwards. Also the code for setting the resource dll can be set in the Application_OnAcquireRequestState event of the Global.aspx file, where the Thread.CurrentThread.CurrentCulture and Thread.CurrentThread.CurrentUICulture can be set to the new culture. Just my $0.02 sheir
IndhuPosted Jul 5, 2006, 12:45 AM
details about asp.net