

In this guide, I’ll walk you through the essentials of getting started with Power Apps, helping you create your first app, and understanding its key features.
What is Power Apps?
Power Apps is part of Microsoft’s Power Platform suite and allows users to create business applications through a simple drag-and-drop interface. You can create forms, automate workflows, and integrate with a wide range of data sources like SharePoint, Excel, and even custom APIs.
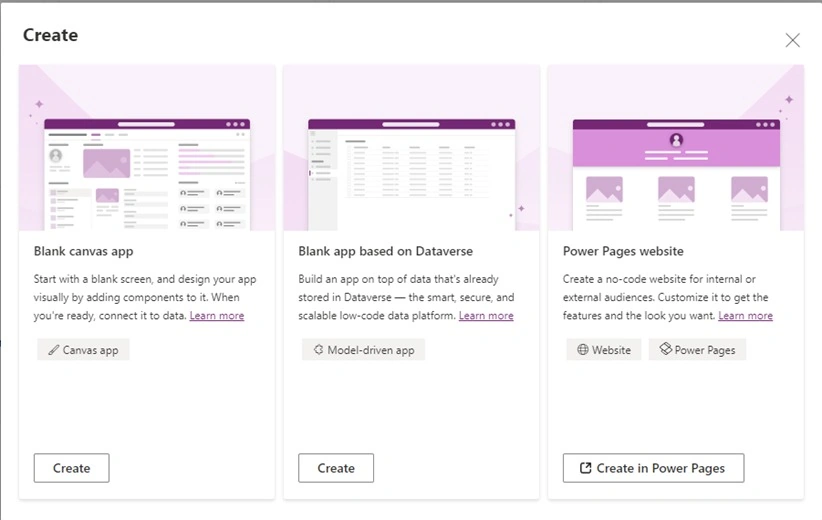
Power Apps supports three types of apps.
- Canvas apps: These allow you to design your app visually, customizing each element and its behavior.
- Model-driven apps: These are based on data models and focus on your business’s underlying data.
- Power Pages: Public-facing websites that allow external users to interact with your data.
In this guide, we’ll focus on Canvas apps, which are perfect for getting started.
Steps to Building Your First Power App
Step 1. Set Up Your Environment.
To get started, all you need is a Microsoft account and access to Power Apps. If you don’t already have it, you can sign up for a free trial by navigating to the Power Apps website.
Once logged in, you’ll be greeted by the Power Apps studio interface. From here, you can start building new apps or explore templates to get an idea of what’s possible.
Step 2. Choose a Data Source.
Before we start building, decide what data your app will use. Power Apps connects seamlessly to a wide range of data sources, such as,
- Microsoft Excel
- SharePoint
- SQL Server
- Common Data Service (Dataverse)
For simplicity, we’ll use Excel as our data source in this tutorial. Ensure your data is structured in a table format with headers for each column (e.g., Employee Name, Department, Email). Save this file to OneDrive or SharePoint Online to allow Power Apps to access it.
Step 3. Create a New Canvas App.
- From the homepage, click on “Create” on the left panel.
- Select the Canvas app from blank.
- Choose the format (Tablet or Phone) based on how you want users to interact with your app. For this example, we’ll choose Phone.
Now, you’re ready to start designing the app!
Step 4. Connect Your Data.
Once inside the app builder.
- Go to the Data tab on the left.
- Click Add data.
- Select Excel and locate your spreadsheet stored in OneDrive or SharePoint.
After connecting your data, Power Apps will automatically generate a gallery to display it. You can further customize this gallery by adding or removing fields.
Step 5. Designing Your App.
The drag-and-drop interface makes designing apps intuitive. Here are some key components.
- Screens: Represent different pages in your app.
- Controls: Buttons, text inputs, labels, etc., that allow user interaction.
- Forms and Galleries: Display and manage data from your connected source.
To start, your app will have a browse screen (a list of items), a details screen (details about a selected item), and an edit screen (where users can input or modify data).
Customizing Your App
- Add Controls: To add elements like buttons or text inputs, click on the Insert tab and choose the component you want.
- Customizing Forms: Power Apps allows you to customize the form layout, add validation, and create dynamic behavior using simple formulas.
- Styling: You can tweak the visual appearance of your app by adjusting colors, fonts, and sizes through the Properties pane.
Step 6. Adding Logic with Formulas.
One of the core strengths of Power Apps is its formula language, which is similar to Excel’s. This makes it easy to add logic to your app, for instance.
Filtering data: Use the Filter function to display specific records based on user input.
PowerApps
Filter(
    Employees,
    Department = "Sales"
)
Navigating between screens: Use the Navigate function to switch between screens.
PowerApps
Navigate(DetailsScreen)
These formulas can add sophisticated logic to your app without the need for complex coding.
Step 7. Preview and Test Your App
Once you've designed your app and added the necessary logic, it’s time to test it. You can preview your app by clicking the Play button in the top right corner of the Power Apps studio.
Go through the flow.
- Browse through your records.
- View the details of individual items.
- Add new records or edit existing ones.
Make sure everything works as expected!
Step 8. Publish Your App.
Once you’re satisfied with the app, the final step is to share it with your team or organization. To do this.
- Click File > Save > Publish.
- After publishing, share the app by clicking Share from the File menu. You can assign permissions based on user roles within your organization.
Join the conversation! Your thoughts help the community grow.