
Introduction
What do I need to get started
To develop Android applications, you need to install the Java Development Platform (JDK) and then install Eclipse, Android SDK and the Android Development Tool plugin for Eclipse. All these tools are available for free.
Another option is to use Mono for Android: http://xamarin.com/monoforandroid
This tool allows you to use either the Visual Studio IDE or use the MonoDevelop IDE to create applications. It also facilitates installing the Android SDK. This is ideal for developers already in the .Net resource pool. They can leverage the familiar environment and tools to build Android apps thus shortening the learning curve. However, it also comes attached with a price tag. For pricing/licensing/additional info, you can reference the xamarin web site.
Since I have started looking into Android development at a hobbyist level, a good starting point for me was to leverage the free tools. I also wanted to figure out how different Android programming using the native tools was, through the eyes of a .Net developer.
So, here we go dipping into the Android waters :)
Step 1: get the JDK - http://www.oracle.com/technetwork/java/javase/downloads/index.html and install it
Step 2: get the Eclipse IDE - http://www.eclipse.org/downloads/
Step 3: Get the Android SDK starter package.
Step 4: Install the Eclipse ADT plug-in: Within Eclipse, click Help -> Install New Software. Click "Add". In the Add Repository dialog box, enter "ADT Plugin" for the Name and specify the Location URL: https://dl-ssl.google.com/android/eclipse/
If you get any errors after clicking OK, try using https in the above URL. I had some trouble at this point and kept getting an error message. Old friend google came up with several suggestions related to firewall issues etc. The solution was ultimately found on the Android developer site (http://developer.android.com/sdk/eclipse-adt.html#installing) to download the ADT plugin and save it locally (not unzip it) and then in the Add Site dialog, click Archive and select the downloaded archive. voila!
Step 5: Install the Android platforms that you wish to develop against. Run the Android SDK and AVD Manager and within the Available Packages menu select the platforms that you wish to download.
This is where I had hit a speed bump. I would get a connection error when the SDK and AVD manager tried to fetch the Available packages. I tried various options for firewall settings, HTTP vs https setting as well as running the program as administrator. None of these solutions worked for me. Finally, the step that I had to take as a workaround was to download the platforms directly and install the packages manually offline. Here is the best resource that I could find on getting this setup work.
Download Android SDK standalone for offline installation
http://qdevarena.blogspot.com/2010/05/download-android-sdk-standalone-for.html
Step 6: Create a new Android virtual device - From the Android Virtual Device Manager (AVD). Click the new button and select the configuration for the virtual device.
Let the coding begin
At this point, I had a working environment and I hope some of the real-life issues described above might help someone running into the same issues.
So we are at a stage when we can begin the coding. We start with a simple "Hello world" type program just to get the components running together to see how the end result looks like.
Start the Eclipse editor and select a default workspace. Click on File-New Android Project and enter the name for your project. I used the name "HelloWorld".
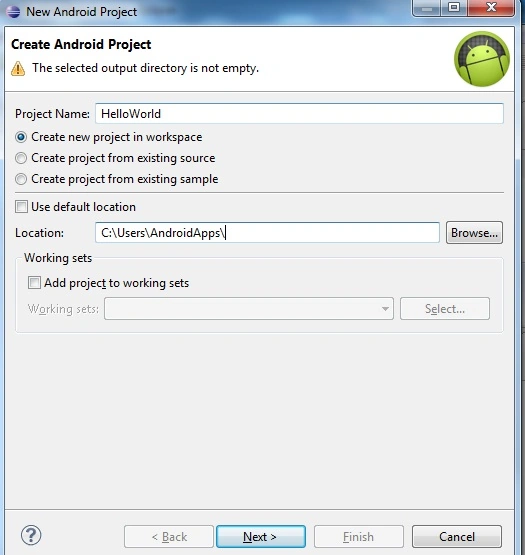
Image: Create New Project
Next, select the target platform. I have selected Android 2.2 for this example.
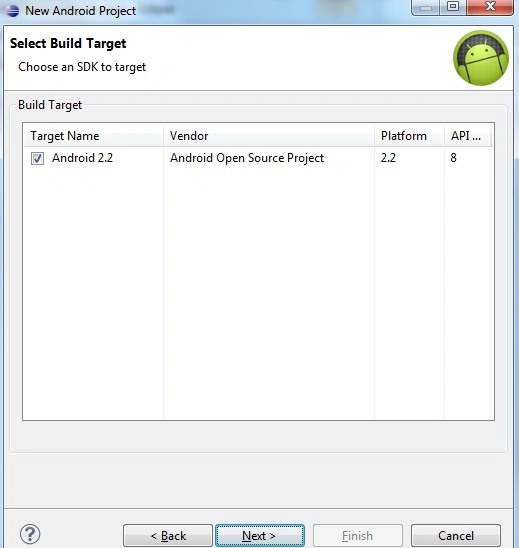
Image: Select the platform
Add the code as follows within the java source file (HelloWorldActivity.java)
Source code
- package com.android.HelloWorld01;
- import android.app.Activity;
- import android.os.Bundle;
- import android.widget.TextView;
- public class HelloWorld01Activity extends Activity {
- /** Called when the activity is first created. */
- @Override
- public void onCreate(Bundle savedInstanceState) {
- super.onCreate(savedInstanceState);
- TextView tvHello = new TextView(this);
- tvHello.setText("Hello Android World");
- setContentView(tvHello);
- }
- }
Now run the application... If prompted, select to run the application as an Android app.
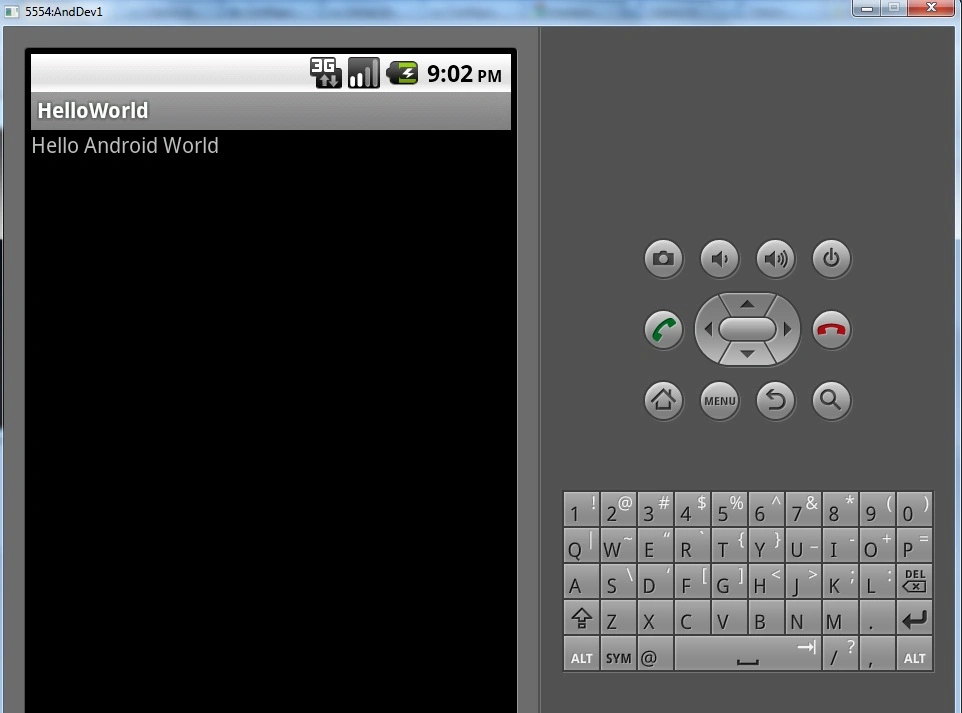
Image: The application running in the emulator
Conclusion
Happy Coding!
Gowtham RajamanickamPosted Apr 12, 2016, 1:20 AM
Good One, Thanks for sharing
anil babuPosted Aug 17, 2012, 7:04 AM
HOW TO deploye asp.net pages into windows azure? Tel me how to work with windows azure? I am new to windows azure? tell me step by step
sasheet kripalaniPosted May 16, 2012, 6:36 AM
Just what i needed...thanks
Dipal ChoksiPosted Dec 28, 2011, 9:24 AM
Thanks for the feedback comments!
Alten ChingumbraPosted Dec 28, 2011, 12:08 AM
good Efforts Dipal
Chintan RathodPosted Dec 27, 2011, 2:29 PM
Nice article.
Akash AhlawatPosted Dec 27, 2011, 12:01 PM
I need this overview about the application development in Android..Thanks
Akshay TeotiaPosted Dec 27, 2011, 11:52 AM
nice work.
Arjun PanwarPosted Dec 27, 2011, 11:51 AM
Thanks for this article
Manish SinghPosted Dec 27, 2011, 11:37 AM
Very helpful article
Vikas MishraPosted Dec 27, 2011, 11:35 AM
hi Dipal you have done a very good work
Abhi KumarPosted Dec 27, 2011, 4:29 AM
Very useful article. Thanks for sharing.
Adam McartneyeditedPosted Dec 27, 2011, 4:15 AMEdited Dec 27, 2011, 4:20 AM
Thanks a lot to explore the world of android. Keep sharing it further.
Monika AroraPosted Dec 27, 2011, 4:11 AM
Great what a concept, I will surely implement this.
Emmy DickenseditedPosted Dec 27, 2011, 1:02 AMEdited Dec 27, 2011, 1:02 AM
It is one of ma field of interests,always like to enhance ma knowledge in this field