

Introduction
Generally, a machine learning workflow should be a process of data preparation, modeling, and evaluation to meet future solutions. For that, we need to invest a lot of work, significant domain knowledge, and much time. Being a data scientist, it will be a convenient workflow, but what about beginners and developers? Here Azure automated ML comes in to provide an effective and efficient feature to make ML modeling and evaluation easier.
Benefits of Azure automated ML
- Reduce cost and time.
- It does not require programming knowledge in automated ML.
- It is convenient for Developers, Analysts, and Data scientists to make quick solutions for their problems.
- Provide a structured and flexible workflow by dominating Agile.
- Automatic model evaluation.
Azure automated ML Workflow
- Understand the ML problem.
- Prepare data sources.
- Configure the target metrics.
- Configure compute.
- Configure train and modeling parameters.
- Evaluate algorithms.
Prerequisites
- Active Azure subscription.
- Knowing ML workflow
Let’s get started.
Here are the tasks that we are going to do,
- Exploring Microsoft Azure ML studio (preview)
- Create a new automated ML experiment
- Create a compute device for Training
- Configure and Run automated ML experiment
- Understanding the evaluated model

Step 1 - Create a resource
- Workspace name: Type a new workspace name (eg: Azure_auto_ML)
- Subscription: Choose your active subscription
- Resource Group: Choose your existing Resource group or Create New one
- Location: Choose server location which is nearest you
- Workspace edition: Enterprise
After finishing your resource credentials just click on
review + Create
>>
Review
>>
Create
.
Step 2 - Explore Microsoft Azure automated ML studio
After creating an ML resource you will have a deployment complete screen, Click on
Go to the resource
.
In our ML resource, click on
Launch now
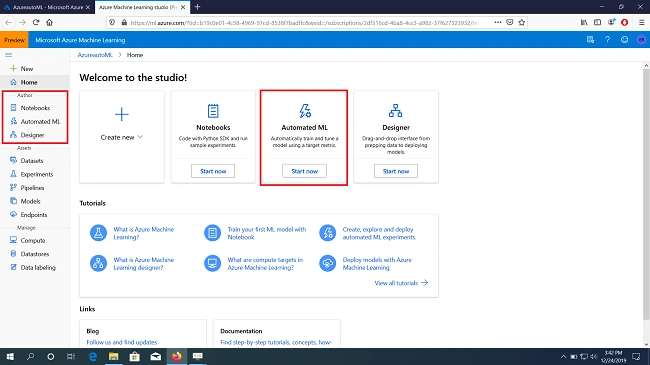
to explore Azure ML studio. The detailed instruction is given below with an image.

- Author Pane - It includes three types of ML tools to make ML workflow easier and powerful.
- Assets - Contains all your datasets, experiments, pipelines, and models as well as deployed sources.
- Manage - It manages our compute devices, datastores, and Data labeling.
Click on
Automated ML
under the author to start the demo.
Step 3 - Create a new automated ML

Under the
author
>>
Automated ML
>>
New automated ML run


- Select dataset
- Configure run
- Task type and settings
Now upload/create a dataset for data preparations.
- Select dataset >> Create dataset >> From local files.
After clicking on from the local file, you will navigate to the Create dataset pane where we can construct our dataset, which includes Basic info, setting, and preview, schema, and confirm details.
Step 4 - Create/Select dataset
Let’s construct our dataset,
Basic info
- Name: Your dataset name
- Description: write something about your dataset
Click
Next
.
Setting and preview - you can handle your dataset settings and preview >> Click Next
Schema - Enable schema level configuration at your convenience (Recemented: make default).
Verify details - after completing our configuration once we can verify all the details by its.
Click on
create
.
After all working fine, you will get a success message like “
Your Dataset created successfully
”.
Step 5 - Configure Run
Let us move on Configure run task,
- Experiment Name: Type your experiment name.
- Target column: Select which column you want to predict.
- Select training computes target: choose your existing compute for training or create a new one.
For creating a new compute, follow the instructions given below,
- Compute Name: name of your compute
- Virtual machine size: By default, you can choose Standard_DS12_v2 which includes basic configuration of computing.
- Virtual Machine priority: dedicated
- Minimum number of Nods: 0
- Maximum number of Nodes: 6
- Idle seconds before scale down: 120
Click on
Create.
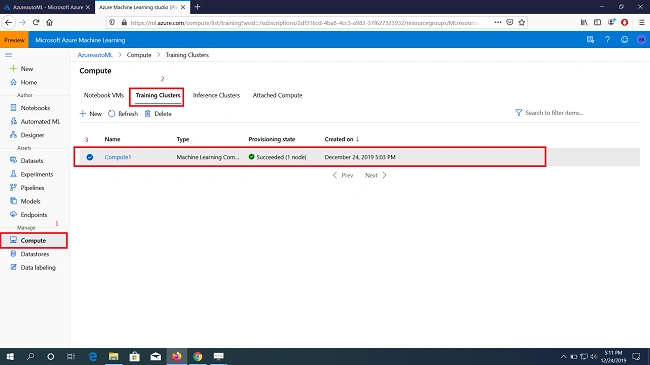
Now, you can see your newly created Compute under Manage.
Go to Compute >> Training cluster >> Compute1
Select your compute >> Next
Step 6 - Task type and settings
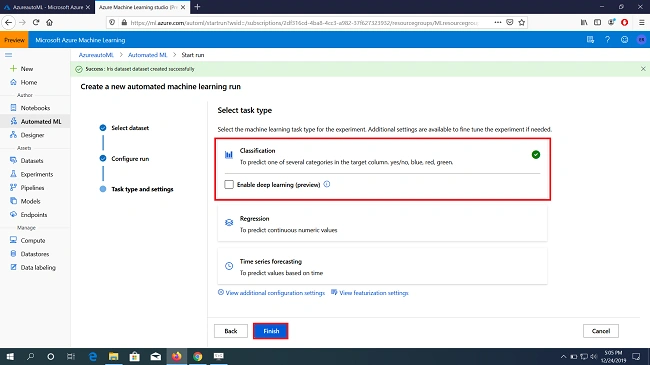
There are three types of tasks available, you can choose either one of them based on your solution.
For our demo, I am choosing a
classification
task that will provide us an answer as either True or False.
Click on
Finish.
After clicking on the Finish button, you will navigate on the
Run Detail
screen.
It will take some time around 15 to 30mts for Modeling and evaluation.

Step 7 - Explore our Running experiment
- Details : you can get the recemented model and run summary.
- Models : we can see what models have been evaluated.
- Data guardrails : This contains information about what tasks have been completed behind the ML automation.
- Properties : we can see our experiment properties.
- Logs : we can get our experiment Logs
- Output : This provides us our experiment output as a JSON format.

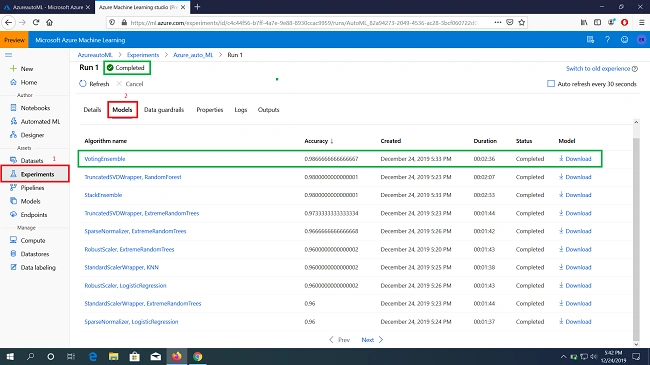
- The recommended Model is VotingEncemble which only provides 99% accuracy.
- Each iteration of the trained model was validated through cross-validation.
- The class is balanced in the training data.
- There were no missing values found in the training data.
Conclusion
In this article, we have learned what is Azure automated ML and Benefits. Moreover, we get started with a simple demo. I hope this article will help you if you feel any query, feel free to ask in the comment section.
References
- https://docs.microsoft.com/en-us/azure/machine-learning
- https://www.c-sharpcorner.com/article/what-is-data-visualization-in-machine-learning-and-how-does-it-work/
Sourav Kumar DasPosted Dec 30, 2019, 3:07 AM
Nice and informative article. Thanks for sharing.
Dipa MehtaPosted Dec 29, 2019, 4:47 AM
Nice Article on Azure ML...