
Introduction
As you know, in the professional world, we have to do many things such as meetings, business trips, and training sessions. Therefore all that must be organized by using a calendar.
In this article, we will demonstrate how we can use a Full Calendar plugin based on ASP.Net Web API (Back-end) and AngularJS (Front-end). Here what we are doing exactly is to customize the FullCalendar plugin in order to be able to perform CRUD operations. I'd like to remind you that you should have some basic knowledge of Web API and AngularJS. I hope you will like it.
Prerequisites
Make sure you have installed Visual Studio 2017 (.NET Framework 4.6.1) and SQL Server.
In this post, we are going to:
- Create Database.
- Create MVC application.
- Configuring Entity framework ORM to connect to a database.
- Create our Calendar controller.
- Create AngularJS file.
- Create HTML page for a demo.
SQL Database part
Here, you will find the script to create database and table.
Create Database
- USE [master]
- GO
- /****** Object: Database [CalendarDB] Script Date: 1/24/2018 9:11:39 PM ******/
- CREATE DATABASE [CalendarDB]
- CONTAINMENT = NONE
- ON PRIMARY
- ( NAME = N'CalendarDB', FILENAME = N'c:\Program Files (x86)\Microsoft SQL Server\MSSQL11.MSSQLSERVER\MSSQL\DATA\CalendarDB.mdf' , SIZE = 4096KB , MAXSIZE = UNLIMITED, FILEGROWTH = 1024KB )
- LOG ON
- ( NAME = N'CalendarDB_log', FILENAME = N'c:\Program Files (x86)\Microsoft SQL Server\MSSQL11.MSSQLSERVER\MSSQL\DATA\CalendarDB_log.ldf' , SIZE = 1024KB , MAXSIZE = 2048GB , FILEGROWTH = 10%)
- GO
- ALTER DATABASE [CalendarDB] SET COMPATIBILITY_LEVEL = 110
- GO
- IF (1 = FULLTEXTSERVICEPROPERTY('IsFullTextInstalled'))
- begin
- EXEC [CalendarDB].[dbo].[sp_fulltext_database] @action = 'enable'
- end
- GO
- ALTER DATABASE [CalendarDB] SET ANSI_NULL_DEFAULT OFF
- GO
- ALTER DATABASE [CalendarDB] SET ANSI_NULLS OFF
- GO
- ALTER DATABASE [CalendarDB] SET ANSI_PADDING OFF
- GO
- ALTER DATABASE [CalendarDB] SET ANSI_WARNINGS OFF
- GO
- ALTER DATABASE [CalendarDB] SET ARITHABORT OFF
- GO
- ALTER DATABASE [CalendarDB] SET AUTO_CLOSE OFF
- GO
- ALTER DATABASE [CalendarDB] SET AUTO_CREATE_STATISTICS ON
- GO
- ALTER DATABASE [CalendarDB] SET AUTO_SHRINK OFF
- GO
- ALTER DATABASE [CalendarDB] SET AUTO_UPDATE_STATISTICS ON
- GO
- ALTER DATABASE [CalendarDB] SET CURSOR_CLOSE_ON_COMMIT OFF
- GO
- ALTER DATABASE [CalendarDB] SET CURSOR_DEFAULT GLOBAL
- GO
- ALTER DATABASE [CalendarDB] SET CONCAT_NULL_YIELDS_NULL OFF
- GO
- ALTER DATABASE [CalendarDB] SET NUMERIC_ROUNDABORT OFF
- GO
- ALTER DATABASE [CalendarDB] SET QUOTED_IDENTIFIER OFF
- GO
- ALTER DATABASE [CalendarDB] SET RECURSIVE_TRIGGERS OFF
- GO
- ALTER DATABASE [CalendarDB] SET DISABLE_BROKER
- GO
- ALTER DATABASE [CalendarDB] SET AUTO_UPDATE_STATISTICS_ASYNC OFF
- GO
- ALTER DATABASE [CalendarDB] SET DATE_CORRELATION_OPTIMIZATION OFF
- GO
- ALTER DATABASE [CalendarDB] SET TRUSTWORTHY OFF
- GO
- ALTER DATABASE [CalendarDB] SET ALLOW_SNAPSHOT_ISOLATION OFF
- GO
- ALTER DATABASE [CalendarDB] SET PARAMETERIZATION SIMPLE
- GO
- ALTER DATABASE [CalendarDB] SET READ_COMMITTED_SNAPSHOT OFF
- GO
- ALTER DATABASE [CalendarDB] SET HONOR_BROKER_PRIORITY OFF
- GO
- ALTER DATABASE [CalendarDB] SET RECOVERY SIMPLE
- GO
- ALTER DATABASE [CalendarDB] SET MULTI_USER
- GO
- ALTER DATABASE [CalendarDB] SET PAGE_VERIFY CHECKSUM
- GO
- ALTER DATABASE [CalendarDB] SET DB_CHAINING OFF
- GO
- ALTER DATABASE [CalendarDB] SET FILESTREAM( NON_TRANSACTED_ACCESS = OFF )
- GO
- ALTER DATABASE [CalendarDB] SET TARGET_RECOVERY_TIME = 0 SECONDS
- GO
- ALTER DATABASE [CalendarDB] SET READ_WRITE
- GO
Create Table
After creating database, we will move to create events table.
Events Table
- USE [CalendarDB]
- GO
- /****** Object: Table [dbo].[Events] Script Date: 1/24/2018 9:12:14 PM ******/
- SET ANSI_NULLS ON
- GO
- SET QUOTED_IDENTIFIER ON
- GO
- SET ANSI_PADDING ON
- GO
- CREATE TABLE [dbo].[Events](
- [EventID] [int] IDENTITY(1,1) NOT NULL,
- [EventTitle] [varchar](50) NULL,
- [EventDescription] [varchar](50) NULL,
- [StartDate] [datetime] NULL,
- [EndDate] [datetime] NULL,
- CONSTRAINT [PK_Events] PRIMARY KEY CLUSTERED
- (
- [EventID] ASC
- )WITH (PAD_INDEX = OFF, STATISTICS_NORECOMPUTE = OFF, IGNORE_DUP_KEY = OFF, ALLOW_ROW_LOCKS = ON, ALLOW_PAGE_LOCKS = ON) ON [PRIMARY]
- ) ON [PRIMARY]
- GO
- SET ANSI_PADDING OFF
- GO
Create your MVC application
Open Visual Studio and select File >> New Project.
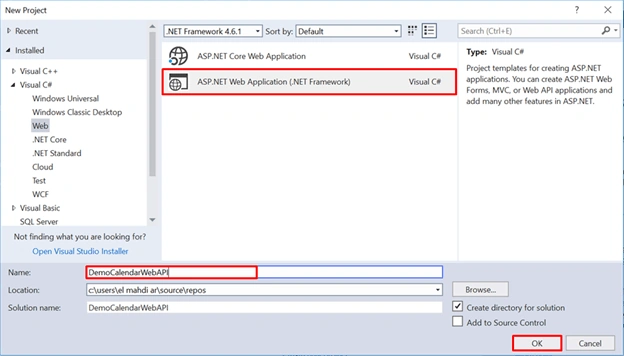
The "New Project" window will pop up. Select ASP.NET Web Application (.NET Framework), name your project, and click OK.
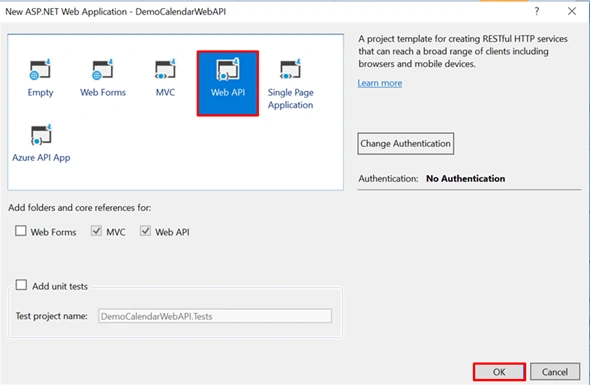
Next, a new dialog will pop up for selecting the template. We are going choose Web API template and click Ok.
Once our project is created, we will add ADO.NET Entity Data Model.
Adding ADO.NET Entity Data Model
From solution explorer, right click on the project name, click Add >> Add New Item.
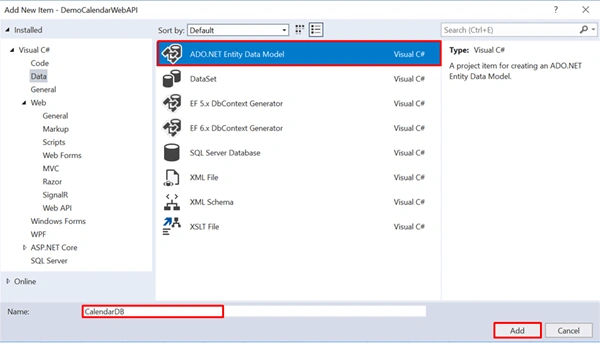
A dialog box will pop up, inside Visual C#, select Data then ADO.NET Entity Data Model, and enter the name for your DbContext model as CalendarDB, then click Add.
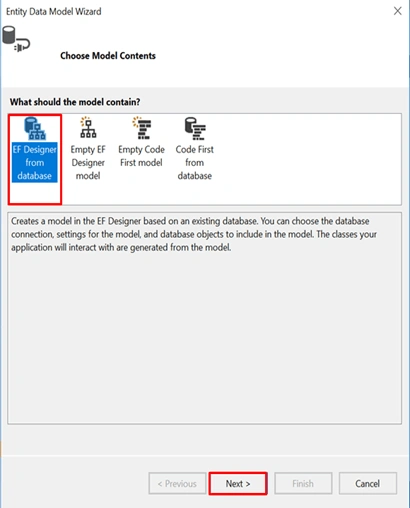
As you can see, we have 4 model contents, we are selecting the first approach (EF Designer from a database).
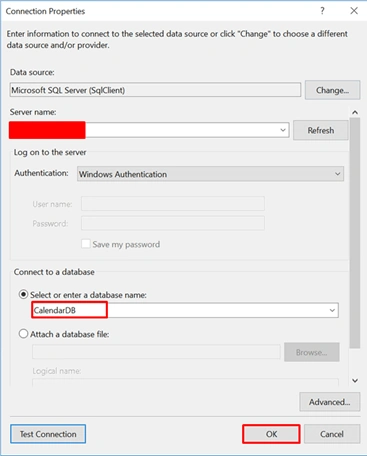
In the next step, we need to select server name, then via drop-down list in connect to a database section. You must choose your database name and finally click OK.
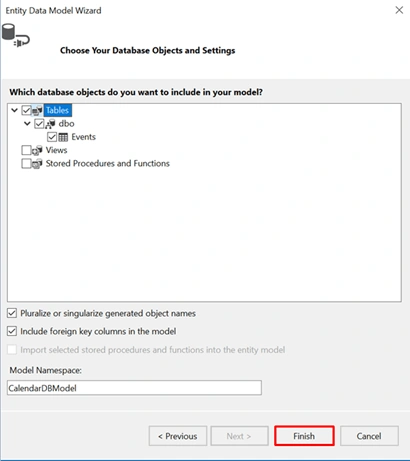
After that, Entity Data Model Wizard dialog will pop up for choosing objects which will be used in our application. We are selecting the events table then click finish.
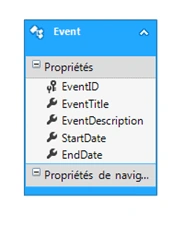
Finally, we see that EDMX model generates events table as an object as shown below.
Create a controller
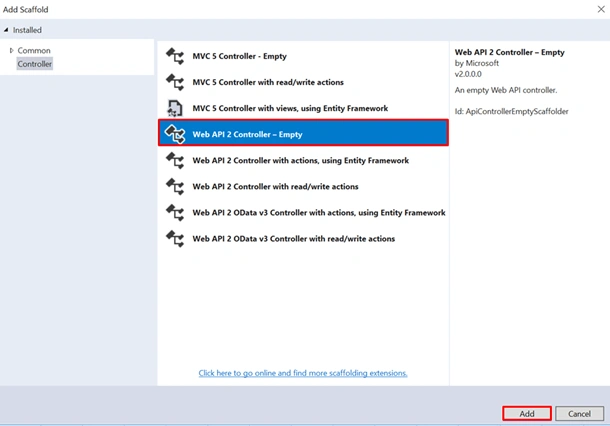
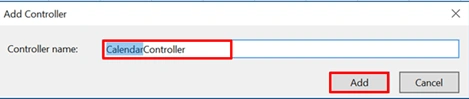
Now, we are going to create a controller. Right-click on the controllers folder> > Add >> Controller>> selecting Web API 2 Controller – Empty >> click Add. In the next dialog, name the controller as CalendarController and then click Add.
CalendarController.cs
- using System;
- using System.Collections.Generic;
- using System.Linq;
- using System.Net;
- using System.Net.Http;
- using System.Web.Http;
- namespace DemoCalendarWebAPI.Controllers
- {
- [RoutePrefix("api/Calendar")]
- public class CalendarController : ApiController
- {
- /// <summary>
- /// Gets all events from Events table
- /// </summary>
- /// <returns></returns>
- ///
- //[HttpGet]
- [Route("GetEvents")]
- public IHttpActionResult GetEvents()
- {
- using (CalendarDBEntities1 context = new CalendarDBEntities1())
- {
- var eventsList = context.Events.ToList();
- return Ok(eventsList);
- }
- }
- /// <summary>
- /// Save or update event.
- /// </summary>
- /// <param name="eventObject"></param>
- /// <returns></returns>
- ///
- //[HttpPost]
- [Route("PostSaveOrUpdate")]
- public IHttpActionResult PostSaveOrUpdate(Event NewEvent)
- {
- using (CalendarDBEntities1 context = new CalendarDBEntities1())
- {
- if(!ModelState.IsValid)
- {
- return BadRequest();
- }
- var eventObj = context.Events.FirstOrDefault(e => e.EventID == NewEvent.EventID);
- if(eventObj != null)
- {
- eventObj.EventTitle = NewEvent.EventTitle;
- eventObj.EventDescription = NewEvent.EventDescription;
- eventObj.StartDate = NewEvent.StartDate;
- eventObj.EndDate = NewEvent.EndDate;
- }
- else
- {
- context.Events.Add(NewEvent);
- }
- context.SaveChanges();
- return Ok();
- }
- }
- /// <summary>
- /// Delete an event based on the given id.
- /// </summary>
- /// <param name="eventId"></param>
- /// <returns></returns>
- ///
- //[HttpDelete]
- [Route("DeleteEvent/{eventId:int}")]
- public IHttpActionResult DeleteEvent(int EventID)
- {
- using (CalendarDBEntities1 context = new CalendarDBEntities1())
- {
- Event eventObj = context.Events.FirstOrDefault(e=>e.EventID == EventID);
- if(eventObj == null)
- {
- return NotFound();
- }
- context.Events.Remove(eventObj);
- context.SaveChanges();
- return Ok(eventObj);
- }
- }
- }
- }
As I mentioned previously, we are using Web API to create all the necessary methods which will be called from the browser.
Now, it's time to define all the methods to perform CRUD operations.
Let's begin with GetEvents() which is responsible to get all the events from the database. This method is decorated as you can see by [Route("GetEvents")] attribute that means if you would call this method, you should proceed as follows: api/Calendar/GetEvents.
Next, we have PostSaveOrUpdate() method which is used to add a new event or update it.
Here, the code snippet implemented is very simple. When we receive event object from HTTP request, we will search it based on EventId. If it already exists in the database that means the operation which will be performed is an update, otherwise we will add it to events table.
One thing that I’d clarify, [Route("PostSaveOrUpdate")] attribute explains we should call the method as follows : /api/Calendar/PostSaveOrUpdate.
Finally, the DeleteEvent method accepts EventId as a parameter and is used to delete an event based on the given EventId parameter. Let’s describe the code snippet of DeleteEvent method,
- Search an event based on the EventId parameter. To accomplish that, we used FirstOrDefault() extension method.
- If the eventObj object is NULL, we will return NotFound() translated by 404 as status code result, otherwise, we will proceed to delete the returned object by using remove() extension method and finally, we will return OK() which is translated as 200 status code result.
AngularJS Part
Add JavaScript File
In solution explorer, right-click the project name, Add >> JavaScript File.
App.js
- var app = angular.module('App', ['ui.calendar', 'ui.bootstrap']);
- app.controller('CalendarController', ['$scope', '$http', 'uiCalendarConfig', '$uibModal', function ($scope, $http, uiCalendarConfig, $uibModal) {
- $scope.eventsTab = [];
- $scope.events = [$scope.eventsTab];
- $scope.EventObj = {};
- //Clear calendar
- function clearCalendar() {
- if (uiCalendarConfig.calendars.Calendar != null) {
- uiCalendarConfig.calendars.Calendar.fullCalendar('removeEvents');
- }
- }
- //Gets all events from db
- function GetEvents() {
- clearCalendar();
- $http.get('/api/Calendar/GetEvents', {
- cache: false,
- params: {},
- }).then(function (response) {
- angular.forEach(response.data, function (value) {
- $scope.eventsTab.push({
- id: value.EventID,
- title: value.EventTitle,
- description: value.EventDescription,
- start: new Date(parseInt(value.StartDate.substr(6))),
- end: new Date(parseInt(value.EndDate.substr(6))),
- backgroundColor: "#f9a712",
- borderColor: "#8e8574"
- });
- console.log($scope.eventsTab);
- });
- });
- }
- GetEvents();
- //Configure Calendar
- $scope.uiConfig = {
- calendar: {
- height: 450,
- editable: true,
- displayEventTime: true,
- header: {
- left: 'prev,next today',
- center: 'title',
- right: 'month,agendaWeek,agendaDay'
- },
- selectable: true,
- select: function (start, end) {
- var startDate = moment(start).format('YYYY/MM/DD');
- var endDate = moment(end).format('YYYY/MM/DD');
- $scope.EventObj = {
- EventID: 0,
- EventTitle: '',
- EventDescription: '',
- StartDate: startDate,
- EndDate: endDate
- };
- $scope.ShowModal();
- },
- eventClick: function (event) {
- var startDate = moment(event.start).format('YYYY/MM/DD');
- var endDate = moment(event.end).format('YYYY/MM/DD');
- $scope.EventObj = {
- EventID: event.id,
- EventTitle: event.title,
- EventDescription: event.description,
- StartDate: startDate,
- EndDate: endDate
- };
- $scope.ShowModal();
- }
- }
- };
- // Popup modal
- $scope.ShowModal = function () {
- var modalInstance = $uibModal.open({
- templateUrl: 'modalPopUp.html',
- controller: 'modalCtrl',
- backdrop: 'static',
- resolve: {
- EventObj: function () {
- return $scope.EventObj;
- }
- }
- });
- modalInstance.result.then(function (result) {
- switch (result.operation) {
- case 'AddOrUpdate':
- $http({
- method: 'POST',
- url: '/api/Calendar/PostSaveOrUpdate',
- data: $scope.EventObj
- }).then(function (response) {
- console.log("Added ^_^");
- GetEvents();
- }, function errorRollBak() {
- console.log("Something Wrong !!");
- });
- break;
- case 'Delete':
- $http({
- method: 'DELETE',
- url: '/api/Calendar/DeleteEvent/' + $scope.EventObj.EventID
- }).then(function (response) {
- GetEvents();
- }, function errorRollBack() {
- console.log("Something Wrong !!");
- });
- break;
- default:
- break;
- }
- }, function () {
- $log.info('modal-component dismissed at: ' + new Date());
- })
- }
- }])
- //modalCtrl controller will be used to perform CRUD Operation.
- app.controller('modalCtrl', ['$scope', '$uibModalInstance', 'EventObj', function ($scope, $uibModalInstance, EventObj) {
- $scope.EventObj = EventObj;
- $scope.AddOrUpdateEvent = function () {
- $uibModalInstance.close({ event: $scope.EventObj, operation: 'AddOrUpdate' });
- }
- $scope.DeleteEvent = function () {
- $uibModalInstance.close({ event: $scope.EventObj, operation: 'Delete' });
- }
- $scope.CancelEvent = function () {
- $uibModalInstance.dismiss('cancel');
- }
- }])
Let's explain how to configure our calendar.
As you can see above, to configure calendar, we need to provide so many properties such as:
- height: represents the height of calendar.
- header: contains the information such as title, navigation calendar (previous, next, today)
which will be shown at top of the calendar.
- selectable: accepts as parameter Boolean value(true/false) and means if calendar will be
selectable or not.
- eventClick: will be triggered when a user clicks an event.
Finally, Show modal function is used to perform CRUD operations.
Add HTML page
To add html page, right click the project name >> Add >> HTML page
Calendar.html
- <!DOCTYPE html>
- <html>
- <head>
- <meta charset="utf-8" />
- <title>.: Demo Calendar :.</title>
- <!-- CSS -->
- <link href="Content/bootstrap.min.css" rel="stylesheet" />
- <link href="Content/fullcalendar.css" rel="stylesheet" />
- </head>
- <body>
- <div ng-app="App" ng-controller="CalendarController">
- <script type="text/ng-template" id="modalPopUp.html">
- <div class="modal-header">
- <h3 class="modal-title"> CUD Events </h3>
- </div>
- <div class="modal-body">
- <div class="form-group">
- <label>Event Title : </label>
- <input type="text" ng-model="EventObj.EventTitle" class="form-control" />
- </div>
- <div class="form-group">
- <label>Description : </label>
- <input type="text" ng-model="EventObj.EventDescription" class="form-control" />
- </div>
- <div class="form-group">
- <label>Date (Start - END) : </label>
- <span>{{EventObj.StartDate}} - {{EventObj.EndDate}}</span>
- </div>
- </div>
- <div class="modal-footer">
- <button class="btn btn-primary" type="button" ng-click="AddOrUpdateEvent()">Add Or Update Event</button>
- <button class="btn btn-success" type="button" ng-show="EventObj.EventID > 0" ng-click="DeleteEvent()">Delete Event</button>
- <button class="btn btn-info" type="button" ng-click="CancelEvent()">Cancel Event</button>
- </div>
- </script>
- <div class="CalenderClass">
- <div class="row">
- <div class="col-md-12">
- <div ui-calendar="uiConfig.calendar" class="calendar" ng-model="events" calendar="Calendar"></div>
- </div>
- </div>
- </div>
- </div>
- <!-- JS -->
- <script src="Scripts/moment.js"></script>
- <script src="Scripts/jquery-1.10.2.min.js"></script>
- <script src="Scripts/bootstrap.js"></script>
- <script src="Scripts/angular.js"></script>
- <script src="Scripts/calendar.js"></script>
- <script src="Scripts/fullcalendar.js"></script>
- <script src="Scripts/gcal.js"></script>
- <script src="Scripts/ui-bootstrap-tpls.min.js"></script>
- <script src="Scripts/App.js"></script>
- </body>
- </html>
Note
Do not forget to add the following libraries within Calendar.html page.
- <!-- JS -->
- <script src="Scripts/moment.js"></script>
- <script src="Scripts/jquery-1.10.2.min.js"></script>
- <script src="Scripts/bootstrap.js"></script>
- <script src="Scripts/angular.js"></script>
- <script src="Scripts/calendar.js"></script>
- <script src="Scripts/fullcalendar.js"></script>
- <script src="Scripts/gcal.js"></script>
- <script src="Scripts/ui-bootstrap-tpls.min.js"></script>
- <script src="Scripts/App.js"></script>
You can download them from Here
Demo
Now, our Calendar application is ready. We can run and see the output in the browser.
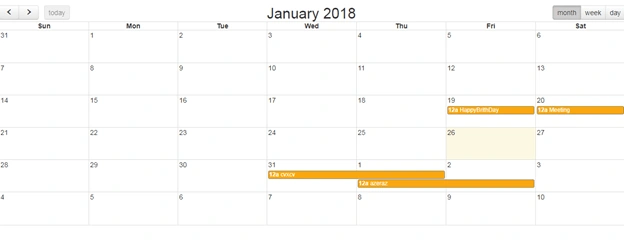
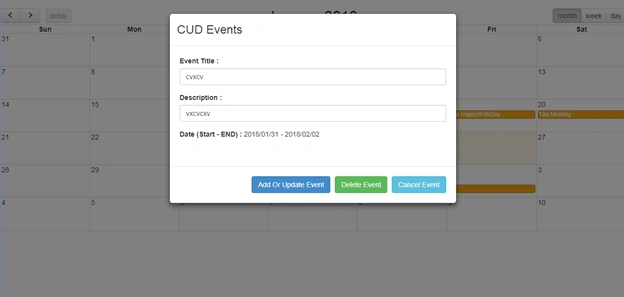
That’s all. Please send your feedback and queries in the comments box.
R O D OPosted Jan 16, 2020, 9:36 PM
Your article is very good, update it please
Benali RajaPosted Oct 29, 2018, 9:02 AM
Thanks for the article, but it is missing some files: fulcalendar.css and angular.js, where can I found them please ?
Abdullah MondolPosted Sep 19, 2018, 5:13 AM
Thank you for the nice article. Where is the fullcalendar.css?
Mon PunzalPosted Jun 13, 2018, 9:27 PM
Hi! when i use this nice article my API is working but UI is not showing the scheduled event. Please help...
Uttam ChaturvediPosted Mar 2, 2018, 8:14 AM
Very Nice Article!!!!!!!!!!!!!
Rizky MaulanaPosted Feb 9, 2018, 11:34 PM
Thx for sharing, very nice article
Abhinav BhutadaPosted Feb 9, 2018, 7:23 AM
Thanks nice article program MVC use
Sanwar RanwaPosted Feb 2, 2018, 7:27 AM
NICE article sir.............
Humayun Kabir MamunPosted Jan 31, 2018, 11:04 PM
Thanks Mahdi for this nice article and I also agree with Rahul that change the title to AngularJS
RahulPosted Jan 31, 2018, 10:02 PM
Nice article. Quick suggestion, Plz correct the title of this article as AngularJS has been used in this demo, not Angular.