

Introduction
Multiple files uploaded with AngularJS and ASP.NET MVC scan an individual file's upload progress. Files upload faster compared to the traditional way, which we followed earlier in ASP.NET.
Description

Here, I have an upload button. This one supports and lets the user select multiple files to upload and each file will be tracked, which is based on its upload progress. Here, you can check your file name, path, Extension, Size and status. Status message is based on the file upload to the destination or not.
This part is configured in AngularJS.
References for better understanding are given below.
- http://www.c-sharpcorner.com/article/introduction-to-angularjs-in-asp-net-mvc/
- http://www.c-sharpcorner.com/members/satyaprakash-samantaray
Step1
First, create a MVC Application named SatyaFileUploadAngularJS.

Create a folder named App_Content.
Inside it, add Bootstrap related files, as shown below.
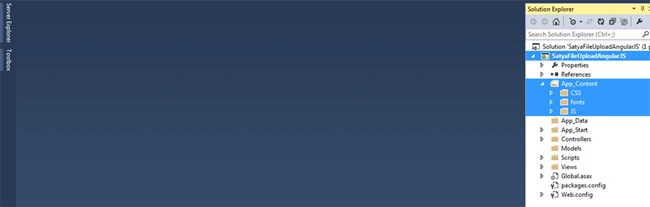
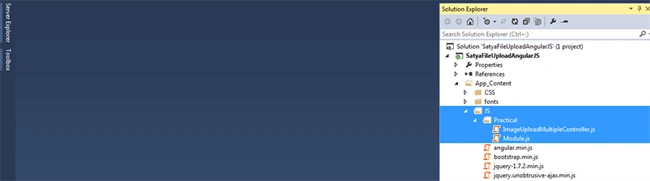
Inside JS folder, create a sub folder named Practical.
Inside it, add two JavaScript files named ImageUploadMultipleController.js and Module.js.
Step 3
Code ref of ImageUploadMultipleController.js is given below.
- app.controller('ImageUploadMultipleCtrl', function ($scope) {
- $scope.fileList = [];
- $scope.curFile;
- $scope.ImageProperty = {
- file: ''
- }
- $scope.setFile = function (element) {
- $scope.fileList = [];
- var files = element.files;
- for (var i = 0; i < files.length; i++) {
- $scope.ImageProperty.file = files[i];
- $scope.fileList.push($scope.ImageProperty);
- $scope.ImageProperty = {};
- $scope.$apply();
- }
- }
- $scope.UploadFile = function () {
- for (var i = 0; i < $scope.fileList.length; i++) {
- $scope.UploadFileIndividual($scope.fileList[i].file,
- $scope.fileList[i].file.name,
- $scope.fileList[i].file.type,
- $scope.fileList[i].file.size,
- i);
- }
- }
- $scope.UploadFileIndividual = function (fileToUpload, name, type, size, index) {
- var reqObj = new XMLHttpRequest();
- reqObj.upload.addEventListener("progress", uploadProgress, false)
- reqObj.addEventListener("load", uploadComplete, false)
- reqObj.addEventListener("error", uploadFailed, false)
- reqObj.addEventListener("abort", uploadCanceled, false)
- reqObj.open("POST", "/FileUpload/UploadFiles", true);
- reqObj.setRequestHeader("Content-Type", "multipart/form-data");
- reqObj.setRequestHeader('X-File-Name', name);
- reqObj.setRequestHeader('X-File-Type', type);
- reqObj.setRequestHeader('X-File-Size', size);
- reqObj.send(fileToUpload);
- function uploadProgress(evt) {
- if (evt.lengthComputable) {
- var uploadProgressCount = Math.round(evt.loaded * 100 / evt.total);
- document.getElementById('P' + index).innerHTML = uploadProgressCount;
- if (uploadProgressCount == 100) {
- document.getElementById('P' + index).innerHTML =
- '<i class="fa fa-refresh fa-spin" style="color:green;"></i>';
- }
- }
- }
- function uploadComplete(evt) {
- document.getElementById('P' + index).innerHTML = '<span style="color:Green;font-weight:bold;font-style: oblique">Saved..</span>';
- $scope.NoOfFileSaved++;
- $scope.$apply();
- }
- function uploadFailed(evt) {
- document.getElementById('P' + index).innerHTML = '<span style="color:Red;font-weight:bold;font-style: oblique">Upload Failed..</span>';
- }
- function uploadCanceled(evt) {
- document.getElementById('P' + index).innerHTML = '<span style="color:Red;font-weight:bold;font-style: oblique">Canceled..</span>';
- }
- }
- });
This part controls file upload progress and tracking of the files, using AngularJS.
The module to develop our Angular Controller is used for the file upload and the code is given below in an Angular Controller with SetFile function.
- $scope.setFile = function (element) {
- $scope.fileList = [];
- Now Get The Multiple files….
- var files = element.files;
- for (var i = 0; i < files.length; i++) {
- $scope.ImageProperty.file = files[i];
- $scope.fileList.push($scope.ImageProperty);
- $scope.ImageProperty = {};
- $scope.$apply();
- }
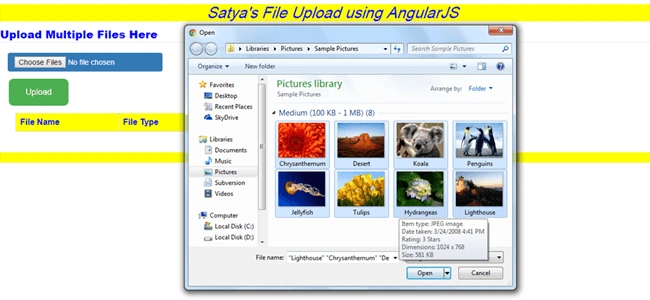
Here, ImageUploadMultipleCtrl is our Controller name. The $scope variable fileList is an array of files, which you selected. This ends our step 1. Run the project and select the multiple files by pressing Ctrl key and you will find the effect given below.
The code given below is an Angular Controller with UploadFile function. Here, I have mentioned UploadFileIndividual Function with the assigned parameter, which is similar to the properties of the files.
- $scope.UploadFile = function () {
- for (var i = 0; i < $scope.fileList.length; i++) {
- $scope.UploadFileIndividual($scope.fileList[i].file,
- $scope.fileList[i].file.name,
- $scope.fileList[i].file.type,
- $scope.fileList[i].file.size,
- i);
- }
- }
I have developed an upload function with XMLHttpRequest. XMLHttpRequest is an API, which provides client functionality to transfer the data between a client and a Server. It provides an easy way to retrieve the data from a URL without having to do a full page refresh.
XMLHttpRequest was originally designed by Microsoft and is supported by Mozilla, Apple and Google.
I chose XMLHttpRequest for the reasons given below.
- It provides us asynchronous upload of the multiple files.
- It provides a way for tracking the progress of each file.
I have all the files in an array named fileList, so loop through the fileList and get each file from the list with the name, size, type and send all to another function to upload, so add two functions at our Controller at imageUploadMultipleController.js.
- UploadFile - This function calls when we click Upload button.
- UploadFileIndividual function has parameters like fileToUpload, name, type, size, index- It is responsible to upload an indivudual file. It takes 4 parameters; i.e., the file to upload, the file name, the file type, file size and an index.
- $scope.UploadFile = function () {
- for (var i = 0; i < $scope.fileList.length; i++) {
- $scope.UploadFileIndividual($scope.fileList[i].file,
- $scope.fileList[i].file.name,
- $scope.fileList[i].file.type,
- $scope.fileList[i].file.size,
- i);
- }
- }
- $scope.UploadFileIndividual = function (fileToUpload, name, type, size, index) {
- var reqObj = new XMLHttpRequest();
- reqObj.upload.addEventListener("progress", uploadProgress, false)
- reqObj.addEventListener("load", uploadComplete, false)
- reqObj.addEventListener("error", uploadFailed, false)
- reqObj.addEventListener("abort", uploadCanceled, false)
- reqObj.open("POST", "/FileUpload/UploadFiles", true);
- reqObj.setRequestHeader("Content-Type", "multipart/form-data");
- reqObj.setRequestHeader('X-File-Name', name);
- reqObj.setRequestHeader('X-File-Type', type);
- reqObj.setRequestHeader('X-File-Size', size);
- reqObj.send(fileToUpload);
- function uploadProgress(evt) {
- if (evt.lengthComputable) {
- var uploadProgressCount = Math.round(evt.loaded * 100 / evt.total);
- document.getElementById('P' + index).innerHTML = uploadProgressCount;
- if (uploadProgressCount == 100) {
- document.getElementById('P' + index).innerHTML =
- '<i class="fa fa-refresh fa-spin" style="color:green;"></i>';
- }
- }
- }
- function uploadComplete(evt) {
- document.getElementById('P' + index).innerHTML = '<span style="color:Green;font-weight:bold;font-style: oblique">Saved..</span>';
- $scope.NoOfFileSaved++;
- $scope.$apply();
- }
- function uploadFailed(evt) {
- document.getElementById('P' + index).innerHTML = '<span style="color:Red;font-weight:bold;font-style: oblique">Upload Failed..</span>';
- }
- function uploadCanceled(evt) {
- document.getElementById('P' + index).innerHTML = '<span style="color:Red;font-weight:bold;font-style: oblique">Canceled..</span>';
- }
- }
- var reqObj = new XMLHttpRequest();
- reqObj.upload.addEventListener("progress", uploadProgress, false)
- reqObj.addEventListener("load", uploadComplete, false)
- reqObj.addEventListener("error", uploadFailed, false)
- reqObj.addEventListener("abort", uploadCanceled, false)
- reqObj.open("POST", "/FileUpload/UploadFiles", true);
- reqObj.setRequestHeader("Content-Type", "multipart/form-data");
- reqObj.setRequestHeader('X-File-Name', name);
- reqObj.setRequestHeader('X-File-Type', type);
- reqObj.setRequestHeader('X-File-Size', size);
- reqObj.send(fileToUpload);
- function uploadProgress(evt) {
- if (evt.lengthComputable) {
- var uploadProgressCount = Math.round(evt.loaded * 100 / evt.total);
- document.getElementById('P' + index).innerHTML = uploadProgressCount;
- if (uploadProgressCount == 100) {
- document.getElementById('P' + index).innerHTML =
- '<i class="fa fa-refresh fa-spin" style="color:green;"></i>';
- }
- }
- }
- if (uploadProgressCount == 100) {
- document.getElementById('P' + index).innerHTML =
- '<i class="fa fa-refresh fa-spin" style="color:green;"></i>';
- }
To Save status with the color, proceed, as shown below.
- function uploadComplete(evt) {
- document.getElementById('P' + index).innerHTML = '<span style="color:Green;font-weight:bold;font-style: oblique">Saved..</span>';
- $scope.NoOfFileSaved++;
- $scope.$apply();
- }
- function uploadFailed(evt) {
- document.getElementById('P' + index).innerHTML = '<span style="color:Red;font-weight:bold;font-style: oblique">Upload Failed..</span>';
- }
- function uploadCanceled(evt) {
- document.getElementById('P' + index).innerHTML = '<span style="color:Red;font-weight:bold;font-style: oblique">Canceled..</span>';
- }
XMLHttpRequest object returns the status of an each event of each file. By writing an event handler function, we can access return status. We can add EventListener method of XMLHttpRequest object to handle the event . XMLHttpRequest raises an event at the different status of uploading.
- Progress - It is raised during the upload process and sends us the necessary information on the progress status.
- Load - It is raised after the uploaded file is saved at the destination and the Server sends back a response.
- Error - it raises imediately, if any error occurs during the upload.
- Abort - It raises imediately, if the user cancels the upload process.
The code mentioned above described how to develop an Upload functionality with XMLHttpRequest.

- var app = angular.module('AgApp', []);
Now, use the module to develop Angular Controller for the file upload.

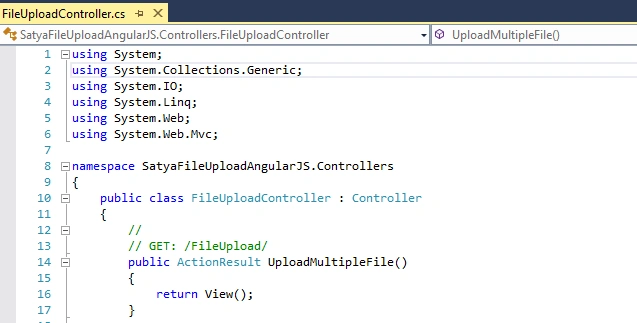
Create a controller class file named FileUploadController.cs.
ASP.NET MVC Controller helps to receive the object sent by XMLHttpRequest.
Code ref of FileUploadController.cs
- using System;
- using System.Collections.Generic;
- using System.IO;
- using System.Linq;
- using System.Web;
- using System.Web.Mvc;
- namespace SatyaFileUploadAngularJS.Controllers
- {
- public class FileUploadController : Controller
- {
- public ActionResult UploadMultipleFile()
- {
- return View();
- }
- [HttpPost]
- public virtual string UploadFiles(object obj)
- {
- var length = Request.ContentLength;
- var bytes = new byte[length];
- Request.InputStream.Read(bytes, 0, length);
- var fileName = Request.Headers["X-File-Name"];
- var fileSize = Request.Headers["X-File-Size"];
- var fileType = Request.Headers["X-File-Type"];
- var saveToFileLoc = "D:\\Images\\" + fileName;
- var fileStream = new FileStream(saveToFileLoc, FileMode.Create, FileAccess.ReadWrite);
- fileStream.Write(bytes, 0, length);
- fileStream.Close();
- return string.Format("{0} bytes uploaded", bytes.Length);
- }
- }
- }
Here, I assigned the code to add headers.
- var fileName = Request.Headers["X-File-Name"];
- var fileSize = Request.Headers["X-File-Size"];
- var fileType = Request.Headers["X-File-Type"];
- var saveToFileLoc = "D:\\Images\\" + fileName;
- var fileStream = new FileStream(saveToFileLoc, FileMode.Create, FileAccess.ReadWrite);
- fileStream.Write(bytes, 0, length);
- fileStream.Close();
- return string.Format("{0} bytes uploaded", bytes.Length);
Create a view named UploadMultipleFile.cshtml.
I used HTML input tag, using ASP.NET MVC to input multiple/ single file upload.
Code ref
- <html ng-app="AgApp">
- <head>
- <meta name="viewport" content="width=device-width" />
- <title>Satyaprakash File Upload AngularJS</title>
- <link href="~/App_Content/CSS/bootstrap.min.css" rel="stylesheet" />
- <link href="~/App_Content/CSS/font-awesome.min.css" rel="stylesheet" />
- <style>
- table {
- font-family: arial, sans-serif;
- border-collapse: collapse;
- width: 100%;
- }
- td, th {
- border: 1px solid #dddddd;
- text-align: left;
- padding: 8px;
- }
- tr:nth-child(even) {
- background-color: #dddddd;
- }
- .button {
- background-color: #4CAF50;
- border: none;
- color: white;
- padding: 15px 32px;
- text-align: center;
- text-decoration: none;
- display: inline-block;
- font-size: 16px;
- margin: 4px 2px;
- cursor: pointer;
- }
- .button4 {
- border-radius: 9px;
- }
- </style>
- </head>
- <body>
- <h2 style="background-color: Yellow;color: Blue; text-align: center; font-style: oblique">Satya's File Upload using AngularJS</h2>
- <fieldset>
- <legend style="font-family:Arial Black;color:blue">Upload Multiple Files Here</legend>
- <div ng-controller="ImageUploadMultipleCtrl">
- <div class="col-md-12" style="text-align:center;margin-bottom:10px;">
- <input type="file" id="file" name="file" multiple onchange="angular.element(this).scope().setFile(this)" accept="image/*" class="btn btn-primary" />
- </div>
- <div class="col-md-12">
- <button ng-click="UploadFile()" class="button button4">Upload</button>
- </div>
- <div class="col-md-12" style="padding-top:10px;">
- <div class="col-md-7">
- <table align="center" border="1" cellpadding="4" cellspacing="4">
- <thead>
- <tr>
- <th style="background-color: Yellow;color: blue">File Name</th>
- <th style="background-color: Yellow;color: blue">File Type</th>
- <th style="background-color: Yellow;color: blue">File Size</th>
- <th style="background-color: Yellow;color: blue">Status</th>
- </tr>
- </thead>
- <tbody>
- <tr ng-repeat="file in fileList">
- <td style="color: blue">{{file.file.name}}</td>
- <td style="color: blue">{{file.file.type}}</td>
- <td style="color: blue">{{file.file.size}}</td>
- <td>
- <div id="{{'P'+$index}}">
- </div>
- </td>
- </tr>
- </tbody>
- </table>
- </div>
- </div>
- </div>
- <script src="~/App_Content/JS/jquery-1.7.2.min.js"></script>
- <script src="~/App_Content/JS/jquery.unobtrusive-ajax.min.js"></script>
- <script src="~/App_Content/JS/angular.min.js"></script>
- <script src="~/App_Content/JS/Practical/Module.js"></script>
- <script src="~/App_Content/JS/Practical/ImageUploadMultipleController.js"></script>
- </fieldset>
- <br />
- <br />
- <footer>
- <p style="background-color: Yellow; font-weight: bold; color:blue; text-align: center; font-style: oblique">© @DateTime.Now.ToLocalTime()</p> @*Add Date Time*@
- </footer>
- </body>
- </html>
- ng‐app="AgApp" we bootstrap an Angular Application.
- ng‐controller="ImageUploadMultipleCtrl" specifies the Controller for this page, which contains the code to show the selected file information and file upload function.
- <input type="file" id="file" name="file" multiple onchange="angular.element(this).scope().setFile(this)" accept="image/*" class="btn btn-primary" />
- This enables us to input the multiple files and onchange event, we call setFile function, which is an Angular function. This function collects all the files, which you selected and put into a $scope variable name fileList.
- We loop through the fileList by <tr ng‐repeat="file in fileList"> to show the file information.
- Each file has 3 auto property names, types and sizes. Thes 3 properties of files can be accessed directly.
I have added Bootstrap related files here.
- <link href="~/App_Content/CSS/bootstrap.min.css" rel="stylesheet" />
- <link href="~/App_Content/CSS/font-awesome.min.css" rel="stylesheet" />
- <style>
- table {
- font-family: arial, sans-serif;
- border-collapse: collapse;
- width: 100%;
- }
- td, th {
- border: 1px solid #dddddd;
- text-align: left;
- padding: 8px;
- }
- tr:nth-child(even) {
- background-color: #dddddd;
- }
- .button {
- background-color: #4CAF50;
- border: none;
- color: white;
- padding: 15px 32px;
- text-align: center;
- text-decoration: none;
- display: inline-block;
- font-size: 16px;
- margin: 4px 2px;
- cursor: pointer;
- }
- .button4 {
- border-radius: 9px;
- }
- </style>
- <script src="~/App_Content/JS/jquery-1.7.2.min.js"></script>
- <script src="~/App_Content/JS/jquery.unobtrusive-ajax.min.js"></script>
- <script src="~/App_Content/JS/angular.min.js"></script>
- <script src="~/App_Content/JS/Practical/Module.js"></script>
- <script src="~/App_Content/JS/Practical/ImageUploadMultipleController.js"></script>
- <div class="col-md-12" style="text-align:center;margin-bottom:10px;">
- <input type="file" id="file" name="file" multiple onchange="angular.element(this).scope().setFile(this)" accept="image/*" class="btn btn-primary" />
- </div>
- <div class="col-md-12">
- <button ng-click="UploadFile()" class="button button4">Upload</button>
- </div>
- <th style="background-color: Yellow;color: blue">File Name</th>
- <th style="background-color: Yellow;color: blue">File Type</th>
- <th style="background-color: Yellow;color: blue">File Size</th>
- <th style="background-color: Yellow;color: blue">Status</th>
- <tr ng-repeat="file in fileList">
- <td style="color: blue">{{file.file.name}}</td>
- <td style="color: blue">{{file.file.type}}</td>
- <td style="color: blue">{{file.file.size}}</td>
- <td>
- <div id="{{'P'+$index}}">
- </div>
- </td>
- </tr>
- <td>
- <div id="{{'P'+$index}}">
- </div>
- </td>

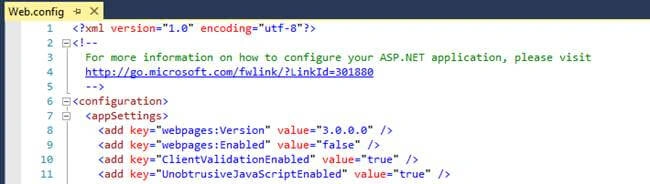
Add the code for Web.Config file.
Change the Maximum Upload length in Web.config. In <system.web> section, change the http in the way given below.
Code ref
- <?xml version="1.0" encoding="utf-8"?>
- <configuration>
- <appSettings>
- <add key="webpages:Version" value="3.0.0.0" />
- <add key="webpages:Enabled" value="false" />
- <add key="ClientValidationEnabled" value="true" />
- <add key="UnobtrusiveJavaScriptEnabled" value="true" />
- </appSettings>
- <system.web>
- <compilation debug="true" targetFramework="4.5" />
- <httpRuntime targetFramework="4.5" maxRequestLength="1048576" />
- </system.web>
- <system.webServer>
- <security>
- <requestFiltering>
- <requestLimits maxAllowedContentLength="1073741824" />
- </requestFiltering>
- </security>
- </system.webServer>
- </configuration>
In <system.web> section, change the http in the way given below.
- <httpRuntime targetFramework="4.5" maxRequestLength="1048576" />
- <system.webServer>
- <security>
- <requestFiltering>
- <requestLimits maxAllowedContentLength="1073741824" />
- </requestFiltering>
- </security>
- </system.webServer>
The value maxRequestLength in <system.web> and maxAllowedContentLength in <system.webserver> must be same.
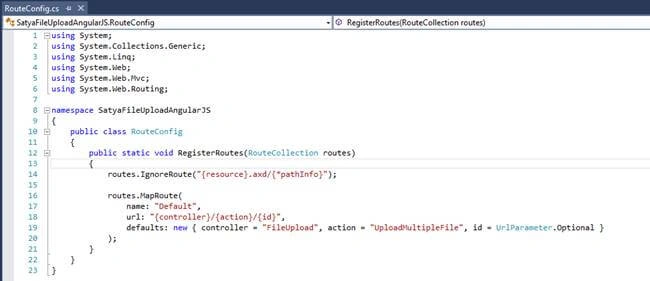
Set start page in MVC, using Controller name and controller action method.
Code ref of RouteConfig.cs
- routes.MapRoute(
- name: "Default",
- url: "{controller}/{action}/{id}",
- defaults: new { controller = "FileUpload", action = "UploadMultipleFile", id = UrlParameter.Optional }
- );
The controller name - “FileUpload”.
The controller action method name - “UploadMultipleFile”.
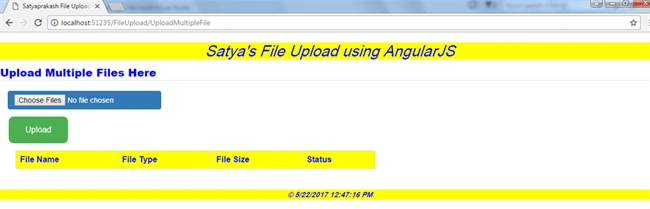
OUTPUT

URL is - http://localhost:51235/FileUpload/UploadMultipleFile
Desktop View
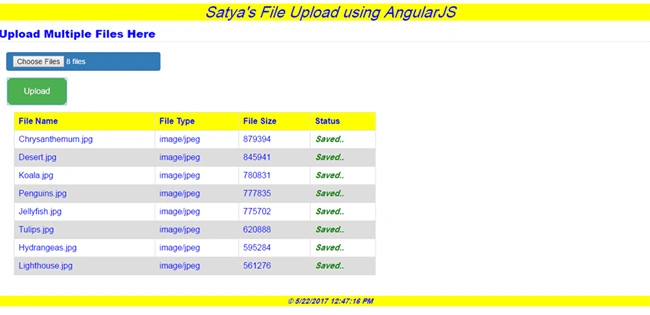
I uploaded the files by changing an invalid destination path i.e. D:\Images1
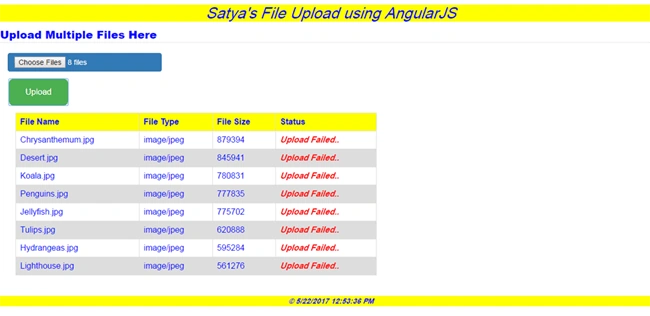
Refer the screenshot.

Progress bar is given
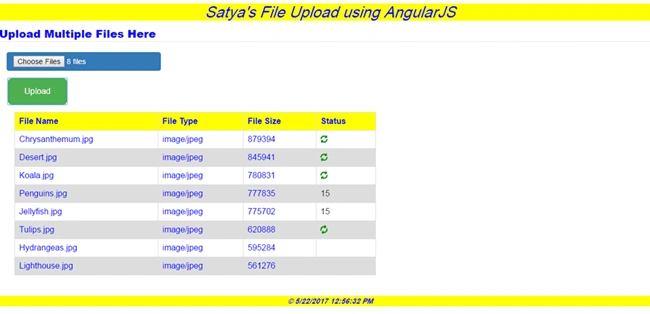
Mobile View
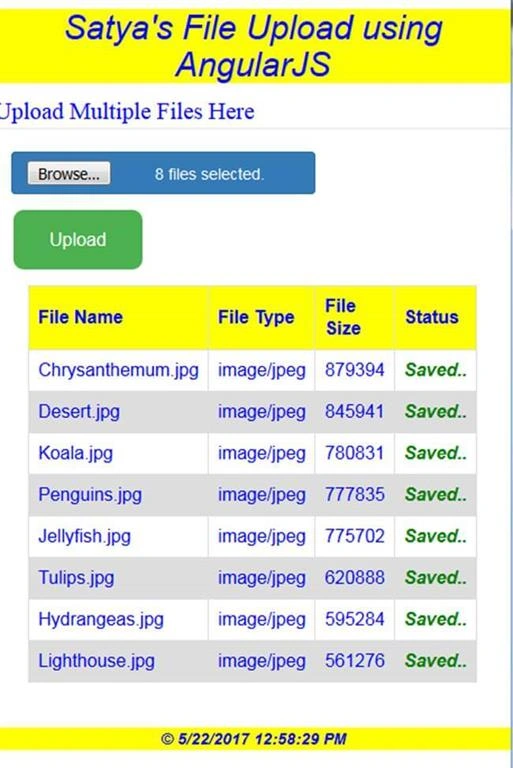
Desktop View
Mobile View
Summary
- File upload, using AngularJS.
- Implement in MVC and Bootstrap.
- File progress tracking .
- AngularJS file upload is faster .
syamprasad vepagaPosted Feb 4, 2020, 9:13 AM
Iam getting this error kindly help this
syamprasad vepagaPosted Feb 4, 2020, 9:13 AM
Cannot set property 'innerHTML' of null at XMLHttpRequestUpload.uploadProgress (ProjectTask.js:60)
tyne ghiePosted Mar 18, 2019, 1:28 AM
Good explanation :) Many thanks.
dawood abbasPosted Oct 28, 2018, 6:50 AM
Cant we get its source code please?
shervin salimianPosted Dec 9, 2017, 2:46 AM
Hi,i test this program but my files dont save in path D:\\Images\\.i think this code is wrong var saveToFileLoc = "D:\\Images\\" + fileName; can u help me plz?
Natália SebbenPosted Aug 16, 2017, 11:01 AM
Its just for images? works with files like xlsl or cvs?
Former memberPosted May 30, 2017, 9:48 AM
I got few more code for the same issue Example 1 ------------ html, body { margin: 0; padding: 0; width: 100%; height: 100%; display: table; } .container { display: table-cell; text-align: center; vertical-align: middle; } .content { background-color: red; display: inline-block; text-align: left; } <div class="container"> <div class="content"> content content content <br/> moooooooooooooooore content <br/> another content </div> </div> Example 2 ------------ .parent { display: table; /* optional, just for the demo */ height: 300px; background: yellow; } .child { display: table-cell; vertical-align: middle; /* optional, just for the demo */ background: red; height: 100px; } .content { /* optional, just for the demo */ background: blue; } <div class="parent"> <div class="child"> <div class="content">XXX</div> </div> </div>
Manas MohapatraPosted May 29, 2017, 9:49 AM
Good development using AngularJS
Former memberPosted May 29, 2017, 7:08 AM
Anyway thanks a lot for your help. tell me can we inject div into another div at run time dynamically by angularjs like jquery ? please suggest me a code sample. if possible. thanks
Former memberPosted May 29, 2017, 7:07 AM
I checked your code and found your first and last sample code works fine.
Former memberPosted May 29, 2017, 5:20 AM
Can u tell me how could i show a busy icon div position at the center of another div? please share the idea with code sample or link if possible. i asked u this question because u know angular. thanks
Former memberPosted May 29, 2017, 5:19 AM
Sorry it was my mistake. thanks
Former memberPosted May 29, 2017, 5:11 AM
It would be nice if you show busy icon when uploading file.