

Introduction
The Factory Method design pattern is one of the 23 design patterns. It is a creational design pattern. If you're unsure what a creational design pattern is, I suggest you check out my previous article on Introduction to Design Patterns in Flutter. In this article, I will be covering the following topics.
- What is the Factory Method?
- Problem statement
- Solution
- When to use the Factory Method?
- The disadvantage of the Factory Method
- An Example of Factory Method In Flutter
- Conclusion
So before going to make any delay, let’s start.
What is the Factory Method?
According to the book Design Patterns, Elements of Reusable Object-Oriented Software, Factory Method defines an interface for creating an object but lets subclasses decide which class to instantiate. Factory Method lets a class defer instantiation to subclasses.
I am sure from the above introduction you didn't understand anything, so let me describe it in more simple terms.
Assume you're running an internet store. Your consumers can pay for their products in a variety of ways, including cards(credits/debits), PayPal, and bank transfers.
Now, you must include a method in your code to handle all of these distinct forms of payments. You could write separate pieces of code for each payment method, but this would be cluttered and difficult to manage.
This is where the factory method comes into the picture. Rather than constructing payment method objects directly in your code, you write a method (the "Factory Method") that does it for you.
You tell the Factory Method the form of payment you require (cards, PayPal, or bank transfer), and it returns an object of that type as you can see in the diagram below
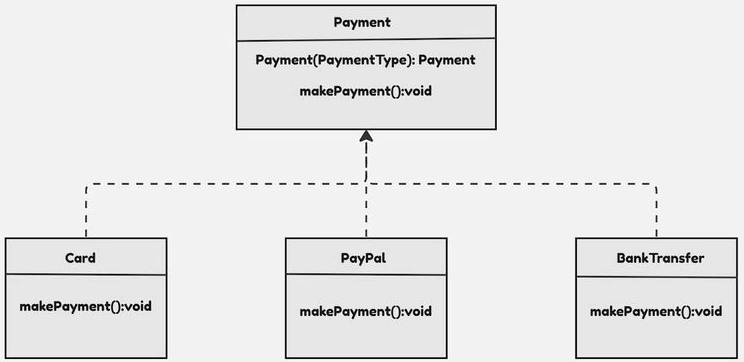
I hope you understand now, but if you are still confused, don't worry. Let's look at the code problem, and then we will see how the Factory Method solves it.
Note. The factory method is sometimes called a virtual constructor as well.
Problem Statement
Above, we looked at an example where an online store needs to integrate a payment mechanism in their program, where a consumer can pay the amount by payment methods such as cards, PayPal, and bank transfer. Now, let's code that.
// Card class represents a payment method using a card
class Card{
  // Method to make payment using a card
  void makePayment() {
    print("Make your payment through card");
  }
}
// PayPal class represents a payment method using PayPal
class PayPal {
  // Method to make payment using PayPal
  void makePayment() {
    print("Make payment through paypal");
  }
}
// BankTransfer class represents a payment method using bank transfer
class BankTransfer {
  // Method to make payment using bank transfer
  void makePayment() {
    print("Make payment through bank transfer");
  }
}
// checkOut function takes a payment method as a string and makes payment using the appropriate method
void checkOut(String paymentMethod) {
  if(paymentMethod == 'card') {
    Card card = Card();
    card.makePayment();
  }else if(paymentMethod == 'paypal') {
    PayPal paypal = PayPal();
    paypal.makePayment();
  }else if(paymentMethod == 'bank_transfer') {
    BankTransfer bankTransfer = BankTransfer();
    bankTransfer.makePayment();
  }else {
    print("Invalid payment method");
  }
}
// Main function of the program, it calls the checkOut function with 'bank_transfer' as the payment method
void main() {
  checkOut('bank_transfer');
}
Some issues with this approach
Now, you might be thinking it’s simple, but wait, there are some issues with this approach, such as
- Scattered logic: The code for creating several payment options is spread over the checkout function. This makes the function more difficult to read and maintain. It also makes it more difficult to add additional payment methods because you must edit the checkout function every time.
- Tight coupling: The checkOut feature is closely linked to the payment methods (Card, PayPal, BankTransfer). This means that if you wish to alter how a payment method works, you'll probably need to change the checkout function as well. This tight coupling limits the code's flexibility and makes it more difficult to maintain.
- Inefficient code: Each payment type follows the same logic for creating a payment method and calling the make payment method. This repetition makes the code less efficient and more difficult to maintain. If you wanted to modify the way the make payment method is called, you'd have to do it for every payment type.
Solution
An efficient solution to the above problem can be achieved through the Factory Method pattern; let’s see how.
// Enum representing different types of payment methods
enum PaymentType {
  card,
  paypal,
  bankTransfer
}
// Abstract class PaymentMethod with a factory constructor to create different types of payment methods
abstract class PaymentMethod {
  factory PaymentMethod(PaymentType type) {
    switch(type) {
      case PaymentType.card:
        return Card();
      case PaymentType.paypal:
        return PayPal();
      case PaymentType.bankTransfer:
        return BankTransfer();
      default:
        return Card();
    }
  }
  // Abstract method to make payment
  void makePayment();
}
// Card class implements PaymentMethod and provides implementation for makePayment method
class Card implements PaymentMethod{
  @override
  void makePayment() {
    print("Make your payment through card");
  }
}

// PayPal class implements PaymentMethod and provides implementation for makePayment method
class PayPal implements PaymentMethod{
  @override
  void makePayment() {
    print("Make payment through paypal");
  }
}

// BankTransfer class implements PaymentMethod and provides implementation for makePayment method
class BankTransfer implements PaymentMethod{
  @override
  void makePayment() {
    print("Make payment through bank transfer");
  }
}

// checkOut function takes a PaymentType and makes payment using the appropriate method
void checkOut(PaymentType paymentType) {
  PaymentMethod paymentMethod = PaymentMethod(paymentType);
  paymentMethod.makePayment();
}

// Main function of the program, it calls the checkOut function with PaymentType.paypal as the payment method
void main() {
  checkOut(PaymentType.paypal);
}
Note: Implementation acts like an interface, while extends act like a base class in Dart.
What are the advantages of using a factory method over the old code?
You might be wondering what are the advantages of using a factory method over the old code, so here are some.
- Decoupling: In the original code, the checkout function is tightly linked to the specific payment classes (Card, PayPal, BankTransfer). In the revised code, this function only interacts with the PaymentMethod interface, reducing dependencies and making the code more modular.
- Flexibility: The original code required updating the checkout function whenever a new payment method was added. The revised code uses a factory method, which allows additional payment methods to be readily added without modifying the current code.
- Maintainability: The original code scatters the logic for creating payment methods throughout the checkout function. The new code consolidates this logic into the PaymentMethod factory, making it easier to maintain and update.
- Polymorphism: The original code doesn't take advantage of Dart's support for polymorphism. The updated code allows the checkOut method to interact with any object that implements the PaymentMethod interface.
- Use of Enum: The original code represents payment types with strings, which can result in mistakes due to typos. The rewritten code incorporates an enum, making it safer and easier to understand.
When To Use Factory Method Design Pattern?
- Dynamic Creation: If you're writing a program that requires you to produce many types of objects while it's running, and these objects are all comparable in some manner (they have a common interface), you can use the Factory Method.
- Subclass Determination: Sometimes you have a primary class, but you want its subclasses (smaller classes that fall under the main class) to select what kinds of objects to create. The Factory Method can help with this.
- Delegation: If you want to keep your main class simple and easy to understand, you can delegate (assign) the work of object creation to smaller helper classes. In this way, each class has its own set of responsibilities, making the code easier to manage.
- Complex Creation: If creating an object requires a lot of steps or repetitive code, you can utilize the Factory Method to make the process easier. It centralizes (consolidates) the creation process, making your code clearer and more maintainable.
The disadvantage of the Factory Method
- Complexity: The Factory Method might complicate your code, particularly if you have several different types of objects (subclasses).
- Code Changes: If you add additional sorts of objects, you may have to modify the Factory Method, which can be inconvenient.
- Debugging: If something goes wrong while creating an object, it may be more difficult to diagnose the problem because the factory method hides the details of how objects are made.
- Dependency: Your code can become too reliant on the Factory Method for creating objects. If you need to change how objects are made, it can be difficult because your code is tied to the Factory Method.
An Example of Factory Method In Flutter
Let's learn how to implement the Factory Method design pattern in Flutter. In this example, we will create a button widget that will change its style depending on the platform it is running on. For instance, if the platform is Android, the widget will render an Android button. Similarly, if the platform is iOS, the widget will render an iOS button.
// Importing necessary Flutter packages
import 'package:flutter/cupertino.dart';
import 'package:flutter/material.dart';

// Entry point of the Flutter application
void main() {
 runApp(const MyApp());
}
// MyApp is the root widget of the application
class MyApp extends StatelessWidget {
 const MyApp({super.key});
 // This method builds the widget tree for MyApp
 @override
 Widget build(BuildContext context) {
   return MaterialApp(
     debugShowCheckedModeBanner: false,
     title: 'Flutter Demo',
     theme: ThemeData(
       colorScheme: ColorScheme.fromSeed(seedColor: Colors.deepPurple),
       useMaterial3: true,
     ),
     home: const HomePage(),
   );
 }
}
// HomePage is the home screen of the application
class HomePage extends StatelessWidget {
 const HomePage({super.key});
 // This method builds the widget tree for HomePage
 @override
 Widget build(BuildContext context) {
   return Scaffold(
     appBar: AppBar(
       title: const Text('Factory Method Example'),
     ),
     body: Center(
       child: AppButton(Theme.of(context).platform).build(
           context: context,
           child: const Text('Button'),
           onPressed: () {
             print("Button clicked");
           }),
     ),
   );
 }
}
// AppButton is an abstract class that defines a factory method for creating platform-specific buttons
abstract class AppButton {
 factory AppButton(TargetPlatform platform) {
   switch (platform) {
     case TargetPlatform.android:
       return AndroidButton();
     case TargetPlatform.iOS:
       return IOSButton();
     default:
       return AndroidButton();
   }
 }
 // This method builds the platform-specific button
 Widget build(
     {required BuildContext context,
     required Widget child,
     required VoidCallback onPressed});
}
// AndroidButton is a concrete implementation of AppButton for Android
class AndroidButton implements AppButton {
 @override
 Widget build(
     {required BuildContext context,
     required Widget child,
     required VoidCallback onPressed}) {
   return ElevatedButton(
     onPressed: onPressed,
     child: child,
   );
 }
}
// IOSButton is a concrete implementation of AppButton for iOS
class IOSButton implements AppButton {
 @override
 Widget build(
     {required BuildContext context,
     required Widget child,
     required VoidCallback onPressed}) {
   return CupertinoButton(
     onPressed: onPressed,
     child: child,
   );
 }
}
You can access the AppButton like this
AppButton(Theme.of(context).platform).build(
   context: context,
   child: const Text('Button'),
   onPressed: () {
     //onpress logic will go here
   })
Theme.of(context).platform dynamically detects the current platform
Conclusion
The Factory Method design pattern is an effective tool in a developer's arsenal. It encapsulates the complexity of object creation and improves code flexibility, maintainability, and scalability. It allows subclasses to choose which class to instantiate, encouraging loose coupling.
However, as with any tool, it should be handled with caution. Overuse can cause needless complexity and make the code more difficult to understand and debug. It's critical to understand the problem before using the Factory Method. If you like my articles, you can connect with me on LinkedIn and say hi.
If you want to read more about Design Patterns in Flutter, the next articles are listed below in this series.
Join the conversation! Your thoughts help the community grow.