

Background
There is often a need in a project's reporting module to export a Grid View to a HTML File, so by considering that requirement I decided to write this article especially focusing on beginners and those who want to learn how to export a Grid View to HTML file using ASP.NET C#.
Now before creating the application, let us create a table named employee in a database from where we show the records in a Grid View, the table has the following fields (shown in the following image):
Now before creating the application, let us create a table named employee in a database from where we show the records in a Grid View, the table has the following fields (shown in the following image):
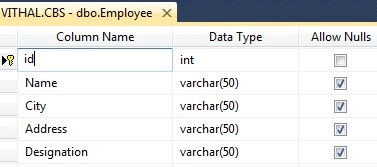
I hope you have created the same type of table.
Now create the project as:
- "Start" - "All Programs" - "Microsoft Visual Studio 2010".
- "File" - "New Project" - "C#" - "Empty Project" (to avoid adding a master page).
- Provide the Project name such as ExportGridToHTML or another as you wish and specify the location.
- Then right-click on Solution Explorer and select "Add New Item" then select Default.aspx page.
- One Button and a grid view.
Now the Default.aspx source code will be as follows:
- <%@ Page Language="C#" AutoEventWireup="true" CodeBehind="Default.aspx.cs" Inherits="ExportGridviewToHTML.Default" %>
- <!DOCTYPE html PUBLIC "-//W3C//DTD XHTML 1.0 Transitional//EN" "http://www.w3.org/TR/xhtml1/DTD/xhtml1-transitional.dtd">
- <html>
- <head id="Head1" runat="server">
- <title></title>
- </head>
- <body bgcolor="Silver">
- <form id="form1" runat="server">
- <br />
- <h2 style="color: #808000; font-size: x-large; font-weight: bolder;">
- Article by Vithal Wadje</h2>
- <br />
- <div>
- <asp:GridView ID="GridView1" AutoGenerateColumns="false" runat="server" CellPadding="6"
- ForeColor="#333333" GridLines="None">
- <AlternatingRowStyle BackColor="White" />
- <EditRowStyle BackColor="#7C6F57" />
- <FooterStyle BackColor="#1C5E55" Font-Bold="True" ForeColor="White" />
- <HeaderStyle BackColor="#1C5E55" Font-Bold="True" ForeColor="White" />
- <PagerStyle BackColor="#666666" ForeColor="White" HorizontalAlign="Center" />
- <RowStyle BackColor="#E3EAEB" />
- <SelectedRowStyle BackColor="#C5BBAF" Font-Bold="True" ForeColor="#333333" />
- <SortedAscendingCellStyle BackColor="#F8FAFA" />
- <SortedAscendingHeaderStyle BackColor="#246B61" />
- <SortedDescendingCellStyle BackColor="#D4DFE1" />
- <SortedDescendingHeaderStyle BackColor="#15524A" />
- <Columns>
- <asp:BoundField DataField="id" HeaderText="id" />
- <asp:BoundField DataField="Name" HeaderText="Name" />
- <asp:BoundField DataField="City" HeaderText="City" />
- <asp:BoundField DataField="Address" HeaderText="Address" />
- <asp:BoundField DataField="Designation" HeaderText="Designation" />
- </Columns>
- </asp:GridView>
- <br />
- <asp:Button ID="Button1" runat="server"
- Text="Export To HTML" OnClick="Button1_Click" />
- </div>
- </form>
- </body>
- </html>
If you are a beginner and don't understand in detail how to bind a Grid View from a database then refer to my following article.
Now, for this article create the following function in the default.aspx.cs page to bind the Grid View:
- private void Bindgrid()
- {
- connection();
- query = "select *from Employee";//not recommended this i have written just for example,write stored procedure for security
- com = new SqlCommand(query, con);
- SqlDataAdapter da = new SqlDataAdapter(query, con);
- DataSet ds = new DataSet();
- da.Fill(ds);
- GridView1.DataSource = ds;
- GridView1.DataBind();
- con.Close();
- }
Now, call the preceding function on page load as:
- protected void Page_Load(object sender, EventArgs e)
- {
- if (!IsPostBack)
- {
- Bindgrid();
- }
- }
Now create the following function to export the Grid View to HTML File:
- private void ExportGridToHTML()
- {
- HtmlForm form = new HtmlForm();
- GridView1.AllowPaging = false;
- Bindgrid();
- Response.ClearContent();
- Response.AddHeader("content-disposition", string.Format("attachment; filename=VithalWadje.html"));
- Response.Charset = "";
- Response.ContentType = "text/html";
- StringWriter sw = new StringWriter();
- HtmlTextWriter htw = new HtmlTextWriter(sw);
- form.Attributes["runat"] = "server";
- form.Controls.Add(GridView1);
- this.Controls.Add(form);
- Form.RenderControl(htw);
- Response.Write(sw.ToString());
- Response.Flush();
- Response.End();
- }
We have created the preceding function to export the GridView to a HTML file. Now call the preceding function on the Export HTML button click as:
- protected void Button1_Click(object sender, EventArgs e)
- {
- ExportGridToHTML();
- }
The entire code of the default.aspx page will look as follows:
- using System;
- using System.IO;
- using System.Data;
- using System.Threading;
- using System.Data.SqlClient;
- using System.Configuration;
- using System.Text;
- using System.Web.UI.WebControls;
- using System.Web.UI.HtmlControls;
- using System.Web.UI;
- namespace ExportGridviewToHTML
- {
- public partial class Default : System.Web.UI.Page
- {
- private SqlConnection con;
- private SqlCommand com;
- private string constr, query;
- private void connection()
- {
- constr = ConfigurationManager.ConnectionStrings["getconn"].ToString();
- con = new SqlConnection(constr);
- con.Open();
- }
- protected void Page_Load(object sender, EventArgs e)
- {
- if (!IsPostBack)
- {
- Bindgrid();
- }
- }
- private void Bindgrid()
- {
- connection();
- query = "select *from Employee";//not recommended this i have written just for example,write stored procedure for security
- com = new SqlCommand(query, con);
- SqlDataAdapter da = new SqlDataAdapter(query, con);
- DataSet ds = new DataSet();
- da.Fill(ds);
- GridView1.DataSource = ds;
- GridView1.DataBind();
- con.Close();
- }
- protected void Button1_Click(object sender, EventArgs e)
- {
- ExportGridToHTML();
- }
- private void ExportGridToHTML()
- {
- HtmlForm form = new HtmlForm();
- GridView1.AllowPaging = false;
- Bindgrid();
- Response.ClearContent();
- Response.AddHeader("content-disposition", string.Format("attachment; filename=VithalWadje.html"));
- Response.Charset = "";
- Response.ContentType = "text/html";
- StringWriter sw = new StringWriter();
- HtmlTextWriter htw = new HtmlTextWriter(sw);
- form.Attributes["runat"] = "server";
- form.Controls.Add(GridView1);
- this.Controls.Add(form);
- Form.RenderControl(htw);
- Response.Write(sw.ToString());
- Response.Flush();
- Response.End();
- }
- }
- }
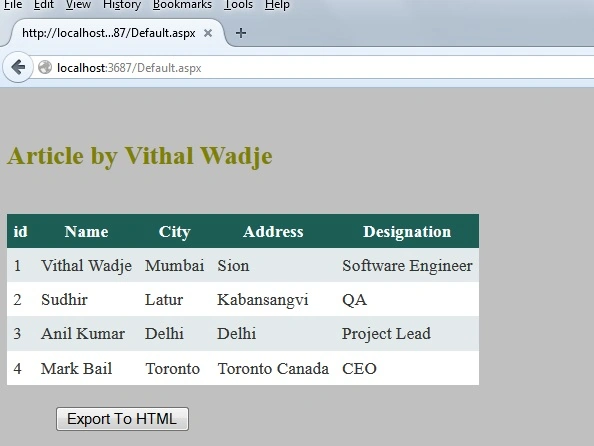
Now click on the export text button, the following popup will appear:
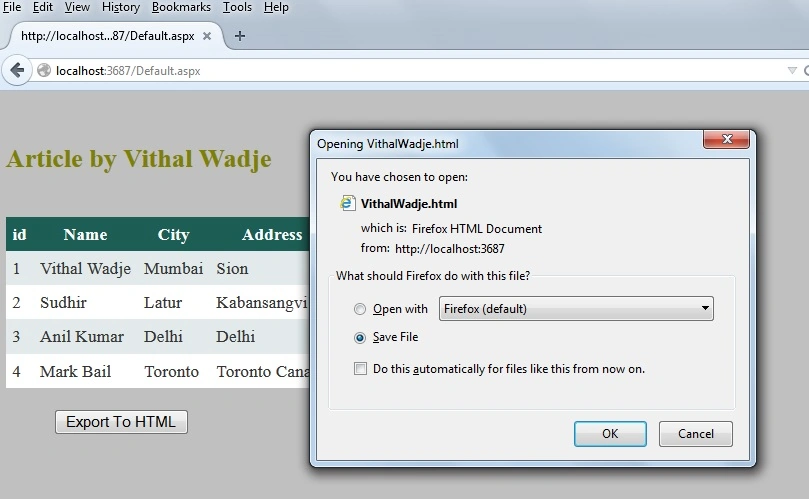
Now click on the button by the selection option. Open it or save it on your system, to see that I will save it on my Desktop as:

Now double-click on the above file, then the Exported Grid view will look like as follows:
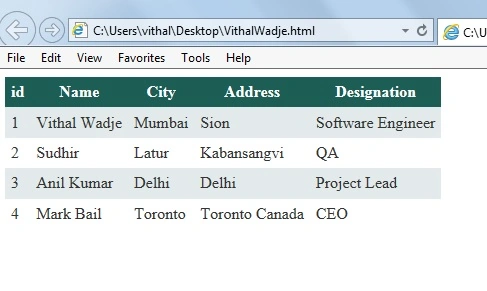
Now you see the Grid View exported to the HTML file and the Exported Grid view records we can see offline.
Notes
I hope this article is useful for all readers, if you have any suggestion then please contact me including beginners also.
Notes
- Download the Zip file from the attachment for the full source code of the application.
- Change the connection string in the web.config file to specify your server location.
I hope this article is useful for all readers, if you have any suggestion then please contact me including beginners also.
Nordine NordinePosted Jun 16, 2021, 12:54 PM
Very nice and interesting solution . Thanks a lot.
Vithal WadjePosted Nov 23, 2014, 11:30 PM
thanks
Manish Kumar ChoudharyPosted Nov 23, 2014, 11:11 PM
nice..