

We are going to use EPPLus library in this article. It is an open source library and very easy to use for developers.
EPPlus supports many properties like cell ranges, cell styling (border, color, fill, font, number, alignments), charts, pictures, shapes, comments, tables, protection, encryption, pivot tables, data validation, conditional formatting, formula calculation etc.
We have to follow some simple steps for using EPPlus library in C#.
Step 1
We have to install EPPlus through manage NuGet packages, as shown below.
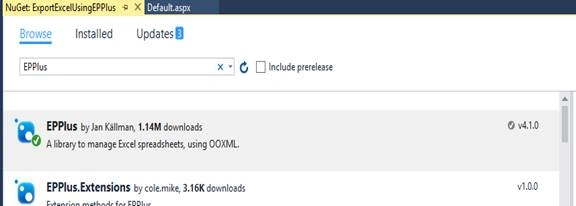
We can install it, using Package Manager console with the line given below.
Install-Package EPPlus
Step 2
Now, add the line given below in .ASPX page.
- <asp:Button ID="ExportExcel" runat="server" Text="Export Excel" OnClick="ExportExcel_Click" />
Step 3
Now, add the two namespaces given below on the top of .CS page.
- using OfficeOpenXml;
- using OfficeOpenXml.Style;
- using System.IO;
Step 4
Create a method for exporting Excel file by clicking Export button and writing the logic.
- protected void ExportExcel_Click(object sender, EventArgs e)
- {
- var students = new []
- {
- new {
- Id = "101", Name = "Vivek", Address = "Hyderabad"
- },
- new {
- Id = "102", Name = "Ranjeet", Address = "Hyderabad"
- },
- new {
- Id = "103", Name = "Sharath", Address = "Hyderabad"
- },
- new {
- Id = "104", Name = "Ganesh", Address = "Hyderabad"
- },
- new {
- Id = "105", Name = "Gajanan", Address = "Hyderabad"
- },
- new {
- Id = "106", Name = "Ashish", Address = "Hyderabad"
- }
- };
- ExcelPackage excel = new ExcelPackage();
- var workSheet = excel.Workbook.Worksheets.Add("Sheet1");
- workSheet.TabColor = System.Drawing.Color.Black;
- workSheet.DefaultRowHeight = 12;
- //Header of table
- //
- workSheet.Row(1).Height = 20;
- workSheet.Row(1).Style.HorizontalAlignment = ExcelHorizontalAlignment.Center;
- workSheet.Row(1).Style.Font.Bold = true;
- workSheet.Cells[1, 1].Value = "S.No";
- workSheet.Cells[1, 2].Value = "Id";
- workSheet.Cells[1, 3].Value = "Name";
- workSheet.Cells[1, 4].Value = "Address";
- //Body of table
- //
- int recordIndex = 2;
- foreach(var student in students) {
- workSheet.Cells[recordIndex, 1].Value = (recordIndex - 1).ToString();
- workSheet.Cells[recordIndex, 2].Value = student.Id;
- workSheet.Cells[recordIndex, 3].Value = student.Name;
- workSheet.Cells[recordIndex, 4].Value = student.Address;
- recordIndex++;
- }
- workSheet.Column(1).AutoFit();
- workSheet.Column(2).AutoFit();
- workSheet.Column(3).AutoFit();
- workSheet.Column(4).AutoFit();
- string excelName = "studentsRecord";
- using(var memoryStream = new MemoryStream()) {
- Response.ContentType = "application/vnd.openxmlformats-officedocument.spreadsheetml.sheet";
- Response.AddHeader("content-disposition", "attachment; filename=" + excelName + ".xlsx");
- excel.SaveAs(memoryStream);
- memoryStream.WriteTo(Response.OutputStream);
- Response.Flush();
- Response.End();
- }
- }
In this method, we are taking static values for the students data but in real time, we can use database call and foreach loop for iteration of each record.
In the lines given below, we are creating an instance of ExcelPackage and with that object, we are giving the sheet name as Sheet1.
- ExcelPackage excel = new ExcelPackage();
- var workSheet = excel.Workbook.Worksheets.Add("Sheet1");
The properties are given below of the first row of Excel sheet.
- workSheet.Row(1).Height = 20;
- workSheet.Row(1).Style.HorizontalAlignment = ExcelHorizontalAlignment.Center;
- workSheet.Row(1).Style.Font.Bold = true;
The code for the first row is given below; i.e., header row for Excel sheet.
- workSheet.Cells[1, 1].Value = "S.No";
- workSheet.Cells[1, 2].Value = "Id";
- workSheet.Cells[1, 3].Value = "Name";
- workSheet.Cells[1, 4].Value = "Address";
We are using foreach loop for inserting the student record into Excel sheet, Here, we are using recordIndex for inserting rows for Excel sheet. We already inserted the 1st row as shown in earlier lines of code, so it will start with the 2nd row due to which we assigned recordIndex = 2 in the lines given below.
- int recordIndex = 2;
- foreach(var student in students)
- {
- workSheet.Cells[recordIndex, 1].Value = (recordIndex - 1).ToString();
- workSheet.Cells[recordIndex, 2].Value = student.Id;
- workSheet.Cells[recordIndex, 3].Value = student.Name;
- workSheet.Cells[recordIndex, 4].Value = student.Address;
- recordIndex++;
- }
By default, the column width is not set to auto fit for the content of the range, so we are using AutoFit() method here. We can also use AutoFit (double MinimumWidth) and AutoFit (double MinimumWidth, double MaximumWidth) as per our requirement.
- workSheet.Column(2).AutoFit();
- workSheet.Column(3).AutoFit();
- workSheet.Column(4).AutoFit();
We can give our own name to Excel file, as shown below.
- Response.AddHeader("content-disposition", "attachment; filename=" + excelName + ".xlsx");
Here, we can see the screenshot given below for Excel file.
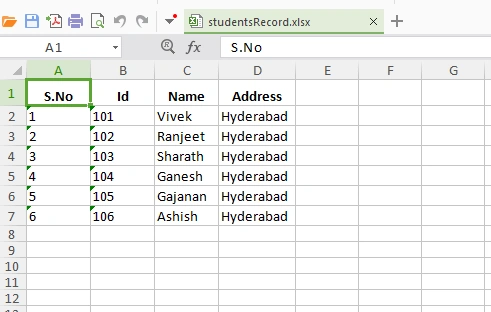
In this easy way, we can export Excel files in ASP.NET, using EPPlus library.
Fozia KhanPosted Apr 20, 2020, 12:50 PM
Nice Article, thanks for sharing but I am getting error "The name 'Response' does not exist in current context". Could anybody help me in this, am I doing some silly mistake. I have already added the namespaces.
Allison PaivaPosted Feb 7, 2019, 4:54 AM
Can anyone please provide the code for exporting data from Excel to SQL Server
JackPosted Nov 27, 2017, 9:01 AM
Nice Article, Keep Sharing.....
shpat ademiPosted Aug 31, 2017, 1:36 AM
Thanks. Nice article. How can we increase index of cell dynamically. For exampel: int recordIndex = 2; foreach(var student in students) { int cellIndex = 1; workSheet.Cells[recordIndex, index].Value = (recordIndex - 1).ToString(); index ++; workSheet.Cells[recordIndex, 2].Value = student.Id; index++; }
Michel DemersPosted Jun 14, 2017, 4:02 PM
Would you know how we can manage the acute accent and grave accent? I tried with the Response.ContentEncoding stuff with no success