

Using Google Maps in C# Xamarin.Android Application
Like any other Android application built in java, Xamarin also provides you the flexibility of using Google Maps in your Xamarin.Android app. You can use the Maps feature in Android, Windows phone and iPhone, as Xamarin is cross platform development IDE but native API implementation is required for these three target platforms.
This means that shared code to use map control will be written in PCL project whereas a call to use Maps API will be native with each platform. In this article, I ‘ll be discussing how you can use Google Maps in your Android application.
There are the following steps involved in using Google Maps in Xamarin.Andorid.
- Initialization
- Platform Specific API Implementation
- Using Map control in C#
Initialization
Here, I presume that you have created a Xamarin.Forms (Portable class library) project before proceeding.
- To use Google Maps in your project, add Xamarin.Forms.Maps package from NuGet Package Manager. To add this package, right click on your project, go to Manage NuGet Packages, search and install package from there. It will take a few minutes for installing the package.
- After adding the package, some code initialization is required in Android project. You must pass the same parameters as Forms.Init in MainActivity.cs class of droid project, as shown in the screenshot below.
Xamarin.FormsMaps.Init(this, bundle)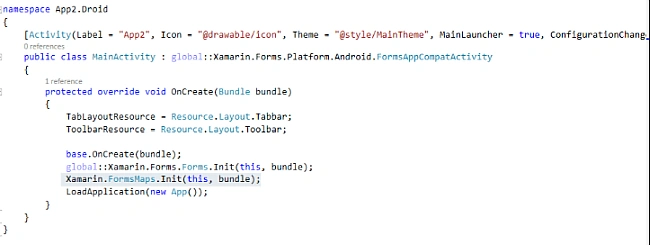
Platform Specific API Implementation
- In this section, let us implement API call for Android project. To use Google Maps API, you must generate an API key and add it to your project. This task is going to be the heart of your project and needs to be performed carefully.
- To generate API key, you need to register with Google Maps API by creating a project in Google API console. KeyStore is a file that is used to sign application and can be used in both debugged and released builds.To request API key from Google, you will have to generate SHA-1 fingerprint of debug.keystore file which can be found at the following path.
Windows - C:\Users\[USERNAME]\AppData\Local\Xamarin\Mono for Android\debug.keystore
- Information about a keystore file is needed to know about SHA-1 fingerprint and this is done by running a keytool command from the jdk. The path for this tool is given below:
Windows - C:\Program Files (x86)\Java\jdk[VERSION]\bin\keytool.exe
- Keytool needs the following command to generate SHA-1 fingerprint
keytool -list -v -keystore [STORE FILENAME] -alias [KEY NAME] -storepass [STORE PASSWORD] -keypass [KEY PASSWORD]
- To generate SHA-1 fingerprint of debug.keystore file, open command prompt and write the following command and hit enter
"C:\Program Files (x86)\Java\jdk1.7.0_71\bin\keytool.exe" -list -v -keystore "%LocalAppData% \Xamarin\Mono for Android\debug.keystore" -alias androiddebugkey -storepass android -keypass android
Note
JDK version may be different on your PC and you need to verify it by following the path written above.
- Following screenshot is the result of executing command in Command Prompt. You can now find the certificate fingerprint that is to be used while generating API key of Google Maps.
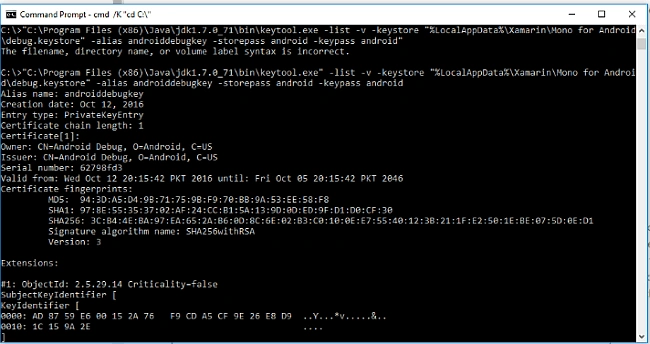
- Please take note of the SHA-1 address. After you have generated SHA-1, create a new project in Google APIs console. Doing so will add the Google Maps Android API v2 to your project.
- Navigate to the following link, sign in with your Google account and create a project as shown in the screenshot.
https://console.developers.google.com/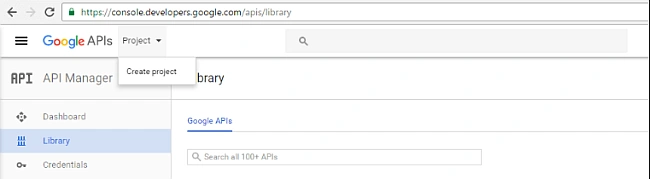
- Give your project a name. Better use the same name that you used to create Xamarin Forms solution. Google will generate a new Unique ID for your project as shown below.
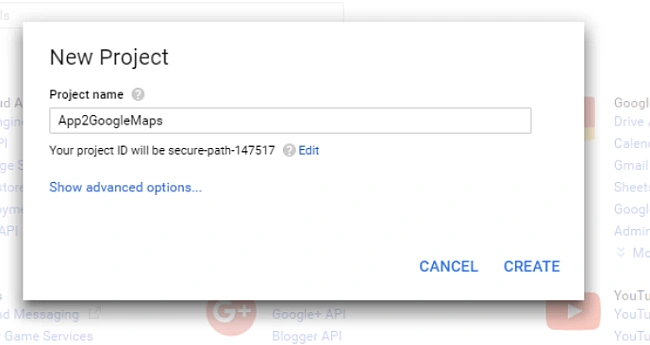
- After project is created, you will be directed to API manager page. Select the API that you want to use in your project. I ‘ll click on Google Maps Android APIs.
- After choosing Google Maps Android APIs, you will be taken to Google Maps Android API dashboard where you have to Enable API as shown below.
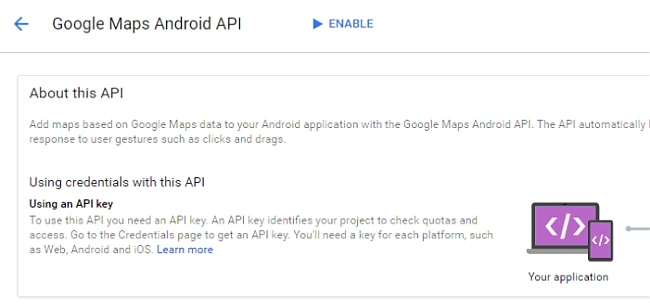
- After enabling this API, you have to check your credentials. To do so, click Go to Credentials.

- Click “What credentials do I need” in the Credentials page as shown below.
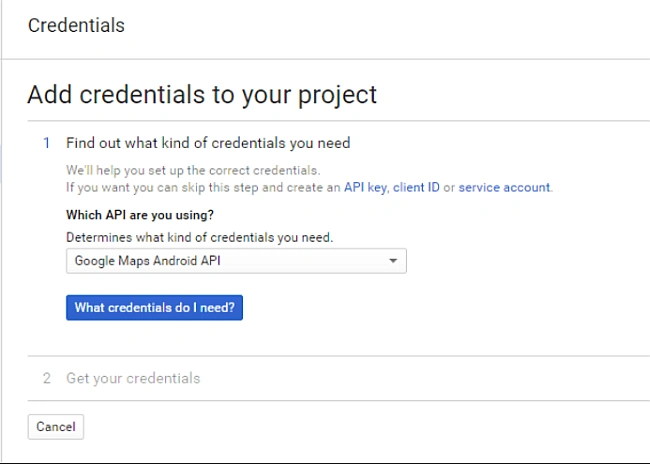
- After clicking this button, your API key will be generated. Next you have to restrict this key to Android apps if you are building for Android.
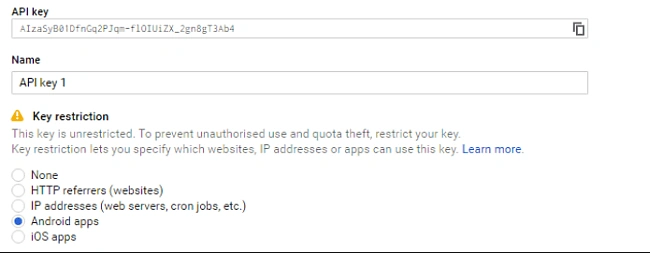
- To restrict the usage of this API key to only your Android apps, you have to click on add package name and fingerprint. Key will be unrestricted and unsecured if you do not perform this step. It is recommended to perform key restriction. I’ll click on add package name and fingerprint.
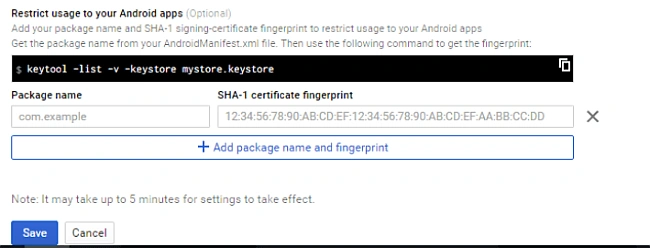
- Give your solution package name and SHA-1 fingerprint in the above two fields and hit save button. You will then be directed to your API’s page.
- Next step is to add the API key to your Android project. To do so, open AndroidManifest.xml file where “YOUR_API_KEY” is to be replaced with the API key generated in the previous steps
- <?xml version="1.0" encoding="utf-8"?>
- <manifest xmlns:android="http://schemas.android.com/apk/res/android" package="App2.Droid" android:installLocation="auto">
- <uses-sdk android:minSdkVersion="15" />
- <application android:label="App2.Droid">
- <meta-data android:name="com.google.android.maps.v2.API_KEY" android:value="AIzaSyDolji09BGL4McCrniUmldjTYS7bniPYGw" />
- </application>
- </manifest>
- Without a valid API key the maps control will display as a grey box on Android.
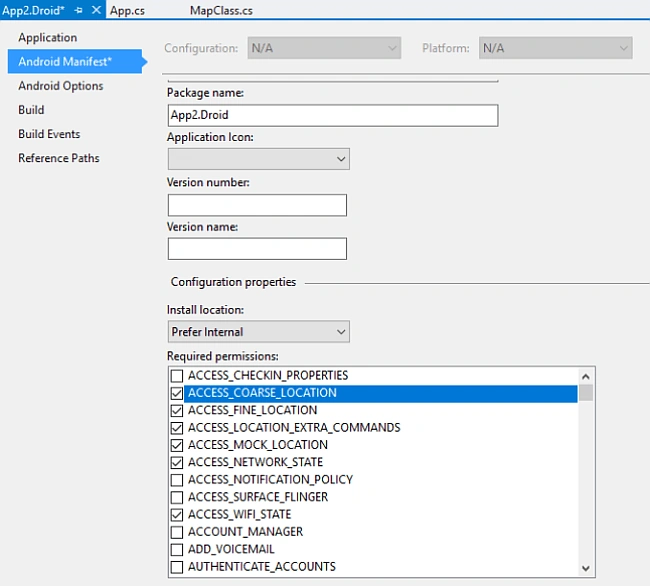
- Next, you have to grant special permissions to your app so that it may use internet, wifi, location, and CoarseLocation services from within your Android device. To do so, right click on your Android project and go to properties. Click on Android Manifest tab. A table will be visible where you have to check the below mentioned permissions.
- AccessCourseLocation
- AccessFineLocation
- AccessLocationExtraCommands
- AccessMockLocation
- AccessNetworkState
- AccessWifiState
- AccessInternet
Using Map control in C#
Next, create a class in PCL project and don’t forget to add Xamarin.Forms.Maps package in PCL project. Given below is a sample code to use map control in C#. You can use it in your project to use map control.
Remember, if valid API key is not used, map control will just display grey box.
- class MapClass: ContentPage {
- public MapClass() {
- var map = new Map(
- MapSpan.FromCenterAndRadius(
- new Position(37, -122), Distance.FromMiles(0.3))) {
- IsShowingUser = true,
- HeightRequest = 100,
- WidthRequest = 960,
- VerticalOptions = LayoutOptions.FillAndExpand
- };
- map.MapType = MapType.Street;
- var slider = new Slider(1, 18, 1);
- slider.ValueChanged += (sender, e) => {
- var zoomLevel = e.NewValue; // between 1 and 18
- var latlongdegrees = 360 / (Math.Pow(2, zoomLevel));
- map.MoveToRegion(new MapSpan(map.VisibleRegion.Center, latlongdegrees, latlongdegrees));
- };
- var position = new Position(37, -122); // Latitude, Longitude
- var pin = new Pin {
- Type = PinType.Place,
- Position = position,
- Label = "custom pin",
- Address = "custom detail info"
- };
- map.Pins.Add(pin);
- var stack = new StackLayout {
- Children = {
- map,
- slider
- }
- };
- Content = stack;
- }
- }
- Hybrid
- Satellite
- Street (the default)
Now, it’s time to test our Maps application. I’ll recommend to test it using a real Android device because testing in emulator will cause an issue. Emulator does not have Google Play services installed on it and Google Maps heavily rely on it. App in emulator will not run without Google Play services. To install Google play services on your emulator, you can get help from this link.
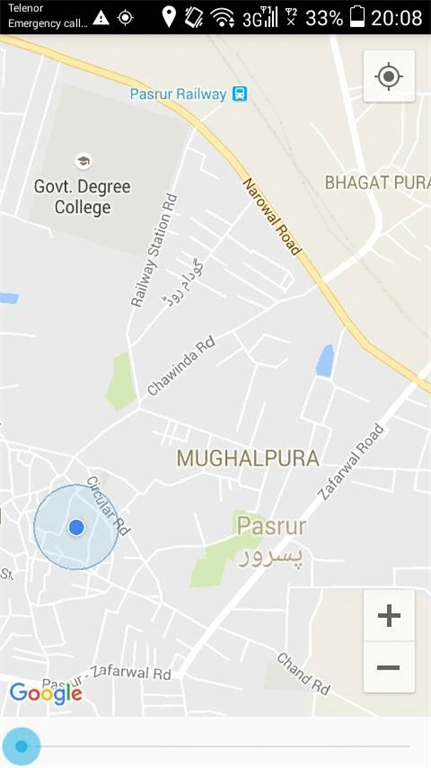
I tested my App2 Android application on Huawei y625. It worked perfectly fine and produced the results shown in the screenshot.
I hope that this tutorial has helped you to get your hands dirty with Google Maps in Xamarin.Android applications and if you have got any issues, please post in comments below. I’ll be looking forward to answering them all.
Thank you
shahid zammanPosted Sep 12, 2022, 3:11 PM
AOA. Dear brother. I am new to Xamarin. I followed all the above steps. everything is ok. but still grey color map. API is added. There is no error. In the output window there is a message. java.lang.SecurityException: GoogleCertificatesRslt: not allowed: pkg=
Ronak ShetiyaPosted May 16, 2018, 6:42 AM
How can i show the navigation path from A to B