

Today, I will explain to you about binding the radio button in WPF, using MVVM pattern. In my previous article, you learned about combo box binding in WPF using MVVM pattern. Before we start, I want to ask have you ever gone through the concept of INotifyPropertyChanged and ICommand interface? It's the most important part of the MVVM pattern, so if you have any confusion regarding both these interfaces, please read my previous article, whose links are given below.
We will make one example in which we display four radio buttons and one text box. When the user selects any radio button, we have to display this radio button content in text box, so lets start.
- Create simple WPF Application with four radio buttons and one text box, as shown below.
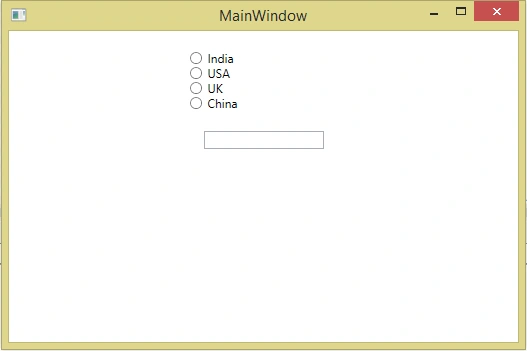
Code - MainWindow.xaml
- <Window x:Class="MVVM_RadioButton.View.MainWindow"
- xmlns="http://schemas.microsoft.com/winfx/2006/xaml/presentation"
- xmlns:x="http://schemas.microsoft.com/winfx/2006/xaml"
- Title="Main Window" Height="350" Width="525">
- <StackPanel Orientation="Vertical" Margin="20">
- <RadioButton Width="150" Content="India" Name="cbIndia" IsChecked="True"></RadioButton>
- <RadioButton Width="150" Content="USA" Name="cbUSA"></RadioButton>
- <RadioButton Width="150" Content="UK" Name="cbUK"></RadioButton>
- <RadioButton Width="150" Content="China" Name="cbChina"></RadioButton>
- <TextBox Width="120" Margin="20"></TextBox>
- </StackPanel>
- </Window>
- When a user changes the selection, we have to display its selected radio button content in the textbox, so first we have to command for the radio button selection change. In simple words, we have to create radio button selection, change event in Windows form Application but in MVVM pattern, we say that we have to create command for the same. Thus, we create the Relay Command class, which implements the ICommand interface. This is already learned in (ICommand Interface In MVVM - WPF) article.
Code - RelayCommand.cs
- public class RelayCommand:ICommand
- {
- Action<object> _executemethod;
- Func<object, bool> _canexecutemethod;
- public RelayCommand(Action<object> executemethod,Func<object,bool> canexecutemethod)
- {
- _executemethod = executemethod;
- _canexecutemethod = canexecutemethod;
- }
- public bool CanExecute(object parameter)
- {
- if (_canexecutemethod != null)
- {
- return _canexecutemethod(parameter);
- }
- else
- {
- return false;
- }
- }
- public event EventHandler CanExecuteChanged
- {
- add { CommandManager.RequerySuggested += value; }
- remove { CommandManager.RequerySuggested -= value; }
- }
- public void Execute(object parameter)
- {
- _executemethod(parameter);
- }
- }
- Now, we have to make one view-model class, which has one property ‘Name’ with Get and Set method. When the user changes the radio button selection, we update this property value and we bind this property to the textbox, so it will display the user selected radio button content into the text box.
- When we change the ‘Name’ property, we have to inform UI (view) to display the changes. We need INotifyPropertyChanged interface, so we implement this interface and fire the property change event when ‘Name’ value changes.
- public class ViewModel :INotifyPropertyChanged
- {
- private string _name;
- public string Name
- {
- get { return _name; }
- set
- {
- _name = value;
- OnPropertyChange("Name");
- }
- }
- public event PropertyChangedEventHandler PropertyChanged;
- private void OnPropertyChange(string propertyname)
- {
- if (PropertyChanged !=null)
- {
- PropertyChanged(this, new PropertyChangedEventArgs(propertyname));
- }
- }
- }
- As far as details of INotifyPropertyChanged interface are concerned, we have already learnt in the previous article (Explain INotifyPropertyChanged In WPF - MVVM).
Now, we create the ICommand property in view model class.
- public ICommand MyCommand { get; set; }
- We create two method canexecute and execute, where canexecute decides to fire an execute method or not. It is an execute method, which contains the actual logic like assigning radio button value to the ‘Name’ property.
- private bool canexecutemethod(object parameter)
- {
- if (parameter != null)
- {
- return true;
- }
- else
- {
- return false;
- }
- }
- private void executemethod(object parameter)
- {
- Name = (string)parameter;
- }
- Now, we declare MyCommand in the constructor of the view-model class and pass these both methods to it.
Full Code - ViewModel.cs- public ViewModel()
- {
- MyCommand = new RelayCommand(executemethod, canexecutemethod);
- }
- public class ViewModel :INotifyPropertyChanged
- {
- public ICommand MyCommand { get; set; }
- private string _name;
- public string Name
- {
- get { return _name; }
- set
- {
- _name = value;
- OnPropertyChange("Name");
- }
- }
- public ViewModel()
- {
- MyCommand = new RelayCommand(executemethod, canexecutemethod);
- }
- public event PropertyChangedEventHandler PropertyChanged;
- private void OnPropertyChange(string propertyname)
- {
- if (PropertyChanged !=null)
- {
- PropertyChanged(this, new PropertyChangedEventArgs(propertyname));
- }
- }
- private bool canexecutemethod(object parameter)
- {
- if (parameter != null)
- {
- return true;
- }
- else
- {
- return false;
- }
- }
- private void executemethod(object parameter)
- {
- Name = (string)parameter;
- }
- }
- Now, move to the view(UI) side. First, we have to give view-model reference to the view, so we define the namespace for view-mode in the view.
- xmlns:viewmodel="clr-namespace:MVVM_RadioButton.ViewModel"
- Also, define Window resource property and give unique key to it.
- <Window.Resources>
- <viewmodel:ViewModel x:Key="vm"></viewmodel:ViewModel>
- </Window.Resources>
- Set data context property for the parent control (stack panel).
- <StackPanel Orientation="Vertical" DataContext="{Binding Source={StaticResource vm}}" Margin="20">
- Now, see the command property for the all four radio buttons.
Do the same for all four radio buttons.- <RadioButton
- Width="150"
- Content="India"
- Command="{Binding Path=MyCommand}"
- Name="cbIndia">
- </RadioButton>
- Also, set the command parameter property for the radio button and pass the radio button content value to it. Because whatever parameter you pass here, it will assign to ‘Name’ property in view model and it displays in the textbox, so here we pass name radio button content value as a parameter.
Do the same for all four radio buttons.- <RadioButton
- Width="150"
- Content="India"
- Command="{Binding Path=MyCommand}"
- Name="cbIndia"
- CommandParameter="{Binding ElementName=cbIndia, Path=Content}">
- </RadioButton>
- Now, we bind the ‘Name’ property to the text box.
Full Code - MainWindow.xaml- <TextBox
- Width="120"
- Margin="20"
- Text="{Binding Path=Name, Mode=TwoWay,UpdateSourceTrigger=PropertyChanged}">
- </TextBox>
- <Window x:Class="MVVM_RadioButton.MainWindow"
- xmlns="http://schemas.microsoft.com/winfx/2006/xaml/presentation"
- xmlns:x="http://schemas.microsoft.com/winfx/2006/xaml"
- xmlns:viewmodel="clr-namespace:MVVM_RadioButton.ViewModel"
- Title="MainWindow" Height="350" Width="525">
- <Window.Resources>
- <viewmodel:ViewModel x:Key="vm"></viewmodel:ViewModel>
- </Window.Resources>
- <StackPanel Orientation="Vertical" DataContext="{Binding Source={StaticResource vm}}" Margin="20">
- <RadioButton Width="150" Content="India" Command="{Binding Path=MyCommand}" Name="cbIndia" CommandParameter="{Binding ElementName=cbIndia, Path=Content}"></RadioButton>
- <RadioButton Width="150" Content="USA" Command="{Binding Path=MyCommand}" Name="cbUSA" CommandParameter="{Binding ElementName=cbUSA, Path=Content}"></RadioButton>
- <RadioButton Width="150" Content="UK" Command="{Binding Path=MyCommand}" Name="cbUK" CommandParameter="{Binding ElementName=cbUK, Path=Content}"></RadioButton>
- <RadioButton Width="150" Content="China" Command="{Binding Path=MyCommand}" Name="cbChina" CommandParameter="{Binding ElementName=cbChina, Path=Content}"></RadioButton>
- <TextBox Width="120" Margin="20" Text="{Binding Path=Name, Mode=TwoWay, UpdateSourceTrigger=PropertyChanged}"></TextBox>
- </StackPanel>
- </Window>
- Now, run the Application and check the output by changing the selection of the radio button.
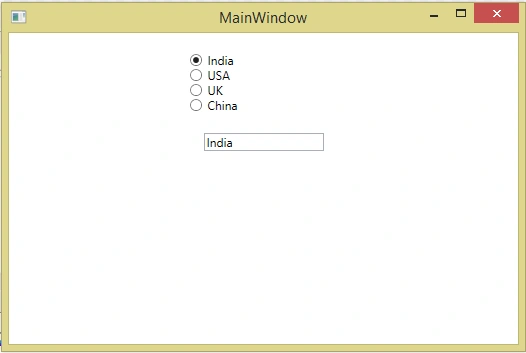
Thanks for reading my article. If you have any confusion, type it in the comment section.
Les PinterPosted Mar 15, 2023, 5:08 PM
I copied and pasted your code into a project, and the Textbox does not update. So I downloaded the ZIP file, and it contains code for a different project! Excellent way to start a career...
Orlando ReyesPosted Jan 18, 2021, 4:11 PM
After spent many hours reading dozen of articles and trying complex solutions, finally I found the best and simplest solution!! Thanks Nirav.
vinod mPosted Mar 11, 2018, 1:41 AM
This is my code I am getting empty display data
vinod mPosted Mar 11, 2018, 1:41 AM
Using System;using System.Collections.Generic; using System.Linq; using System.Text; using System.Threading.Tasks; using System.Windows; using System.Windows.Controls; using System.Windows.Data; using System.Windows.Documents; using System.Windows.Input; using System.Windows.Media; using System.Windows.Media.Imaging; using System.Windows.Shapes; using System.Data; using System.Data.SqlClient; namespace Q.View { /// <summary> /// Interaction logic for NewOrderView.xaml /// </summary> public partial class NewOrderView : Window { public NewOrderView() { InitializeComponent(); BindCheckBoxList(); } private void BindCheckBoxList() { string ListName = ""; SqlConnection con = new SqlConnection(); con.ConnectionString = "Data Source=DESKTOP-GC5TPQV;Initial Catalog=dagal;Persist Security Info=True;User ID=sa;Password=123;Connection Timeout=600"; con.Open(); SqlCommand cmd = new SqlCommand("select NewOrderListID,ItemCode,ItemName from MM2_NewOrderList where NewOrderListID > 0", con); SqlDataAdapter da = new SqlDataAdapter(cmd); DataTable dt = new DataTable(); da.Fill(dt); if (dt.Rows.Count > 0) { for (int i = 0; i < dt.Rows.Count; i++) { ListName = (dt.Rows[i]["ItemCode"].ToString()) + " - " + (dt.Rows[i]["ItemName"].ToString()); RadioButtonList.Items.Add((dt.Rows[i]["ItemCode"].ToString()) + " - " + (dt.Rows[i]["ItemName"].ToString())); } LoginView oldobj = new LoginView(); oldobj.Hide(); oldobj.Close(); } else { MessageBox.Show("Invalid Login please check username and password"); } } } }
Raj SPosted Feb 20, 2018, 12:41 PM
As a learner it helped me a lot .. Thank you :)