
In this tutorial, I'll teach you a quick and easy way to export/download `IEnumerable<T>` data into an Excel file in Asp.Net Core Backend. There are lots of tutorials available, but this tutorial will be super simple to implement and won't take more than 10 minutes of your time.
Before we proceed, install the following Nuget Package.
Fingers10.ExcelExport v1.0.0
Package Manager
PM> Install-Package Fingers10.ExcelExport
.Net CLI
dotnet add package Fingers10.ExcelExport
Generally, we always want to export lists of data into Excel in most cases. After analyzing this with many solutions available on the internet, I have come up with an easy approach to implement this functionality. I have done all the hard work in my Nuget Package - Fingers10.ExcelExport. All you need to do is to follow the below steps.
- Get your IEnumerable data from the database or service.
- I have created an Action Result named ExcelResult<T> in my package. Now in your action method/page handler make a call to this ExcelResult and pass your data, sheet name, and file name as parameters.
- That's it -- this will take care of processing your data and return it back to the browser as an Excel file.
- Your data can have any level of nesting.
- You can customize the Excel column header names using Data Annotations as explained below.
- The Excel will have columns displayed in the order of properties that you have in your data model.
Let's say we have a model like the below one. Note that we can have Nested Properties up to any level and they are displayed in Excel in the order we add the property in the class.
Root Model
public class DemoExcel
{
    public int Id { get; set; }
    public string Name { get; set; }
    public string Position { get; set; }
    [Display(Name = "Office")]
    public string Offices { get; set; }
    public DemoNestedLevelOne DemoNestedLevelOne { get; set; }
}
Nested level one model
public class DemoNestedLevelOne
{
    public short? Experience { get; set; }
    [DisplayName("Extn")]
    public int? Extension { get; set; }
    public DemoNestedLevelTwo DemoNestedLevelTwos { get; set; }
}
Nested level two model
public class DemoNestedLevelTwo
{
    [DisplayName("Start Date")]
    public DateTime? StartDates { get; set; }
    public long? Salary { get; set; }
}
Column Names
As mentioned earlier, Column names in Excel Export can be configured using the below attributes.
- * `[Display(Name = "")]`
- * `[DisplayName(“”)]`
If the above attributes are not used then the column name will default to property name.
Action Method
Here comes the cool part. Now in your action method, get your IEnumerable<T> data from the service and then return it as an ExcelResult<T> by specifying the Root Model sheet name and Excel file name.
public async Task<IActionResult> GetExcel()
{
    // Get you IEnumerable<T> data
    var results = await _demoService.GetDataAsync();
    return new ExcelResult<DemoExcel>(results, "Demo Sheet Name", "Fingers10");
}
Page Handler
The same goes for page handlers. Now in your page handler, get your IEnumerable<T> data from the service and then return it as an ExcelResult<T> by specifying the Root Model sheet name and Excel file name.
public async Task<IActionResult> OnGetExcelAsync()
{
    // Get you IEnumerable<T> data
    var results = await _demoService.GetDataAsync();
    return new ExcelResult<DemoExcel>(results, "Demo Sheet Name", "Fingers10");
}
Output
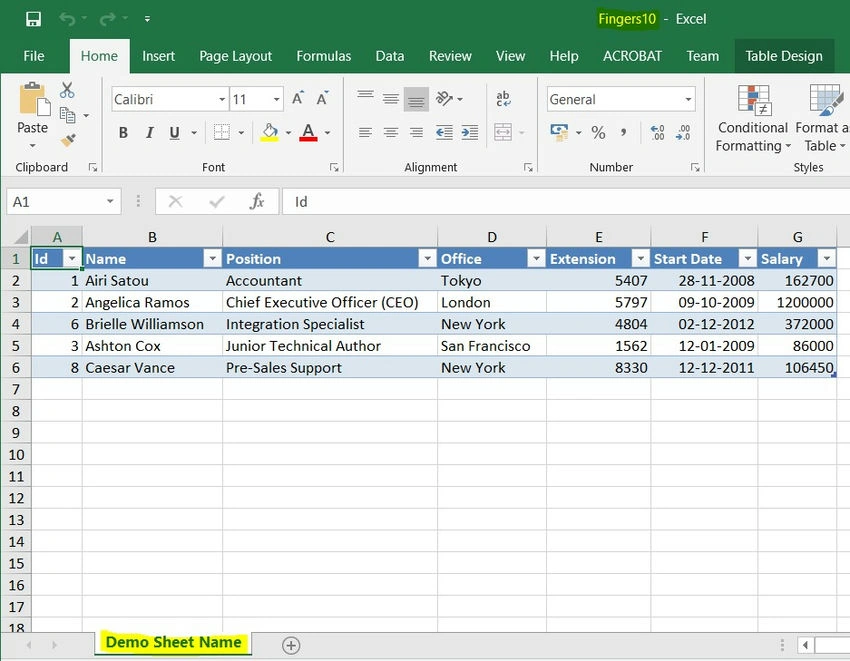
Now the Excel file will be downloaded as shown below,
If you have a look at the generated Excel, you can see that the columns are ordered the same as our data model. Id, Name, Position, and Office from DemoExcel class, and the last property in our DemoExcel class is a ComplexType which is DemoNestedLevelOne which in turn has Experience, Extension, and another ComplexType which is DemoNestedLevelTwoand Finally this has StartDate and Salary columns. The column order can be changed by changing the property order in your model classes.
Thanks for reading.
Full updated documentation can be found here on my GitHub Page - ExcelExport
Add a star to my repo if this saved you effort and time.
Share via LinkedIn, Twitter, Facebook, and WhatsApp to spread the knowledge.
sandip patelPosted Sep 5, 2022, 6:36 AM
Hi, I tried with latest 3.0.1 dll but export excel as blank excel.
Koen GalletPosted Feb 22, 2022, 11:40 AM
Hi, the documentation says "Please note: From v.2.0.0, simple properties in your models with [IncludeInReport] attribute will be displayed in excel report. You can add any level of nesting to your models using [NestedIncludeInReport] attribute." Does this mean this library does not work with Lists of nested properties? I'm only getting my toplevel data displayed in the excel file, but not the list of nested objects underneath. BEst regards, Koen
Soma DeyPosted Jul 31, 2020, 2:19 AM
I tried with theis dll.But Excel is generated as blank,though I'm getting data in list.Could you please guide why excel is blank?
Roger OspinaPosted Nov 17, 2019, 5:54 PM
Hi Abdul, I added an improvement to discriminate if a property must be included in the report or not. Can I contribute it in your Github project?
Roger OspinaPosted Nov 17, 2019, 2:55 PM
Hi Abdul, I hope you're great !! This is my situation ? I've made my development in the way that my actual view that i'm showing in a table, is the same view that i'm exporting to the Excel file. For different reasons I have properties that make some function but I don't include them in the view. I really don't see so practial, split both in different viewModels. What do you think ? Thanks man, Have a good day
Roger OspinaPosted Nov 16, 2019, 11:28 AM
Hi body, can u tell me how can I omit a property of the Export action ? Thanks
Roger OspinaPosted Nov 15, 2019, 11:00 PM
Ey man, you're a crack !!! Thanks a lot, I've been looking for a practical way, and this is the best. I mean, i'm not a lazy developer, but "why reinvent the wheel?" Thanks again =D
Salman ShaikhPosted Oct 20, 2019, 7:52 AM
Awesome !!
Chittaranjan SwainPosted Oct 19, 2019, 2:57 AM
Nice one....