

This article will brief you about setting up the Azure Active Directory in the Azure portal and integrate the Azure AD Authentication in our project. First, let's create an Azure Active Directory application that helps in protecting our web app.
Prerequisites
Steps to Configure this are,
- Create a Web API project with Microsoft Identity Platform - Authentication type
- Register an Azure AD (AAD) app for the Web API.
- Create a Scope for App registration (API)
- Update the Web API Project to use Azure AD Authentication.
- Configure the Redirect URL's (If you are testing with Postman)
- Create a Client Secret.
Create a Web API project
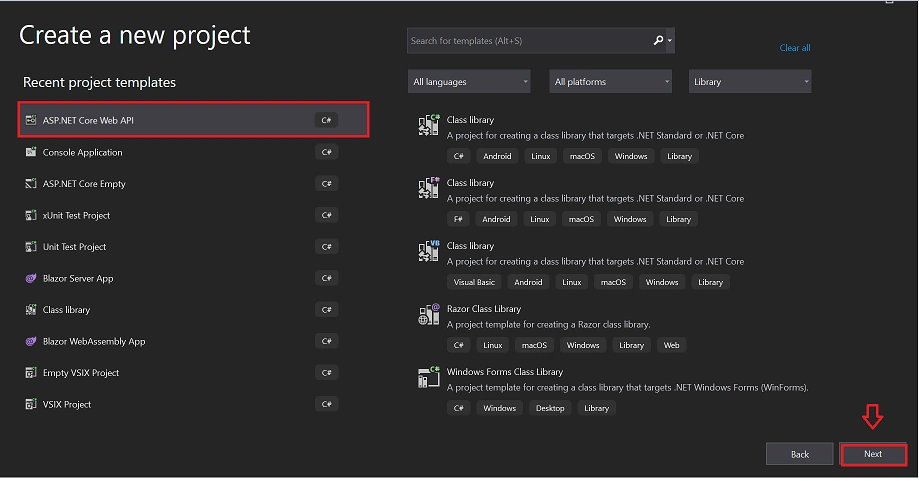
Choose the Project Template
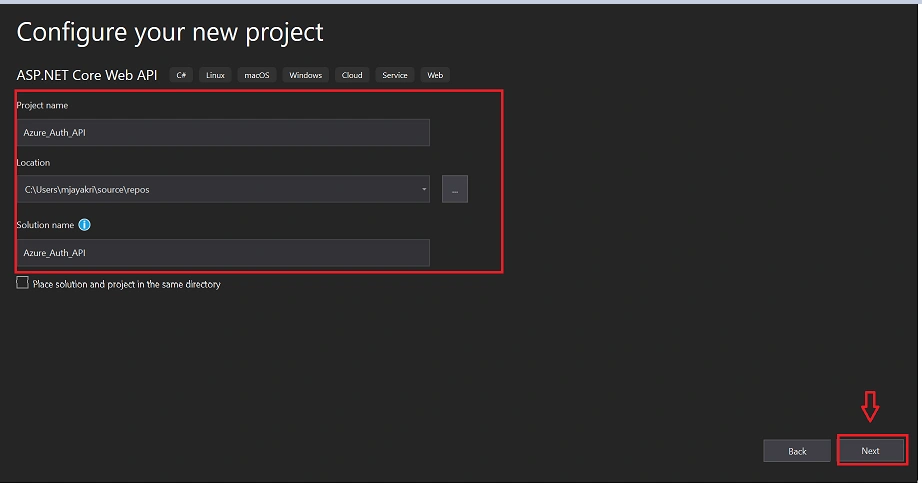
Name the project and solution and its saving location.
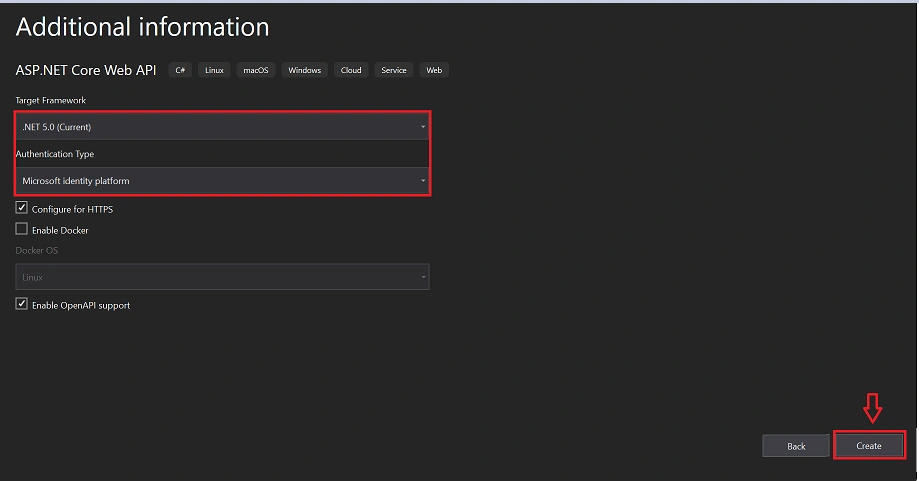
- Choose the Target Framework - .Net 5.0 Current.
- Change the Authentication Type - Microsoft Identity Platform
Register an Azure AD (AAD) app for the Web API
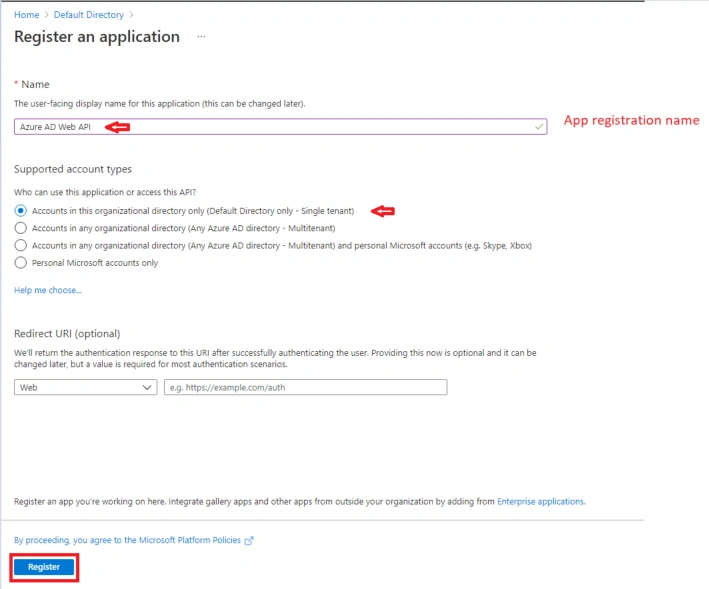
To authenticate against Azure AD you need to add the Azure AD app registration and this can be done through the Azure portal at http://portal.azure.com > Azure Active Directory > App registrations > New application registration.
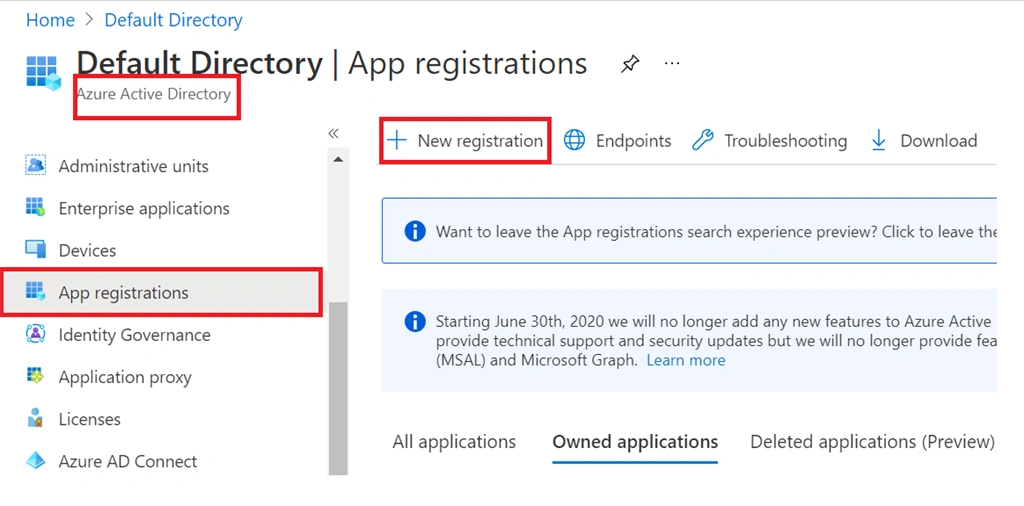
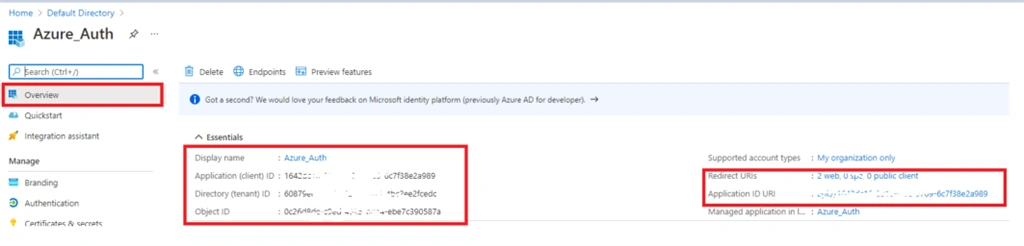
When the app registration is complete we can see the Client Id and Tenant Id in the Azure overview and copy those ID'd we will need in configuration setup.
Create Scope for App registration
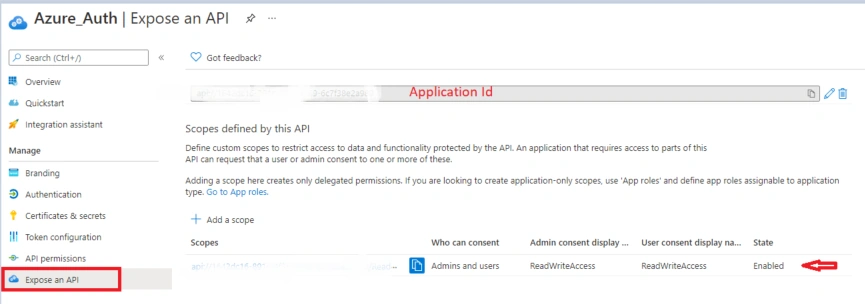
The scope is required for authorizing the API like read and write access so we can define multiple scopes for our APIs if we are dealing with multiple projects or Microservices.
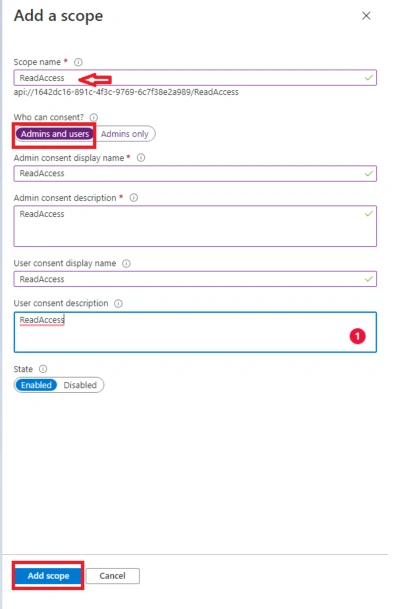
For that select the Expose an API from the Azure _Auth application. Click on the + Add Scope button. where it will open the popup to create the scopes.
Update the Web API Project to use Azure AD Authentication
We need to configure the Azure active directory setup in appsettings.json like adding the application (client ID) and Tenant Id.
The Authentication type Microsoft.identity.platform helps in the integration of Azure AD and it will add all the basic configuration setup in the respective files.
app.settings.json
- "AzureAd": {
- "Instance": "https://login.microsoftonline.com/",
- "Domain": "*Your domain name*", //Domain name configured in Azure
- "TenantId": "0000-00000-00000-0000", // Tenant Id configured in Azure
- "ClientId": "0000-00000-00000-0000", // Client Id configured in Azure
- "CallbackPath": "/signin-oidc"
WeatherController.cs
- using Microsoft.AspNetCore.Authorization;
- using Microsoft.AspNetCore.Mvc;
- using Microsoft.Extensions.Logging;
- using Microsoft.Identity.Web.Resource;
- using System;
- using System.Collections.Generic;
- using System.Linq;
- using System.Threading.Tasks;
- namespace AzureAD_OAuth_API.Controllers
- {
- [Authorize]
- [ApiController]
- [Route("[controller]")]
- public class WeatherForecastController : ControllerBase
- {
- private static readonly string[] Summaries = new[]
- {
- "Freezing", "Bracing", "Chilly", "Cool", "Mild", "Warm", "Balmy", "Hot", "Sweltering", "Scorching"
- };
- private readonly ILogger<WeatherForecastController> _logger;
- // The Web API will only accept tokens 1) for users, and 2) having the "access_as_user" scope for this API
- static readonly string[] scopeRequiredByApi = new string[] { "ReadWriteAccess" };
- public WeatherForecastController(ILogger<WeatherForecastController> logger)
- {
- _logger = logger;
- }
- [HttpGet]
- public IEnumerable<WeatherForecast> Get()
- {
- HttpContext.VerifyUserHasAnyAcceptedScope(scopeRequiredByApi);
- var rng = new Random();
- return Enumerable.Range(1, 5).Select(index => new WeatherForecast
- {
- Date = DateTime.Now.AddDays(index),
- TemperatureC = rng.Next(-20, 55),
- Summary = Summaries[rng.Next(Summaries.Length)]
- })
- .ToArray();
- }
- }
- }
Configure the Redirect URL's (If you are testing with Postman)
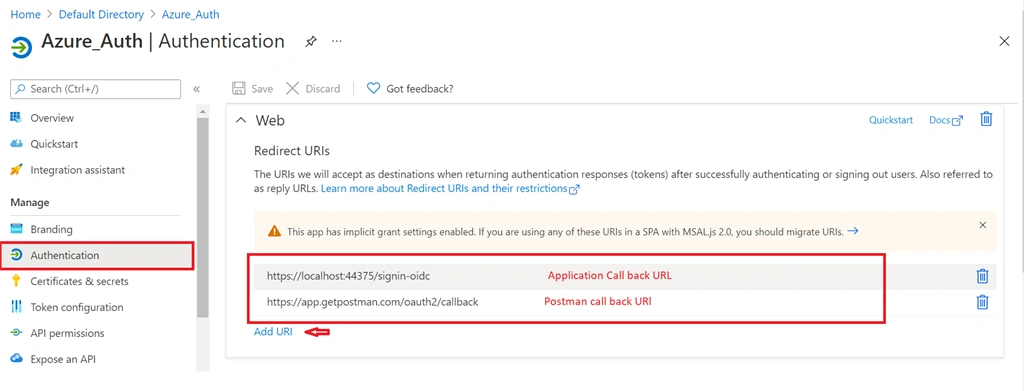
To test the APIs with Postman we need to configure the Callback URLs. Click on the Authentication menu, under the Platform Configurations, add the Redirect URLs - add the postman call back URL's - https://app.getpostman.com/oauth2/callback and application callback URL.
Create Client Secret
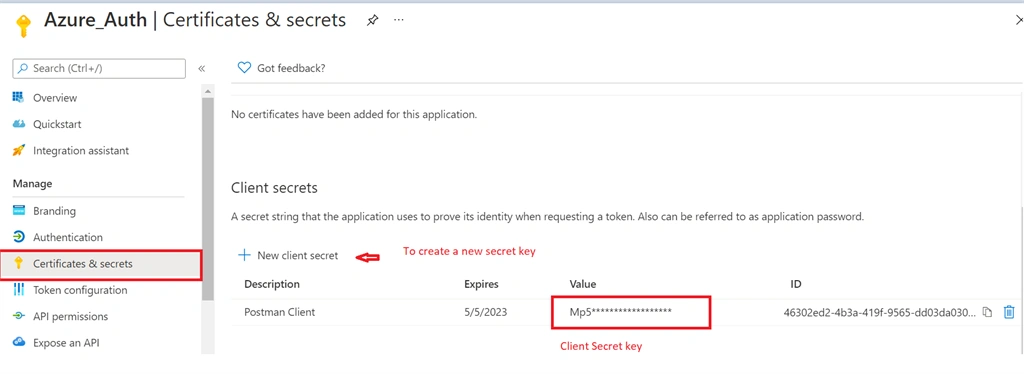
And we can create the client secret using the certificates & secrets menu, add a new client secret. Set the description and duration as never. Add click on create it will create a token copy it. You won't see it again.
Setup the Authorization setup in Postman to test the API
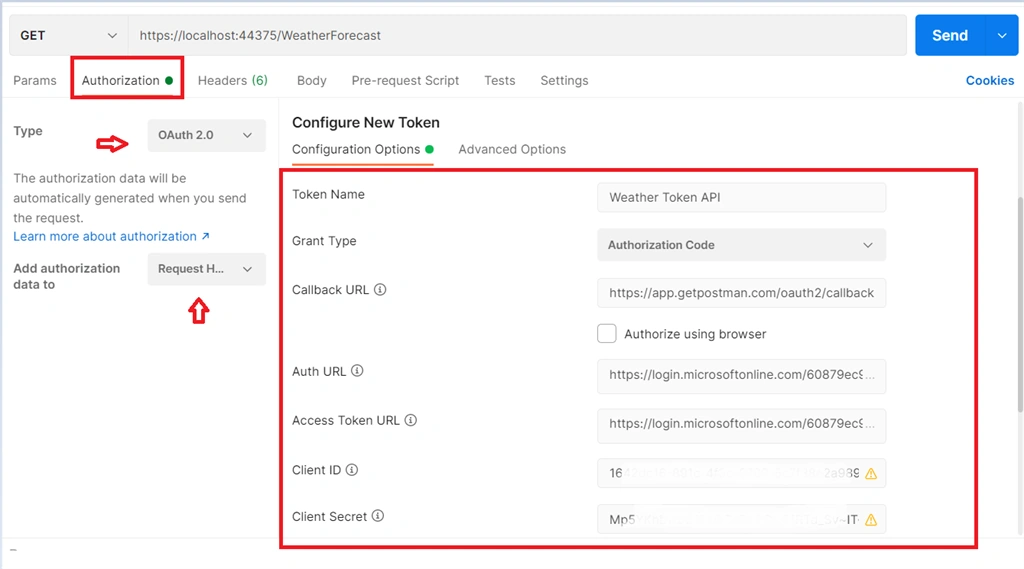
We have completed the configuration for connecting the client using Postman. Now open Postman, provide the URL - https://localhost:*****/WeatherForecast, then select the Authorization tab and choose OAuth 2 from the Type list and choose Request Headers in Add authorization data to the Values for Authorization in Postman.
- Token name - Valid name
- Grant Type - Choose Authorization Type
- callback URL - https://app.getpostman.com/oauth2/callback
- Auth URL - https://login.microsoftonline.com/*Tenant ID*/oauth2/v2.0/authorize
- Access Token URL - https://login.microsoftonline.com/*Tenant ID*/oauth2/v2.0/token
- Client ID - Client ID > Azure portal
- Client Secret - Secret Value > Azure portal
Once you fill up all the fields - you can skip the State field, click on the Get New Access Token button. It will popup the Azure AD login dialog and you can log in. Once the login is completed, Postman will show a Token, which can be used to talk to the API.
Azure Portal > Login
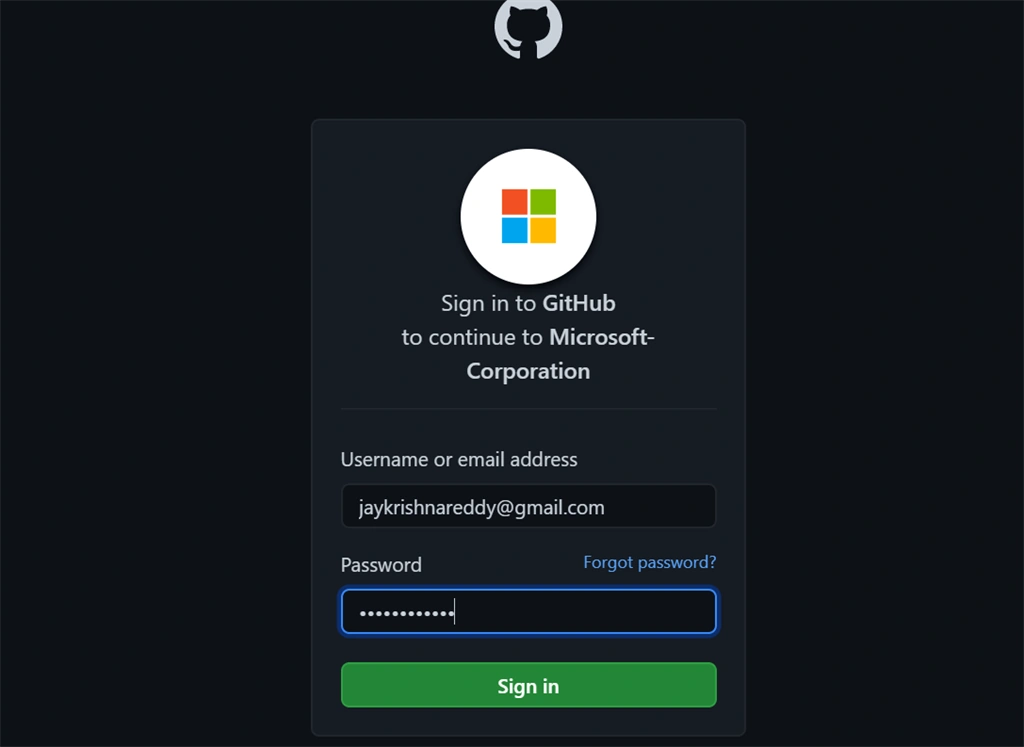
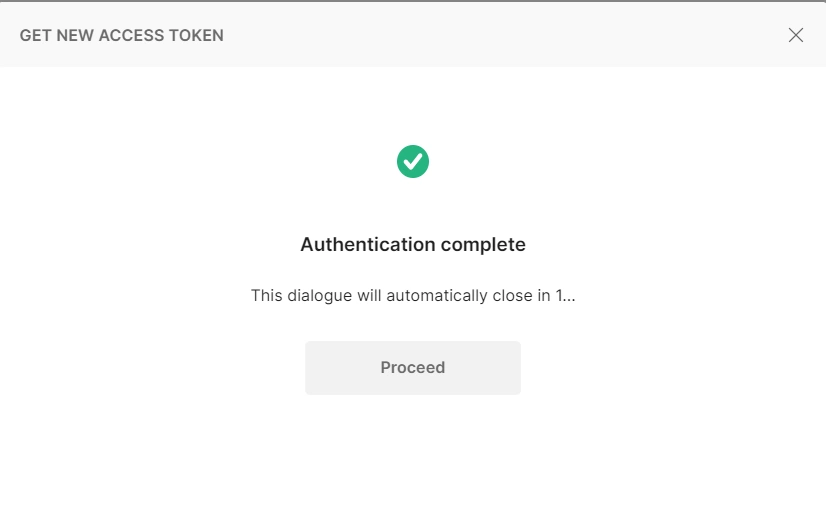
It will authenticate based on your credentials and once the Authentication completes it will redirect to the token page.
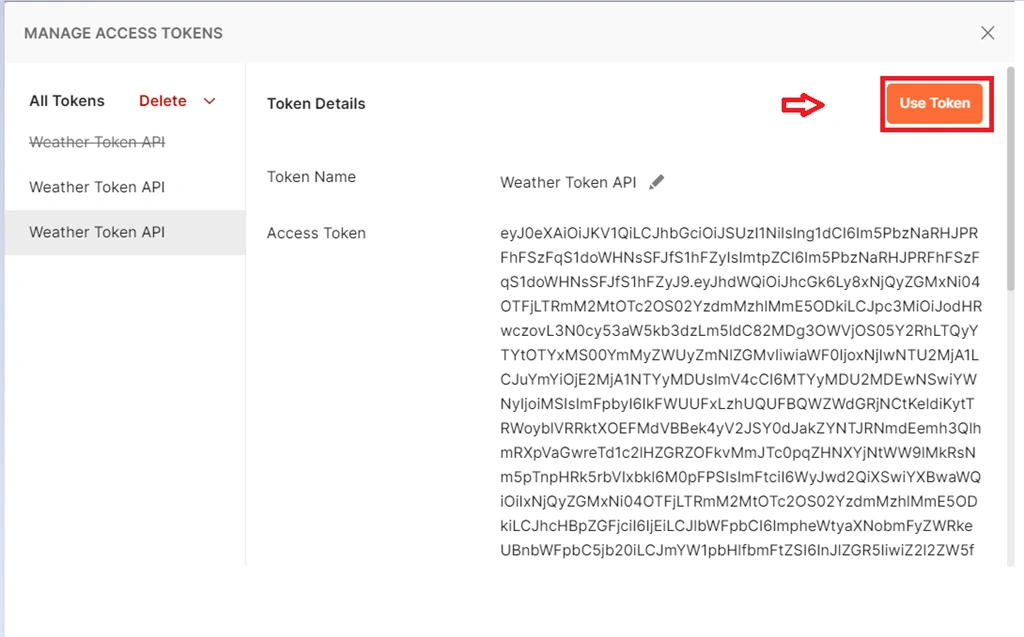
Below is the token generated by authenticating with our credentials click on > Use Token > it will automatically add in the request header.
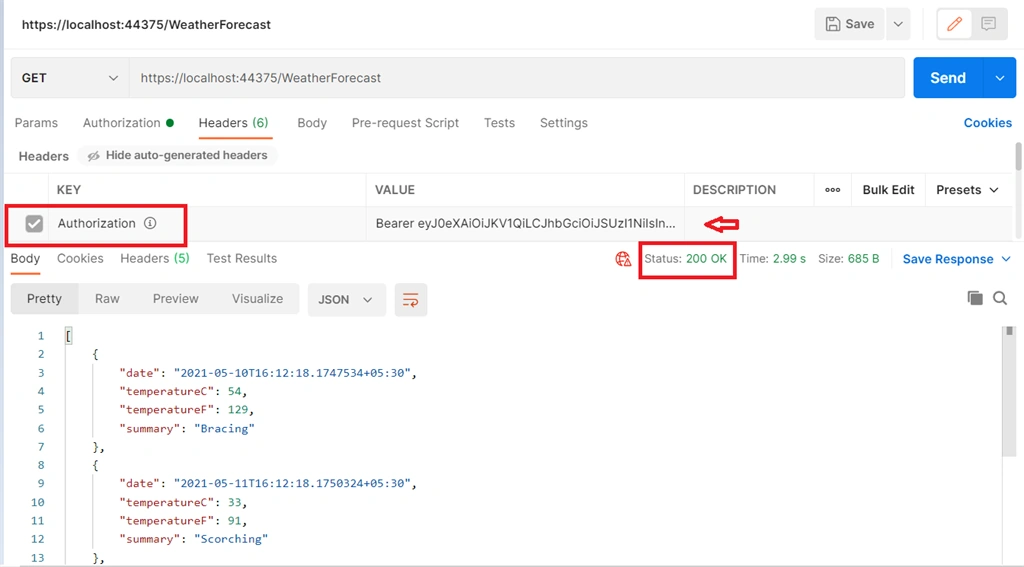
After the successful Authentication, now we can send the GET request which will return the JSON result, like this.
GitHub - Source Code
Conclusion
I hope this article gives you a clear picture of how to set up the Azure AD in the Azure portal and authenticate the Web API using .Net 5.0. The next article will show you how we can integrate the Azure Ad Authentication with Swagger.
Happy Coding ....!
Aafaan JiiPosted Jul 2, 2024, 4:01 AM
Hi, I want to implement it as a 3rd party login. after getting token, I want to retrieve email id from it and check if it is present in db? How to do that? In that case do i need to follow the same procedure also?
Mithun MPosted Jan 19, 2023, 7:21 AM
Hi Jay, thanks for sharing this article. I am just wondering how would be able to write the integration, especially when it comes to mocking the token. Would it be possible to share any information on that matter would be really helpful.
Jamal AshrafPosted Aug 23, 2022, 7:50 AM
Hey! Jay, how we can do that same thing to protect our api , backend (nodejs -apollo server ) front end (reactjs)? do you have same kind of tutorial for that too or would you make one? I want to apply authentication on it in Azure.
sana kanchhaPosted Oct 4, 2021, 6:21 PM
Great article. Able to generate the token but getting Error: connect ECONNREFUSED 127.0.0.1:44375 using postman. Could you share the postman settings?
ahmed elagamyPosted Aug 17, 2021, 11:20 AM
Good work but you can share with us how consume that api in ajax call ?
Rohit SharmaPosted Jul 25, 2021, 1:12 PM
Unable to get the token
Herbal SinghPosted Jun 24, 2021, 9:33 AM
Thanks for sharing such nice information in this article, Wisdom InfoSoft provides Custom Web API development services enabling businesses to collaborate and share data between their custom applications and third-party applications. For further information, you can visit our website https://wisdominfosoft.com/services/custom-web-api-development-services
Vincent DewismePosted Jun 22, 2021, 5:56 PM
Hi Jay, Thank you for your very detailed how-to! While testing it, I had to set Authentication Code (with PKCE) to make it work. Thank you
Anup HosurPosted Jun 3, 2021, 3:08 PM
Amazing work Jay.