

A comprehensive knowledge base is a key to increased customer satisfaction and improved productivity of users. It is designed to assist customer service representatives as they answer questions and resolve cases. It is a repository of information that is used by the customer service team but is visible to everyone. It consists of articles (documents) that are categorized by subjects.
Dynamics 365 supports two knowledge management solutions,
Native Dynamics 365 knowledge management
It is available for both Dynamics 365 (online) and Dynamics 365 on-premises users. For Microsoft Dynamics 365 (online) organizations, the native Dynamics 365 knowledge solution is only available if you've updated to CRM Online 2016 Update. For on-premises organizations, this feature is only available if you've upgraded to CRM 2016.
Parature knowledgebase
It is available only for Dynamics 365 (online) users. This feature was introduced in CRM Online 2015 Update 1.
After knowledge management is set up, users will be able to:
- Search for relevant KB articles in Parature right from Microsoft Dynamics 365 as they're working on a record.
- See the content of the KB article inline, including images and videos.
- Give timely and consistent information to customers when working on their cases by using actions like opening the article and sharing the information or emailing the article link to customers.
Set up knowledge management
Step 1
Make sure that the user has the System Administrator or System Customizer security role or equivalent permissions. Also, the user should be the tenant administrator of Microsoft Office 365.
Step 2
Go to Settings > Service Management.
Step 3
Under Knowledge Base Management, click Embedded Knowledge Search.
Step 4
In the Knowledge Base Management Settings wizard, in Record Types, select the record types to turn on knowledge management for. The list will include all entities that are available for an N: N relationship. Knowledge management is enabled for case entity by default.
Step 5
Under Knowledge Source, in the Knowledge Solution field, select between the Dynamics 365 native knowledge solution and Parature knowledgebase.
Step 6
If user is using Native Dynamics 365 knowledge solution, in the Support Portal Connection section, enter the following:
- Use an external portal: It is possible to integrate an external portal for publishing knowledge articles. If given organization uses one, select this check box.
- URL Format: Type the portal URL that will be used to create external (public-facing) portal links for knowledge articles, which the service agents can share with the customers. The external URL is created in the following format: http://<support portal URL>/kb/ {kbnum}
The placeholder "{kbnum}" is replaced by an actual knowledge article number.
Step 7
If user is using the Parature knowledgebase, in Parature Connection Details, enter the following,
- Parature Instance
Select the Parature instance to connect to. The drop-down list by default shows the instance present in users Microsoft Office 365 subscription.
- Parature URL
This is automatically filled and shows the URL of the selected Parature instance in the tenant.
- Account ID
This is automatically filled and shows the ID of the account as it is set up in Parature for the selected Parature instance.
- Parature Department ID
Specify the department ID for the selected Parature instance. Every department in an organization can have their own knowledge base. So you must specify the ID of the department you want to connect to. It is possible to connect to only one department at a time. To find the department ID, sign in to Parature, and on the Setup tab, click System Overview.
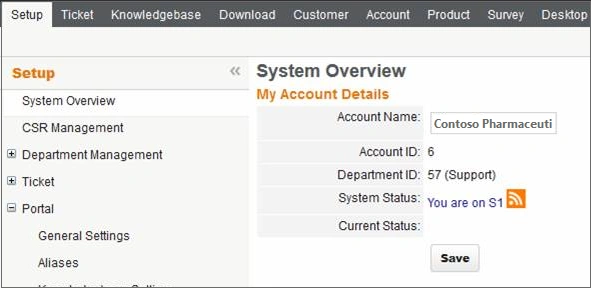
- Support Portal URL
Type the support portal URL that will be used to create external (public-facing) portal links for KB articles, which the service agents can share with the customers. Parature offers a customer-facing support portal that your customers can use to access your knowledge base articles or download content. To find the support portal URL, sign in to the Parature Service Desk, and on the Setup tab, click Portal > Aliases.
The external URL is created in the following format,
<Support Portal URL>/link/portal/<account id>/<department id>/Article/<Article id>
Step 8
Click Next.
Step 9
If details are specified correctly, the page shows the connection details for Dynamics 365 or Parature. Click Finish to complete the setup.
Join the conversation! Your thoughts help the community grow.