

In this article, I will demonstrate how to dynamically bind ListView control in ASP.NET from a database and display the values of a data source by using user-defined templates. The ListView control enables users to select, sort, delete, edit, and insert records.
- Dynamically Bind DataList Control in Asp.Net from Database - Part One
- Dynamically Bind DetailsView Control in Asp.Net from Database - Part Two
- Dynamically Bind FormViewControl in Asp.Net from Database - Part Three
- Dynamically Bind GridViewControl in Asp.Net from Database - Part Four
Step 1
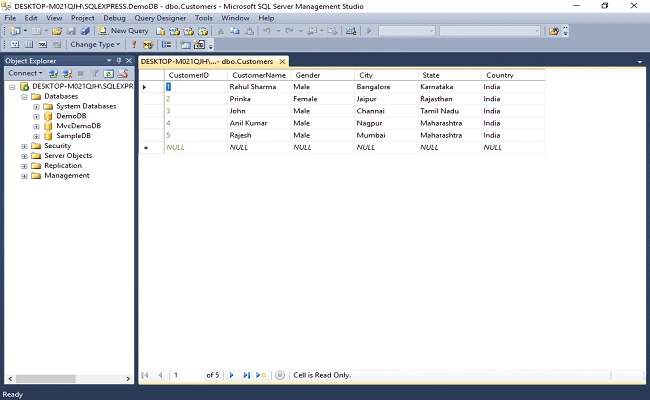
Create a database table in SQL Server 2014.
- CREATE TABLE [dbo].[Customers](
- [CustomerID] [int] IDENTITY(1,1) NOT NULL,
- [CustomerName] [nvarchar](50) NULL,
- [Gender] [char](10) NULL,
- [City] [nvarchar](50) NULL,
- [State] [nvarchar](50) NULL,
- [Country] [nvarchar](50) NULL,
- CONSTRAINT [PK_Customers] PRIMARY KEY CLUSTERED
- (
- [CustomerID] ASC
- )WITH (PAD_INDEX = OFF, STATISTICS_NORECOMPUTE = OFF, IGNORE_DUP_KEY = OFF, ALLOW_ROW_LOCKS = ON, ALLOW_PAGE_LOCKS = ON) ON [PRIMARY]
- ) ON [PRIMARY]
- GO
- CREATE PROCEDURE [dbo].[spGetAllCustomers]
- AS
- BEGIN
- SELECT CustomerID,CustomerName,Gender,City,State,Country from [dbo].[Customers]
- END
Screenshot of database table
Step 2
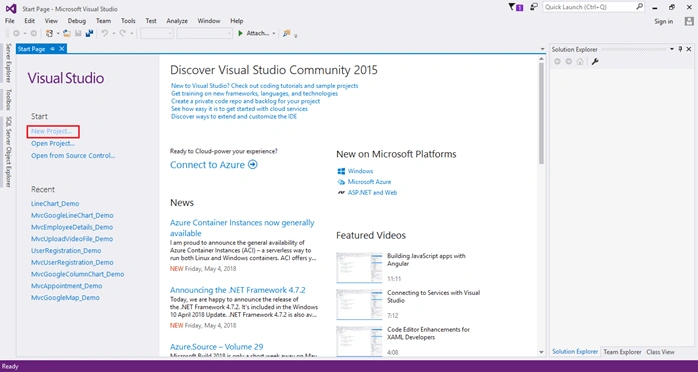
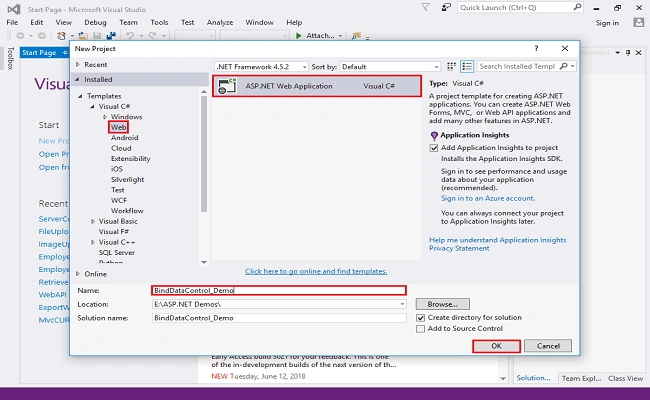
Open Visual Studio 2015, click on New Project, and create an empty web application project.
Screenshot for creating new project 1
Screenshot for creating new project 2
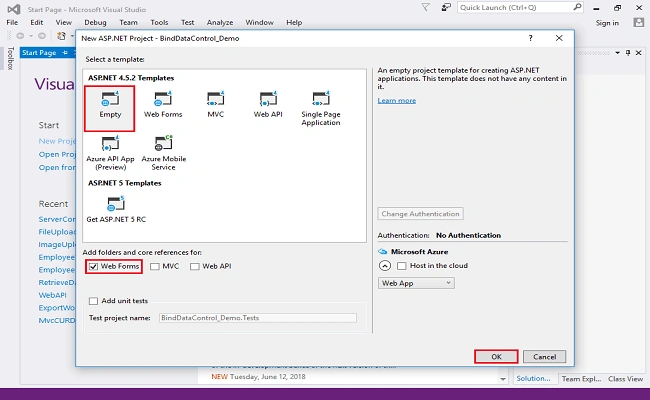
After clicking on OK, one more window will appear. Choose Empty check on Web Forms checkbox and click on OK.
Screenshot for creating new project 3
Step 3
Double click on webconfig file and database connect. Write the following line of code.
- <connectionStrings>
- <add name="DBCS" connectionString="data source=DESKTOP-M021QJH\SQLEXPRESS; database=DemoDB; integrated security=true;"/>
- </connectionStrings>
Step 4
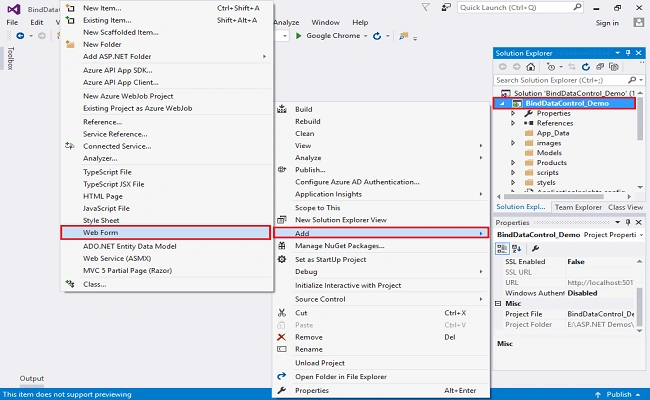
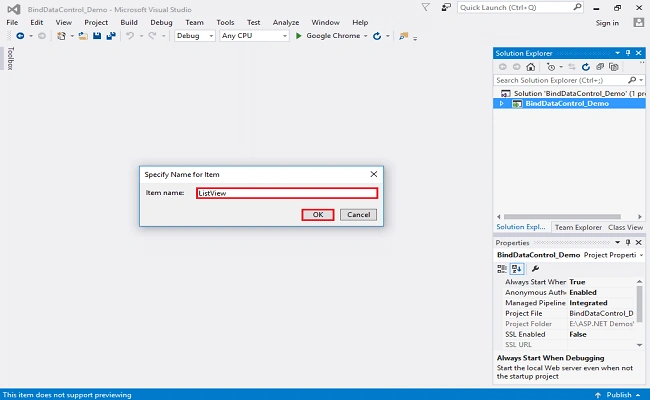
Add web form in your project.
Right click on project select add choose Web Form and click.
Screenshot adding web form 1
Screenshot adding web form 2
Step 5
Add script and styles of bootstrap in head section of web form.
- <link rel="stylesheet" href="https://maxcdn.bootstrapcdn.com/bootstrap/4.1.0/css/bootstrap.min.css">
- <script src="https://ajax.googleapis.com/ajax/libs/jquery/3.3.1/jquery.min.js"></script>
- <script src="https://maxcdn.bootstrapcdn.com/bootstrap/4.1.0/js/bootstrap.min.js"></script>
Step 6
Drag and drop a ListView control on web form. Design ListView control.
- <body>
- <form id="form1" runat="server">
- <div class="container py-4">
- <h5 class="text-uppercase text-center">ListView control in asp.net</h5>
- <asp:ListView ID="ListView1" runat="server">
- <LayoutTemplate>
- <table class="table table-bordered table-striped">
- <tr class="bg-danger text-white">
- <th>Customer ID</th>
- <th>Customer Name</th>
- <th>Gender</th>
- <th>City</th>
- <th>State</th>
- <th>Country</th>
- </tr>
- <tbody>
- <asp:PlaceHolder ID="itemPlaceHolder" runat="server" />
- </tbody>
- </table>
- </LayoutTemplate>
- <ItemTemplate>
- <tr>
- <td><%# Eval("CustomerID")%></td>
- <td><%# Eval("CustomerName")%></td>
- <td><%# Eval("Gender")%></td>
- <td><%# Eval("City")%></td>
- <td><%# Eval("State")%></td>
- <td><%# Eval("Country")%></td>
- </tr>
- </ItemTemplate>
- </asp:ListView>
- </div>
- </form>
- </body>
Complete web form code
- <!DOCTYPE html>
- <html>
- <head runat="server">
- <title>ListView</title>
- <link rel="stylesheet" href="https://maxcdn.bootstrapcdn.com/bootstrap/4.1.0/css/bootstrap.min.css">
- <script src="https://ajax.googleapis.com/ajax/libs/jquery/3.3.1/jquery.min.js"></script>
- <script src="https://maxcdn.bootstrapcdn.com/bootstrap/4.1.0/js/bootstrap.min.js"></script>
- </head>
- <body>
- <form id="form1" runat="server">
- <div class="container py-4">
- <h5 class="text-uppercase text-center">ListView control in asp.net</h5>
- <asp:ListView ID="ListView1" runat="server">
- <LayoutTemplate>
- <table class="table table-bordered table-striped">
- <tr class="bg-danger text-white">
- <th>Customer ID</th>
- <th>Customer Name</th>
- <th>Gender</th>
- <th>City</th>
- <th>State</th>
- <th>Country</th>
- </tr>
- <tbody>
- <asp:PlaceHolder ID="itemPlaceHolder" runat="server" />
- </tbody>
- </table>
- </LayoutTemplate>
- <ItemTemplate>
- <tr>
- <td><%# Eval("CustomerID")%></td>
- <td><%# Eval("CustomerName")%></td>
- <td><%# Eval("Gender")%></td>
- <td><%# Eval("City")%></td>
- <td><%# Eval("State")%></td>
- <td><%# Eval("Country")%></td>
- </tr>
- </ItemTemplate>
- </asp:ListView>
- </div>
- </form>
- </body>
- </html>
Step 7
Right click and view web form code. Write the following code.
- using System;
- using System.Configuration;
- using System.Data;
- using System.Data.SqlClient;
- namespace BindDataControl_Demo
- {
- public partial class ListView : System.Web.UI.Page
- {
- protected void Page_Load(object sender, EventArgs e)
- {
- if (!IsPostBack)
- {
- BindListView();
- }
- }
- private void BindListView()
- {
- string CS = ConfigurationManager.ConnectionStrings["DBCS"].ConnectionString;
- using (SqlConnection con = new SqlConnection(CS))
- {
- SqlCommand cmd = new SqlCommand("spGetAllCustomers", con);
- cmd.CommandType = CommandType.StoredProcedure;
- con.Open();
- ListView1.DataSource = cmd.ExecuteReader();
- ListView1.DataBind();
- }
- }
- }
- }
Step 8
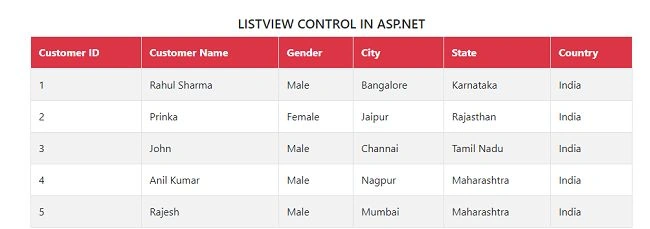
Run the project ctrl+F5
Screenshot
Conclusion
In this article I have explained how to dynamically bind ListView control from database step by step. I hope it will help you.
Join the conversation! Your thoughts help the community grow.