

Introduction
Like the Apple Store for iOS and MacOS applications and the PlayStore for Android applications, Google has launched its Chrome Web Store. Looking at increasing demand and technical feasibility towards developing complex desktop applications, developers are showing interest in Chrome App Development.
Difference between Chrome App and Chrome extensions
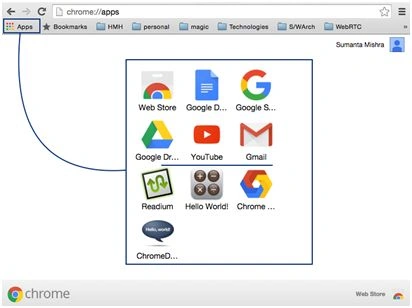
Chrome Apps are generally known as packaged apps which directly run from your PC and do not necessarily need an Internet connection unless it is required in your application. Packaged Apps are packaged as .crx which is a special ZIP archive. And these packages contain some mandatory files along with the resources required for the app. A list of all installed Chrome apps can be seen by typing “chrome://apps/” in the address bar of the Chrome browser.
Chrome extensions are very similar to Chrome Apps in regards to development, packaging, and installation processes. But as its name (extension) suggests, these modify or extend the functionalities of the Chrome Browser, as they have access to Chrome APIs. And one of the main differences is that extensions can add a button to the extensions bar which can be used as quick shortcuts for extensions. The list of Chrome extensions can be seen by typing “chrome://extensions” in the address bar of the Chrome browser. This article does not cover anything about extensions.
Prerequisites
If we talk about prerequisites for developing a Chrome App, they are:
- Chrome Browser installed in your system.
- A good Text Editor which supports HTML, JavaScript and CSS, etc.
- Knowledge of HTML, JavaScript, CSS and any preferred JavaScript framework (if required in your app).
Components of Chrome App
Four basic items are required inside the package of Chrome App:
- Manifest
- Background script
- Icon files
- Source code for the app
How to create a manifest
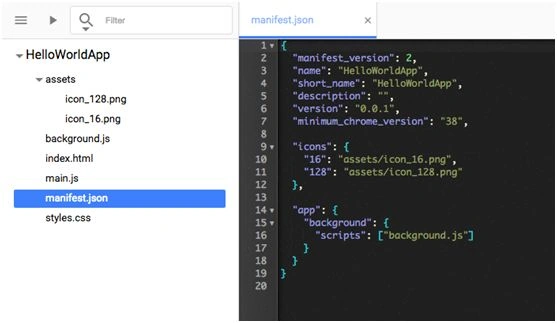
The name of the manifest file should be manifest.json. And the structure of the manifest.json should look like the following:
- {
- "manifest_version": 2,
- "name": "HelloWorldApp",
- "short_name": "HelloWorldApp",
- "description": "",
- "version": "0.0.1",
- "minimum_chrome_version": "38",
- "icons": {
- "16": "assets/icon_16.png",
- "128": "assets/icon_128.png"
- },
- "app": {
- "background": {
- "scripts": ["background.js"]
- }
- }
- }
- Name and shortname properties are the name of the application.
- Icons property requires the name of the icon files of size 16x16 and 128x128 size images and paths should be mentioned against respective properties of “icons” properties of the json.
- Scripts property accepts array and that name should include “background.js” file name.
- And other properties are self explanatory.
How to create background script file
The recommended name of the background script file is background.js. And the structure of the background script file should look like the following:
- chrome.app.runtime.onLaunched.addListener(function(launchData) {
- chrome.app.window.create(
- 'index.html',
- {
- id: 'mainWindow',
- bounds: {width: 800, height: 600}
- }
- );
- });
There are some other events like chrome.runtime.onInstalled and chrome.runtime.onSuspend for which handlers can be set in background script file.
How to prepare icon files
It is recommended that two images should be provided. One icon size should be 16x16 pixels and another should be 128x128 pixels. If not, both your icon's sizes should be 128x128 pixels and they will be resized by Chrome as required. It accepts various image formats but PNG format works best as it supports transparency.
Source code for the application
This is basically the HTML, JavaScript, CSS files and other assets like audio, video etc. which all are required for your application package.
IDEs for Development of Chrome App
I have used two ways to develop, test, and run Chrome Apps:
Option one:
- Use any Editor which supports IntelliSense for HTML, JS and CSS.
- Prepare all the required items.
- Run the build using manual process as described in Launch your App section.
Option two:
This is the easiest way to create a new project and launch in Chrome. Google has released an IDE for Chrome called Chrome Dev Editor. This Editor makes Chrome App creation and running the App easy. The following are some steps which explain how to create project and run:
Step 1: Go to Web Store and search for Chrome Dev Editor and add it to Chrome.
Step 2: Launch Chrome Dev Editor.
Step 3: Go to Main Menu (in left top corner) and click on New Project. It will open the following dialog box:
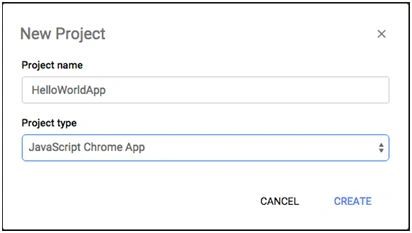
Enter project name and select JavaScript Chrome App from the drop down.
Step 4: And then click on CREATE button. It will create a new Chrome App project with all required files inside.
Things to remember while developing
Developing Chrome App using HTML, JavaScript and CSS is not the same as developing Web Apps. Here are few things to remember while developing a Chrome App:
- Any type of JavaScript in HTML page does not work.
- JavaScript inside <script> tag does not work. JavaScript only works if it is written in separate .js file and imported using:
- <script src="main.js"></script>
- Inline event handlers like onclick, onload, etc do not work. These need to be declared using querySelectors in Javascript. Examples of inline event handlers:
- <body onload=”onloadHandler()”></body>
- <div onclick=”onClickHandler()”></div>
- <a> tag navigation does not work.
- Access to external assets are restricted. For example, assigning an online image path to <img> tag does not work. To access the image, it is required to keep that image inside the app package or load that image as a blob and assign to the <img> tag.
- HTML alert does not work. To show any dialog box, custom dialog box or bootstrap dialog box needs to be used.
- Embedding any object like Flash objects does not work.
Launch your App
If you are using Chrome Dev Editor, then its just one click. By clicking on Run button (available in top left corner of the Editor) build will get launched.
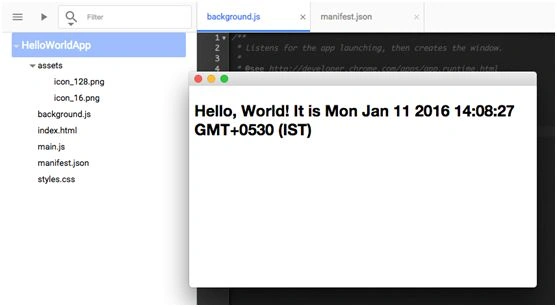
To launch the Chrome App manually, then following steps need to be followed:
- Open “chrome://extensions” in Chrome browser.
- Click on “Developer Mode” checkbox to enable Developer mode.
- Click on “Load unpacked extension” button.
- Browse and select the application folder and click OK. Application will get listed in the extensions page.
- Launch the application by clicking the Launch button.
Publishing your App in ChromeWeb Store
To publish your chrome App, Google charges $5 which is one-time fee to use Chrome Web Store. Apart from the fee, as described on the Chrome Developer Site, there are few steps that need to be followed:
- Create your app’s zip file.
- Login to Chrome Developer Dashboard.
- Upload your app (.zip not .crx)
- Pick a payments system (if your app is not free). This step can be skipped if your app is free.
- Get app constraints and finish your app’s code.
- Get the app ID.
- Get the OAuth token.
- Finish the app.
- Provide store content.
- Pay the developer signup fee.
- Publish your app.
A more detailed documentation about publishing Chrome App is available in Chrome Developer Documentation.
For further readings please refer Chrome Developer Documentation.
Kumaresh RajalingamPosted Mar 6, 2016, 8:32 PM
Nice explanation
Sr KarthigaPosted Feb 8, 2016, 8:57 AM
Nice share
Santhakumar MunuswamyPosted Jan 13, 2016, 9:52 AM
Thanks for nice article. Keep it up
Pankaj Kumar ChoudharyPosted Jan 12, 2016, 12:09 PM
Nice Explain.........
Ankit SaxenaPosted Jan 12, 2016, 11:45 AM
Nice share. Thanks for posting.
Humayun Kabir MamunPosted Jan 12, 2016, 10:08 AM
Nice...
Kumaresh RajalingamPosted Jan 12, 2016, 10:04 AM
Nice share
Ankit BansalPosted Jan 12, 2016, 12:53 AM
very useful..