

Introduction
In today's Web-based application work, MEAN stack is one of the popular web development stacks. MEAN stack mainly consists of MongoDB, Express, Angular, and Node.js. MEAN has become much popular because it allows us to develop a program in JavaScript on both the client-side and server-side. The MEAN stack always enables a perfect combination of JavaScript Object Notation (JSON) development like MongoDB stores data in a JSON-like format, Express, and Node.js provide facility easy JSON based query creation and Angular allows the client to seamlessly send and receive the JSON documents.
MEAN is mainly used to develop a browser-based web application since Angular (client-side) and Express (server-side) are both the frameworks related to the web applications. Also using MEAN stack, we can develop a RESTful API Server with the help of Express and Node.js very easily. Since the RESTful API server is required to provide support related to the API endpoint so that those can be accessed from any applications or devices.
The application we will develop in this article is a basic Product Catalog that supports standard CRUD (Create, Read, Update, Delete) operations along with the authentication mechanism. So that nobody can access the product catalog without proper authorization. For the authorization purpose, we will use the JWT tokens and shown how to implement JWT token in this MEAN stack based application. For this purpose, we will break down this article into the below sub-category or parts.
- Create a Basic Projects structure using Angular CLI.
- Develop API Server using Express to Insert Initial Data into Mongo Database
- Develop CRUD related API
- Develop Product List UI using Angular
- Develop UI for Add New Product in the List
- Implement API wrapper service
- Implement Router in Express App
- Create JWT token and implement in API endpoints for Authentication
- Implement Http Interceptor to pass a token from Angular Component to API request
- Implement User Login Screen to generate the token
- Implement the Route guard so that nobody can access product list UI without proper authentication.
Prerequisites
For developing this MEAN stack-based web application, the below-mentioned software needs to be installed in our machine.
- Node.js (Latest Version)
- MongoDB
- Angular CLI 10 (Latest Version)
Project Structure
First, we need to create a blank folder structure for the MEAN stack-based web application. For that purpose, we will create the below project structure:
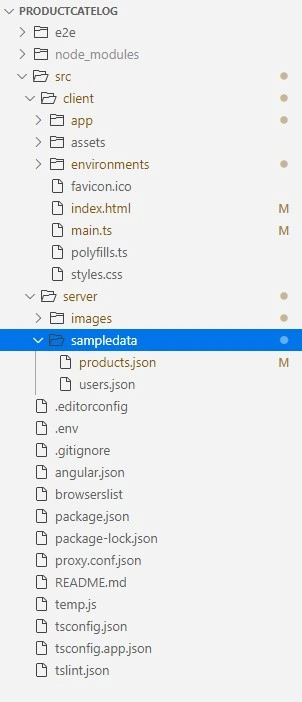
In the above image, we can see that we create two folder name client (this folder will contain all files related to the client-side application which is used in Angular 10) and server (this folder contains all files related server-side operation like initial data insert through API, express app, etc.) under the src folder. Within the client folder, we create blank Angular CLI Projects which contain all files related to the Angular CLI project structure.
Now, we need to include some extra packages in the package.json which will help us to develop this MEAN stack-based application. Also, we include two new script based commands (sample to insert initialize data into MongoDB & start to run both the App i.e. Angular & Express at a time) to initialize the API server using express App.
- {
- "name": "ng-product-manager",
- "version": "0.0.0",
- "scripts": {
- "ng": "ng",
- "start": "run-s build start:server",
- "serve": "ng serve",
- "build": "ng build --prod",
- "start:server": "node src/server/index.js",
- "watch:client": "ng serve --proxy-config proxy.conf.json --open",
- "server": "npx nodemon src/server/index.js",
- "watch": "run-p watch:*",
- "sample": "node src/server/sampledata/initialize-db.js",
- "test": "ng test",
- "lint": "ng lint",
- "e2e": "ng e2e"
- },
- "private": true,
- "dependencies": {
- "@angular/animations": "~10.0.0",
- "@angular/common": "~10.0.0",
- "@angular/compiler": "~10.0.0",
- "@angular/core": "~10.0.0",
- "@angular/forms": "~10.0.0",
- "@angular/platform-browser": "~10.0.0",
- "@angular/platform-browser-dynamic": "~10.0.0",
- "@angular/router": "~10.0.0",
- "bcrypt": "^5.0.0",
- "body-parser": "^1.19.0",
- "core-js": "^3.6.5",
- "dotenv": "^8.2.0",
- "express": "^4.17.1",
- "express-jwt": "^5.3.3",
- "jsonwebtoken": "^8.5.1",
- "mongodb": "^3.5.9",
- "npm-run-all": "^4.1.5",
- "rxjs": "~6.5.5",
- "tslib": "^2.0.0",
- "zone.js": "~0.10.3"
- },
- "devDependencies": {
- "@angular-devkit/build-angular": "~0.1000.0",
- "@angular/cli": "~10.0.0",
- "@angular/compiler-cli": "~10.0.0",
- "@types/jasmine": "~3.5.0",
- "@types/jasminewd2": "~2.0.3",
- "@types/node": "^12.11.1",
- "codelyzer": "^6.0.0-next.1",
- "jasmine-core": "~3.5.0",
- "jasmine-spec-reporter": "~5.0.0",
- "karma": "~5.0.0",
- "karma-chrome-launcher": "~3.1.0",
- "karma-coverage-istanbul-reporter": "~3.0.2",
- "karma-jasmine": "~3.3.0",
- "karma-jasmine-html-reporter": "^1.5.0",
- "nodemon": "^2.0.4",
- "protractor": "~7.0.0",
- "ts-node": "~8.3.0",
- "tslint": "~6.1.0",
- "typescript": "~3.9.5"
- }
- }
Develop API using Express to Insert Initial Data Into Mongo Database
Step 1
Now, add a new file named .env to store some key-pair value related to the environment. In this file, we will keep the MongoDB server URL along with Database Name.
- DB_CONN=mongodb://127.0.0.1:27017/ProductCatelog
- DB_NAME = ProductCatelog
Add another file named proxy.conf.json which is used to define the proxy setting for the RESTfull API server.
- {
- "/api": {
- "target": "http://localhost:3000",
- "secure": false
- }
- }
Step 3
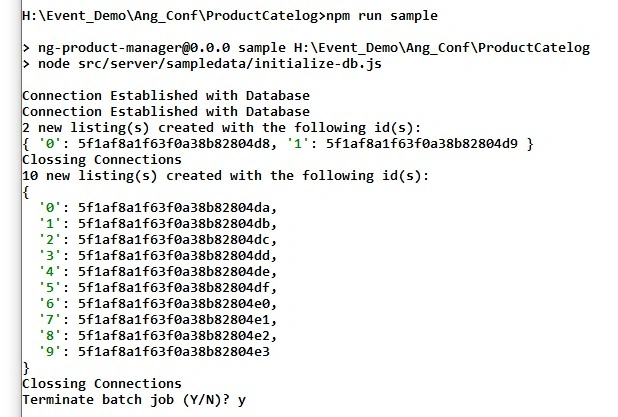
Now go to the SampleData folder under the server folder. This folder already contains two JSON files named users.json and products.json which contain some initial data related to the product and user. Now, add a new file named initialize-db.js within the folder and write down the below code within that file. The code written in this file is used to insert the initial record into the MongoDB. For that, we first read the .env environment file where we already mentioned the server details related to MongoDB. Then we also create an instance of Mongo DB and pass those credentials along with Collection name to insert those records into the Mongo DB.
- require('dotenv').config();
- const {MongoClient} = require('mongodb');
- const bcrypt = require('bcrypt');
- const users = require('./users');
- const products = require('./products');
- async function initializeDBRecords(collectionName, data){
- const client = new MongoClient(process.env.DB_CONN,{ useNewUrlParser: true, useUnifiedTopology: true });
- await client.connect();
- data.forEach((item) => {
- if (item.password) {
- item.password = bcrypt.hashSync(item.password, 10);
- }
- });
- const result = await client.db(process.env.DB_NAME).collection(collectionName).insertMany(data);
- console.log(`${result.insertedCount} new listing(s) created with the following id(s):`);
- console.log(result.insertedIds);
- client.close
- console.log("Clossing Connections");
- }
- initializeDBRecords('Users', users);
- initializeDBRecords('Products', products);
- npm run sample
Develop CRUD Related API
Now, its time to develop the CRUD related API. For that purpose, we will add a new file named index.js under the server folder and the below code:
- const express = require('express');
- const app = express();
- const {MongoClient} = require('mongodb');
- const bodyParser = require('body-parser');
- const path = require('path');
- require('dotenv').config();
- app.use(express.static(path.join(__dirname, 'public')));
- app.use('/images', express.static(path.join(__dirname, 'images')));
- app.use(bodyParser.json());
- let mongoclient;
- console.log('Server Started');
- async function initializeDBConnections(){
- let client = new MongoClient(process.env.DB_CONN,{ useNewUrlParser: true, useUnifiedTopology: true });
- await client.connect();
- console.log("Database connection ready");
- // Initialize the app.
- app.listen(3000, () => {
- mongoclient= client;
- console.log("App Run in Port 3000");
- });
- }
- initializeDBConnections();
- app.get('/api/products', async (req, res) => {
- let client = new MongoClient(process.env.DB_CONN,{ useNewUrlParser: true, useUnifiedTopology: true });
- await client.connect();
- const cursor = await client.db(process.env.DB_NAME).collection('Products')
- .find({});
- const result = await cursor.toArray((err, docs) => {
- return res.json(docs)
- });
- });
- app.post('/api/products', async(req,res) => {
- const product = req.body;
- let client = new MongoClient(process.env.DB_CONN,{ useNewUrlParser: true, useUnifiedTopology: true });
- await client.connect();
- const productCollection = await client.db(process.env.DB_NAME).collection('Products');
- productCollection.insertOne(product, (err, r) => {
- if (err) {
- return res.status(500).json({ error: 'Error inserting new record.' });
- }
- const newRecord = r.ops[0];
- return res.status(201).json(newRecord);
- });
- });
- app.get('*', (req, res) => {
- return res.sendFile(path.join(__dirname, 'public/index.html'))
- });
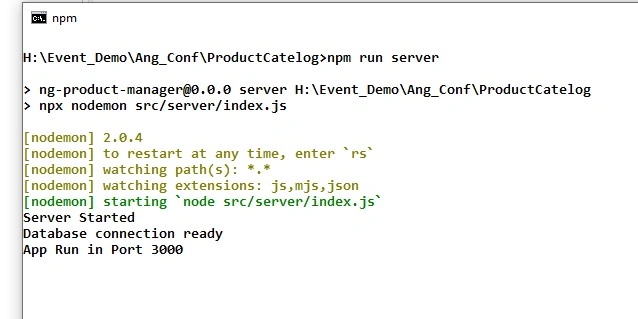
- npm run server
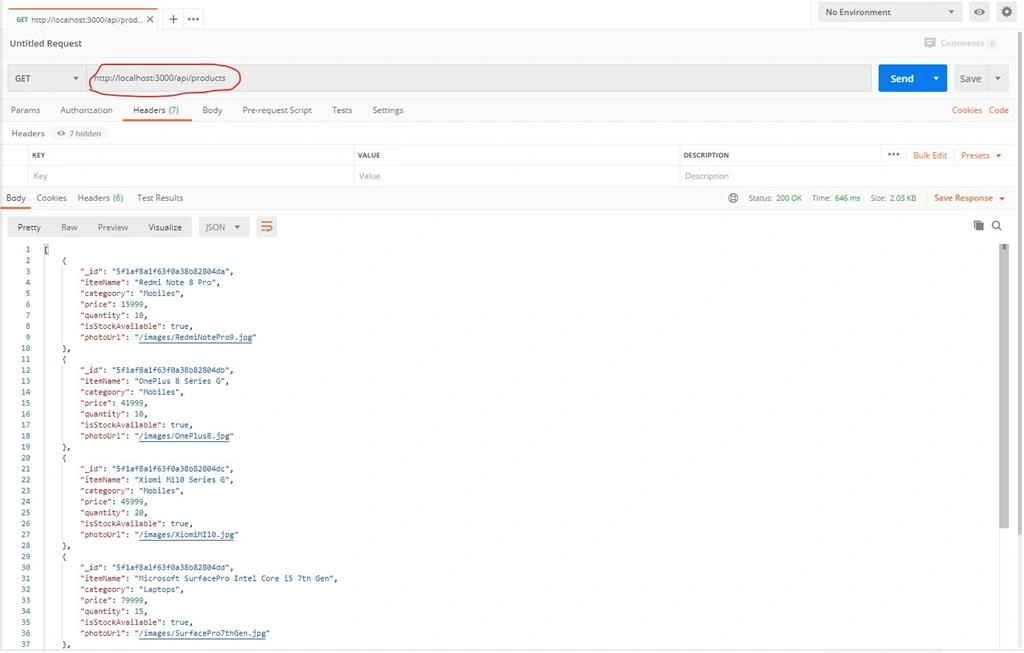
Now to check either API is working on not, open the POSTMAN and execute the Get API Command:
Develop Product List UI
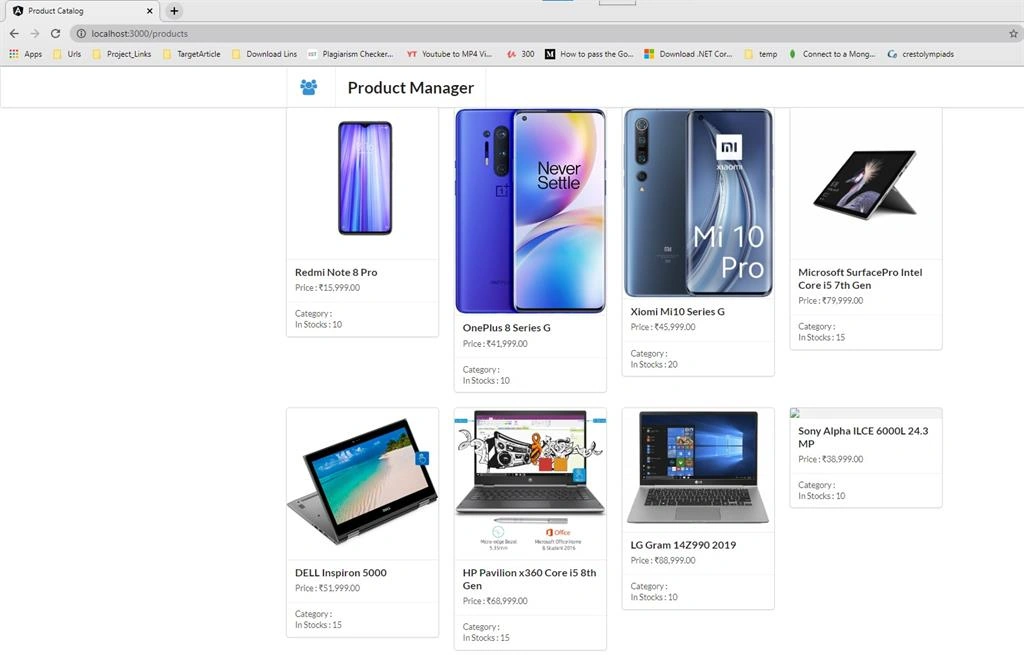
So, after completing the CRUD API, we need to develop a Product List UI where Product Get API will be executed and as per the record return from the API, product list details will be populated. For that purpose, we need to perform the below steps:
Step 1
Create a folder named shared under the client/app folder and then create a file called product.model.ts to define the Product model objects.
- export interface Product {
- itemName: string;
- category: string;
- price: number;
- quantity: number;
- isStockAvailable:boolean;
- photoUrl:string;
- }
Add another folder called menu and add the menu component within this folder.
menu.component.ts
- import { Component, OnInit } from '@angular/core';
- @Component({
- selector: 'app-menu',
- templateUrl: './menu.component.html'
- })
- export class MenuComponent implements OnInit {
- constructor() { }
- ngOnInit() {
- }
- }
menu.component.html
- <div class="ui menu header">
- <div class="ui container">
- <div class="item">
- <i class="icon users large blue"></i>
- </div>
- <div class="header item">
- <h1>Product Manager</h1>
- </div>
- </div>
- </div>
Now add another folder named product and add the product component which will display the product details along with a product image
product.component.ts
- import { Component, OnInit, Input, HostBinding } from '@angular/core';
- import { Product } from '../shared/product.model';
- @Component({
- selector: 'app-product',
- templateUrl: './product.component.html'
- })
- export class ProductComponent implements OnInit {
- @Input() product: Product;
- @HostBinding('class') columnClass = 'four wide column';
- constructor() { }
- ngOnInit() {
- }
- }
product.component.html
- <div class="ui card">
- <div class="image">
- <img [src]="product?.photoUrl">
- </div>
- <div class="content">
- <a class="header">{{product.itemName}}</a>
- <div class="description">
- <span>
- <span>Price : {{product.price | currency:'INR'}}</span>
- </span>
- </div>
- </div>
- <div class="extra content">
- <div class="description">
- <span>Category : {{product.category}}</span>
- </div>
- <div class="description">
- <span>
- <span>In Stocks : {{product.quantity}}</span>
- </span>
- </div>
- </div>
- </div>
Now add a new folder named product-list and add the product list component which will fetch data from the product api and populate product list. To display product information, we will use the product component as a child component within the product list component.
product-list.component.ts
- import { Component, OnInit } from '@angular/core';
- import { HttpClient, HttpResponse, HttpHeaders } from '@angular/common/http';
- import { Product } from '../shared/product.model';
- import { Observable } from 'rxjs';
- @Component({
- selector: 'app-product-list',
- templateUrl: './product-list.component.html'
- })
- export class ProductListComponent implements OnInit {
- products: Array<Product>;
- constructor(public http: HttpClient) { }
- ngOnInit() {
- this.loadData().subscribe((data) => {
- this.products = data
- });
- }
- private loadData(): Observable<any> {
- return this.http.get<any>('/api/products');
- }
- }
product-list.component.html
- <div class="ui container">
- <div class="ui grid">
- <app-product *ngFor="let product of products" [product]="product"></app-product>
- </div>
- </div>
Now add the Product list information in the routing module.
- import { NgModule } from '@angular/core';
- import { Routes, RouterModule } from '@angular/router';
- import { ProductListComponent } from './product-list/product-list.component';
- const routes: Routes = [
- {
- path: '',
- redirectTo: 'products',
- pathMatch: 'full'
- },
- {
- path: 'products',
- component: ProductListComponent
- }
- ];
- @NgModule({
- imports: [RouterModule.forRoot(routes)],
- exports: [RouterModule]
- })
- export class AppRoutingModule { }
Now add the all newly added component in the app.module.ts file
- import { BrowserModule } from '@angular/platform-browser';
- import { NgModule } from '@angular/core';
- import { FormsModule } from '@angular/forms';
- import { HttpClientModule } from '@angular/common/http';
- import { AppRoutingModule } from './app-routing.module';
- import { AppHomeComponent } from './app.component';
- import { MenuComponent } from './menu/menu.component';
- import { ProductListComponent } from './product-list/product-list.component';
- import { ProductComponent } from './product/product.component';
- @NgModule({
- declarations: [
- AppHomeComponent,
- MenuComponent,
- ProductListComponent,
- ProductComponent
- ],
- imports: [
- BrowserModule,
- FormsModule,
- HttpClientModule,
- AppRoutingModule
- ],
- providers: [],
- bootstrap: [AppHomeComponent]
- })
- export class ProductManagerModule { }
Now change the html part code of AppHomeComponent to place the router container in the application.
- <app-menu></app-menu>
- <router-outlet></router-outlet>
Now run the below command to execute the application.
- npm start
Develop Add Product UI Component
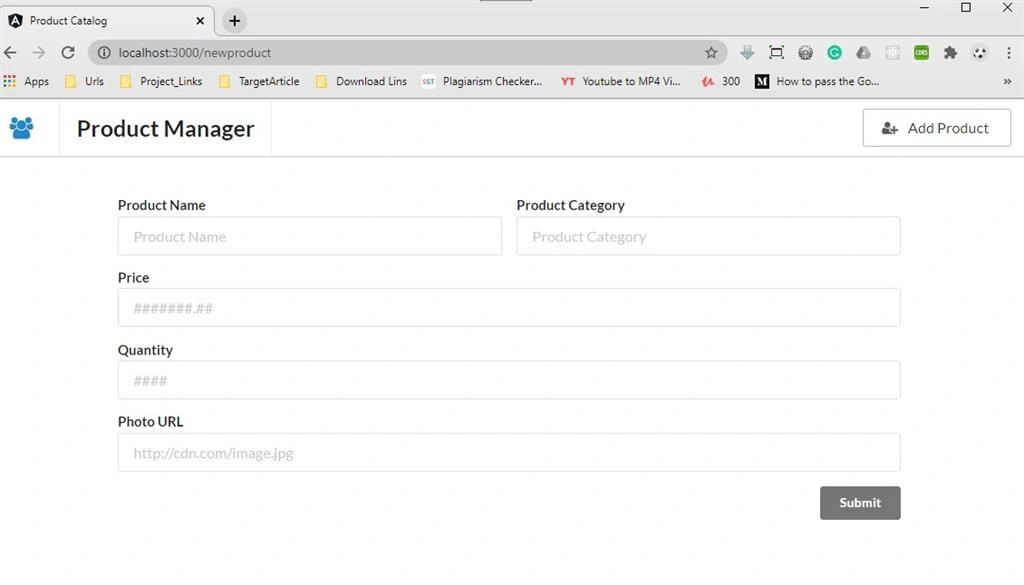
Now, we need to develop a component through which we can add new products within the Product List component. For that purpose, first, we need to add the addproduct component as shown below.
app-product.component.ts
- import { Component, OnInit } from '@angular/core';
- import { HttpClient, HttpResponse, HttpHeaders } from '@angular/common/http';
- import { Product } from '../shared/product.model';
- import { Observable } from 'rxjs';
- import { NgForm } from '@angular/forms';
- @Component({
- selector: 'app-add-product',
- templateUrl: './add-product.component.html',
- styleUrls: ['./add-product.component.scss']
- })
- export class AddProductComponent implements OnInit {
- loading: Boolean = false;
- newProduct: Product;
- constructor(public http: HttpClient) { }
- ngOnInit() {
- }
- onSubmit(form: NgForm) {
- this.loading = true;
- debugger;
- const formValues = Object.assign({}, form.value);
- const product: Product = {
- itemName: formValues.itemName,
- category: formValues.category,
- price: formValues.price,
- quantity:formValues.quantity,
- isStockAvailable: formValues.quantity>0 ? true : false,
- photoUrl: formValues.photo
- };
- const httpOptions = {
- headers: new HttpHeaders({
- 'Content-Type': 'application/json; charset=utf-8'
- })
- };
- this.http.post("/api/products", product, httpOptions)
- .subscribe((res: Response) => {
- debugger;
- form.reset();
- this.loading = false;
- this.newProduct = product;
- });
- }
- }
- <div class="add-form-container">
- <div class="ui icon message" *ngIf="newProduct">
- <i class="notched check green icon"></i>
- <i class="close icon" (click)="newProduct = null"></i>
- <div class="content">
- <div class="header">
- New Product added!
- </div>
- <p>Product Name: {{newProduct.itemName}}</p>
- </div>
- </div>
- <form class="ui big form" #productForm="ngForm" (submit)="onSubmit(productForm)" [class.loading]="loading">
- <div class="fields">
- <div class="eight wide field">
- <label>Product Name</label>
- <input type="text" placeholder="Product Name" name="itemName" ngModel>
- </div>
- <div class="eight wide field">
- <label>Product Category</label>
- <input type="text" placeholder="Product Category" name="category" ngModel>
- </div>
- </div>
- <div class="field">
- <label>Price</label>
- <input type="number" placeholder="Price" placeholder="#######.##" name="price" ngModel>
- </div>
- <div class="field">
- <label>Quantity</label>
- <input type="number" maxlength="4" placeholder="####" name="quantity" ngModel>
- </div>
- <div class="field">
- <label>Photo URL</label>
- <input type="text" placeholder="http://cdn.com/image.jpg" name="photo" ngModel>
- </div>
- <button type="submit" class="ui submit large grey button right floated">Submit</button>
- </form>
- </div>
- <div class="ui menu header">
- <div class="ui container">
- <div class="item">
- <a [routerLink]="['/products']" aria-label="Products">
- <i class="icon users large blue" aria-hidden="true"></i>
- </a>
- </div>
- <div class="header item">
- <h1>Product Manager</h1>
- </div>
- </div>
- <div class="item">
- <button [routerLink]="['/newproduct']" class="ui basic button">
- <i class="add user icon" aria-hidden="true"></i>
- Add Product
- </button>
- </div>
- </div>
app-routing.module.ts
- import { NgModule } from '@angular/core';
- import { Routes, RouterModule } from '@angular/router';
- import { ProductListComponent } from './product-list/product-list.component';
- import { AddProductComponent } from './add-product/add-product.component';
- const routes: Routes = [
- {
- path: '',
- redirectTo: 'products',
- pathMatch: 'full'
- },
- {
- path: 'products',
- component: ProductListComponent
- },
- {
- path: 'newproduct',
- component: AddProductComponent
- }
- ];
- @NgModule({
- imports: [RouterModule.forRoot(routes)],
- exports: [RouterModule]
- })
- export class AppRoutingModule { }
- import { BrowserModule } from '@angular/platform-browser';
- import { NgModule } from '@angular/core';
- import { FormsModule } from '@angular/forms';
- import { HttpClientModule } from '@angular/common/http';
- import { AppRoutingModule } from './app-routing.module';
- import { AppHomeComponent } from './app.component';
- import { MenuComponent } from './menu/menu.component';
- import { ProductListComponent } from './product-list/product-list.component';
- import { ProductComponent } from './product/product.component';
- import { AddProductComponent } from './add-product/add-product.component';
- @NgModule({
- declarations: [
- AppHomeComponent,
- MenuComponent,
- ProductListComponent,
- ProductComponent,
- AddProductComponent
- ],
- imports: [
- BrowserModule,
- FormsModule,
- HttpClientModule,
- AppRoutingModule
- ],
- providers: [],
- bootstrap: [AppHomeComponent]
- })
- export class ProductManagerModule { }
Implement API Wrapper Service
Since we already complete the API operations, but still we need to implement Angular HTTPClient Module call in all the components from where we want to communicate with the API server. That's why we will create an API communication service that will be responsible for any type of API communication. We will inject this API communication service into our component to invoke the API call. For that purpose, we will add a new service under the shared folder called api.service.ts.
- import { Injectable } from '@angular/core';
- import { HttpClient, HttpHeaders, HttpRequest, HttpResponse } from '@angular/common/http';
- import { map } from 'rxjs/operators';
- import { Observable } from 'rxjs';
- import { environment } from '../../environments/environment';
- @Injectable()
- export class ApiService {
- private baseUrl = environment.apiUrl;
- constructor(private http: HttpClient) { }
- subscribeFunction(res: any): any { return null };
- errorFunction(res: any): any { return res };
- subscribe(r: any): any {
- this.subscribeFunction = r;
- return this;
- };
- error(e: any): any {
- this.errorFunction = e;
- return this;
- };
- get(url: string) {
- return this.request(url, "GET");
- }
- post(url: string, body: Object) {
- return this.request(url, "POST", body);
- }
- put(url: string, body: Object) {
- return this.request(url, "PUT", body);
- }
- delete(url: string) {
- return this.request(url, "DELETE");
- }
- request(url: string, method: string, body?: Object) : any {
- const headers = new HttpHeaders();
- headers.append('Content-Type', 'application/json');
- const finalUrl =`${this.baseUrl}/${url}`;
- var request;
- if (body) {
- request = new HttpRequest(method, finalUrl,body,{headers:headers, responseType:'json'});
- }
- else{
- request = new HttpRequest(method, finalUrl,{headers:headers});
- }
- let serviceObject=this;
- this.http.request(request)
- .subscribe((res: HttpResponse<any>) =>{
- if (serviceObject.subscribeFunction != null) {
- serviceObject.subscribeFunction(res.body);
- }
- },
- (error: HttpResponse<any>) => {
- const statusCode = error.status;
- const body = error.statusText;
- const errorMessage = {
- statusCode: statusCode,
- error: body
- };
- console.log(errorMessage);
- return Observable.throw(error);
- }
- );
- return this;
- }
- }
- import { Component, OnInit } from '@angular/core';
- import { Product } from '../shared/product.model';
- import { Observable } from 'rxjs';
- import { ApiService } from '../shared/api.service';
- @Component({
- selector: 'app-product-list',
- templateUrl: './product-list.component.html'
- })
- export class ProductListComponent implements OnInit {
- products: Array<Product>;
- constructor(public http: ApiService) { }
- ngOnInit() {
- this.loadData().subscribe((data) => {
- this.products = data;
- });
- }
- private loadData(): Observable<any> {
- return this.http.get('products');
- }
- }
- import { BrowserModule } from '@angular/platform-browser';
- import { NgModule } from '@angular/core';
- import { FormsModule } from '@angular/forms';
- import { HttpClientModule } from '@angular/common/http';
- import { AppRoutingModule } from './app-routing.module';
- import { AppHomeComponent } from './app.component';
- import { MenuComponent } from './menu/menu.component';
- import { ProductListComponent } from './product-list/product-list.component';
- import { ProductComponent } from './product/product.component';
- import { AddContactComponent } from './add-product/add-product.component';
- import { ApiService } from './shared/api.service';
- @NgModule({
- declarations: [
- AppHomeComponent,
- MenuComponent,
- ProductListComponent,
- ProductComponent,
- AddContactComponent
- ],
- imports: [
- BrowserModule,
- FormsModule,
- HttpClientModule,
- AppRoutingModule
- ],
- providers: [ApiService],
- bootstrap: [AppHomeComponent]
- })
- export class ProductManagerModule { }
Implement Router in Express App
Now, we need to implement the API router in the express app. Since, we need to implement the API router and then intialize that API router through the Express App. For that purpose, first, we need to create api-router.js file and add the below code:
- const express = require('express');
- const {MongoClient} = require('mongodb');
- const jwt = require('jsonwebtoken');
- const bcrypt = require('bcrypt');
- function apiRouter() {
- const router = express.Router();
- router.get('/products', async (req, res) => {
- let client = new MongoClient(process.env.DB_CONN,{ useNewUrlParser: true, useUnifiedTopology: true });
- await client.connect();
- const cursor = await client.db(process.env.DB_NAME).collection('Products')
- .find({});
- const result = await cursor.toArray((err, docs) => {
- return res.json(docs)
- });
- });
- router.post('/api/products', async(req,res) => {
- const product = req.body;
- let client = new MongoClient(process.env.DB_CONN,{ useNewUrlParser: true, useUnifiedTopology: true });
- await client.connect();
- const productCollection = await client.db(process.env.DB_NAME).collection('Products');
- productCollection.insertOne(product, (err, r) => {
- if (err) {
- return res.status(500).json({ error: 'Error inserting new record.' });
- }
- const newRecord = r.ops[0];
- return res.status(201).json(newRecord);
- });
- });
- return router;
- }
- module.exports = apiRouter;
- const express = require('express');
- const bodyParser = require('body-parser');
- const path = require('path');
- const apiRouter = require('./api-router');
- function createExpressApp() {
- const app = express();
- app.use(express.static(path.join(__dirname, 'public')));
- app.use('/images', express.static(path.join(__dirname, 'images')));
- app.use(bodyParser.json());
- app.use('/api', apiRouter());
- app.use('*', (req, res) => {
- return res.sendFile(path.join(__dirname, 'public/index.html'))
- });
- return app;
- }
- module.exports = createExpressApp;
- const express = require('express');
- const app = express();
- const {MongoClient} = require('mongodb');
- const bodyParser = require('body-parser');
- const path = require('path');
- const createExpressApp = require('./create-express-app');
- require('dotenv').config();
- let mongoclient;
- console.log('Server Started');
- async function initializeDBConnections(){
- let client = new MongoClient(process.env.DB_CONN,{ useNewUrlParser: true, useUnifiedTopology: true });
- await client.connect();
- console.log("Database connection ready");
- // Initialize the app.
- createExpressApp().listen(3000, () => {
- mongoclient= client;
- console.log("App Run in Port 3000");
- });
- }
- initializeDBConnections();
Create a JWT Token and Implement an API Endpoint
Now, we need to implement authentication in the API. For that purpose, we will implement the JWT token for authentication purposes. For activate JWT token, we first need to provide a JWT secret in the .env file. If you need to generate the JWT secret then that can be retrieved from this URL. Now, after putting the JWT secret, need to make changes in the API-router.js file. We need to check the JWT token before any API router and also, we will create a new API endpoint for authentication purposes. This endpoint accepts the user name and password as input and generates and returns the token if the provided user name and password matched with the stored user name and password in the Mongo DB user collection.
- const express = require('express');
- const {MongoClient} = require('mongodb');
- const jwt = require('jsonwebtoken');
- const bcrypt = require('bcrypt');
- const checkJwt = require('express-jwt');
- function apiRouter() {
- const router = express.Router();
- router.use(
- checkJwt({ secret: process.env.JWT_SECRET }).unless({ path: '/api/authenticate'})
- );
- router.use((err, req, res, next) => {
- if (err.name === 'UnauthorizedError') {
- res.status(401).send({ error: err.message });
- }
- });
- router.get('/products', async (req, res) => {
- let client = new MongoClient(process.env.DB_CONN,{ useNewUrlParser: true, useUnifiedTopology: true });
- await client.connect();
- const cursor = await client.db(process.env.DB_NAME).collection('Products')
- .find({});
- const result = await cursor.toArray((err, docs) => {
- return res.json(docs)
- });
- });
- router.post('/products', async(req,res) => {
- const product = req.body;
- let client = new MongoClient(process.env.DB_CONN,{ useNewUrlParser: true, useUnifiedTopology: true });
- await client.connect();
- const productCollection = await client.db(process.env.DB_NAME).collection('Products');
- productCollection.insertOne(product, (err, r) => {
- if (err) {
- return res.status(500).json({ error: 'Error inserting new record.' });
- }
- const newRecord = r.ops[0];
- return res.status(201).json(newRecord);
- });
- });
- router.post('/authenticate', async(req, res) => {
- const user = req.body;
- let client = new MongoClient(process.env.DB_CONN,{ useNewUrlParser: true, useUnifiedTopology: true });
- await client.connect();
- const usersCollection = await client.db(process.env.DB_NAME).collection('Users');
- usersCollection
- .findOne({ username: user.username }, (err, result) => {
- if (!result) {
- return res.status(404).json({ error: 'user not found' })
- }
- if (!bcrypt.compareSync(user.password, result.password)) {
- return res.status(401).json({ error: 'incorrect password '});
- }
- const payload = {
- username: result.username,
- admin: result.admin
- };
- const token = jwt.sign(payload, process.env.JWT_SECRET, { expiresIn: '4h' });
- return res.json({
- message: 'successfuly authenticated',
- token: token
- });
- });
- });
- return router;
- }
- module.exports = apiRouter;
So, from now onwards we need to first generate Token and then pass that token in the header part of the API request so that our API can be authenticated.
Implement Http Interceptor to Pass token from Component to API Request
So, after implementing the JWT token in the API request, we can retrieve the product data through postman after passing the token value. But need to pass the token value from our angular application so that we can call the API endpoint, it will return the data from the application. For that purpose, first, we need to create a jwtinterceptor service so that it can intercept any HTTP request and push the token value within that HTTP request. So, we will add a new file called jwtinterceptor.ts file under the shared folder and add the below code:
- import { Injectable } from '@angular/core';
- import { HttpRequest, HttpHandler, HttpEvent, HttpInterceptor } from '@angular/common/http';
- import { Observable } from 'rxjs';
- import { AuthService } from './auth.service';
- @Injectable()
- export class JwtInterceptor implements HttpInterceptor {
- constructor(private authenticationService: AuthService) { }
- intercept(request: HttpRequest<any>, next: HttpHandler): Observable<HttpEvent<any>> {
- const isLoggedIn = this.authenticationService.isLoggedIn();
- const token = this.authenticationService.getToken();
- if (isLoggedIn) {
- request = request.clone({
- setHeaders: {
- Authorization: `Bearer ${token}`
- }
- });
- }
- return next.handle(request);
- }
- }
- import { Injectable } from '@angular/core';
- import { Router } from '@angular/router';
- @Injectable()
- export class AuthService {
- storageKey: string = 'product-manager-jwt';
- constructor(private router: Router) { }
- setToken(token: string) {
- localStorage.setItem(this.storageKey, token);
- }
- getToken() {
- return localStorage.getItem(this.storageKey);
- }
- isLoggedIn() {
- return this.getToken() !== null;
- }
- logout() {
- localStorage.removeItem(this.storageKey);
- this.router.navigate(['/login']);
- }
- }
Implement Login Screen
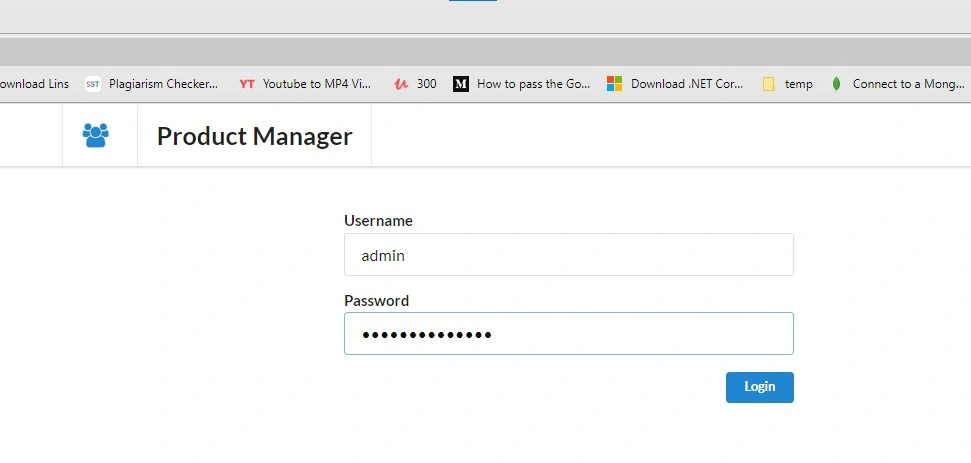
Now, since we already implement the authentication service and http interceptor service in the client-side application. Now we need to provide options to generate the token from the client-side application. For that purpose, we need to add Login Component in the client-side application.
login.component.ts
- import { Component, OnInit } from '@angular/core';
- import { ApiService } from '../shared/api.service';
- import { AuthService } from '../shared/auth.service';
- import { Router } from '@angular/router';
- import { NgForm } from '@angular/forms';
- @Component({
- selector: 'app-login',
- templateUrl: './login.component.html',
- styleUrls: ['./login.component.css']
- })
- export class LoginComponent implements OnInit {
- constructor(private api: ApiService,private auth: AuthService,private router: Router) {
- }
- ngOnInit() {
- }
- onSubmit(form: NgForm) {
- const values = form.value;
- const payload = {
- username: values.username,
- password: values.password
- };
- this.api.post('authenticate', payload)
- .subscribe(data => {
- if (data!=undefined){
- this.auth.setToken(data.token);
- this.router.navigate(['/products']);
- }
- });
- }
- }
login.component.html
- <div class="login-container">
- <form class="ui big form" #loginForm="ngForm" (submit)="onSubmit(loginForm)">
- <div class="field">
- <label>Username</label>
- <input type="text" name="username" placeholder="Username" ngModel>
- </div>
- <div class="field">
- <label>Password</label>
- <input type="password" name="password" placeholder="Password" ngModel>
- </div>
- <button type="submit" class="ui primary button float right floated">Login</button>
- </form>
- </div>
- import { NgModule } from '@angular/core';
- import { Routes, RouterModule } from '@angular/router';
- import { ProductListComponent } from './product-list/product-list.component';
- import { AddProductComponent } from './add-product/add-product.component';
- import { LoginComponent } from './login/login.component';
- import { AuthGuard } from './auth.guard';
- const routes: Routes = [
- {
- path: '',
- redirectTo: 'login',
- pathMatch: 'full'
- },
- {
- path: 'products',
- component: ProductListComponent,
- canActivate:[AuthGuard]
- },
- {
- path: 'newproduct',
- component: AddProductComponent,
- canActivate:[AuthGuard]
- },
- {
- path: 'login',
- component: LoginComponent
- },
- {
- path:'**',
- redirectTo:'products'
- }
- ];
- @NgModule({
- imports: [RouterModule.forRoot(routes)],
- exports: [RouterModule]
- })
- export class AppRoutingModule { }
- import { Injectable } from '@angular/core';
- import { CanActivate, ActivatedRouteSnapshot, RouterStateSnapshot } from '@angular/router';
- import { Observable } from 'rxjs';
- import { AuthService } from './shared/auth.service';
- import { Router } from '@angular/router';
- @Injectable()
- export class AuthGuard implements CanActivate {
- constructor(private auth: AuthService, private router: Router) {}
- canActivate(
- next: ActivatedRouteSnapshot,
- state: RouterStateSnapshot): Observable<boolean> | Promise<boolean> | boolean {
- if (this.auth.isLoggedIn()) {
- return true;
- } else {
- this.router.navigate(['/login']);
- return false;
- }
- }
- }
Conclusion
So, in this article, we will discuss how to develop a web-based application using MEAN stack i.e. MongoDB, Express, Angular, and NodeJs. The source code related to this article also attached along with the article. Any feedback or suggestion related to this article is always welcome.
anubha sahuPosted Aug 28, 2020, 11:02 AM
How can i get password to run the application?