

Introduction
So you finished your application and you are ready to deploy it. You want to create a setup for the application, but you don't want to spend a $1000+ on InstallShield or Wise InstallBuilder. You create a setup project in Visual Studio .NET and run the setup wizard. It creates a minimal installation, but where is my readme dialog? Where is my registration dialog? How can I make this minimal installation actually do something besides copy my files into a directory?
The fact of the matter is that Visual Studio.NET already contains everything you need to create a rich setup experience for your users. In this article, we are going to show you two ways to add a readme dialog to your application, the easy way, and the hard way. The easy way requires absolutely no coding. The hard way requires coding and actually allows you to add complex custom features to your application.
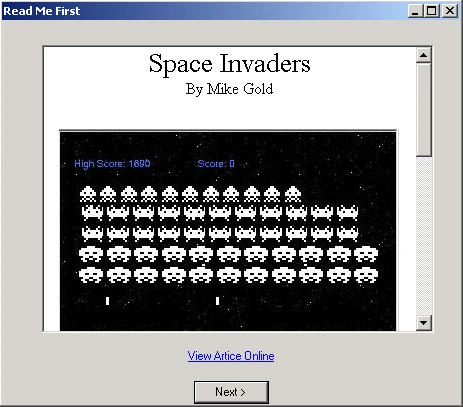 Figure 1 - Custom ReadMe Dialog Added to the .NET Setup
Creating a Read Me Dialog the Easy Way
The first step in creating an installation for your application is to create a new Setup Project and run the Setup Wizard (See my article on creating a setup project in Visual Studio.NET). Once you've created a minimum setup project for your application, you can use the solution explorer to add the readme dialog. Just right click on the Setup Project and choose View->User Interface as shown in figure 2 below:
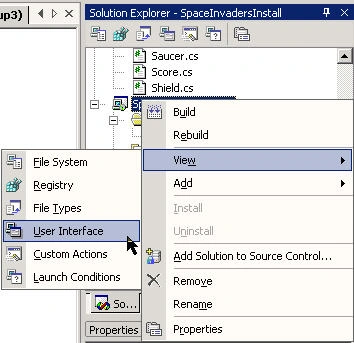
Figure 2 - Adding User Interfaces to your Setup Project
This menu action will bring up a template dialog with a host of additional setup dialogs you can add to your installation. Each template is accompanied by a property sheet in which you can adjust the properties of the dialog to suit your particular dialog. The template dialog is shown in figure 3 below. Note that the read me template is selected:
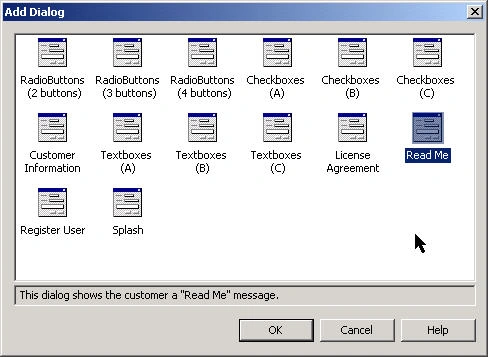
Figure 3 - The Template Dialog for adding additional Useful Screen to your set up
Double Clicking on the Read Me file adds it to the User Interface View. We can use the Move Up and Move Down buttons to choose where it appears in our setup (see figure 4). You can also see from the user interface screen that the setup wizard has automatically added a Welcome Screen, An Installation Folder Screen, and A Confirmation Screen. You can click on any one of these screens in the User Interface View and edit the properties of these views as well. Also note that there are two installations created by the setup wizard: a personal install sequence and an administration install sequence. In this example, we are only adding the readme to the personal install.
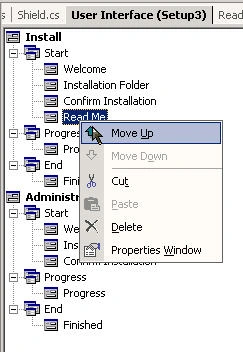
Figure 4 - Ordering the Readme in the User Interface Screen
By clicking on the ReadMe template in the User Interface Tree, we bring up the property screen shown in Figure 5. The ReadMe Template has three properties: BannerBitmap, ReadmeFile, and Sunken. The BannerBitmap allows you to change the bitmap appearing in the upper right-hand corner of the Readme dialog. The ReadmeFile property allows you to choose a rich text format readme file to display inside the dialog. Rich Text Format is nice because you can display different types of fonts, formats, colors, and pictures inside the readme file. A rich text file readme can easily be created using either Microsoft Word or if you don't own Word, you can use WordPad.
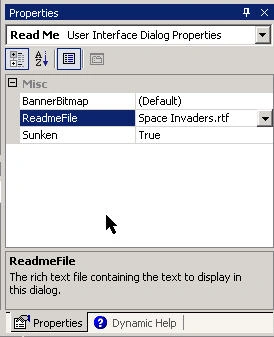
Figure 5 - Property Window for the ReadMe Dialog Template
That's all there is to create a read me dialog using the User Interface Dialog Templates. Now you just build your setup project in Visual Studio and run the installation it creates. The readme that is displayed is shown in figure 6 below:
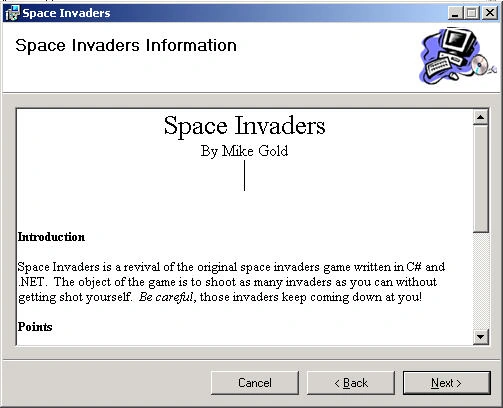
Figure 6 - Readme File Shown during Installation
Creating a Custom ReadMe File using C#
Perhaps you aren't thrilled with the ReadMe provided with the User Interface Templates. Perhaps you want more features and enhancements to the dialog displayed. (For example, pictures don't seem to show up in the readme in the current User Interface Template). Maybe you want a link to your website in the readme dialog so you can provide a dynamic readme update. What can you do? The Microsoft Visual Studio.NET framework not only supplies you with ready-made custom User Interface Dialogs to add to your setup. It also provides a way to create custom actions for your setup project. In the custom actions, you can basically add anything to your setup project that you can program yourself. Custom actions can include doing additional file manipulation (such as copying files to other directories), GAC manipulation, Registry manipulation, Internet Updates, creating databases, etc. The sky is the limit here, the only drawbacks art that you have to code it up (albeit, for a programmer, this may not seem like drawback) and that the action will only occur at the end of your installation.
To add a custom action to your project. Right-click on the deployment project in the solution explorer and choose View->Custom Actions.
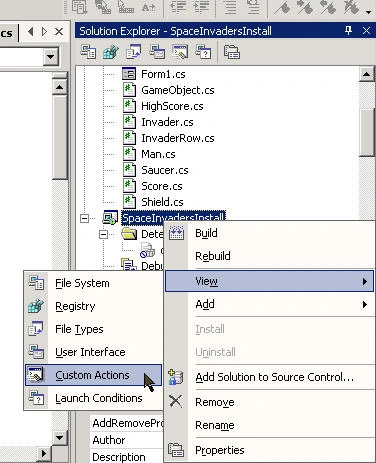
Figure 7 - Choosing Custom Actions from the menu in Solution Explorer
Choosing Custom Actions brings up the custom action screen shown in figure 8. Custom Actions can be divided into 4 categories: Install, Commit, Rollback, and Uninstall depending on what part of the installation you want to affect. In our readme example, we add a custom action and place it in the Install section.
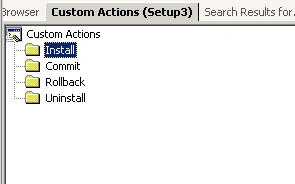
Figure 8 - Custom Action View in Visual Studio.NET
Creating a Custom Action Assembly
You may be wondering, what form does a custom action take? A custom action is simply an executable, script(vb or javascript), or assembly that is executed at the end of the installation. In the case of the ReadMe Dialog, we are going to use a special Installer Class Assembly created in .NET Class Library. The first step to creating our custom action assembly is to create a new class library project in our solution (see figure 9):
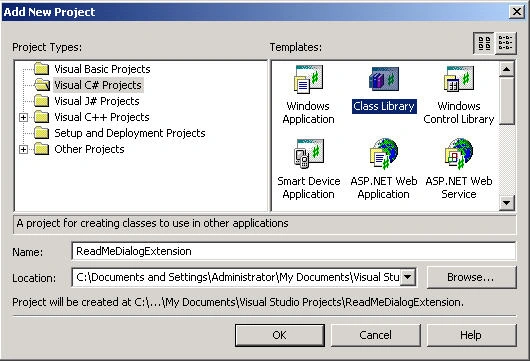
Figure 9 - Adding the class library project for the readme dialog extension
This creates a project which will contain our Installer Class. The next step is to convert our library class to a class that uses the Installer library assembly. First, we will need to add a reference to the assembly to allow it to utilize the System.Configuration.Install the library. If we right-click on the class library project and choose Add References, it will bring up the dialog shown in figure 10 and allow us to add this assembly reference to our project.
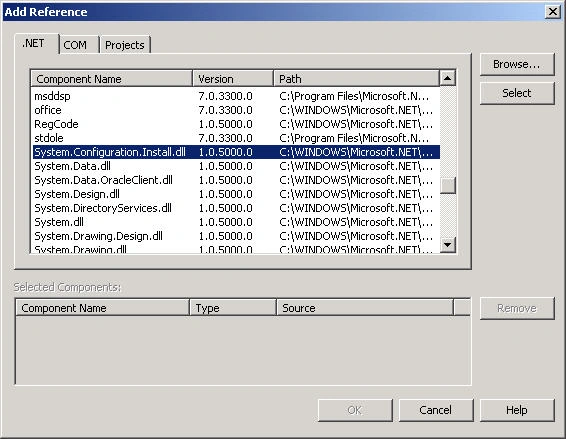
Figure 10 - Adding the Install library to our Custom Action Assembly
Note, in the case of the read me file dialog, we will also need to add System.Windows.Forms.dll reference, since the Class Library project doesn't contain it by default.
Coding the Installer
Now we are ready to code up the ReadMe Window Custom Action. The first step is to create the derived Installer class. Creating the Installer class will allow entry into the installation and also allow us to bring over any parameters passed from the Custom Action. Note that we need to add an attribute RunInstaller to our Installer class and set it to true, in order to gain entry from the installation.
Listing 1 - Installer Class for the Custom Action Readme file
- // Set 'RunInstaller' attribute to true.
- [RunInstaller(true)]
- public class ReadmeInstaller: Installer {
- public ReadmeInstaller(): base() {}
- // Override the 'Install' method.
- // The Installation will call this method to run the Custom Action
- public override void Install(IDictionary savedState) {
- base.Install(savedState);
- // get readme file name from custom action parameter
- string ProvidedName = this.Context.Parameters["file"];
- // get hyperlink to web from custom action parameters
- string LinkName = this.Context.Parameters["link"];
- // get the source directory of the installation from the default context parameters
- string TheAssemblyPath = this.Context.Parameters["assemblypath"];
- string MainDirectory = TheAssemblyPath.Substring(0, TheAssemblyPath.LastIndexOf "\\"));
- // Construct a ReadMe Dialog and pass it all the parameters from the installation ReadmeForm MyReadMe = new ReadmeForm(ProvidedName, LinkName, MainDirectory);
- // Show the ReadMe Dialog in the installation
- MyReadMe.ShowDialog();
- }
The Readme dialog we want to create looks similar to the one in the user interface template dialog, except it also contains a field for the hyperlink to a website. The dialog uses an rtf control to display the readme, a LinkLabel control to launch the readme Internet Explorer page, and a button to terminate the custom action. (See Figure 11.)
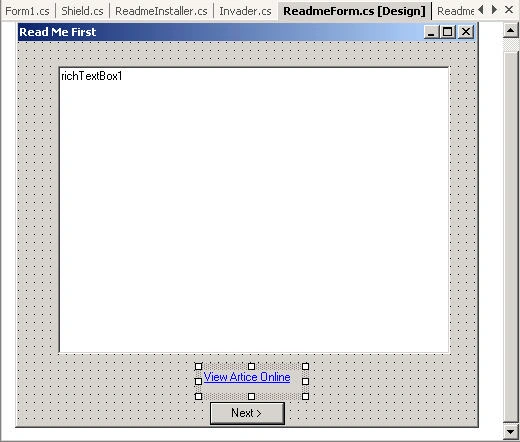
Figure 11 - Readme Form Design
The rtf file is read into the control using a StreamReader. The StreamReader reads the rtf file into a string using the file name passed in as a custom action parameter. The string is then simply assigned to the RichTextbox control's Rtf property as shown in Listing 2.
Listing 2 - Reading the rtf file into the Readme Dialog:
- void ReadRtfReadMe() {
- // Use StreamReader to read the rtf file into a string and assign it to the Rtf property of the RichTextBox
- // control
- StreamReader sr = new StreamReader(MainDirectoryPath + "\\" +
- eadmeFileName);
- richTextBox1.Rtf = sr.ReadToEnd();
- sr.Close();
- }
The hyperlink is activated in the LinkLabel's click event. The program uses the Process class to launch Internet Explorer with the hyperlink passed in as a Custom Action Parameter:
Listing 3 - Launching the link from the Custom Action Data
- // Put user code to initialize the page here
- private void linkLabel1_LinkClicked(object sender, System.Windows.Forms.LinkLabelLinkClickedEventArgs e) {
- try {
- Process.Start("IExplore.exe", ReadmeLink);
- } catch (Exception ex) {
- MessageBox.Show("Couldn't Show Page " + ReadmeLink);
- }
- }
Adding the assembly to the Setup Project as a Custom Action
Once we've finished coding up our custom action assembly and compiling it, we need to add it to the setup project. If we go back to our Custom Action View (shown in figure 8 above), we can right-click on the Install Action folder and add the class library assembly we just created by choosing Add Custom Action.
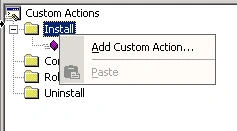
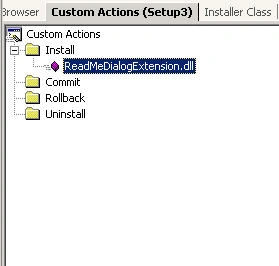
Figure 12 - Adding the Custom Action Assembly to the Setup Project
Now we need to setup the properties of our custom action assembly. The Properties window allows us to specify the parameters we wish to pass into the custom action assembly. This way we can specify the rtf file used, and the hyperlink at the bottom of the page. Clicking on the ReadMeDialogExtension.dll inside the Custom Actions View brings up the Properties Window for this custom action assembly shown in Figure 13. Note that InstallerClass is set to True to tell the setup that we are using the Installer Class.
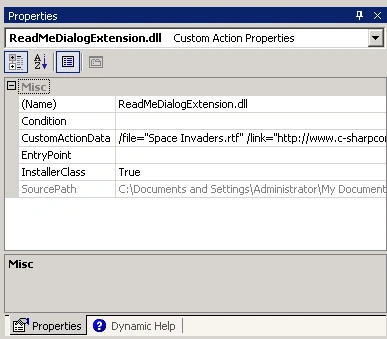
Figure 13 - Property Window for the ReadMe Custom Action Assembly
If we examine the CustomActionData properties of the Properties Window, we note that the parameters are passed in a certain format. All parameter keys are specified as /key. All parameter values are contained in double-quotes after an equal sign. Be sure there are no spaces surrounding the equal sign, this caused me some initial problems. Remember that the parameter /file="Space Invaders.rtf" is handled inside the Installer class (Listing 1) as
- // get readme file name from custom action parameter
- string ProvidedName = this.Context.Parameters["file"];
That's all there is to creating a Custom Action in your installation. We can now rebuild the setup project and if we run our setup we get the dialog shown in Figure 1 coming up at the end of our installation.
Conclusion
Next time you plan on deploying your application and are curious about how you are going to implement the special actions that only your installation contains, look no further. You can create any custom action you want using the Visual Studio framework. This way your customers won't be disappointed when you deliver them your next killer app in .NET
rockyy sjjkjaPosted Feb 21, 2012, 8:22 AM
what if i wan to open the ReadMeDialog not by the end of Installation i need to open it up after Welcome dialog is it possbile. even by using Move Up didn't work.any solution u got.
Milton EmmattyeditedPosted Sep 1, 2010, 5:44 PMEdited Sep 1, 2010, 5:45 PM
Can I access webservice from Installer Class for the Custom Action ? Private Sub InstallHelper_BeforeInstall(ByVal sender As Object, ByVal e As System.Configuration.Install.InstallEventArgs) Handles Me.BeforeInstall Try Dim _serialNumber As Long = Context.Parameters("serial") Dim _verificationProxy As New VerificationProxy.VerificationService() ' It breaks here _verificationProxy.SerialNumberVerification(_serialNumber) End Sub Note: The webservice works perfectly
encrypt forallPosted Dec 5, 2009, 5:16 PM
Thank you,
Ajay ChoudharyPosted Jul 26, 2009, 10:11 AM
checking
sanik bajracharyaPosted Jan 8, 2009, 12:32 PM
i have an application on C# and i built the setup file using setup and deployment > setup project. now here is the problem, during installation task the default installation path is assgined as (for eg: c:\program files\xxxx). i removed this path completely and pressed next button without any other path supplied. the installation proceeds fine without any alert..???? and the exe file is setup to the default installation path . so is there any way so that i could validate the installation path so that it's not empty????? plz help solve this problem..
q aPosted Nov 6, 2008, 9:00 AM
Excelente artículo !!!!. Gracias Mike
jaya mathiPosted Aug 22, 2008, 6:41 AM
I want to generate a unique serial key for the software .Can any one help me for dis.. Thanks in advance..
Specs AreGoodPosted Mar 9, 2008, 2:39 PM
This was just what I needed.
Mushtaque NizamaniPosted Feb 29, 2008, 2:46 AM
Hi Mike, Thanks a lot for this wonderful article.
rama krishnaPosted Apr 11, 2007, 3:45 PM
I have created one assembly(.net 2.0 c#) which talks to the web service for getting information from DB. when I do setup a project, it asks for user id(UI provided in Setup project). If we supply wrong userid it shows message, but setup is continuing. I want to stop that continuing setup. how to do this? please help me out Thanks
mallikarjun kalkerePosted Feb 28, 2007, 11:47 PM
hay this was very helpful... but i need still more help.... i want to add to check boxes to the finished dialog and give the functionality to it how can i do it??? plz help me out...
neha singlaPosted Feb 6, 2007, 5:23 PM
error is setup1.vdproj is missing how should i solve it
aperna kPosted Oct 3, 2006, 9:17 AM
hi i`m new to .net....i just need your guidence.. 1.i have created an application and i have give to client by setup exe ,client ask for some change i modify it how will i give it back 2.Just refer some website which wil explain me step by step process in creating a we site ...using .net 2005 hope your answer will be useful to others also.. thanks in advance regards aperna
Yen NguyenPosted Apr 28, 2006, 5:23 PM
Thank you for sharing us the good coding example. I try to build the installer for the application that the data file will be updated by users. So after the user uninstall the application, the data file should be remain (I did that). But when the user reinstall the application again (with later version), the installer should not install the initial data file again. But if the data file is gone or for first time installation, the initial data file should be installed. I am still not succeed for this case. Do you have any idea to share or help. Thanks in advance.