

Introduction
In this article, we will learn how to deploy an ASP.NET Core-hosted Blazor application on Azure. We will use Visual Studio 2017 to publish the app and create an SQL database server on Azure to handle the DB operations.
Prerequisites
- Install the .NET Core 2.1 or above SDK from here.
- Install Visual Studio 2017 v15.7 or above from here.
- Install the ASP.NET Core Blazor Language Services extension from here.
- An Azure subscription account. You can create a free Azure account here.
Please refer to my previous article Cascading DropDownList in Blazor Using EF Core to create the application that we will be deploying in this tutorial.
Create a resource group on the Azure portal
We will create a resource group on the Azure portal to contain all our resources on Azure. Log into the Azure portal click on “Resource groups” on the left menu and then click Add. It will open a “Resource group” window, as shown in the image below.
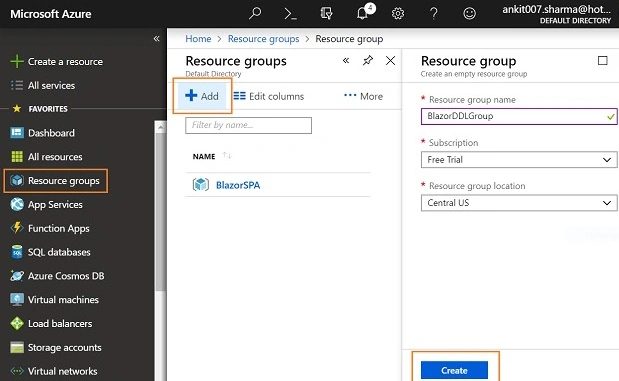
In this window, we need to fill in the following details
- Resource group name: Give a unique name to your resource group. Here, we will use the name BlazorDDLGroup.
- Subscription: Select your subscription type from the drop-down. Here, we are selecting the “free trial” subscription.
- Resource group location: Select a location for your resource group from the drop-down.
Creating SQL DB and DB server on Azure
We will create the SQL database and a database server on the Azure portal to handle our DB operations.
Click on “SQL databases” on the left menu of your Azure portal and then click Add. It will open an “SQL Database” window, as shown in the image below.
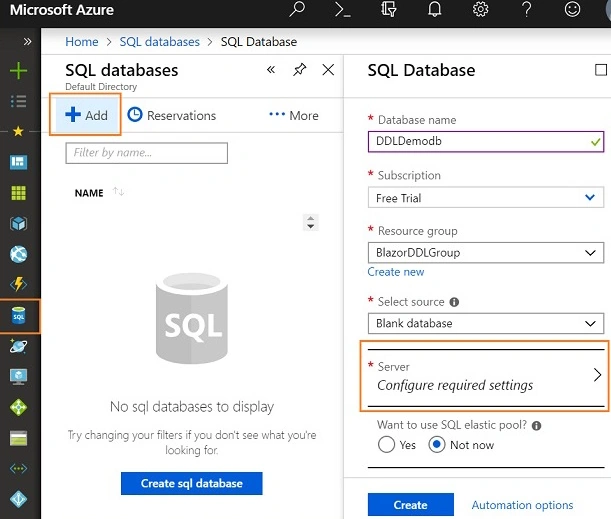
Here, you need to fill in the following details.
- Database name: Put in a name for your database. Here we will use DDLDemodb as our DB name.
- Subscription: Select your subscription type from the drop-down. Here we are selecting the “free trial” subscription.
- Resource group: Select the resource group name that we have created in the previous step.
- Select source: This drop-down contains a list of databases with predefined data provided by Azure. Since we are creating our custom database, hence we will select “Blank database” from this drop-down.
- Pricing tier: Select a pricing tier for your database.
Before creating the database, we need to create a database server for the SQL database. Click on the “Server configure required settings” and then click “Create a new server”. It will open a “New server” window, as shown in the image below.
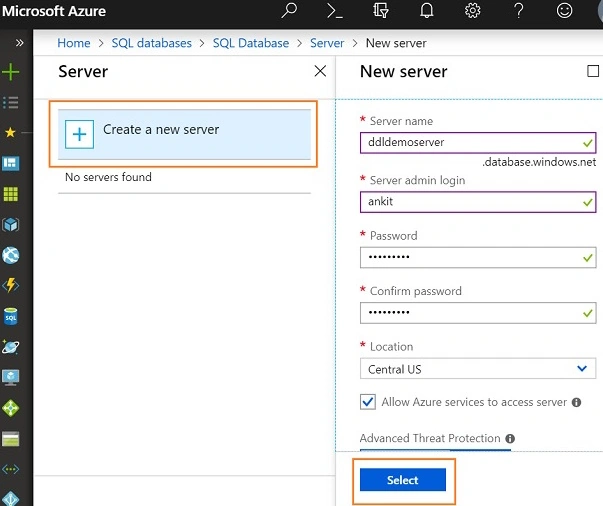
Here we need to furnish the following details
- Server name: Provide a name for your DB server. Here, we will use ddldemoserver. The DB server will be created by appending “.database.windows.net” to the user-provided server name. Hence, the server name will be “ddldbserver.database.windows.net” in this case.
- Server Admin Login: Put an admin login name for your DB server.
- Password: Put the login password corresponding to the admin login for your DB server.
- Location: Select a location for your server from the drop-down.
Check the “Allow Azure services to access server” checkbox and click on “Select” to create your DB Server.
Note. The word “admin” is restricted to the administrator username of the database server. Use any other username than “admin”.
Once the DB server gets created, you will be redirected to the “SQL Database” window. You need to click on the “Create” button to create your database.

Here is the whole process explained in a gif.
Creating DB tables
The database DDLDemodb does not contain the tables that we are using in our application. We will connect to the Azure database using SQL Server Management Studio (SSMS) to create our DB objects.
Open SSMS in your machine and put the server name as “ddldbserver.database.windows.net”. Provide the admin user ID and password that you have configured in the previous section and click on “Connect”.
You will get a pop-up window for configuring the firewall rule to access the Azure DB. Log in with your Azure account credentials and add your machine IP address under the “Firewall rule”. Click on OK to connect to the Azure database server. Refer to the image below.
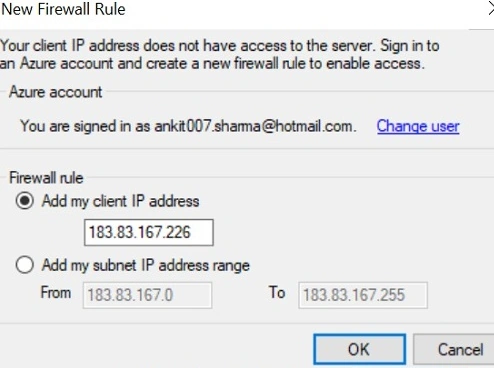
Once the connection is successful, you can see the DDLDemodb database on the server.
Refer to the articleCascading DropDownList in Blazor Using EF Core and run the SQL commands to create and insert sample data in the Country and Cities table that we are using in our application.
Setting the DB connection string
After creating the database objects, we need to replace the connection string of the local database in our application with the connection string of the Azure database.
Open the Azure portal and click on “SQL databases” on the left menu. It will open a window displaying the list of all the databases that you created on the Azure portal. Click on the “DDLDemodb” database and then select “connection strings” from the menu. Select the “ADO.NET” tab and copy the connection string. Refer to the image below.
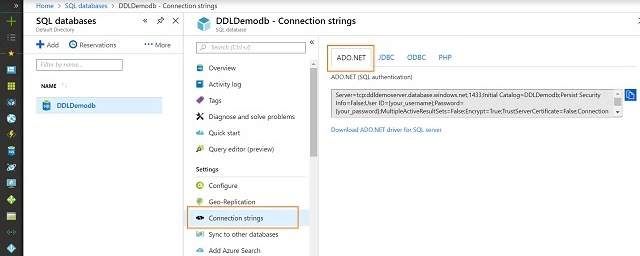
You need to put the admin user ID and password for the database server that you configured earlier in this connection string.
Open the BlazorDDL application using Visual Studio, and navigate to BlazorDDL.Shared/Models/myTestDBContext.cs and replace the local connection string with this new connection string.
Launch your application from Visual Studio to verify if the new connection string is configured correctly and you can access the Azure database.
If the application is not working and you are unable to connect to the database then check if your connection string is correct or not. Once the application is working as expected in your local machine then move to the next section to publish it on Azure.
Publishing blazor application to Azure
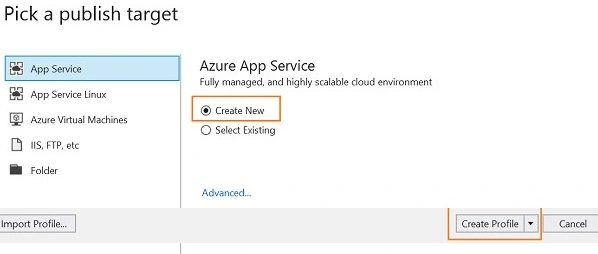
To publish the Blazor app on Azure, Right-click on the Server project of your solution and click publish. In this case, it will be BlazorDDL.Server >> Publish.
It will open the “Pick a publish target” window. Select “App Service” from the left menu. Select the “Create New” radio button and click on “Create profile”. Refer to the image below.
The next window will ask you to log in to your Azure account if you are not logged in. Once the login is successful, a “Create App Service” window will open. Refer to the image below.
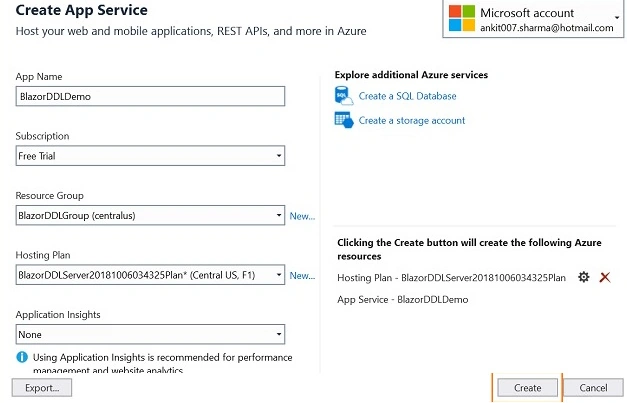
The fields of this window are prepopulated as per the configuration of your Azure account. However, you can change these values as per your requirements.
You can fill in the details as mentioned below
- App Name: Provide an app name for your application. The app name is subject to availability. If the app name you provided is already in use then you need to give a new app name. The website’s public URL will be App Name followed by ".azurewebsites.net". Here we are using the name BlazorDDLDemo, hence the URL for our website will be "BlazorDDLDemo.azurewebsites.net".
- Subscription: Select your subscription type from the drop-down list.
- Resource Group: Select your resource group name, which is BlazorDDLGroup in this case.
- Hosting Plan: You can either use the existing plan or select a new plan by clicking on the “New…” link.
- Application Insights: You can choose a value from the dropdown list. It will provide analytics for your website.
Click on the “Create” button to start the application deployment on Azure. It will take a few minutes to complete depending on your internet connection speed.
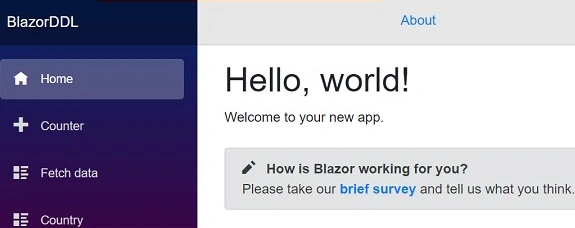
After the deployment is successful, click on the “Publish” button to publish the app to Azure. Once the application is published successfully, the website will be launched automatically in the default browser of your machine. You can also access the website using the URL BlazorDDLDemo.azurewebsites.net.
You can see the application in your browser as shown in the image below
Conclusion
In this article, we learned how to deploy and publish a Blazor application on Azure. We created a SQL database and DB server on Azure and used it in our application to handle the DB operations.
See Also
Sandip PatelPosted Jun 12, 2019, 3:37 PM
Great article with complete details and all steps. Thanks for the great work.
Sarathlal SaseendranPosted Oct 11, 2018, 3:30 PM
It is very informative Ankit. Thanks for sharing.