

Introduction
Welcome to the "Demonstrating Backbone.js" article series. This article demonstrates how to use Backbone.js in a sample application. This article starts with the concept of Backbone.js and various components of it. Previous articles have provided an introduction to views and the implementation of routers and collections. You can get them from the following:
- Demonstrating Backbone.js: Implement View
- Demonstrating Backbone.js: Implement View Part 1
- Demonstrating Backbone.js: Implement View Part 2
- Demonstrating Backbone.js: Implement View Part 3
- Demonstrating Backbone.js: Implement View Part 4
- Demonstrating Backbone.js :Implement View Part 5
- Demonstrating Backbone.js :Implement Routers Part 1
- Demonstrating Backbone.js :Implement Collections Part 2
- Demonstrating Backbone.js :Implement Collections Part 3
- Demonstrating Backbone.js :Implement Collections Part 4
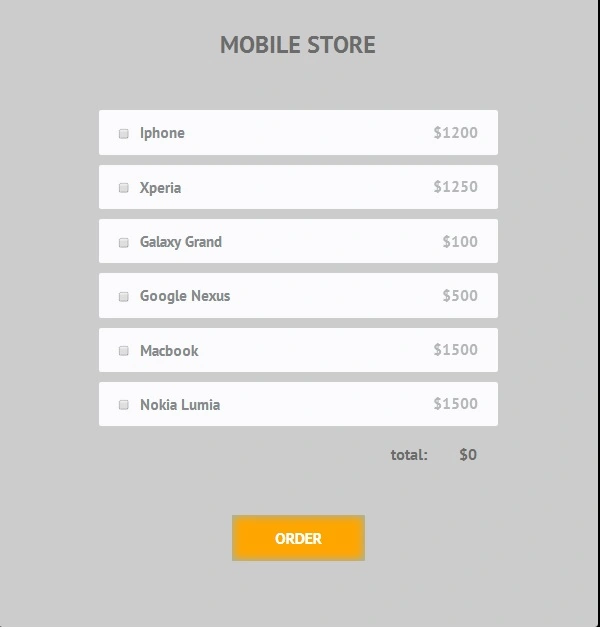
In this article we will see how to use Backbone.js in a simple store application that displays products.
Here we will use a Google web fonts style sheet and customized style sheet.
google.css
- @font-face {
- font-family: 'PT Sans';
- font-style: normal;
- font-weight: 400;
- src: local('PT Sans'), local('PTSans-Regular'), url(http://themes.googleusercontent.com/static/fonts/ptsans/v5/LKf8nhXsWg5ybwEGXk8UBQ.woff) format('woff');
- }
- @font-face {
- font-family: 'PT Sans';
- font-style: normal;
- font-weight: 700;
- src: local('PT Sans Bold'), local('PTSans-Bold'), url(http://themes.googleusercontent.com/static/fonts/ptsans/v5/0XxGQsSc1g4rdRdjJKZrNBsxEYwM7FgeyaSgU71cLG0.woff) format('woff');
- }
Style.css
- /*-------------------------
- Simple reset
- --------------------------*/
- *{
- margin:0;
- padding:0;
- }
- /*-------------------------
- General Styles
- --------------------------*/
- html{
- background-color:#000000;
- }
- body{
- font:15px/1.3 Arial, sans-serif;
- color: #4f4f4f;
- }
- a, a:visited {
- outline:none;
- color:#389dc1;
- }
- a:hover{
- text-decoration:none;
- }
- /*----------------------------
- The main content element
- -----------------------------*/
- #main{
- padding:100px;
- background-color:#ccc;
- box-shadow:0 0 1px #ccc;
- width:700px;
- margin:100px auto;
- border-radius:6px;
- font:bold 24px/1 'PT Sans', sans-serif;
- color:#6b6b6b;
- }
- #main h1{
- font-size:36px;
- text-align: center;
- text-transform: uppercase;
- padding: 0 0 80px;
- }
- #products{
- list-style:none;
- margin:0 auto;
- width:600px;
- }
- #products li{
- background-color: #fbfbfc;
- box-shadow:0 1px 1px #eee;
- font-size:22px;
- color: #85898b;
- padding:22px 30px;
- margin-bottom:15px;
- border-radius:4px;
- cursor:pointer;
- }
- #products li span{
- float:right;
- opacity:0.6;
- }
- #products li input[type=checkbox]{
- border:1px solid #ccc;
- box-shadow:1px 1px 1px #ccc;
- margin-right:10px;
- width:16px;
- height:16px;
- display:inline-block;
- vertical-align: middle;
- }
- #total{
- font-size:24px;
- text-align:right;
- width:570px;
- margin:30px auto 0;
- padding-right:30px;
- }
- #total span{
- display:inline-block;
- min-width:70px;
- }
- #order{
- font:inherit;
- font-size:24px;
- cursor:pointer;
- border:none;
- display:block;
- background-color:#FFA500;
- color:#fff;
- text-transform:uppercase;
- width:200px;
- margin:80px auto 0;
- text-align:center;
- padding:22px 0;
- border-radius: 3px;
- box-shadow:0 1px 1px #ddd, 0 0 20px #84b8e0 inset;
- }
- #order:hover{
- opacity: 0.9;
- }
Javascript.aspx
In this app we will display the list of products in a store.
Please check the inline comments for a better understanding.
- <%@ Page Language="C#" AutoEventWireup="true" CodeBehind="JavaScript.aspx.cs" Inherits="JavaScript.JavaScript" %>
- <!DOCTYPE html>
- <html xmlns="http://www.w3.org/1999/xhtml">
- <head runat="server">
- <!-- Google web fonts -->
- <link href="css/google.css" rel="stylesheet" />
- <!-- The main CSS file -->
- <link href="css/style.css" rel="stylesheet" />
- </head>
- <body>
- <form id="main">
- <h1>Store</h1>
- <ul id="products">
- <!-- The products will be inserted here -->
- </ul>
- <p id="total">total: <span>$0</span></p>
- <input type="submit" id="order" value="Order" />
- </form>
- <script type="text/javascript" src="backbone/Jquery.js"></script>
- <script type="text/javascript" src="backbone/underscore-min.js"></script>
- <script type="text/javascript" src="backbone/backbone-min.js"></script>
- <script>
- $(function () {
- // Create a model for the products
- var Product = Backbone.Model.extend({
- // Will contain three attributes.
- // These are their default values
- defaults: {
- title: 'My products',
- price: 500,
- checked: false
- },
- // Helper function for checking/unchecking a product
- toggle: function () {
- this.set('checked', !this.get('checked'));
- }
- });
- // Create a collection of products
- var ProductList = Backbone.Collection.extend({
- // Will hold objects of the Product model
- model: Product,
- // Return an array only with the checked products
- getChecked: function () {
- return this.where({ checked: true });
- }
- });
- // Prefill the collection with a number of products.
- var products = new ProductList([
- new Product({ title: 'Iphone', price: 1200 }),
- new Product({ title: 'Xperia', price: 1250 }),
- new Product({ title: 'Galaxy Grand', price: 100 }),
- new Product({ title: 'Google Nexus', price: 500 }),
- new Product({ title: 'Macbook', price: 1500 }),
- new Product({ title: 'Nokia Lumia', price: 1500 })
- // Add more here
- ]);
- // This view turns a Product model into HTML
- var ProductView = Backbone.View.extend({
- tagName: 'li',
- events: {
- 'click': 'toggleProduct'
- },
- initialize: function () {
- // Set up event listeners. The change backbone event
- // is raised when a property changes (like the checked field)
- this.listenTo(this.model, 'change', this.render);
- },
- render: function () {
- // Create the HTML
- this.$el.html('<input type="checkbox" value="1" name="' + this.model.get('title') + '" /> ' + this.model.get('title') + '<span>$' + this.model.get('price') + '</span>');
- this.$('input').prop('checked', this.model.get('checked'));
- return this;
- },
- toggleProduct: function () {
- this.model.toggle();
- }
- });
- // The main view of the application
- var App = Backbone.View.extend({
- // Base the view on an existing element
- el: $('#main'),
- initialize: function () {
- // Cache these selectors
- this.total = $('#total span');
- this.list = $('#products');
- // Listen for the change event on the collection.
- // This is equivalent to listening on every one of the
- // product objects in the collection.
- this.listenTo(products, 'change', this.render);
- // Create views for every one of the products in the
- // collection and add them to the page
- products.each(function (product) {
- var view = new ProductView({ model: product });
- this.list.append(view.render().el);
- }, this); // "this" is the context in the callback
- },
- render: function () {
- // Calculate the total order amount by agregating
- // the prices of only the checked elements
- var total = 0;
- _.each(products.getChecked(), function (elem) {
- total += elem.get('price');
- });
- // Update the total price
- this.total.text('$' + total);
- return this;
- }
- });
- new App();
- });
- </script>
- </body>
- </html>
Output
Summary
In this article, I explained how to use Backbone.js to make a simple store application. In future articles we will understand more about Backbone.js with examples.
In this article, I explained how to use Backbone.js to make a simple store application. In future articles we will understand more about Backbone.js with examples.
Join the conversation! Your thoughts help the community grow.