

Delete Data - Reverse Engineering POCO Generator
Introduction
This article demonstrates an interesting and very useful concept in Entity Framework.
Question: What is the reverse engineering POCO generator?
In simple terms "It is a template that enables generation of entity classes by reverse engineering with the POCO generator".
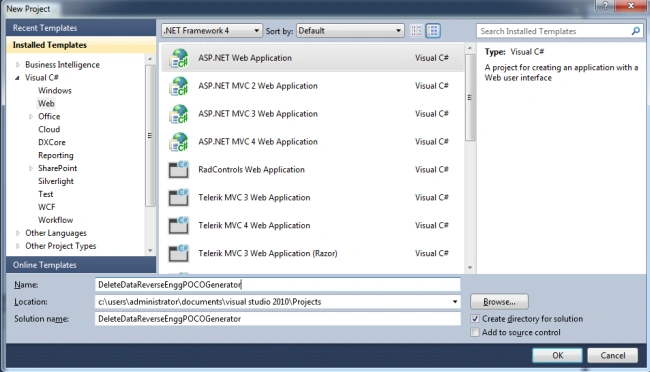
Step 1: Create a new web application
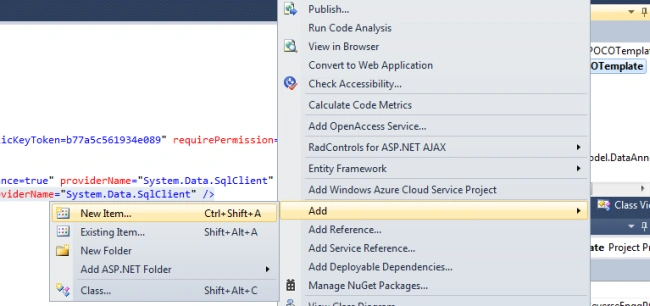
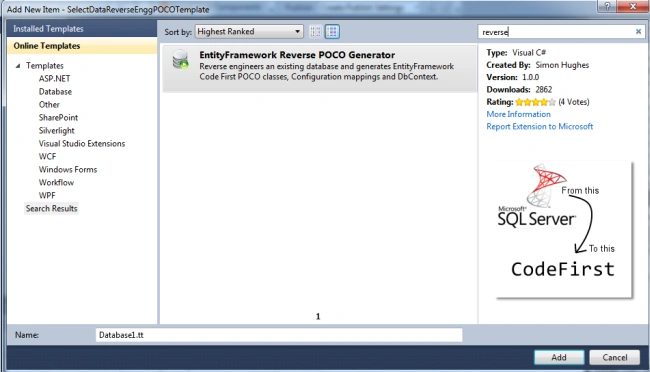
Step 2: Adding a new Entity Framework reverse engineering POCO generator :
Step 3: The complete code of WebForm1.aspx is as in the following:
<%@Page Language="C#"AutoEventWireup="true"CodeBehind="WebForm1.aspx.cs"Inherits="DeleteDataReverseEnggPOCOGenerator.WebForm1"%>
<!DOCTYPE htmlPUBLIC "-//W3C//DTD XHTML 1.0 Transitional//EN" "http://www.w3.org/TR/xhtml1/DTD/xhtml1-transitional.dtd">
<html xmlns="http://www.w3.org/1999/xhtml">
<head id="Head1" runat="server">
<title></title>
</head>
<body>
<formid="form1"runat="server">
<center>
<div>
<table>
<tr>
<tdcolspan="2"align="center">
<asp:LabelID="Label1"runat="server"Text="Delete Data - Reverse Engg. POCO Generator"
Font-Bold="true"Font-Size="Large"Font-Names="Verdana"ForeColor="Maroon"></asp:Label>
</td>
</tr>
<tr>
<td>
<asp:LabelID="Label2"runat="server"Text="Please Enter Employee Id" ForeColor="Brown"
Font-Bold="true"Font-Size="Medium"Font-Names="Verdana"></asp:Label>
</td>
<td>
<asp:TextBoxID="TextBox1"runat="server"></asp:TextBox>
</td>
</tr>
<tr>
<tdcolspan="2"align="center">
<asp:ButtonID="Button1"runat="server"Text="Delete Data"Font-Names="Verdana"Width="213px"
BackColor="Orange"Font-Bold="True"OnClick="Button1_Click"/>
</td>
</tr>
<tr>
<tdcolspan="2"align="center">
<asp:LabelID="Label3"runat="server"Font-Bold="true"Font-Size="Medium"Font-Names="Verdana"></asp:Label>
</td>
</tr>
</table>
</div>
</center>
</form>
</body>
</html>
Step 4: The complete code of WebForm1.aspx.cs is as in the following:
using System;
using System.Collections.Generic;
using System.Linq;
using System.Web;
using System.Web.UI;
using System.Web.UI.WebControls;
namespace DeleteDataReverseEnggPOCOGenerator
{
publicpartial classWebForm1 : System.Web.UI.Page
{
protectedvoid Page_Load(object sender, EventArgs e)
{
}
protectedvoid Button1_Click(object sender, EventArgs e)
{
if (string.IsNullOrEmpty(TextBox1.Text))
{
Label3.Text ="Please Enter Some Values";
Label3.ForeColor = System.Drawing.Color.Red;
}
else
{
int id = int.Parse(TextBox1.Text);
var query = (from r in objEntities.TblEmployee where r.EmpId == idselect r).Single();
objEntities.TblEmployee.Remove(query);
objEntities.SaveChanges();
Label3.Text ="Data Deleted Successfully";
Label3.ForeColor = System.Drawing.Color.Green;
TextBox1.Text =string.Empty;
}
}
#region Instance MembersMyDbContext objEntities = new MyDbContext();
#endregion
}
}
Step 5: The complete code of web.config is as in the following:
<?xml version="1.0"encoding="utf-8"?>
<!--For more information on how to configure your ASP.NET application, please visithttp://go.microsoft.com/fwlink/?LinkId=169433-->
<configuration>
<configSections>
<!-- For more information on Entity Framework configuration, visit http://go.microsoft.com/fwlink/?LinkID=237468 -->
<sectionname="entityFramework"type="System.Data.Entity.Internal.ConfigFile.EntityFrameworkSection, EntityFramework, Version=4.4.0.0, Culture=neutral, PublicKeyToken=b77a5c561934e089"requirePermission="false" />
</configSections>
<connectionStrings>
<addname="ApplicationServices"connectionString="data source=.\SQLEXPRESS;Integrated Security=SSPI;AttachDBFilename=|DataDirectory|\aspnetdb.mdf;User Instance=true" providerName="System.Data.SqlClient" />
<addname="MyDbContext"connectionString="Data Source=WIN-KV3BO1RQQF7;Initial Catalog=Company;Integrated Security=True;MultipleActiveResultSets=True" providerName="System.Data.SqlClient" />
</connectionStrings>
<system.web>
<compilationdebug="true"targetFramework="4.0" />
<authenticationmode="Forms">
<formsloginUrl="~/Account/Login.aspx"timeout="2880" />
</authentication>
<membership>
<providers>
<clear />
<addname="AspNetSqlMembershipProvider"type="System.Web.Security.SqlMembershipProvider"connectionStringName="ApplicationServices"enablePasswordRetrieval="false"enablePasswordReset="true"requiresQuestionAndAnswer="false"requiresUniqueEmail="false"maxInvalidPasswordAttempts="5"minRequiredPasswordLength="6"minRequiredNonalphanumericCharacters="0"passwordAttemptWindow="10"applicationName="/" />
</providers>
</membership>
<profile>
<providers>
<clear />
<addname="AspNetSqlProfileProvider"type="System.Web.Profile.SqlProfileProvider"connectionStringName="ApplicationServices"applicationName="/" />
</providers>
</profile>
<roleManagerenabled="false">
<providers>
<clear />
<addname="AspNetSqlRoleProvider"type="System.Web.Security.SqlRoleProvider"connectionStringName="ApplicationServices"applicationName="/" />
<addname="AspNetWindowsTokenRoleProvider"type="System.Web.Security.WindowsTokenRoleProvider"applicationName="/" />
</providers>
</roleManager>
</system.web>
<system.webServer>
<modulesrunAllManagedModulesForAllRequests="true" />
</system.webServer>
<entityFramework>
<defaultConnectionFactorytype="System.Data.Entity.Infrastructure.SqlConnectionFactory, EntityFramework" />
</entityFramework>
</configuration>
Step 6: The output of the application is as in the following:

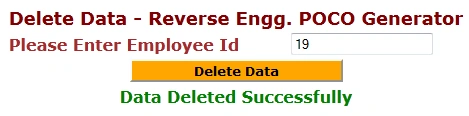
Step 7: The deleted data output of the application is as in the following:
Update Data - Reverse Engineering POCO Generator
Question: What is reverse engineering POCO generator?
In simple terms "It is a template that enables generation of entity classes by reverse engineering with the POCO generator".
Step 1: Create a new web application
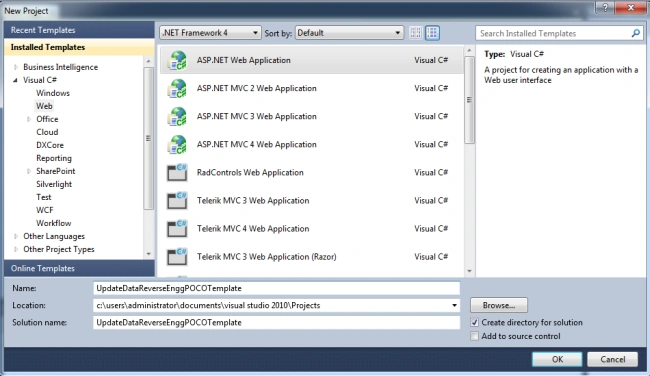
Step 2: Adding a new Entity Framework reverse engineering POCO generator:
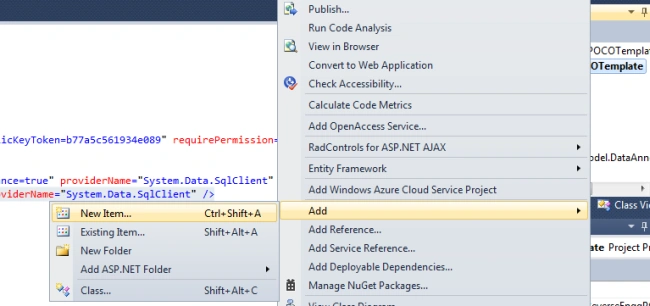
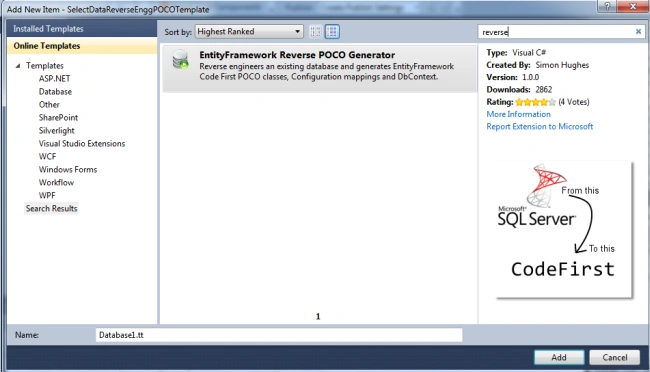
Step 3: The complete code of WebForm1.aspx is as in the following:
<%@Page Language="C#"AutoEventWireup="true"CodeBehind="WebForm1.aspx.cs"Inherits="UpdateDataReverseEnggPOCOTemplate.WebForm1"%>
<!DOCTYPE htmlPUBLIC "-//W3C//DTD XHTML 1.0 Transitional//EN" "http://www.w3.org/TR/xhtml1/DTD/xhtml1-transitional.dtd">
<html xmlns="http://www.w3.org/1999/xhtml">
<head id="Head1" runat="server">
<title></title>
</head>
<body>
<formid="form1"runat="server">
<center>
<div>
<table>
<tr>
<tdcolspan="2">
<asp:LabelID="Label1"runat="server"Text="Update Data - Reverse Engg. POCO Generator"
Font-Bold="true"Font-Size="Large"Font-Names="Verdana"ForeColor="Maroon"></asp:Label>
</td>
</tr>
<tr>
<td>
<asp:LabelID="Label6"runat="server"Text="Please Enter Id" Font-Size="Large"Font-Names="Verdana"
Font-Italic="true"></asp:Label>
</td>
<td>
<asp:TextBoxID="TextBox4"runat="server"></asp:TextBox>
</td>
</tr>
<tr>
<td>
<asp:LabelID="Label2"runat="server"Text="Please Enter First Name" Font-Size="Large"
Font-Names="Verdana"Font-Italic="true"></asp:Label>
</td>
<td>
<asp:TextBoxID="TextBox1"runat="server"></asp:TextBox>
</td>
</tr>
<tr>
<td>
<asp:LabelID="Label3"runat="server"Text="Please Enter Last Name" Font-Size="Large"
Font-Names="Verdana"Font-Italic="true"></asp:Label>
</td>
<td>
<asp:TextBoxID="TextBox2"runat="server"></asp:TextBox>
</td>
</tr>
<tr>
<td>
<asp:LabelID="Label4"runat="server"Text="Please Enter Age" Font-Size="Large"Font-Names="Verdana"
Font-Italic="true"></asp:Label>
</td>
<td>
<asp:TextBoxID="TextBox3"runat="server"></asp:TextBox>
</td>
</tr>
<tr>
<tdcolspan="2"align="center">
<asp:ButtonID="Button1"runat="server"Text="Update"Font-Names="Verdana"Width="213px"
BackColor="Orange"Font-Bold="True"OnClick="Button1_Click"/>
</td>
</tr>
<tr>
<tdcolspan="2"align="center">
<asp:LabelID="Label5"runat="server"Font-Bold="true"Font-Names="Verdana"ForeColor="Maroon"></asp:Label>
</td>
</tr>
</table>
</div>
</center>
</form>
</body>
</html>
Step 4: The complete code of WebForm1.aspx.cs is as in the following:
using System;
using System.Collections.Generic;
using System.Linq;
using System.Web;
using System.Web.UI;
using System.Web.UI.WebControls;
namespace UpdateDataReverseEnggPOCOTemplate
{
publicpartial classWebForm1 : System.Web.UI.Page{protectedvoid Page_Load(object sender, EventArgs e)
{
}
protectedvoid Button1_Click(object sender, EventArgs e)
{
if (string.IsNullOrEmpty(TextBox1.Text) || string.IsNullOrEmpty(TextBox2.Text) ||string.IsNullOrEmpty(TextBox3.Text) ||string.IsNullOrEmpty(TextBox4.Text))
{
Label5.Text ="Please Enter Some Data";
Label5.ForeColor = System.Drawing.Color.Red;
}
else
{
var id1 = Convert.ToInt32(TextBox4.Text);
var objEmployee = objEntities.TblEmployee.Where(a => a.EmpId == id1).FirstOrDefault();
objEmployee.FirstName = TextBox1.Text;
objEmployee.LastName = TextBox2.Text;
objEmployee.Age =int.Parse(TextBox3.Text);
objEntities.SaveChanges();
Label5.Text ="Data Updated Successfully";
Label5.ForeColor = System.Drawing.Color.Green;
TextBox1.Text =string.Empty;
TextBox2.Text =string.Empty;
TextBox3.Text =string.Empty;TextBox4.Text =string.Empty;
}
}
#region Instance MembersMyDbContext objEntities = new MyDbContext();
#endregion
}
}
Step 5: The complete code of web.config is as in the following:
<?xml version="1.0"encoding="utf-8"?>
<!--For more information on how to configure your ASP.NET application, please visithttp://go.microsoft.com/fwlink/?LinkId=169433-->
<configuration>
<configSections>
<!-- For more information on Entity Framework configuration, visit http://go.microsoft.com/fwlink/?LinkID=237468 -->
<sectionname="entityFramework"type="System.Data.Entity.Internal.ConfigFile.EntityFrameworkSection, EntityFramework, Version=4.4.0.0, Culture=neutral, PublicKeyToken=b77a5c561934e089"requirePermission="false" />
</configSections>
<connectionStrings>
<addname="ApplicationServices"connectionString="data source=.\SQLEXPRESS;Integrated Security=SSPI;AttachDBFilename=|DataDirectory|\aspnetdb.mdf;User Instance=true" providerName="System.Data.SqlClient" />
<addname="MyDbContext"connectionString="Data Source=WIN-KV3BO1RQQF7;Initial Catalog=Company;Integrated Security=True;MultipleActiveResultSets=True" providerName="System.Data.SqlClient" />
</connectionStrings>
<system.web>
<compilationdebug="true"targetFramework="4.0" />
<authenticationmode="Forms">
<formsloginUrl="~/Account/Login.aspx"timeout="2880" />
</authentication>
<membership>
<providers>
<clear />
<addname="AspNetSqlMembershipProvider"type="System.Web.Security.SqlMembershipProvider"connectionStringName="ApplicationServices"enablePasswordRetrieval="false"enablePasswordReset="true"requiresQuestionAndAnswer="false"requiresUniqueEmail="false"maxInvalidPasswordAttempts="5"minRequiredPasswordLength="6"minRequiredNonalphanumericCharacters="0"passwordAttemptWindow="10"applicationName="/" />
</providers>
</membership>
<profile>
<providers>
<clear />
<addname="AspNetSqlProfileProvider"type="System.Web.Profile.SqlProfileProvider"connectionStringName="ApplicationServices"applicationName="/" />
</providers>
</profile>
<roleManagerenabled="false">
<providers>
<clear />
<addname="AspNetSqlRoleProvider"type="System.Web.Security.SqlRoleProvider"connectionStringName="ApplicationServices"applicationName="/" />
<addname="AspNetWindowsTokenRoleProvider"type="System.Web.Security.WindowsTokenRoleProvider"applicationName="/" />
</providers>
</roleManager>
</system.web>
<system.webServer>
<modulesrunAllManagedModulesForAllRequests="true" />
</system.webServer>
<entityFramework>
<defaultConnectionFactorytype="System.Data.Entity.Infrastructure.SqlConnectionFactory, EntityFramework" />
</entityFramework>
</configuration>
Step 6: The output of the application is as in the following:
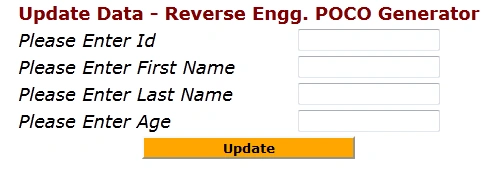
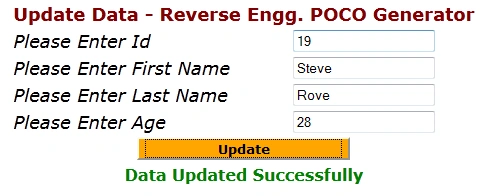
Step 7: The updated data output of the application is as in the following:
I hope this article was useful for you. I look forward to your comments and feedback. Thanks Vijay.
Join the conversation! Your thoughts help the community grow.