

Earlier, we developed the back-end logic for our application. If you have not seen it I recommend you to see that first from here.
Let’s start building our front-end application.
Open a new terminal in Visual Studio Code.
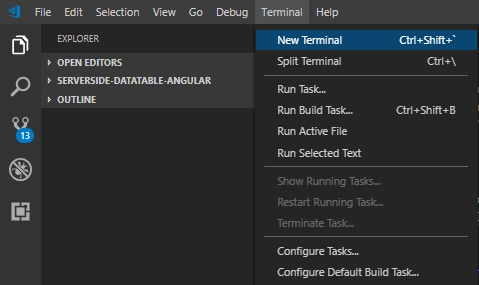
Type the following command to create a new project.

Open the newly created project from Visual Studio Code.
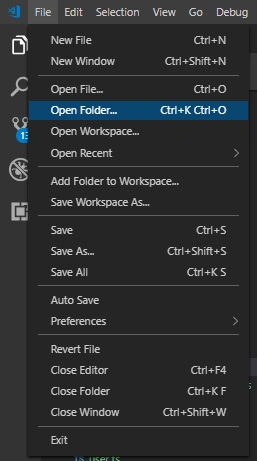
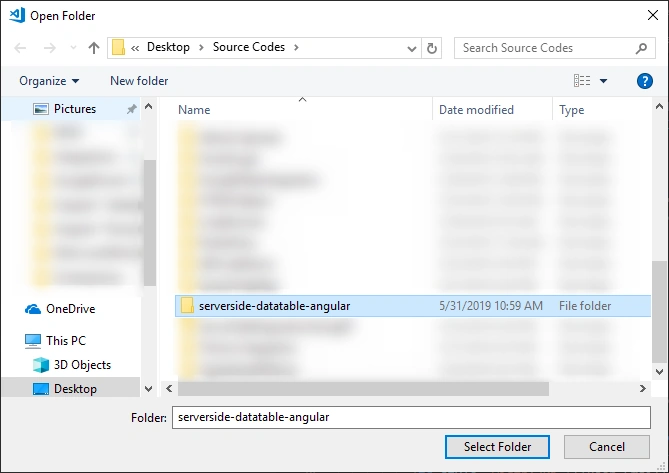
Choose the project from the explorer.
We will create the components for our application by typing these simple commands.

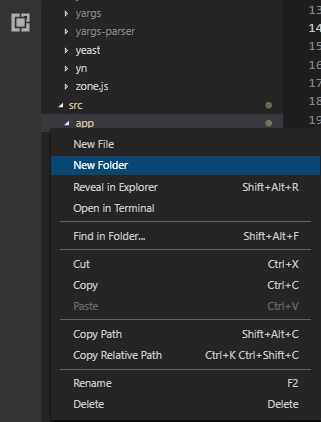
Generate two TypeScript files as user.ts and search-criteria.ts.


Finally, install the DataTable plugins for Angular 7 by typing the following commands in the terminal.
- npm install jquery --save
- npm install datatables.net --save
- npm install datatables.net-dt --save
- npm install angular-datatables --save
- npm install @types/jquery --save-dev
- npm install @types/datatables.net --save-dev
- npm install bootstrap
Open the user.ts file and add the below code in it.
- export class User {
- ID: number;
- Name: string;
- Email: string;
- Company: string;
- ContactNumber: string;
- }
- export interface SearchCriteria {
- isPageLoad: boolean;
- filter: string;
- }
Open the datatable-view.component.css file and add the following styles in it.
- .no-data-available {
- text-align: center;
- }
- .ngHide {
- display: none;
- }
Open the datatable-view.component.html file and add the below styles in it.
- <br>
- <div class="container">
- <h1>Users Table</h1>
- <br>
- <hr>
- <div>
- <div class="form-group">
- <label for="userName" class="control-label">Name</label>
- <input type="text" (keyup)="search()" class="form-control" id="userName" name="userName" [(ngModel)]="userName">
- </div>
- </div>
- <br>
- <div [class.ngHide]="searchCriteria.isPageLoad">
- <table datatable class="table table-striped" [dtOptions]="dtOptions" [dtTrigger]="dtTrigger">
- <thead>
- <tr>
- <td>ID</td>
- <td>Name</td>
- <td>Email</td>
- <td>Company</td>
- <td>Contact Number</td>
- </tr>
- </thead>
- <tbody *ngIf="users != null || users?.length != 0">
- <tr *ngFor="let user of users">
- <td style="width:2%">{{user.ID}}</td>
- <td style="width:10%">{{user.Name}}</td>
- <td style="width:30%">{{user.Email}}</td>
- <td style="width:40%">{{user.Company}}</td>
- <td style="width:18%">{{user.ContactNumber}}</td>
- </tr>
- </tbody>
- <tbody *ngIf="users == null || users?.length == 0">
- <tr>
- <td colspan="5" class="no-data-available">No data!</td>
- </tr>
- <tbody>
- </table>
- </div>
- </div>
Open the datatable-view.component.ts file and add this style into it.
- import { Component, OnInit, OnDestroy, ViewChild } from '@angular/core';
- import { User } from '../models/user';
- import { SearchCriteria } from '../models/search-criteria';
- import { Subject, Observable, Subscription } from 'rxjs';
- import { AppService } from '../app.service';
- import { DataTableDirective } from "angular-datatables";
- import { timer } from 'rxjs';
- @Component({
- selector: 'app-datatable-view',
- templateUrl: './datatable-view.component.html',
- styleUrls: ['./datatable-view.component.css']
- })
- export class DatatableViewComponent implements OnInit {
- title = "app";
- users: User[];
- userName: string;
- searchCriteria: SearchCriteria = { isPageLoad: true, filter: "" };
- dtOptions: DataTables.Settings = {};
- dtTrigger: Subject<any> = new Subject();
- @ViewChild(DataTableDirective)
- dtElement: DataTableDirective;
- timerSubscription: Subscription;
- constructor(private appService: AppService) {}
- ngOnInit() {
- this.dtOptions = {
- pagingType: "full_numbers",
- pageLength: 10,
- serverSide: true,
- processing: true,
- searching: false,
- ajax: (dataTablesParameters: any, callback) => {
- dataTablesParameters.searchCriteria = this.searchCriteria;
- this.appService
- .getAllEmployeesWithPaging(dataTablesParameters)
- .subscribe(resp => {
- this.users = resp.data;
- callback({
- recordsTotal: resp.recordsTotal,
- recordsFiltered: resp.recordsFiltered,
- data: []
- });
- });
- },
- columns: [null, null, null, null, { orderable: false }]
- };
- this.subscribeToData();
- }
- ngAfterViewInit(): void {
- this.dtTrigger.next();
- }
- rerender(): void {
- this.searchCriteria.isPageLoad = false;
- this.searchCriteria.filter = this.userName;
- this.dtElement.dtInstance.then((dtInstance: DataTables.Api) => {
- dtInstance.destroy();
- this.dtTrigger.next();
- });
- }
- search() {
- this.rerender();
- }
- ngOnDestroy(): void {
- this.dtTrigger.unsubscribe();
- if (this.timerSubscription) {
- this.timerSubscription.unsubscribe();
- }
- }
- private refreshData(): void {
- this.rerender();
- this.subscribeToData();
- }
- private subscribeToData(): void {
- this.refreshData();
- }
- }
Create the app.service.ts file in the app folder. Then, add the following code into that.
- import { Injectable } from '@angular/core';
- import { HttpClient } from "@angular/common/http"
- import { User } from './models/user';
- import { Observable } from 'rxjs';
- @Injectable()
- export class AppService {
- private apiURL: string = 'http://localhost:49469/api/';
- constructor(private http: HttpClient) {
- }
- getAllEmployees(): Observable<User[]> {
- return this.http.get<User[]>(this.apiURL + 'DatatableApi');
- }
- getAllEmployeesWithPaging(dtParams: any): Observable<any> {
- return this.http.put(this.apiURL + 'DatatableApi', dtParams);
- }
- }
Open the app.component.html file and add this code into it.
- <app-datatable-view></app-datatable-view>
Here is the code for app.module.ts file.
- import { BrowserModule } from '@angular/platform-browser';
- import { NgModule } from '@angular/core';
- import { AppRoutingModule } from './app-routing.module';
- import { AppComponent } from './app.component';
- import { DatatableViewComponent } from './datatable-view/datatable-view.component';
- import { HttpClientModule } from '@angular/common/http';
- import { DataTablesModule } from 'angular-datatables';
- import { FormsModule } from "@angular/forms"
- import { AppService } from './app.service';
- @NgModule({
- declarations: [
- AppComponent,
- DatatableViewComponent
- ],
- imports: [
- BrowserModule,
- HttpClientModule,
- DataTablesModule,
- FormsModule,
- AppRoutingModule
- ],
- providers: [AppService],
- bootstrap: [AppComponent]
- })
- export class AppModule { }
Open the style.css file and add this line to it.
- .dataTables_empty {
- display: none;
- }
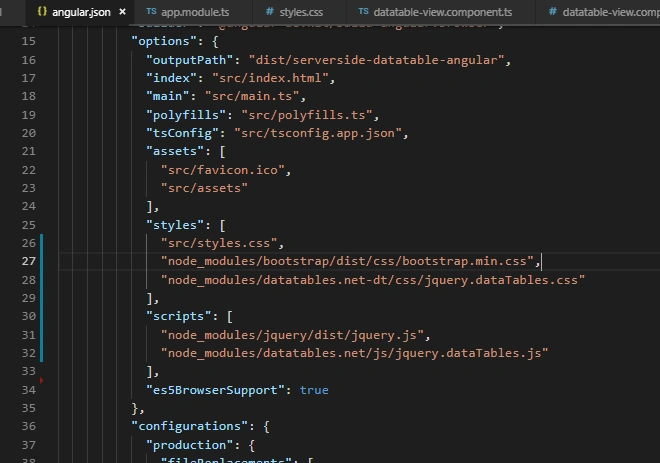
- "styles": [
- "src/styles.css",
- "node_modules/bootstrap/dist/css/bootstrap.min.css",
- "node_modules/datatables.net-dt/css/jquery.dataTables.css"
- ],
- "scripts": [
- "node_modules/jquery/dist/jquery.js",
- "node_modules/datatables.net/js/jquery.dataTables.js"
- ],
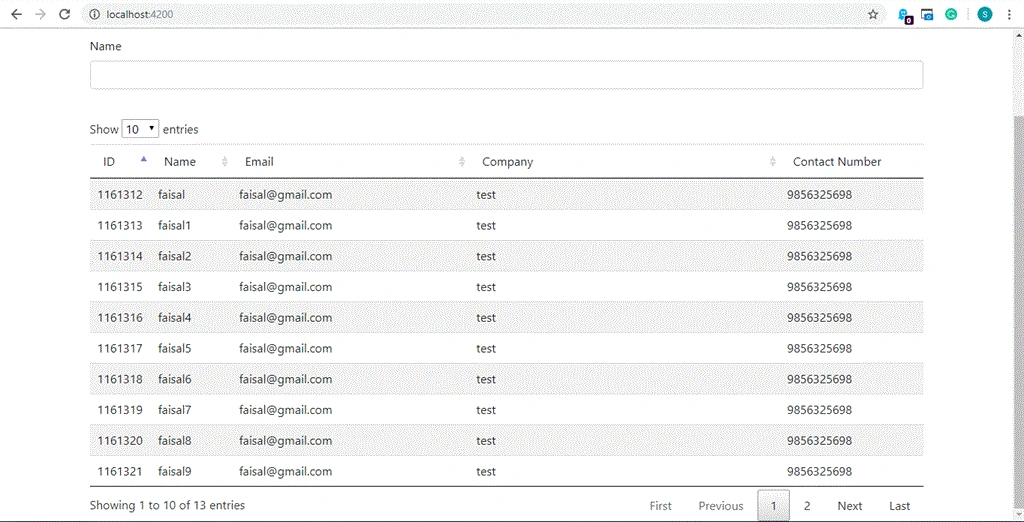
That’s it. Now, run the project and your output will be like this.
Please give your valuable feedback/comments/questions about this article below. Please let me know how you like and understand this article and how I could improve it.
You can download the source code from here.
Riyas AhamedPosted Jan 29, 2021, 1:48 PM
How to add renderer for for two tables in a on component
Ankush MehndirattaPosted Jul 7, 2020, 3:34 AM
Thanks man you are great
MANOJ KUMARPosted Jan 3, 2020, 1:39 PM
Hi , I have used this code but I have two issue .first data is not loading at first time ,api not getting call. second issue is if I am selecting no. of record dropdown First Time it is working but second time not working. in console I am getting error : ERROR TypeError: Cannot read property 'dtInstance' of undefined .can u help me out please