

Introduction
This article describes how to create a Custom Modal Popup Box in ASP.NET Web API.
Procedure for creating the Custom Modal Popup Box in the Web API.
Step 1
First create a Web API Application:
-
Start Visual Studio 2012.
-
From the start window select "New Project".
-
In the Template Window select "Installed" -> "Visual C#" -> "Web".
-
Select "ASP.NET MVC 4 Web Application" and click on "OK".

From the "MVC4 Project" window select "Web API".

Step 2
Create a Modal class "Record.cs":
-
In the "Solution Explorer".
-
Right-click on the "Modal" -> "Add" -> "Class".
-
Select "Installed" -> "Visual C#".

Select "Class" and click the "OK" button.
Write the Following code:
- using System;
- using System.Collections.Generic;
- using System.Collections.ObjectModel;
- using System.Linq;
- using System.Web;
- namespace CustomModel.Models
- {
- public class Record
- {
- public int ID { get; set; }
- public string Name { get; set; }
- public string Description { get; set; }
- }
- public class RecordManager
- {
- public Collection<Record> Records
- {
- get
- {
- if (HttpRuntime.Cache["Records"] == null)
- this.DisplayData();
- return (Collection<Record>)HttpRuntime.Cache["Records"];
- }
- }
- private void DisplayData()
- {
- var records = new Collection<Record>();
- records.Add(new Record
- {
- ID = 1,
- Name = "Set schedule for saturday",
- Description = "Don't forget to upload this schedule.."
- });
- HttpRuntime.Cache["Records"] = records;
- }
- public Collection<Record> GetAll()
- {
- return Records;
- }
- public Record GetById(int Id)
- {
- return Records.Where(i => i.ID == Id).FirstOrDefault();
- }
- public int Collect(Record detail)
- {
- if (detail.ID <= 0)
- return collectAsNew(detail);
- var availableR = Records.Where(a => a.ID == detail.ID).FirstOrDefault();
- availableR.Name = detail.Name;
- availableR.Description = detail.Description;
- return availableR.ID;
- }
- private int collectAsNew(Record item)
- {
- item.ID = Records.Count + 1;
- Records.Add(item);
- return item.ID;
- }
- }
- }
Step 3
In the "HomeController" file write some code. This file exists in:
-
In the "Solution Explorer".
-
Select "Controller" -> "HomeController".
Add the following code:
- using System;
- using System.Collections.Generic;
- using System.Linq;
- using System.Web;
- using System.Web.Mvc;
- using CustomModel.Models;
- namespace CustomModel.Controllers
- {
- public class HomeController : Controller
- {
- public ActionResult Index()
- {
- return View();
- }
- public ActionResult List()
- {
- var mgr = new RecordManager();
- var mode = mgr.GetAll();
- return PartialView(mode);
- }
- public ActionResult Develop()
- {
- var model = new Record();
- return PartialView("RecordForm", model);
- }
- [HttpPost]
- public ActionResult Collect(Record record)
- {
- var mgr = new RecordManager();
- mgr.Collect(record);
- var mode = mgr.GetAll();
- return PartialView("List", mode);
- }
- }
- }
Step 4
In the "Index.cshtml" file that exists in:
-
In the "Solution Explorer".
-
Select "Views" -> "Home" -> "index.cshtml".
Add the following code:
- <div id="RecordListBlock"></div>
- <span class="AddLink ButtonLink">Add Another New information</span>
- <div id="RecordDialog" title="" class="Hidden"></div>
Step 5
Create another view:
-
In the "HomeController".
-
Right-click on the action method "list" -> "Add View".


Click the "Add" button.
Add the following code:
- @{
- ViewBag.Title = "List";
- }
- <h2>List</h2>
- @model IEnumerable<CustomModel.Models.Record>
- <ul class="NotesList">
- @foreach (var data in Model)
- {
- <li>
- @data.ID<br />
- @data.Name <br />
- @data.Description <br />
- </li>
- }
- </ul>
Step 6
Create one more view, "RecordForm.cshtml" as in the following:
-
In the "HomeController".
-
Right-click on the action method "Develop" -> "Add View" then change the name of the view to "RecordForm.cshtml".

Click on the "Add" button.
Add the following code:
- @{
- ViewBag.Title = "RecordForm";
- }
- <h2>NoteForm</h2>
- @model CustomModel.Models.Record
- @using(Html.BeginForm("Collect", "Home", FormMethod.Post, new { Id = "RecordForm" })) {
- @Html.Hidden("ID")
- <label class="Name">
- <span>Name</span><br />
- @Html.TextBox("Name")<br />
- </label>
- <label class="Description">
- <span>Description</span><br />
- @Html.TextArea("Description")
- </label>
- }fa
- <script type="text/javascript">
- $(function () {
- $("#NoteForm").validate({
- rules: {
- Name: { required: true },
- Description: { required: true }
- }
- });
- });
- </script>
Step 7
In the "_Layout.cshtml" file that exists:
-
In the "Solution Explorer".
-
Select "View" -> "Shared" -> "_Layout.cshtml".

Add the following code:
- <!DOCTYPE html>
- <html>
- <head>
- <meta charset="utf-8" />
- <title>@ViewBag.Name</title>
- <link href="@Url.Content("~/Content/themes/base/jquery.ui.all.css")" rel="Stylesheet" type="text/css" />
- <script src="@Url.Content("~/Scripts/jquery-1.8.2.min.js")" type="text/javascript"></script>
- <script src="@Url.Content("~/Scripts/jquery-ui-1.8.24.min.js")" type="text/javascript"></script>
- <script src="@Url.Content("~/Scripts/jquery.validate.min.js")" type="text/javascript"></script>
- </head>
- <body>
- <script type="text/javascript">
- $(function () {
- $("#RecordDialog").dialog({
- autoOpen: false, width: 500, height: 500, modal: true,
- buttons: {
- "Save": function () {
- if ($("#RecordForm").validate().form()) {
- $.post("/Home/Collect",
- $("#RecordForm").serialize(),
- function (data) {
- $("#RecordDialog").dialog("close");
- $("#RecordListBlock").html(data);
- });
- }
- },
- Cancel: function () { $(this).dialog("close"); }
- }
- });
- $(".AddLink").click(function () {
- $("#RecordDialog").html("")
- .dialog("option", "title", "Add Note")
- .load("/Home/Develop", function () { $("#RecordDialog").dialog("open"); });
- });
- LoadList();
- });
- function LoadList() {
- $("#RecordListBlock").load("/Home/List");
- }
- </script>
- @RenderBody()
- </body>
- </html>
Step 8
Now execute the application by pressing "F5".

Click on the "Add Another New information".

Fill in both names and a description box:
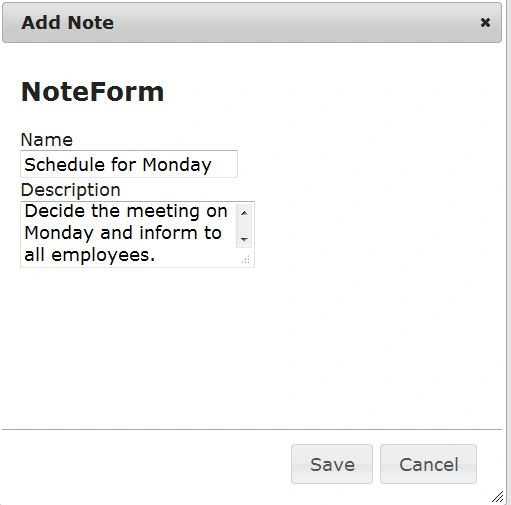
Click on the "Save" button.This show this record in the browser:

Join the conversation! Your thoughts help the community grow.