

In this article, the purpose of the code is to create Login and Logout Functionality in MVC, using Form Authentication. We will discuss about the best way to store the password in the database using HASHING too.
So, here we go.
The most important question is how passwords are protected. If you are storing the password in a plain-text or using encryption/decryption (2-way), then it is a horrible idea. If you store the password in encryption format, then also there is a possibility to revert to the pain-text value using encrypted output.
Here is the best solution for storing the password in database. We encrypt the password using one-way hashing algorithms.
First of all, we create a HASH Value of combination of Passwords, One Unique Field (username, or mobile, or email) and SALT Key using SHA512 Algorithm (bcrypt/PBKDF2/scrypt are also best algorithms for hashing). Also create a unique SALT Key using CSPRNG. Then, we store HASH Value & SALT Key in database.
We don't need to know the password but we just verify the entered password. So, when the user attempts to login, we create one HASH Value of password and one unique field (which is entered by user) and SALT. Then, it is checked against the hash of their real password which are retrieved from the database. If the hashes match, the user is granted access. If not, the user is told that they have entered invalid login credentials.
First of all, we need to create a database & data table which contains users` information. Here, we start the code.
STEP 1 - Create A Database with Name "DemoLoginFunctionality"
- CREATE DATABASE DemoLoginFunctionality;
The following script is used to create a Datatable with Data Entries.
- USE [DemoLoginFunctionality]
- GO
- SET ANSI_NULLS ON
- GO
- SET QUOTED_IDENTIFIER ON
- GO
- SET ANSI_PADDING ON
- GO
- CREATE TABLE [dbo].[UserMaster](
- [UserID] [bigint] IDENTITY(1,1) NOT NULL,
- [Username] [nvarchar](50) NOT NULL,
- [HASH] [nvarchar](max) NOT NULL,
- [SALT] [varbinary](512) NOT NULL,
- CONSTRAINT [PK_UserMaster] PRIMARY KEY CLUSTERED
- (
- [UserID] ASC
- )WITH (PAD_INDEX = OFF, STATISTICS_NORECOMPUTE = OFF, IGNORE_DUP_KEY = OFF, ALLOW_ROW_LOCKS = ON, ALLOW_PAGE_LOCKS = ON) ON [PRIMARY]
- ) ON [PRIMARY] TEXTIMAGE_ON [PRIMARY]
- GO
- SET ANSI_PADDING OFF
- GO
- SET IDENTITY_INSERT [dbo].[UserMaster] ON
- GO
- INSERT [dbo].[UserMaster] ([UserID], [Username], [HASH], [SALT]) VALUES (1, N'****', N'***', 0xE2215FF02C584A4F9252F62E504C171B178AF8B39C758E31BFCE8DC4C35A133A)
- GO
- SET IDENTITY_INSERT [dbo].[UserMaster] OFF
- GO
NOTE
We save the password hashing & SALT in database.
First, we need to create a SALT Key. We use CSPRNG (cryptographically secure pseudo-random number generator) for creating a SALT Key.
What is SALT key?
A SALT is random data that is used as an additional input to a one-way function that "hashes" a password.
What is CSPRNG?
A cryptographically secure pseudo-random number generator (CSPRNG) is a pseudo-random number generator (PRNG) with properties that make it suitable for use in cryptography. It uses mathematical formulas to produce sequences of random numbers.
- #region --> Generate SALT Key
- private static byte[] Get_SALT()
- {
- return Get_SALT(saltLengthLimit);
- }
- private static byte[] Get_SALT(int maximumSaltLength)
- {
- var salt = new byte[maximumSaltLength];
- //Require NameSpace: using System.Security.Cryptography;
- using (var random = new RNGCryptoServiceProvider())
- {
- random.GetNonZeroBytes(salt);
- }
- return salt;
- }
- #endregion
What is Password Hashing?
Hashing performs a one-way transformation on a password, turning the password into another String, called the hashed password. “One-way” means it is practically impossible to go the other way to turn the hashed password back into the original password. They also have the property that if the input changes by even a tiny bit, the resulting hash is completely different.
i.e.

What is SHA512?
The Secure Hash Algorithm (SHA512) is a set of cryptographic hash functions designed by the National Security Agency (NSA).
- #region --> Generate HASH Using SHA512
- public static string Get_HASH_SHA512(string password, string username, byte[] salt)
- {
- try
- {
- //required NameSpace: using System.Text;
- //Plain Text in Byte
- byte[] plainTextBytes = Encoding.UTF8.GetBytes(password + username);
- //Plain Text + SALT Key in Byte
- byte[] plainTextWithSaltBytes = new byte[plainTextBytes.Length + salt.Length];
- for (int i = 0; i < plainTextBytes.Length; i++)
- {
- plainTextWithSaltBytes[i] = plainTextBytes[i];
- }
- for (int i = 0; i < salt.Length; i++)
- {
- plainTextWithSaltBytes[plainTextBytes.Length + i] = salt[i];
- }
- HashAlgorithm hash = new SHA512Managed();
- byte[] hashBytes = hash.ComputeHash(plainTextWithSaltBytes);
- byte[] hashWithSaltBytes = new byte[hashBytes.Length + salt.Length];
- for (int i = 0; i < hashBytes.Length; i++)
- {
- hashWithSaltBytes[i] = hashBytes[i];
- }
- for (int i = 0; i < salt.Length; i++)
- {
- hashWithSaltBytes[hashBytes.Length + i] = salt[i];
- }
- return Convert.ToBase64String(hashWithSaltBytes);
- }
- catch
- {
- return string.Empty;
- }
- }
- #endregion
Now, save the HASH Value & SALT Key in database.
STEP 2 - Create New MVC Application Project.
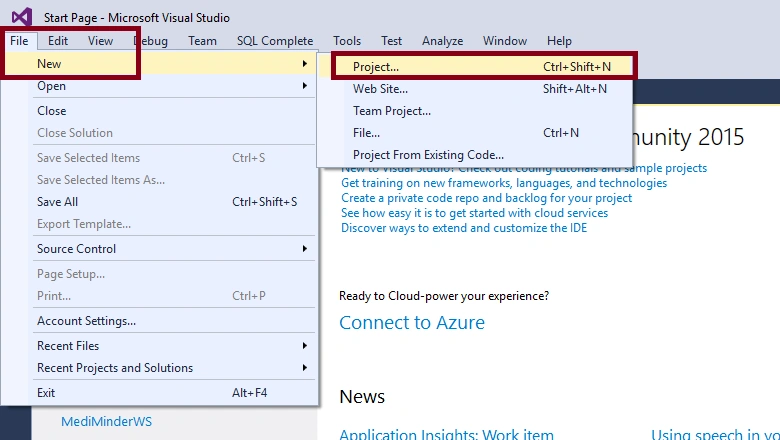
1) On the File menu, click New Project.
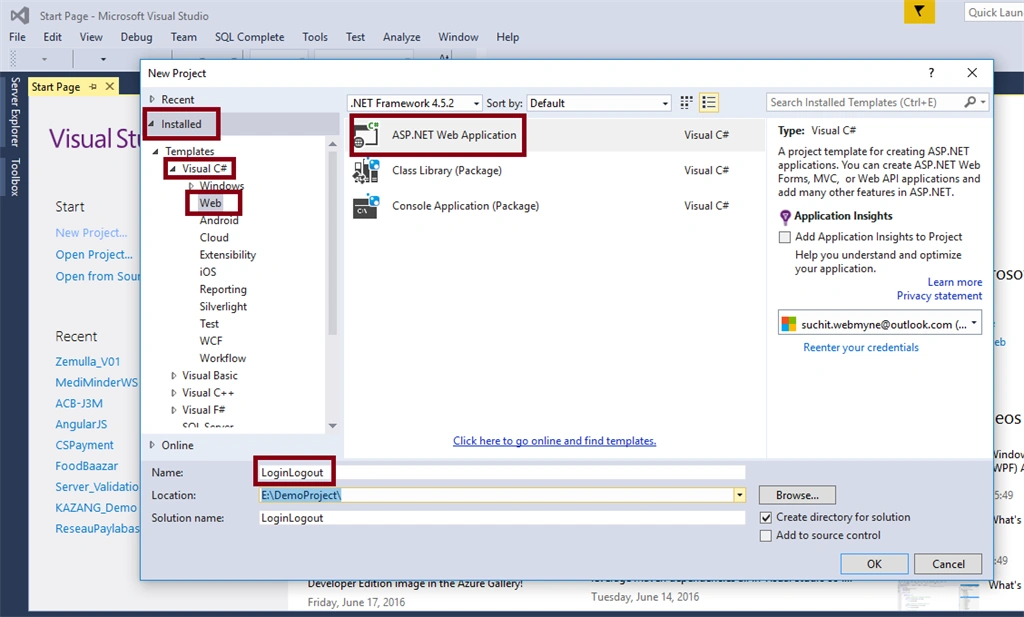
2) In the New Project dialog box under Project types, expand Visual C#, and then click Web. In the Name box, type "LoginLogout" and click on OK.
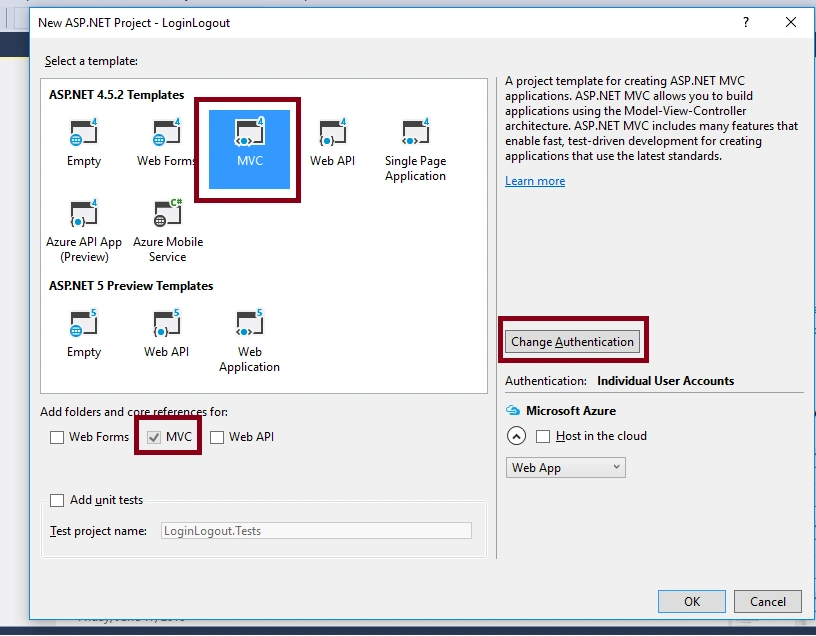
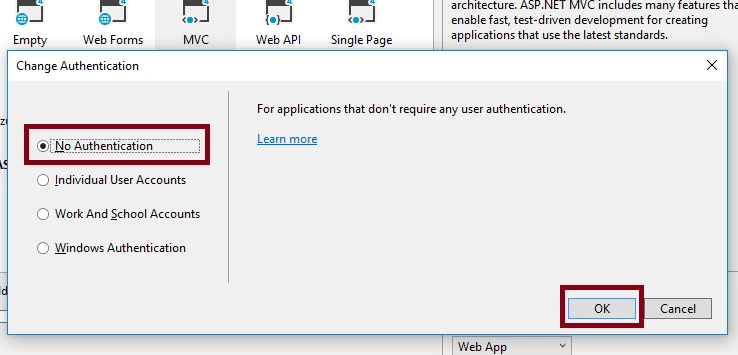
3) Now, in the dialog box, click on the "MVC" under the ASP.NET 4.5.2 Templates. Then, click on Change Authentication in the center of the right side.
STEP 3
So, here is the new new MVC Application created. Now, we need to create an EDMX & bind our database "DemoLogin" with EDMX.
1) On the right side, you can find the Solution Explorer.
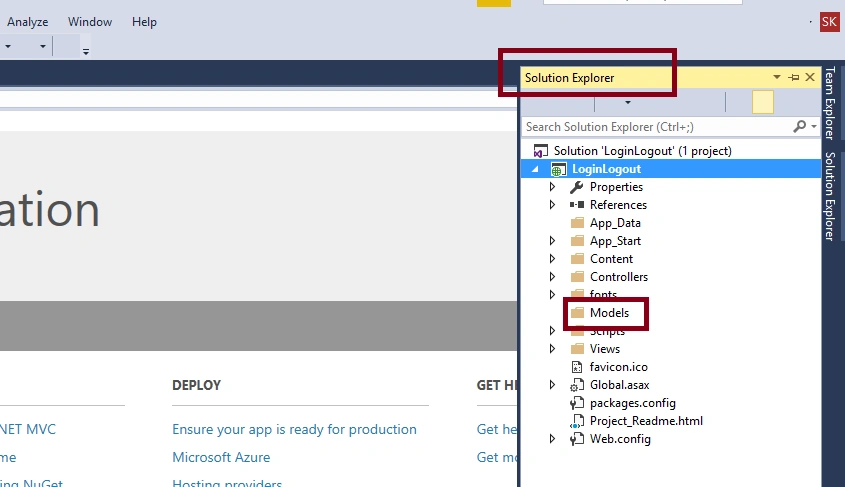
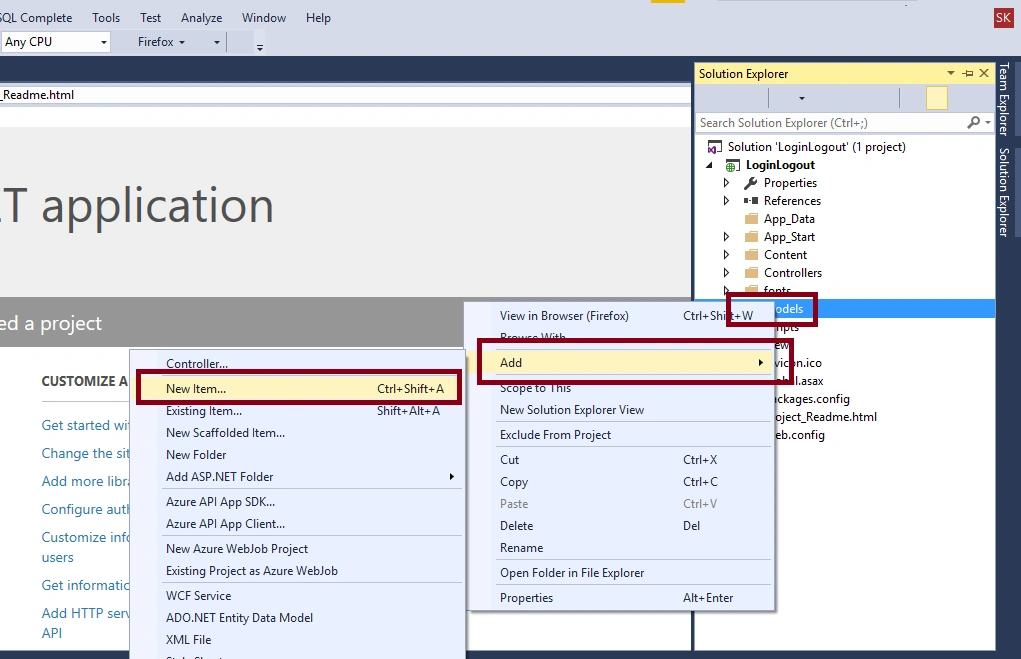
2) In Solution Explorer, right click on "Models" folder. Then, click on the "Add". Now, click on the "New Item..."
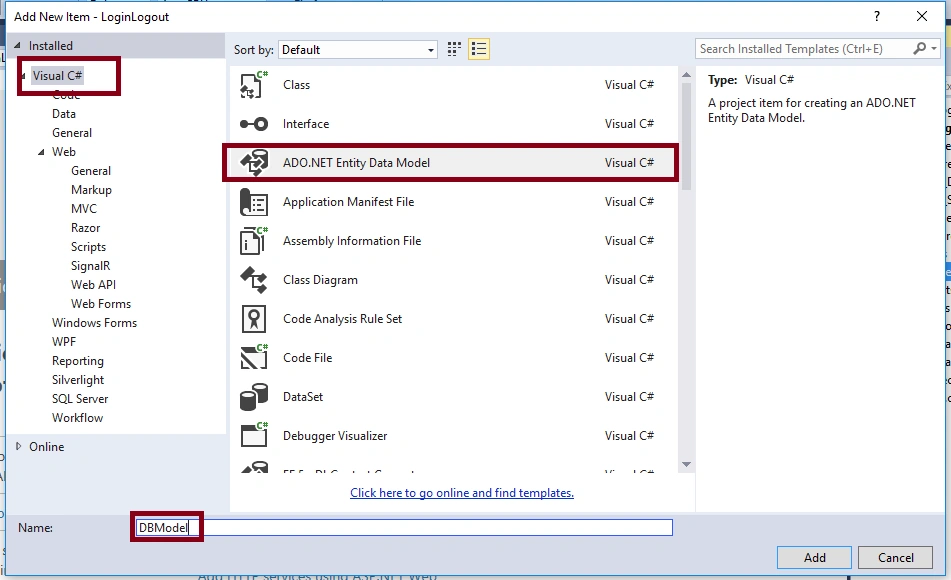
3) Now, click on the Visual C# and select ADO.NET Entity Data Model. Name it "DBModel" and click on OK.
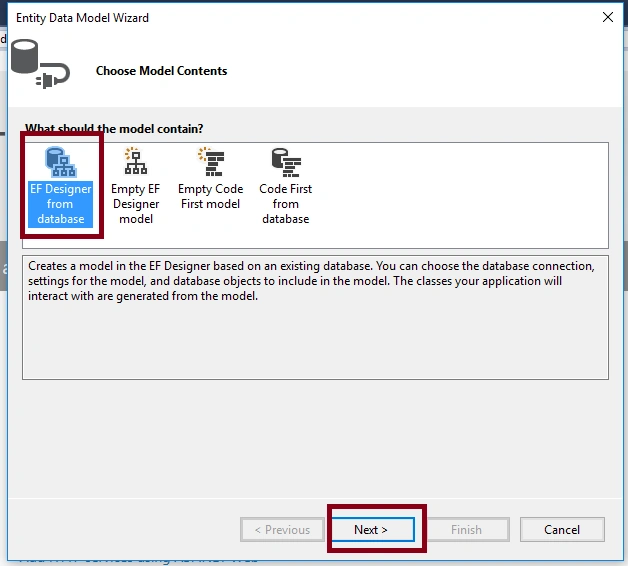
4) Select EF Designer from Database and click on "Next".
5) Now, click on new connection. Define "server name" and select authentication mode to either Windows or SQL Server. If you select SQL server, then enter username or password. Finally, select database "DemoLogin" under Connect to a Database. Click on OK.
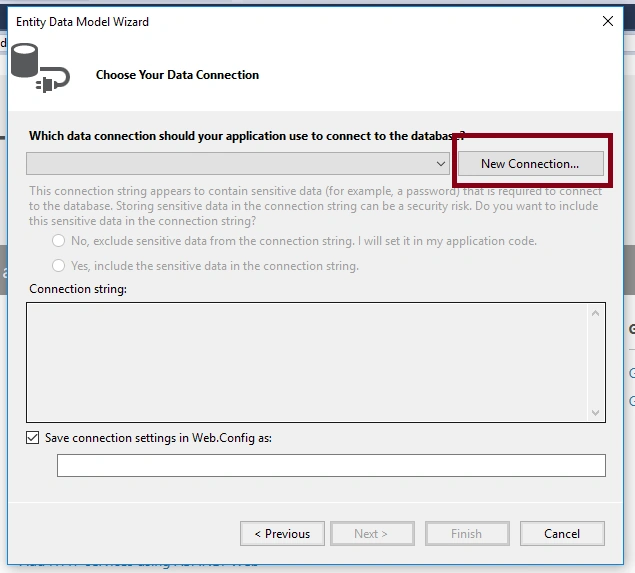
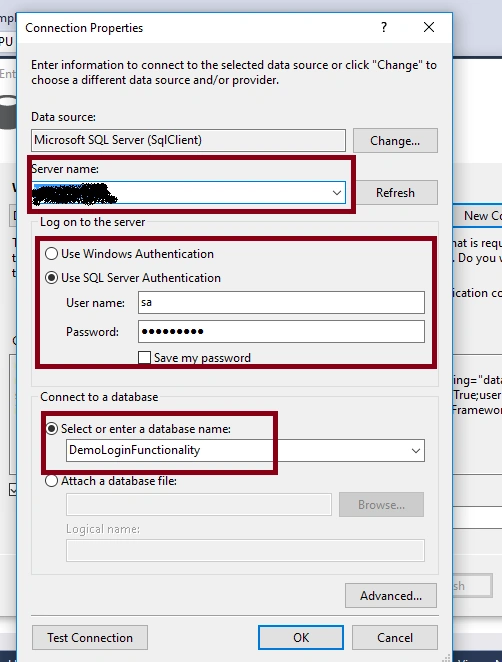
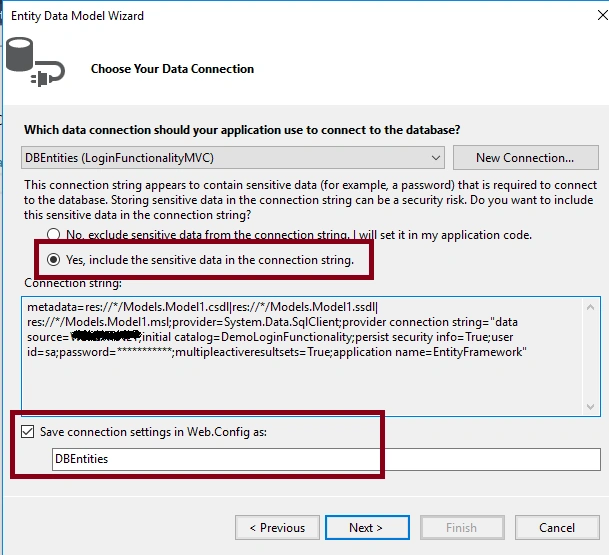
6) Now, declare a name of connection string as "DBEntities" under Save connection setting in Web.config. Then, click on Next.
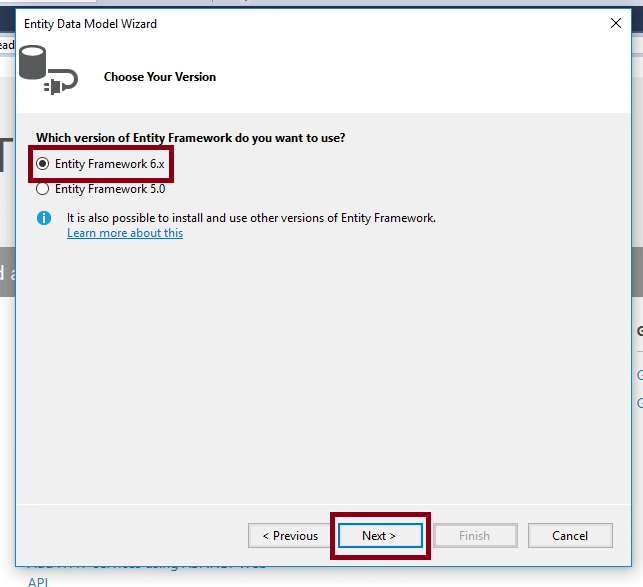
7) Select the version of Entity Framework. Select "Entity Framework 6.x" and click on Next.
8) Expand the "Tables", then expand "dbo" and select your datatable "Users". Now, give the name space as "Models" under Model Namespace. Then, click on OK.
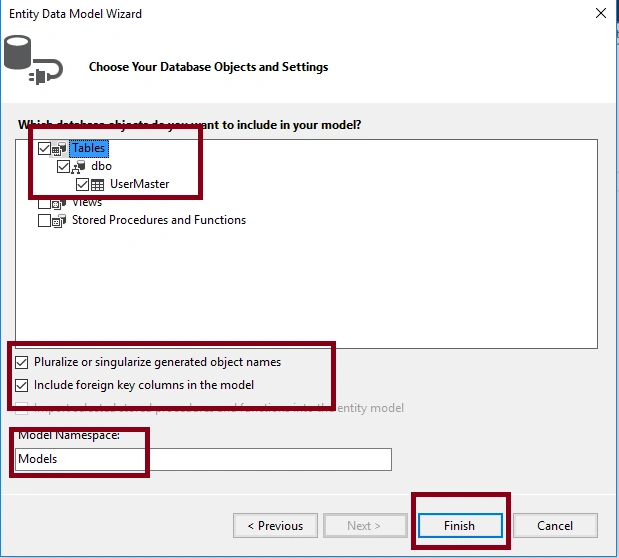
9) Now, build your Project by pressing CLTR + B for updating every entity perfectly.
STEP 4 - Add a new empty controller
1) To add a Controller, right click on "Controllers" folder and select "Add". Then, click on "Controller".
2) Now, in Add Scaffold Dialog box, select "MVC 5 Controller - Empty". Click on Add, and name it as "HomeController". Click on Add.
Create a new ActionResult method named as 'Login'.
- #region --> Login GET Method
- [HttpGet]
- public ActionResult Login(string returnURL)
- {
- var userinfo = new LoginVM();
- try
- {
- // We do not want to use any existing identity information
- EnsureLoggedOut();
- // Store the originating URL so we can attach it to a form field
- userinfo.ReturnURL = returnURL;
- return View(userinfo);
- }
- catch
- {
- throw;
- }
- }
- #endregion
STEP 5 - Add a View
1) For this, right click on your "Login" action method and then select "Add View".
2) Now, uncheck the "Use a layout page" and click on Add button.
3) Add the Model Class in your top of the View.
@model LoginFunctionalityMVC.Models.LoginVM
4) Add an Email, Password textbox, Checkbox (for Remember Me Option), and a Submit button in form tag on Index.cshtml (View).
- //Paste below code in your view
- @model LoginFunctionalityMVC.Models.LoginVM
- @{
- Layout = null;
- }
- <!DOCTYPE html>
- <html>
- <head>
- <meta name="viewport" content="width=device-width" />
- <title>Login</title>
- </head>
- <body>
- @using (Html.BeginForm("Login", "Home", FormMethod.Post))
- {
- @Html.AntiForgeryToken()
- @Html.HiddenFor(s => s.ReturnURL)
- <h1>Login Functionality In MVC</h1>
- <div>
- @if (TempData["ErrorMSG"] != null)
- {
- <label style="color:maroon;"> @TempData["ErrorMSG"] </label>
- <br /><br />
- }
- @Html.TextBoxFor(s => s.Username, new { @placeholder = "Username" })
- <br /> <br />
- @Html.PasswordFor(s => s.Password, new { @placeholder = "Password" })
- <br /> <br />
- @Html.CheckBoxFor(s => s.isRemember) Remember ME
- <br /> <br />
- <button type="submit">Login</button>
- </div>
- }
- </body>
- </html>
Don`t forgot to declare AntiForgeryToken in your View.
AntiForgeryToken: The anti-forgery token can be used to help protect your application against cross-site request forgery.
STEP 6
When login page initializes, we need to check that current session is logged out. So, first we logout the existing user.
For this, we create two methods, "EnsureLoggedOut" and "Logout".
- //GET: EnsureLoggedOut
- private void EnsureLoggedOut()
- {
- // If the request is (still) marked as authenticated we send the user to the logout action
- if (Request.IsAuthenticated)
- Logout();
- }
- //POST: Logout
- [HttpPost]
- [ValidateAntiForgeryToken]
- public ActionResult Logout()
- {
- try
- {
- // First we clean the authentication ticket like always
- //required NameSpace: using System.Web.Security;
- FormsAuthentication.SignOut();
- // Second we clear the principal to ensure the user does not retain any authentication
- //required NameSpace: using System.Security.Principal;
- HttpContext.User = new GenericPrincipal(new GenericIdentity(string.Empty), null);
- Session.Clear();
- System.Web.HttpContext.Current.Session.RemoveAll();
- // Last we redirect to a controller/action that requires authentication to ensure a redirect takes place
- // this clears the Request.IsAuthenticated flag since this triggers a new request
- return RedirectToLocal();
- }
- catch
- {
- throw;
- }
- }
NOTE
Don`t forgot to declare ValidateAntiForgeryToken in your top of POST Method.
ValidateAntiForgeryToken: The feature doesn't prevent any other type of data forgery or tampering based attacks. To use it, decorate the action method or controller with the ValidateAntiForgeryToken attribute and place a call to @Html.AntiForgeryToken(), in the forms posting to the method.
STEP 7
We create one method as "SignInRemember" for setting authentication in cookie (Remember Me option) and one method for redirecting to page, named "RedirectToLocal"
- //GET: SignInAsync
- private void SignInRemember(string userName, bool isPersistent = false)
- {
- // Clear any lingering authencation data
- FormsAuthentication.SignOut();
- // Write the authentication cookie
- FormsAuthentication.SetAuthCookie(userName, isPersistent);
- }
- //GET: RedirectToLocal
- private ActionResult RedirectToLocal(string returnURL = "")
- {
- try
- {
- // If the return url starts with a slash "/" we assume it belongs to our site
- // so we will redirect to this "action"
- if (!string.IsNullOrWhiteSpace(returnURL) && Url.IsLocalUrl(returnURL))
- return Redirect(returnURL);
- // If we cannot verify if the url is local to our host we redirect to a default location
- return RedirectToAction("Index", "Dashboard");
- }
- catch
- {
- throw;
- }
- }
STEP 8
Now, all pre-required Methods are done. Finally, we move to create one method for validating username and password.
- #region --> Login POST Method
- [HttpPost]
- [ValidateAntiForgeryToken]
- public ActionResult Login(LoginVM entity)
- {
- string OldHASHValue = string.Empty;
- byte[] SALT = new byte[saltLengthLimit];
- try
- {
- using (db = new DBEntities())
- {
- // Ensure we have a valid viewModel to work with
- if (!ModelState.IsValid)
- return View(entity);
- //Retrive Stored HASH Value From Database According To Username (one unique field)
- var userInfo = db.UserMasters.Where(s => s.Username == entity.Username.Trim()).FirstOrDefault();
- //Assign HASH Value
- if (userInfo != null)
- {
- OldHASHValue = userInfo.HASH;
- SALT = userInfo.SALT;
- }
- bool isLogin = CompareHashValue(entity.Password, entity.Username, OldHASHValue, SALT);
- if (isLogin)
- {
- //Login Success
- //For Set Authentication in Cookie (Remeber ME Option)
- SignInRemember(entity.Username, entity.isRemember);
- //Set A Unique ID in session
- Session["UserID"] = userInfo.UserID;
- // If we got this far, something failed, redisplay form
- // return RedirectToAction("Index", "Dashboard");
- return RedirectToLocal(entity.ReturnURL);
- }
- else
- {
- //Login Fail
- TempData["ErrorMSG"] = "Access Denied! Wrong Credential";
- return View(entity);
- }
- }
- }
- catch
- {
- throw;
- }
- }
- #endregion
- #region --> Comapare HASH Value
- public static bool CompareHashValue(string password, string username, string OldHASHValue, byte[] SALT)
- {
- try
- {
- string expectedHashString = Get_HASH_SHA512(password, username, SALT);
- return (OldHASHValue == expectedHashString);
- }
- catch
- {
- return false;
- }
- }
- #endregion
STEP 9
Now, the last stage is to create a custom Authorize Attribute In MVC. Because it checks if user is logged in or not before any page initializes.
Create a class named "CheckAuthorization.cs" in "Models" folder.
- public class CheckAuthorization : AuthorizeAttribute
- {
- public override void OnAuthorization(AuthorizationContext filterContext)
- {
- if (HttpContext.Current.Session["UserID"] == null || !HttpContext.Current.Request.IsAuthenticated)
- {
- if (filterContext.HttpContext.Request.IsAjaxRequest())
- {
- filterContext.HttpContext.Response.StatusCode = 302; //Found Redirection to another page. Here- login page. Check Layout ajaxError() script.
- filterContext.HttpContext.Response.End();
- }
- else
- {
- filterContext.Result = new RedirectResult(System.Web.Security.FormsAuthentication.LoginUrl + "?ReturnUrl=" +
- filterContext.HttpContext.Server.UrlEncode(filterContext.HttpContext.Request.RawUrl));
- }
- }
- else
- {
- //Code HERE for page level authorization
- }
- }
- }
STEP 10
Now, I just have to put [CheckAuthorization] attribute on top of my controller to access my CheckAuthorization Function which is Custom Authorize Attribute.
BONUS POINT
BONUS POINT
How to create a new hash & salt (which are needed to save in our database) for new user at registration time.
For create SALT & HASH (Which are saved in database)
For create SALT & HASH (Which are saved in database)
- //Create a salt
- var salt = Get_SALT();
- //Create a hash
- var hash = Get_HASH_SHA512("Your Password", "Your UserName", salt);
STEP 11
Add authentication mode to your web.config.
Add the following code to your web.confing.
- <system.web >
- <authentication mode = "Forms" >
- <forms loginUrl = "~/Home/Login" timeout = "2880" / > //Declare Your Return URL Here. Mean If Login Fail Then Page Redirect This URL
- </authentication>
- </system.web>
nitin patilPosted Jun 14, 2020, 9:52 AM
Steps are not properly mentioned ex where to write ex Get_HASH_SHA512,there is no function LoginVM etc. otherwise it is good..its not complete runnable code..4
zaw zaw theinPosted Apr 15, 2020, 9:22 PM
What is username and password for the demo login page?
Vahhab SamadiPosted Apr 13, 2020, 3:14 AM
In step 9, you have a line: "filterContext.HttpContext.Response.StatusCode = 302; //Found Redirection to another page. Here- login page. Check Layout ajaxError() script". I want to know where is the ajaxError()? I could not find it in your sample code.
Ankit KanojiaPosted Mar 12, 2020, 2:09 AM
Thank you so much shubham singh
Ankit KanojiaPosted Mar 12, 2020, 2:09 AM
Thank you so much Alex Noori
Ankit KanojiaPosted Mar 12, 2020, 2:09 AM
Thank you so much Rohan Rao
Ankit KanojiaPosted Mar 12, 2020, 2:08 AM
Thank you so much Recep Yildiz
Ankit KanojiaPosted Mar 12, 2020, 2:08 AM
Thank you so much Manav Pandya
Ankit KanojiaPosted Mar 12, 2020, 2:08 AM
Thank you so much Ritesh Singh
Ankit KanojiaPosted Mar 12, 2020, 2:08 AM
Thank you so much Thiruppathi R
Ankit KanojiaPosted Mar 12, 2020, 2:07 AM
Thank you so much Raja T
Rohan RaoPosted Jul 3, 2019, 6:55 AM
Oh man.. I found your article on Code Project as well! Bdw great article. Thanks! :)
shubham singhPosted May 24, 2019, 12:33 AM
Wonderful article, do you have any article for registration?
Alex NooriPosted Feb 28, 2018, 1:19 PM
Thanks for your article
shervin salimianPosted Feb 12, 2018, 6:33 AM
Yes i'm sure the salt key updated in database.i check it.my Wrong where is?
Recep YildizPosted Jan 16, 2018, 9:26 AM
This is one of the best article on the Forms Authentication in MVC. Thank you for it :)
Guest UserPosted Nov 21, 2017, 2:45 AM
Great job, nicely documented, keep blogging like this..
Manav PandyaPosted Dec 1, 2016, 2:15 AM
Great article post sir Suchit Khunt ji
Ritesh SinghPosted Jul 26, 2016, 8:12 AM
Very Nice
Thiruppathi RPosted Jul 25, 2016, 2:14 AM
Nice
Raja TPosted Jul 25, 2016, 2:05 AM
Nice, Thanks for sharing..
kalu singh raoPosted Jul 25, 2016, 1:40 AM
Good one