

Introduction
Today, in this article, we will discuss how to develop a web application to perform CRUD operations using Cosmos DB. Now, as we all know, Cosmos DB is a NoSQL database, it is an alternative way of storing information when we do not fit our data storing requirement in an RDBMS system. Cosmos DB is a database server which is always distributed globally. It also supports the multi-model database service. That means it can be used to store a document, key-pair values, relational data, and also, a graph model’s data. Now, in this article, we will first create a Cosmos DB database using Azure portal and then develop an application which will insert, update, and delete data into that Cosmos DB database.
Prerequisites
- Microsoft Visual Studio 2017
- Account in Azure Portal.
If you don’t have any existing Azure account, then you can create a free trial account in Azure portal using your email id.
Cosmos DB Account
For creating a Cosmos DB database in the Azure portal, first, we need to create an Azure Cosmos DB account which is basically an Azure resource which is required to represent the database entity. This account is mainly used to estimate your resource usage and then create billing according to your subscriptions. Azure Cosmos DB account is normally associated with several data models which supported by the Azure Cosmos DB. The default data model of the Azure Cosmos DB is the SQL API.
How to Create Cosmos DB Account in Azure Portal
To create the Cosmos DB Account in Azure Portal, first, we need to log in to the Azure Portal and then perform the below steps to create a Cosmos DB Account.
Step 1
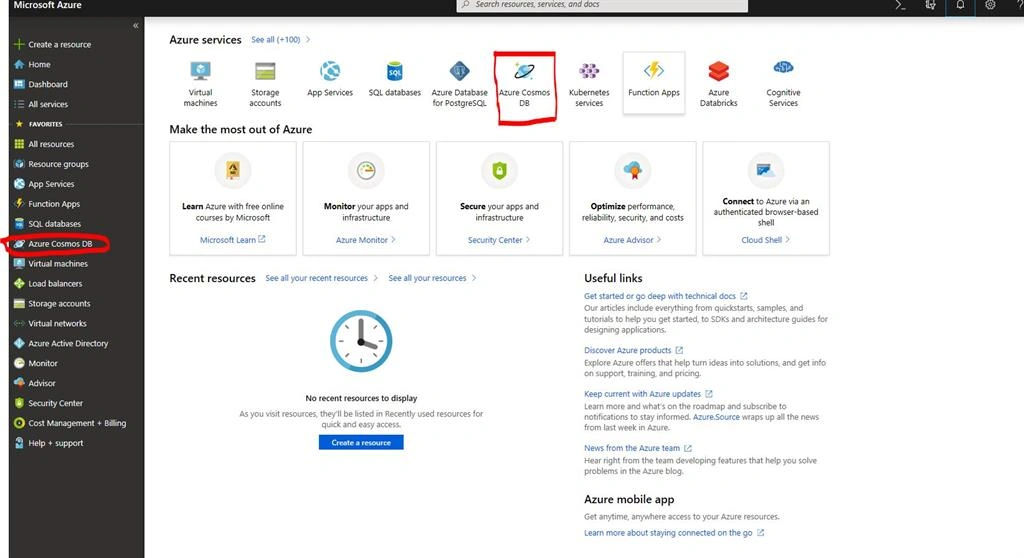
Click on the Azure Cosmos DB option from the Resource Dashboard.
Step 2
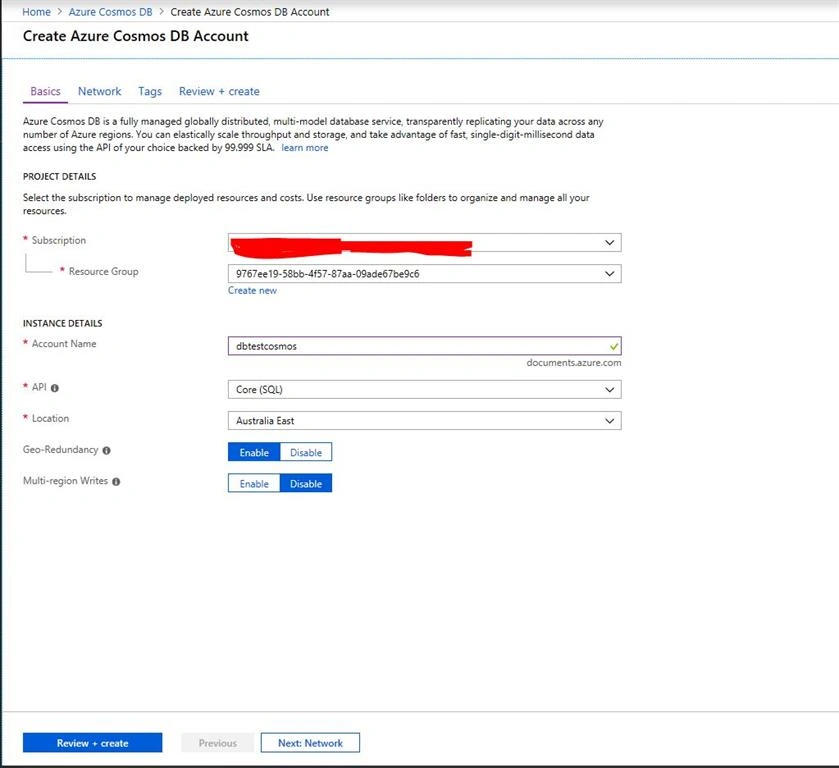
On the Create Azure Cosmos DB Account page, enter the required parameter settings for the new Azure Cosmos DB account, including the database name, resource name, location.
Step 3
In the above image, Account Name means the database name. API is the data model support which is SQL API by default. We will Select Azure Cosmos DB for MongoDB API from that drop down.
Step 4
Now click on the review and create button.
Step 5
After the settings are validated, click Create to create the account
Step 6
The account creation takes some time. Wait for the portal to display the notification that the deployment succeeded and click the notification.
Step 7
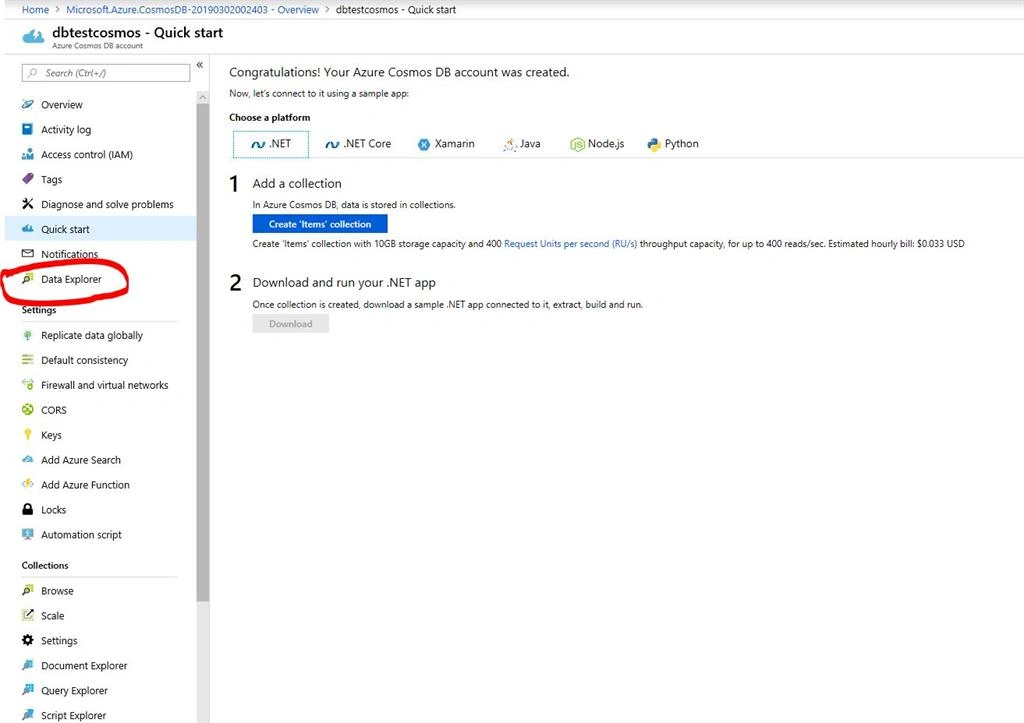
Once the deployment is succeeded, click Go to resource options to open Cosmos DB Account.
Step 8
Now, its time to create Cosmos DB Database and Collections. For this, click on the Data Explorer option.
Step 9
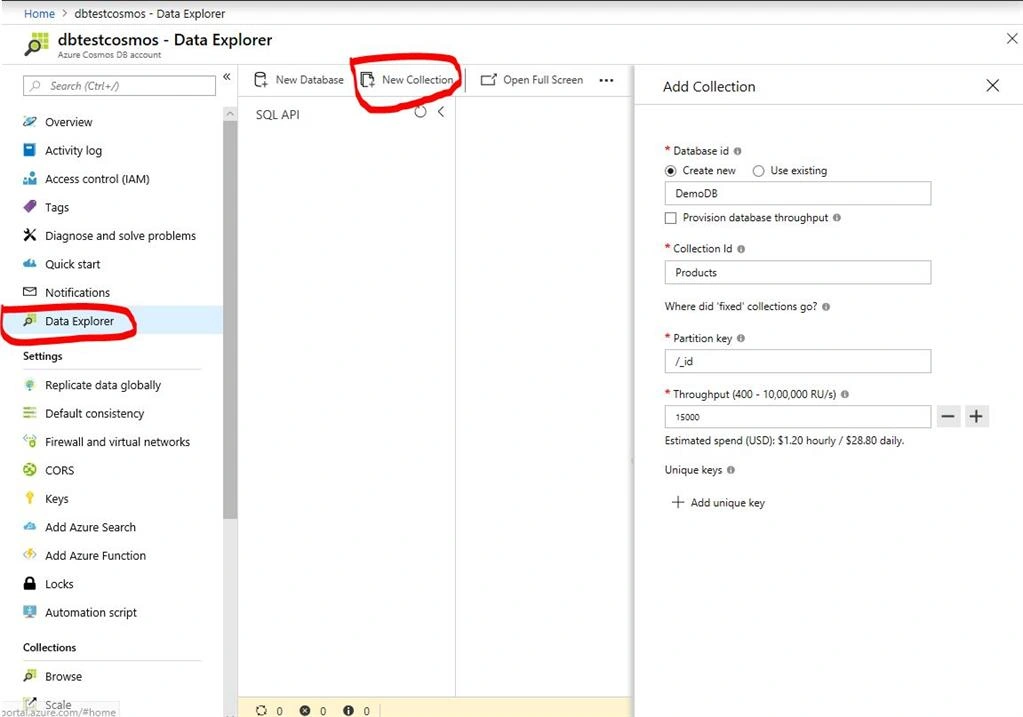
Now Click on New Collections button and then provide the Database Name and Collection Name.
- Database Name : DemoDB
- Collection Name : Products
Step 10
Now click on Ok Button.
Step 11
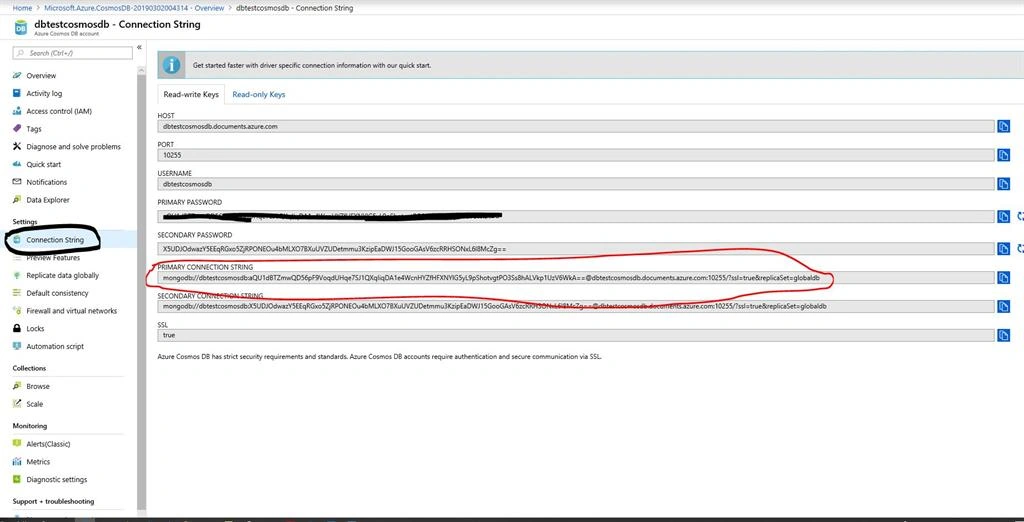
Once Database is created, click on ConnectionString option from the left panel.
Step 12
Now copy the Primary Connection string value and store in a note pad file. We will use this connection string in a configuration file within the applications.
Create a Web Application using .NET Core in VS 2017
Step 1
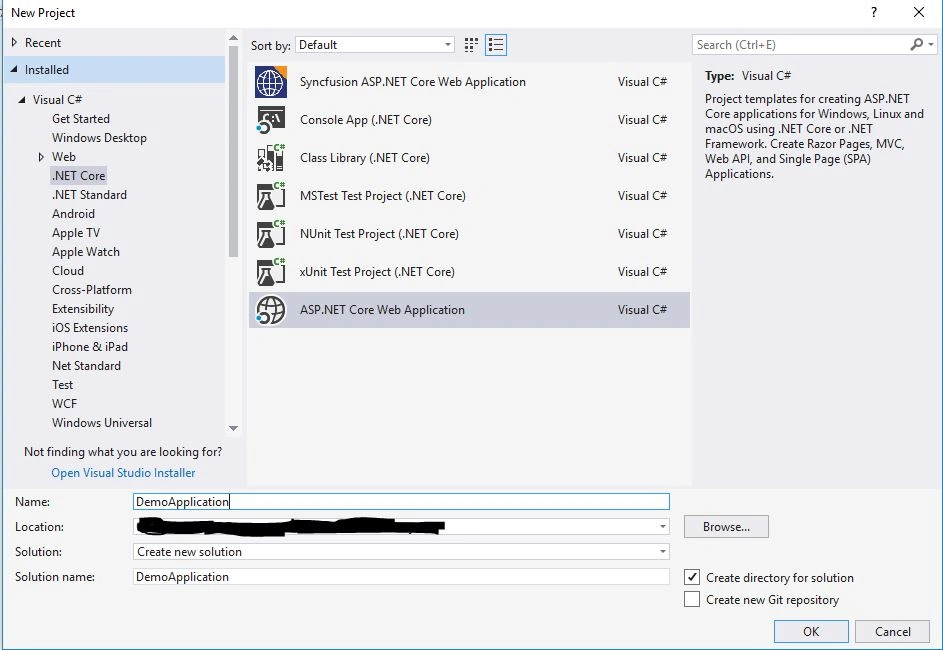
Now, open Microsoft Visual Studio 2017 and click on File --> New --> Projects.
Step 2
Select the Web Application Project template and click OK.
Step 3
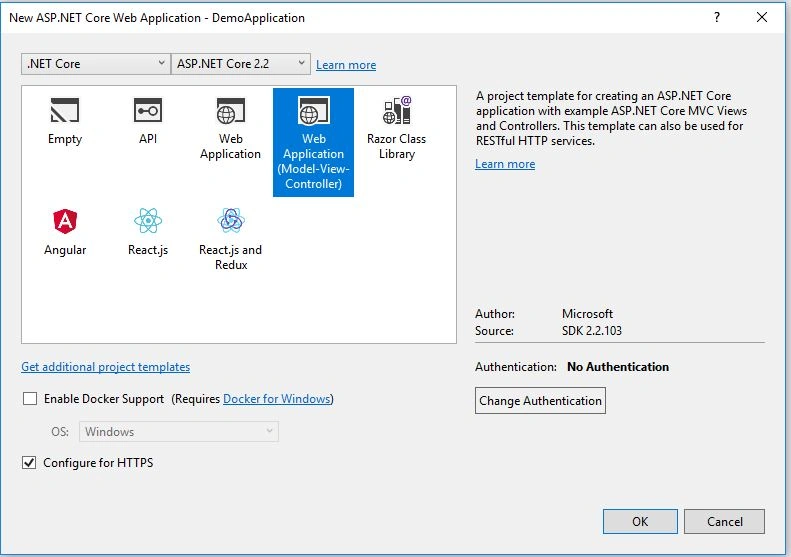
In the Project Template Box, Select Web Application (Model-View-Controller) options and click on the OK button.
Step 4
Now a blank project solution is ready.
Step 5
Now first open the App.Config file and store the database name and connections string to this file which we already copied from the Azure portal.
- {
- "Logging": {
- "LogLevel": {
- "Default": "Warning"
- }
- },
- "AllowedHosts": "*",
- "ConnectionStrings": {
- "ServerName": "mongodb://dbtestcosmosdb:aQU1dBTZmwQD56pF9VoqdUHqe7SJ1QXqIiqDA1e4WcnHYZfHFXNYlG5yL9pShotvgtPO3Ss8hALVkp1UzV6WkA==@dbtestcosmosdb.documents.azure.com:10255/?ssl=true&replicaSet=globaldb",
- "DatabaseName": "DemoDB"
- }
- }
Step 6
Now, add another Class Library Project for creating the Data Access Layer.
Step 7
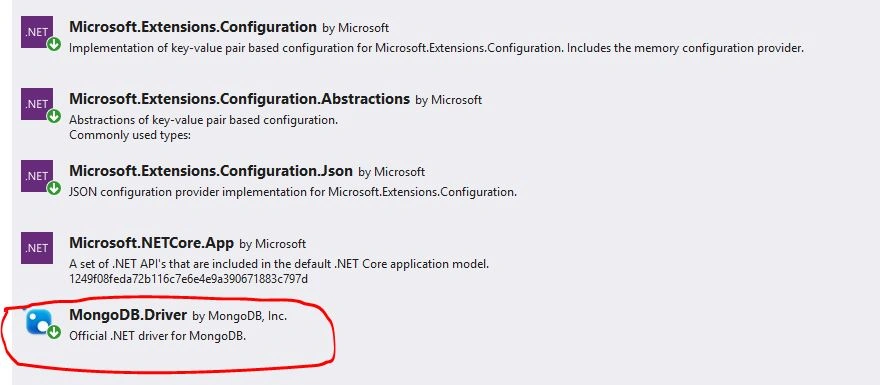
After adding the new projects, we need to install the below NuGet Packages to access Cosmos DB database using MongoDB client driver.
Step 8
Now, add another class library project for Model Class and add a class called Products and define the Product model class as below.
- using MongoDB.Bson;
- using MongoDB.Bson.Serialization.Attributes;
- using Newtonsoft.Json;
- using System;
- using System.ComponentModel.DataAnnotations;
- using System.ComponentModel.DataAnnotations.Schema;
- namespace ModelClass
- {
- public class Product
- {
- public Product()
- {
- CreatedDate = DateTime.Now;
- }
- [BsonId]
- [JsonProperty("objectId"), JsonConverter(typeof(ObjectIdConverter))]
- public ObjectId ObjectId { get; set; }
- [Key]
- public int ProductId { get; set; }
- [Required(ErrorMessage = "Please Enter Name")]
- [Column(TypeName = "varchar(50)")]
- public string Name { get; set; }
- public decimal UnitPrice { get; set; }
- [Required(ErrorMessage = "Please Enter Description")]
- [Column(TypeName = "varchar(500)")]
- public string Description { get; set; }
- [Column(TypeName = "varchar(50)")]
- public string ImageName { get; set; }
- [Column(TypeName = "varchar(250)")]
- public string ImagePath { get; set; }
- public DateTime CreatedDate { get; set; }
- public DateTime? UpdatedDate { get; set; }
- }
- }
Step 9
Now, select the Data Access Layer Projects and Create a New Folder called AppConfig.
Step 10
Now, within this folder add a new class file called AppConfiguration.cs where we will read the configuration file value by providing the key as below.
- using Microsoft.Extensions.Configuration;
- using System;
- using System.Collections.Generic;
- using System.IO;
- using System.Text;
- namespace DataContextLayer.AppConfig
- {
- public static class AppConfiguration
- {
- private static IConfiguration currentConfig;
- public static void SetConfig(IConfiguration configuration)
- {
- currentConfig = configuration;
- }
- public static string GetConfiguration(string configKey)
- {
- try
- {
- string connectionString = currentConfig.GetConnectionString(configKey);
- return connectionString;
- }
- catch (Exception ex)
- {
- throw (ex);
- }
- return "";
- }
- }
- }
Step 11
Now open the Startup.cs file and add the appConfig file so that we can retrieve value of this application configuration file from the class library.
- using System;
- using System.Collections.Generic;
- using System.Linq;
- using System.Threading.Tasks;
- using DataContextLayer.AppConfig;
- using Microsoft.AspNetCore.Builder;
- using Microsoft.AspNetCore.Hosting;
- using Microsoft.AspNetCore.Http;
- using Microsoft.AspNetCore.HttpsPolicy;
- using Microsoft.AspNetCore.Mvc;
- using Microsoft.Extensions.Configuration;
- using Microsoft.Extensions.DependencyInjection;
- namespace CosmosDb_Demo_Crud
- {
- public class Startup
- {
- public Startup(IConfiguration configuration)
- {
- Configuration = configuration;
- }
- public IConfiguration Configuration { get; }
- // This method gets called by the runtime. Use this method to add services to the container.
- public void ConfigureServices(IServiceCollection services)
- {
- services.Configure<CookiePolicyOptions>(options =>
- {
- // This lambda determines whether user consent for non-essential cookies is needed for a given request.
- options.CheckConsentNeeded = context => true;
- options.MinimumSameSitePolicy = SameSiteMode.None;
- });
- services.AddMvc().SetCompatibilityVersion(CompatibilityVersion.Version_2_2);
- services.AddSingleton(_ => Configuration);
- }
- // This method gets called by the runtime. Use this method to configure the HTTP request pipeline.
- public void Configure(IApplicationBuilder app, IHostingEnvironment env)
- {
- if (env.IsDevelopment())
- {
- app.UseDeveloperExceptionPage();
- }
- else
- {
- app.UseExceptionHandler("/Home/Error");
- // The default HSTS value is 30 days. You may want to change this for production scenarios, see https://aka.ms/aspnetcore-hsts.
- app.UseHsts();
- }
- app.UseHttpsRedirection();
- app.UseStaticFiles();
- app.UseCookiePolicy();
- AppConfiguration.SetConfig(Configuration);
- app.UseMvc(routes =>
- {
- routes.MapRoute(
- name: "default",
- template: "{controller=Products}/{action=Index}/{id?}"
- );
- });
- }
- }
- }
Step 12
Now, add another class called clsMongoDBDataContext.cs and then add the below code. This data context is basically established communication between the Cosmos DB and the application.
- using DataContextLayer.AppConfig;
- using Microsoft.Extensions.Configuration;
- using ModelClass;
- using MongoDB.Driver;
- namespace DataContextLayer
- {
- public class clsMongoDbDataContext
- {
- private string _connectionStrings = string.Empty;
- private string _databaseName = string.Empty;
- private string _collectionName = string.Empty;
- private readonly IMongoClient _client;
- private readonly IMongoDatabase _database;
- public clsMongoDbDataContext(string strCollectionName)
- {
- this._collectionName = strCollectionName;
- this._connectionStrings = AppConfiguration.GetConfiguration("ServerName");
- this._databaseName = AppConfiguration.GetConfiguration("DatabaseName");
- this._client = new MongoClient(_connectionStrings);
- this._database = _client.GetDatabase(_databaseName);
- }
- public IMongoClient Client
- {
- get { return _client; }
- }
- public IMongoDatabase Database
- {
- get { return _database; }
- }
- public IMongoCollection<Product> GetProducts
- {
- get { return _database.GetCollection<Product>(_collectionName); }
- }
- }
- }
Step 13
Now, go to the main projects i.e. MVC Application projects.
Step 14
Select the Controller folder and add a new MVC Controller Name ProductsController.cs
Step 15
Now, within the controller class, write down the below code within the Index Method.
- using System;
- using System.Collections.Generic;
- using System.Linq;
- using System.Threading.Tasks;
- using DataContextLayer;
- using Microsoft.AspNetCore.Http;
- using Microsoft.AspNetCore.Mvc;
- using ModelClass;
- using MongoDB.Bson;
- using MongoDB.Driver;
- namespace CosmosDb_Demo_Crud.Controllers
- {
- public class ProductsController : Controller
- {
- clsMongoDbDataContext _dbContext = new clsMongoDbDataContext("Products");
- // GET: Products
- public async Task<ActionResult> Index()
- {
- IEnumerable<Product> products = null;
- using (IAsyncCursor<Product> cursor = await this._dbContext.GetProducts.FindAsync(new BsonDocument()))
- {
- while (await cursor.MoveNextAsync())
- {
- products = cursor.Current;
- }
- }
- return View(products);
- }
- }
- }
Step 16
Now, add a new view against the Index method by clicking the right mouse button. A new view has been added in the view folder.
Step 17
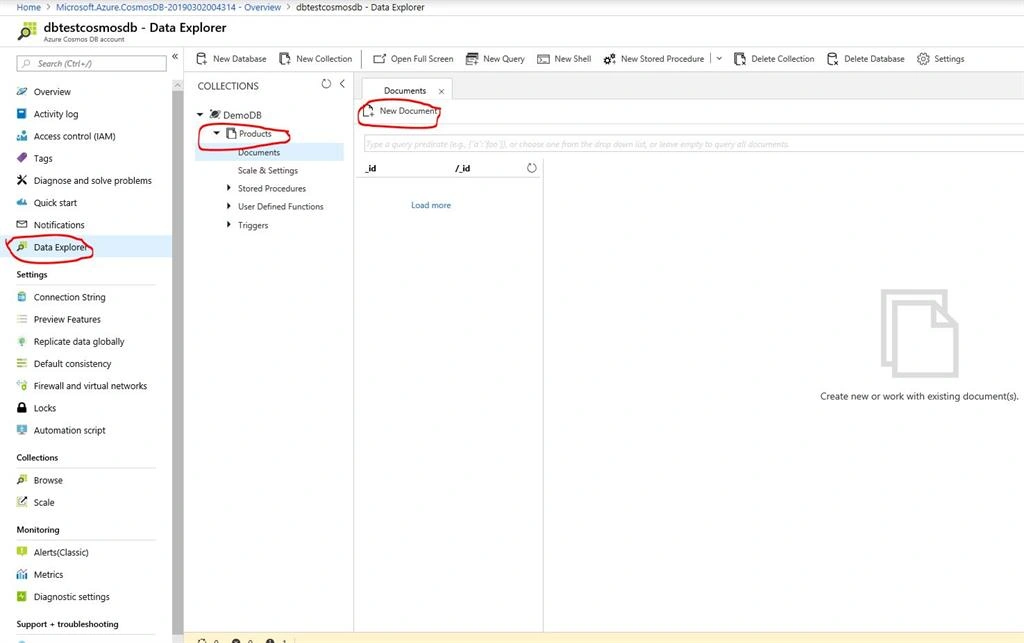
Now again go to the Azure portal, open the data explorer and click on the new documents option to insert a document in the product collection.
Step 18
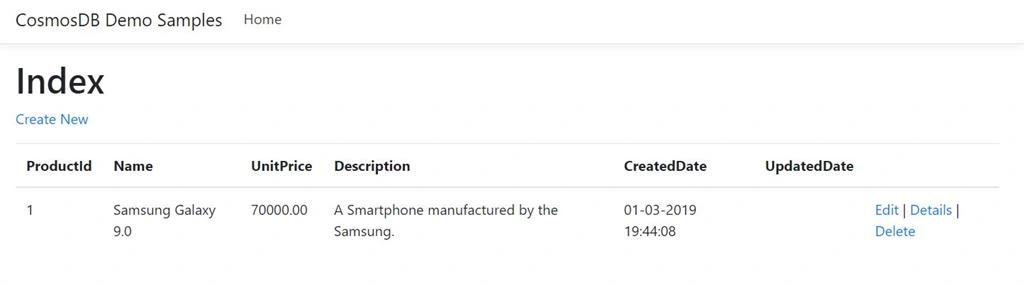
Now, run the application. It will display the insert item in the list page.
Step 19
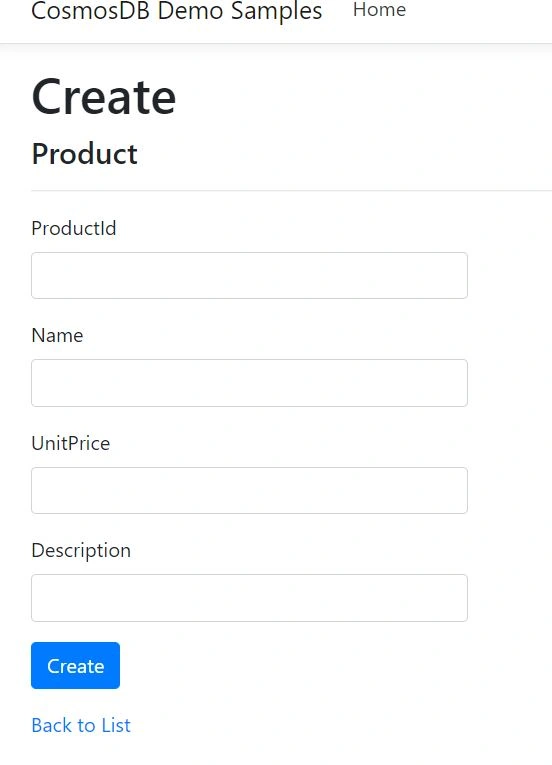
Now, create a new method for creating in the ProductController and add related view against that action method.
Step 20
Now, create an action method for the saving the data and write down the below code.
Step 21
Now run the application and try to insert a new record from the application.
Step 22
Step 22
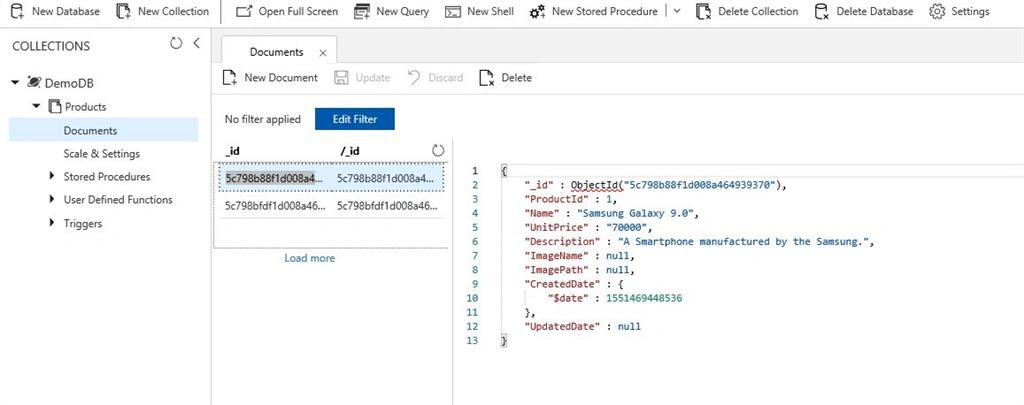
Now, go back to the Azure portal and check if the newly inserted data is shown in the Data Explorer or not.
Step 23
Similarly, add the edit records and delete records functionality along with the related view. Below is the complete code of ProductsController.cs file,
- using System;
- using System.Collections.Generic;
- using System.Linq;
- using System.Threading.Tasks;
- using DataContextLayer;
- using Microsoft.AspNetCore.Http;
- using Microsoft.AspNetCore.Mvc;
- using ModelClass;
- using MongoDB.Bson;
- using MongoDB.Driver;
- namespace CosmosDb_Demo_Crud.Controllers
- {
- public class ProductsController : Controller
- {
- clsMongoDbDataContext _dbContext = new clsMongoDbDataContext("Products");
- // GET: Products
- public async Task<ActionResult> Index()
- {
- IEnumerable<Product> products = null;
- using (IAsyncCursor<Product> cursor = await this._dbContext.GetProducts.FindAsync(new BsonDocument()))
- {
- while (await cursor.MoveNextAsync())
- {
- products = cursor.Current;
- }
- }
- return View(products);
- }
- // GET: Products/Details/5
- [HttpGet]
- public async Task<ActionResult> Details(string id)
- {
- if (!string.IsNullOrEmpty(id))
- {
- FilterDefinition<Product> filter = Builders<Product>.Filter.Eq("_id", ObjectId.Parse(id));
- IEnumerable<Product> entity = null;
- using (IAsyncCursor<Product> cursor = await this._dbContext.GetProducts.FindAsync(filter))
- {
- while (await cursor.MoveNextAsync())
- {
- entity = cursor.Current;
- }
- }
- return View(entity.FirstOrDefault());
- }
- return RedirectToAction("Index");
- }
- // GET: Products/Create
- public ActionResult Create()
- {
- return View();
- }
- // POST: Products/Create
- [HttpPost]
- [ValidateAntiForgeryToken]
- public async Task<ActionResult> Create(Product model)
- {
- try
- {
- if (!ModelState.IsValid)
- {
- return View(model);
- }
- model.CreatedDate = DateTime.UtcNow;
- await this._dbContext.GetProducts.InsertOneAsync(model);
- return RedirectToAction("Index");
- }
- catch
- {
- return View();
- }
- }
- // GET: Products/Edit/5
- public async Task<ActionResult> Edit(string id)
- {
- if (!string.IsNullOrEmpty(id))
- {
- FilterDefinition<Product> filter = Builders<Product>.Filter.Eq("_id", ObjectId.Parse(id));
- IEnumerable<Product> entity = null;
- using (IAsyncCursor<Product> cursor = await this._dbContext.GetProducts.FindAsync(filter))
- {
- while (await cursor.MoveNextAsync())
- {
- entity = cursor.Current;
- }
- }
- return View(entity.FirstOrDefault());
- }
- return View();
- }
- // POST: Products/Edit/5
- [HttpPost]
- [ValidateAntiForgeryToken]
- public async Task<ActionResult> Edit(string id, Product model)
- {
- try
- {
- if (!ModelState.IsValid)
- {
- return View(model);
- }
- model.UpdatedDate = DateTime.UtcNow;
- model.ObjectId = ObjectId.Parse(id);
- FilterDefinition<Product> filter = Builders<Product>.Filter.Eq("_id", ObjectId.Parse(id));
- await this._dbContext.GetProducts.ReplaceOneAsync(filter, model, new UpdateOptions() { IsUpsert = true });
- return RedirectToAction("Index");
- }
- catch
- {
- return RedirectToAction("Index");
- }
- }
- [HttpGet]
- public async Task<ActionResult> Delete(string id)
- {
- if (!string.IsNullOrEmpty(id))
- {
- FilterDefinition<Product> filter = Builders<Product>.Filter.Eq("_id", ObjectId.Parse(id));
- IEnumerable<Product> entity = null;
- using (IAsyncCursor<Product> cursor = await this._dbContext.GetProducts.FindAsync(filter))
- {
- while (await cursor.MoveNextAsync())
- {
- entity = cursor.Current;
- }
- }
- return View(entity.FirstOrDefault());
- }
- return View();
- }
- // POST: Products/Delete/5
- [HttpPost]
- [ValidateAntiForgeryToken]
- public async Task<ActionResult> Delete(string id, Product model)
- {
- try
- {
- if (string.IsNullOrEmpty(id))
- {
- return View(model);
- }
- model.ObjectId = ObjectId.Parse(id);
- FilterDefinition<Product> filter = Builders<Product>.Filter.Eq("_id", ObjectId.Parse(id));
- await this._dbContext.GetProducts.DeleteOneAsync(filter);
- return RedirectToAction("Index");
- }
- catch
- {
- return View();
- }
- }
- }
- }
Step 24
Now the add all CRUD-related operations methods; i.e., update existing data and also, delete any existing data with related views.
Conclusion
In this article, we discussed how to insert, update, or delete data in a MongoDB API based Cosmos DB Database in Azure portal using ASP.NET Core. I hope this article will help you understand. In the next article, we will discuss how to upload files in Azure Blob Storage. For any further query or clarification, ping me.
Join the conversation! Your thoughts help the community grow.