

In this article, we are going through the details and benefits of using Visual Studio extensions and also going through creating a Visual Studio 2019 extension to extend the Menu step by step.
Pre-Requisites
What are Visual Studio 2019 Extensions?
Visual Studio Extensions are extended customized functionalities that may be added to Visual Studio by any developer.
With a Visual Studio Extension, you may customize everything like,
- Visual Studio editor with new languages, IntelliSense, syntax color, etc..
- Visual Studio menu with new items and actions;
- Visual Studio projects with new templates;
- Visual Studio commands with customized settings;
- And so on... your creativity is your limit.
You can find a list of existent Visual Studio Extension on Visual Studio MarketPlace.
Read more about Visual Studio Extension here.
Types of Visual Studio Extensions
The most used types of Visual Studio extensions are the ones as follows, which you may be adding new items or overriding the behavior of the existing ones,
- Menu, as explained in this article;
- Command;
- Tools;
- Editor;
- Language;
- Projects;
- User settings;
- Isolated shell;
Read more about Visual Studio Extension types here.
Creating your first Visual Studio 2019 Extension Step by Step
Creating the project
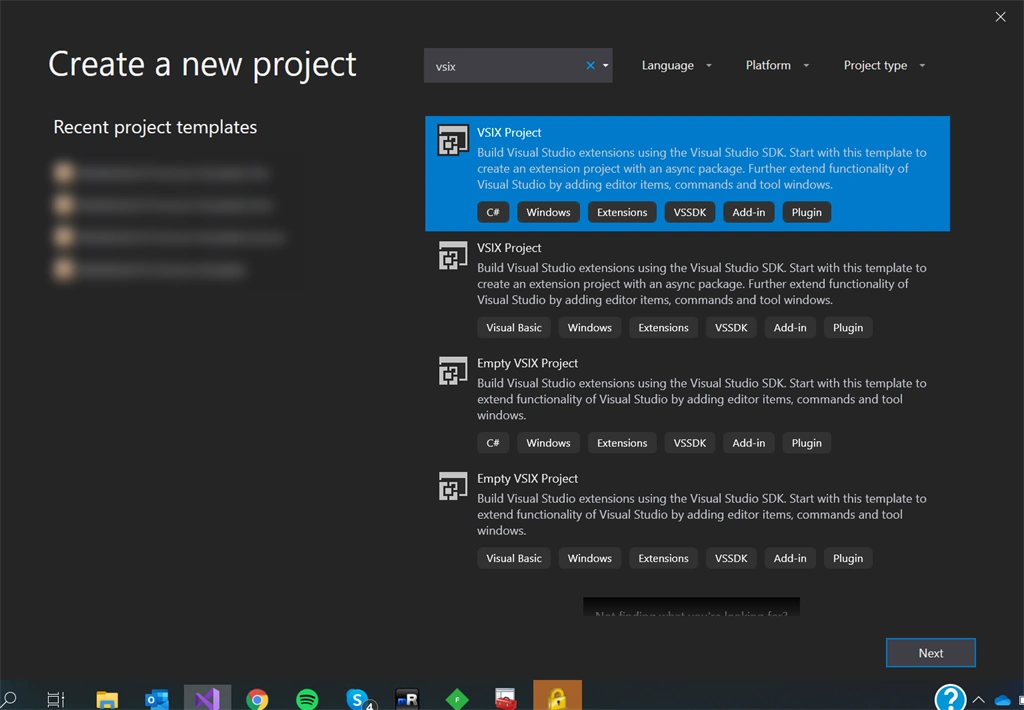
Add a new project of type VSIX Project,
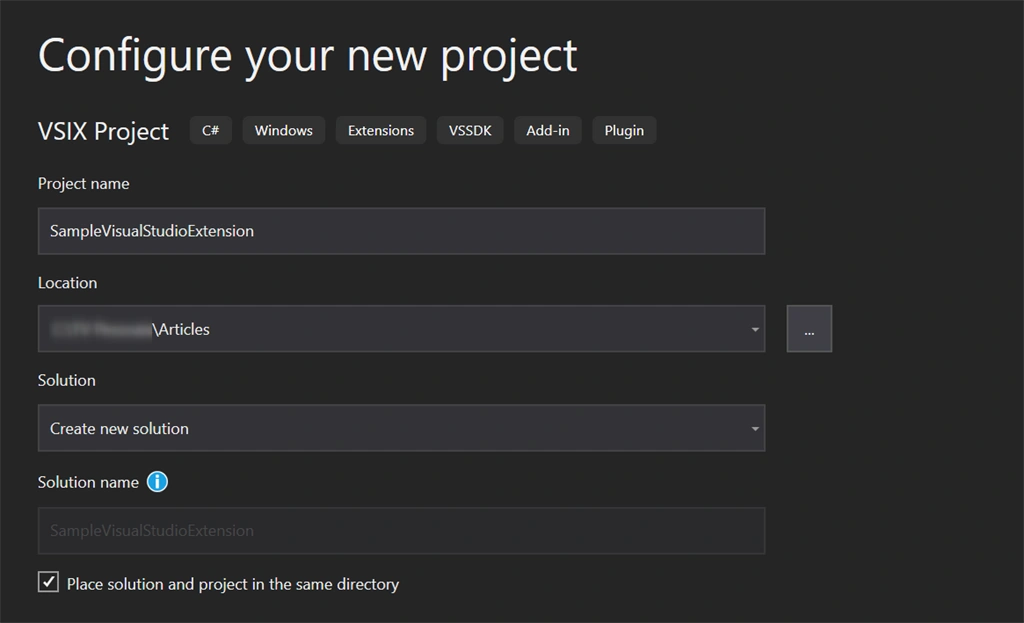
Set your project name as SampleVisualStudioExtension,
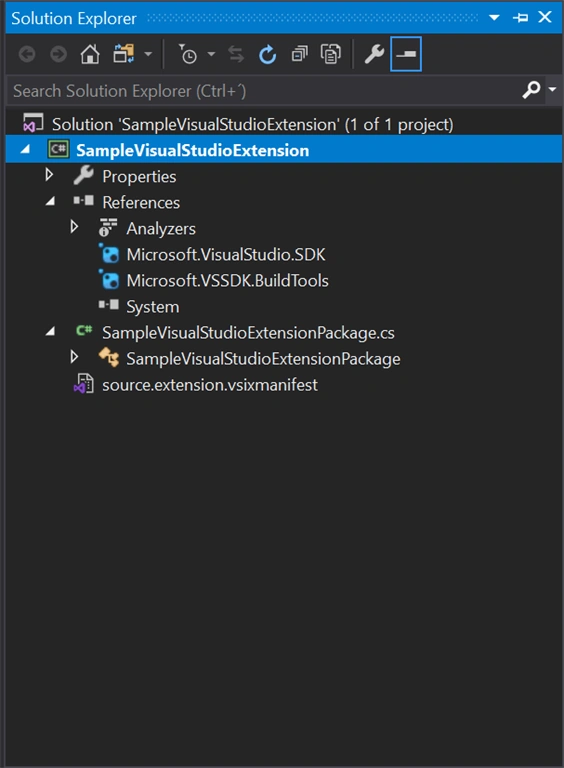
This is the project structure created from the template,
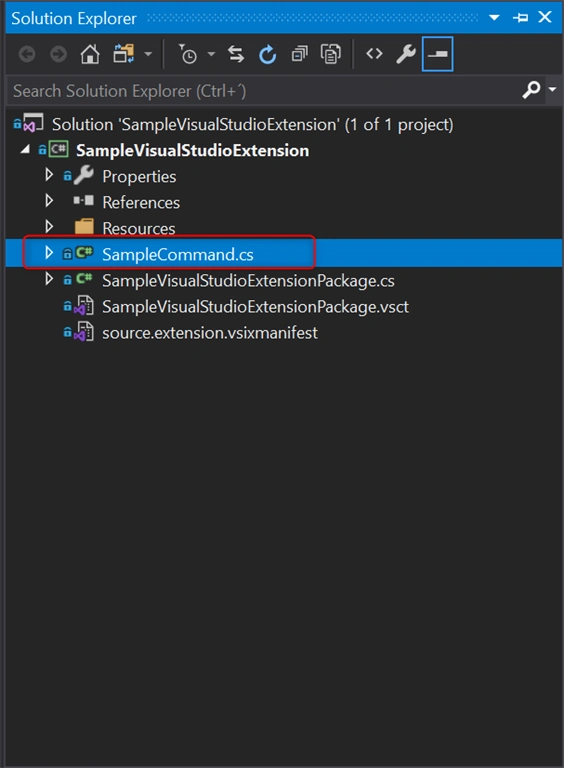
Understanding the project structure
- Has the code for the desired behavior of the functionalities;
- Is initialized by package class;
- Has the property CommandId, which binds the command with the menu item, set by the vsct file inside the Symbols section;
- Has the property CommandSet, which binds the command with the commands menu group, set by the vsct file inside the Symbols section;
- Read more here.
- It is the command table configuration file, which works as a Web.Config for Web Applications projects;
- XML based;
- Has the menu definitions;
- Has the buttons definitions;
- Has the commands definitions;
- Has the images definitions;
- Read more here.
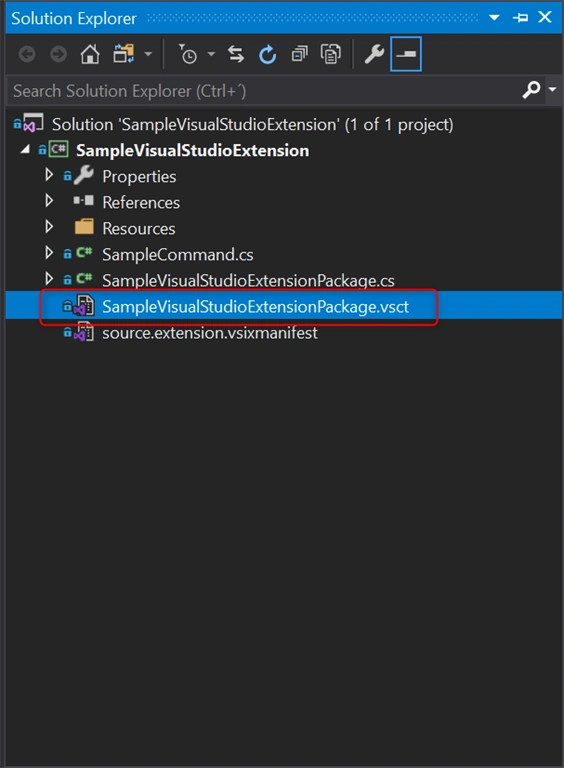
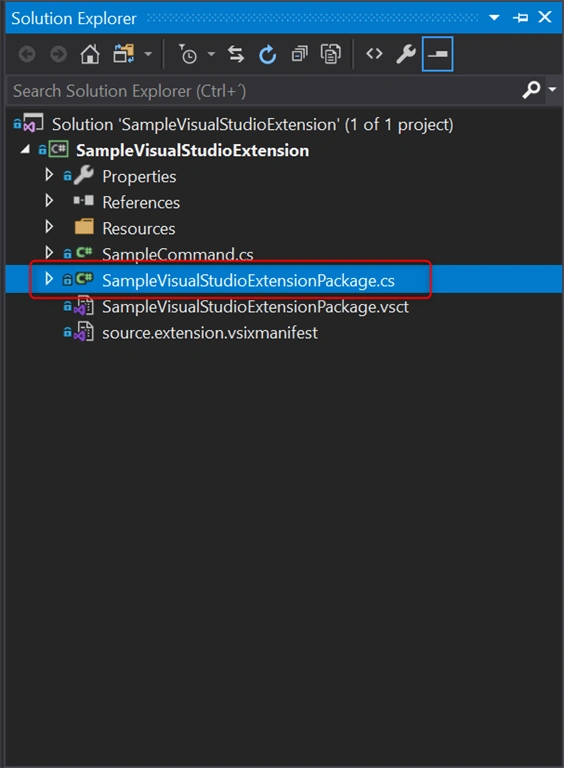
- Represents the package itself;
- Can handle asynchronous services;
- Initializes the command classes;
- Has the property PackageGuidString, which is the package GUID, set by the vsct file inside the Symbols section;
- Read more here.
- Has the installation desired behavior for the Visual Studio extension;
- Has the Visual Studio extension description. Such as Extension Name, Author, Description, License, etc..
- Read more here.
- Storage for the resources used in the extension. Such as images, icons, keys, etc..
- The items here are mapped with the vsct file inside the Commands section;
- Read more here.
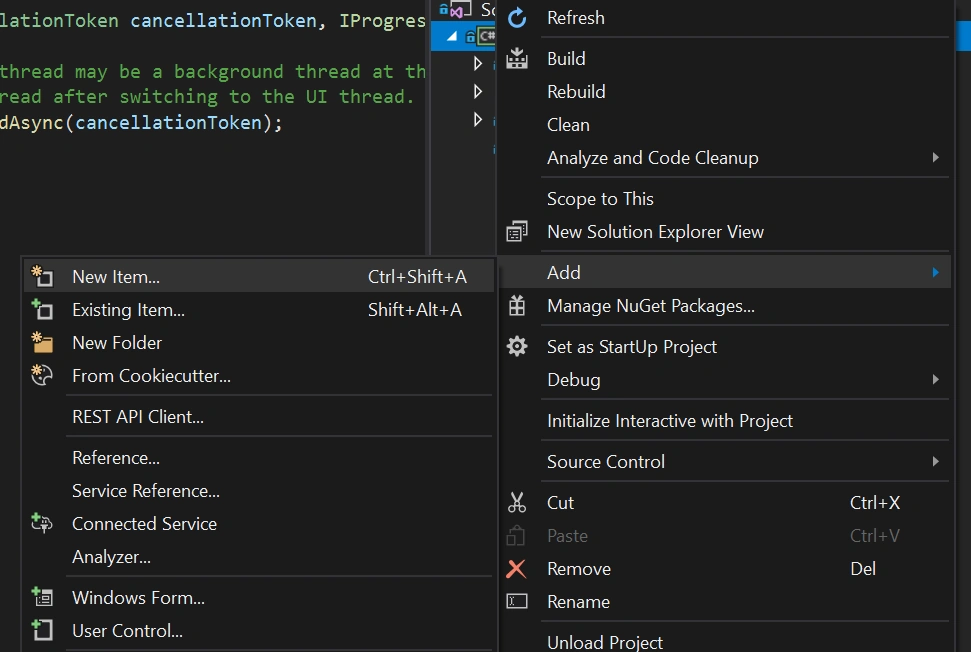
Add a new item into your project,
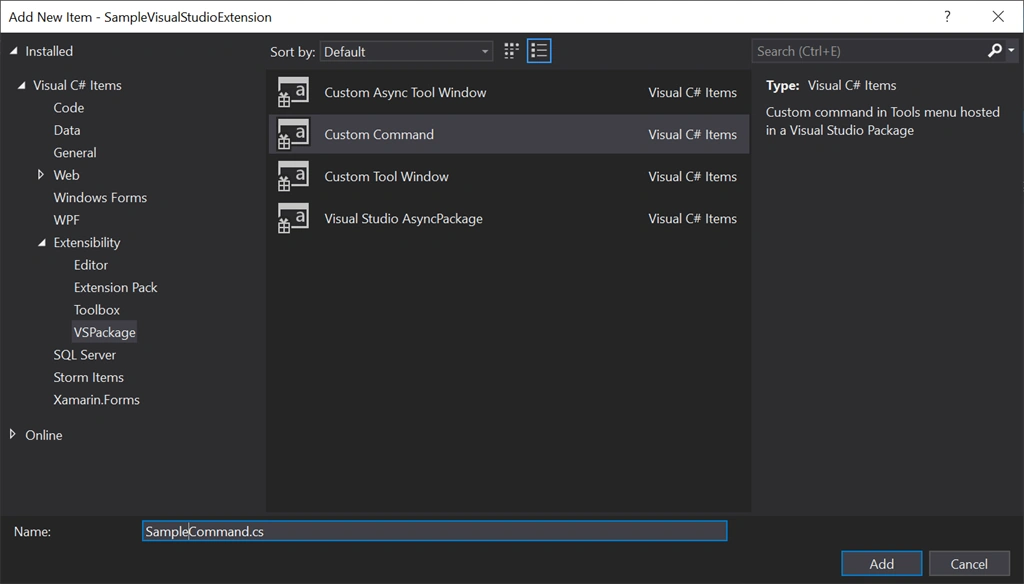
Select the Custom Command item, and set its name as SampleCommand,
Objects created
- using System;
- using System.ComponentModel.Design;
- using System.Globalization;
- using System.Threading;
- using System.Threading.Tasks;
- using Microsoft.VisualStudio.Shell;
- using Microsoft.VisualStudio.Shell.Interop;
- using Task = System.Threading.Tasks.Task;
- namespace SampleVisualStudioExtension
- {
- /// <summary>
- /// Command handler
- /// </summary>
- internal sealed class SampleCommand
- {
- /// <summary>
- /// Command ID.
- /// </summary>
- public const int CommandId = 0x0100;
- /// <summary>
- /// Command menu group (command set GUID).
- /// </summary>
- public static readonly Guid CommandSet = new Guid("f12cb590-7cad-4292-99cb-49d97f71e500");
- /// <summary>
- /// VS Package that provides this command, not null.
- /// </summary>
- private readonly AsyncPackage package;
- /// <summary>
- /// Initializes a new instance of the <see cref="SampleCommand"/> class.
- /// Adds our command handlers for menu (commands must exist in the command table file)
- /// </summary>
- /// <param name="package">Owner package, not null.</param>
- /// <param name="commandService">Command service to add command to, not null.</param>
- private SampleCommand(AsyncPackage package, OleMenuCommandService commandService)
- {
- this.package = package ?? throw new ArgumentNullException(nameof(package));
- commandService = commandService ?? throw new ArgumentNullException(nameof(commandService));
- var menuCommandID = new CommandID(CommandSet, CommandId);
- var menuItem = new MenuCommand(this.Execute, menuCommandID);
- commandService.AddCommand(menuItem);
- }
- /// <summary>
- /// Gets the instance of the command.
- /// </summary>
- public static SampleCommand Instance
- {
- get;
- private set;
- }
- /// <summary>
- /// Gets the service provider from the owner package.
- /// </summary>
- private Microsoft.VisualStudio.Shell.IAsyncServiceProvider ServiceProvider
- {
- get
- {
- return this.package;
- }
- }
- /// <summary>
- /// Initializes the singleton instance of the command.
- /// </summary>
- /// <param name="package">Owner package, not null.</param>
- public static async Task InitializeAsync(AsyncPackage package)
- {
- // Switch to the main thread - the call to AddCommand in SampleCommand's constructor requires
- // the UI thread.
- await ThreadHelper.JoinableTaskFactory.SwitchToMainThreadAsync(package.DisposalToken);
- OleMenuCommandService commandService = await package.GetServiceAsync(typeof(IMenuCommandService)) as OleMenuCommandService;
- Instance = new SampleCommand(package, commandService);
- }
- /// <summary>
- /// This function is the callback used to execute the command when the menu item is clicked.
- /// See the constructor to see how the menu item is associated with this function using
- /// OleMenuCommandService service and MenuCommand class.
- /// </summary>
- /// <param name="sender">Event sender.</param>
- /// <param name="e">Event args.</param>
- private void Execute(object sender, EventArgs e)
- {
- ThreadHelper.ThrowIfNotOnUIThread();
- string message = string.Format(CultureInfo.CurrentCulture, "Inside {0}.MenuItemCallback()", this.GetType().FullName);
- string title = "SampleCommand";
- // Show a message box to prove we were here
- VsShellUtilities.ShowMessageBox(
- this.package,
- message,
- title,
- OLEMSGICON.OLEMSGICON_INFO,
- OLEMSGBUTTON.OLEMSGBUTTON_OK,
- OLEMSGDEFBUTTON.OLEMSGDEFBUTTON_FIRST);
- }
- }
- }
- <?xml version="1.0" encoding="utf-8"?>
- <CommandTable xmlns="http://schemas.microsoft.com/VisualStudio/2005-10-18/CommandTable" xmlns:xs="http://www.w3.org/2001/XMLSchema">
- <!--
- This is the file that defines the actual layout and type of the commands.
- It is divided in different sections (e.g. command definition, command
- placement, ...), with each defining a specific set of properties.
- See the comment before each section for more details about how to
- use it.
- -->
- <!--
- The VSCT compiler (the tool that translates this file into the binary
- format that VisualStudio will consume) has the ability to run a preprocessor
- on the vsct file; this preprocessor is (usually) the C++ preprocessor, so
- it is possible to define includes and macros with the same syntax used
- in C++ files. Using this ability of the compiler here, we include some files
- defining some of the constants that we will use inside the file.
- -->
- <!--This is the file that defines the IDs for all the commands exposed by VisualStudio. -->
- <Extern href="stdidcmd.h"/>
- <!--This header contains the command ids for the menus provided by the shell. -->
- <Extern href="vsshlids.h"/>
- <!--
- The Commands section is where commands, menus, and menu groups are defined.
- This section uses a Guid to identify the package that provides the command defined inside it.
- -->
- <Commands package="guidSampleVisualStudioExtensionPackage">
- <!--
- Inside this section we have different sub-sections: one for the menus, another
- for the menu groups, one for the buttons (the actual commands), one for the combos
- and the last one for the bitmaps used. Each element is identified by a command id that
- is a unique pair of guid and numeric identifier; the guid part of the identifier is usually
- called "command set" and is used to group different command inside a logically related
- group; your package should define its own command set in order to avoid collisions
- with command ids defined by other packages.
- -->
- <!--
- In this section you can define new menu groups. A menu group is a container for
- other menus or buttons (commands); from a visual point of view you can see the
- group as the part of a menu contained between two lines. The parent of a group
- must be a menu.
- -->
- <Groups>
- <Group guid="guidSampleVisualStudioExtensionPackageCmdSet" id="MyMenuGroup" priority="0x0600">
- <Parent guid="guidSHLMainMenu" id="IDM_VS_MENU_TOOLS"/>
- </Group>
- </Groups>
- <!--Buttons section. -->
- <!--
- This section defines the elements the user can interact with, like a menu command or a button
- or combo box in a toolbar.
- -->
- <Buttons>
- <!--
- To define a menu group you have to specify its ID, the parent menu and its display priority.
- The command is visible and enabled by default. If you need to change the visibility, status, etc, you can use
- the CommandFlag node.
- You can add more than one CommandFlag node e.g.:
- <CommandFlag>DefaultInvisible</CommandFlag>
- <CommandFlag>DynamicVisibility</CommandFlag>
- If you do not want an image next to your command, remove the Icon node />
- -->
- <Button guid="guidSampleVisualStudioExtensionPackageCmdSet" id="SampleCommandId" priority="0x0100" type="Button">
- <Parent guid="guidSampleVisualStudioExtensionPackageCmdSet" id="MyMenuGroup" />
- <Icon guid="guidImages" id="bmpPic1" />
- <Strings>
- <ButtonText>Invoke SampleCommand</ButtonText>
- </Strings>
- </Button>
- </Buttons>
- <!--The bitmaps section is used to define the bitmaps that are used for the commands.-->
- <Bitmaps>
- <!--
- The bitmap id is defined in a way that is a little bit different from the others:
- the declaration starts with a guid for the bitmap strip, then there is the resource id of the
- bitmap strip containing the bitmaps and then there are the numeric ids of the elements used
- inside a button definition. An important aspect of this declaration is that the element id
- must be the actual index (1-based) of the bitmap inside the bitmap strip.
- -->
- <Bitmap guid="guidImages" href="Resources\SampleCommand.png" usedList="bmpPic1, bmpPic2, bmpPicSearch, bmpPicX, bmpPicArrows, bmpPicStrikethrough"/>
- </Bitmaps>
- </Commands>
- <Symbols>
- <!-- This is the package guid. -->
- <GuidSymbol name="guidSampleVisualStudioExtensionPackage" value="{c86c0c68-5ff5-43af-8a60-54540cbea3e2}" />
- <!-- This is the guid used to group the menu commands together -->
- <GuidSymbol name="guidSampleVisualStudioExtensionPackageCmdSet" value="{f12cb590-7cad-4292-99cb-49d97f71e500}">
- <IDSymbol name="MyMenuGroup" value="0x1020" />
- <IDSymbol name="SampleCommandId" value="0x0100" />
- </GuidSymbol>
- <GuidSymbol name="guidImages" value="{9dddc041-b350-494a-9e4b-8b89d67437aa}" >
- <IDSymbol name="bmpPic1" value="1" />
- <IDSymbol name="bmpPic2" value="2" />
- <IDSymbol name="bmpPicSearch" value="3" />
- <IDSymbol name="bmpPicX" value="4" />
- <IDSymbol name="bmpPicArrows" value="5" />
- <IDSymbol name="bmpPicStrikethrough" value="6" />
- </GuidSymbol>
- </Symbols>
- </CommandTable>
Vsct file
- <Menus>
- <Menu guid="guidSampleVisualStudioExtensionPackageCmdSet" id="SampleMenu" priority="0x700" type="Menu">
- <Parent guid="guidSHLMainMenu"
- id="IDG_VS_MM_TOOLSADDINS" />
- <Strings>
- <ButtonText>Sample Menu</ButtonText>
- <CommandName>Sample Menu</CommandName>
- </Strings>
- </Menu>
- </Menus>
- <Groups>
- <Group guid="guidSampleVisualStudioExtensionPackageCmdSet" id="MyMenuGroup" priority="0x0600">
- <Parent guid="guidSampleVisualStudioExtensionPackageCmdSet" id="SampleMenu"/>
- </Group>
- </Groups>
- <IDSymbol name="SampleMenu" value="0x1021"/>
Vsct file
- <Button guid="guidSampleVisualStudioExtensionPackageCmdSet" id="SampleCommandId" priority="0x0100" type="Button">
- <Parent guid="guidSampleVisualStudioExtensionPackageCmdSet" id="MyMenuGroup" />
- <Icon guid="guidImages" id="bmpPic1" />
- <Strings>
- <ButtonText>Sample button text.</ButtonText>
- </Strings>
- </Button>
Command Class
- private void Execute(object sender, EventArgs e)
- {
- ThreadHelper.ThrowIfNotOnUIThread();
- string message = string.Format(CultureInfo.CurrentCulture, "Hello World! UTC Time now: {0}", DateTime.UtcNow);
- string title = "Sample title Command";
- // Show a message box to prove we were here
- VsShellUtilities.ShowMessageBox(
- this.package,
- message,
- title,
- OLEMSGICON.OLEMSGICON_INFO,
- OLEMSGBUTTON.OLEMSGBUTTON_OK,
- OLEMSGDEFBUTTON.OLEMSGDEFBUTTON_FIRST);
- }
Debugging
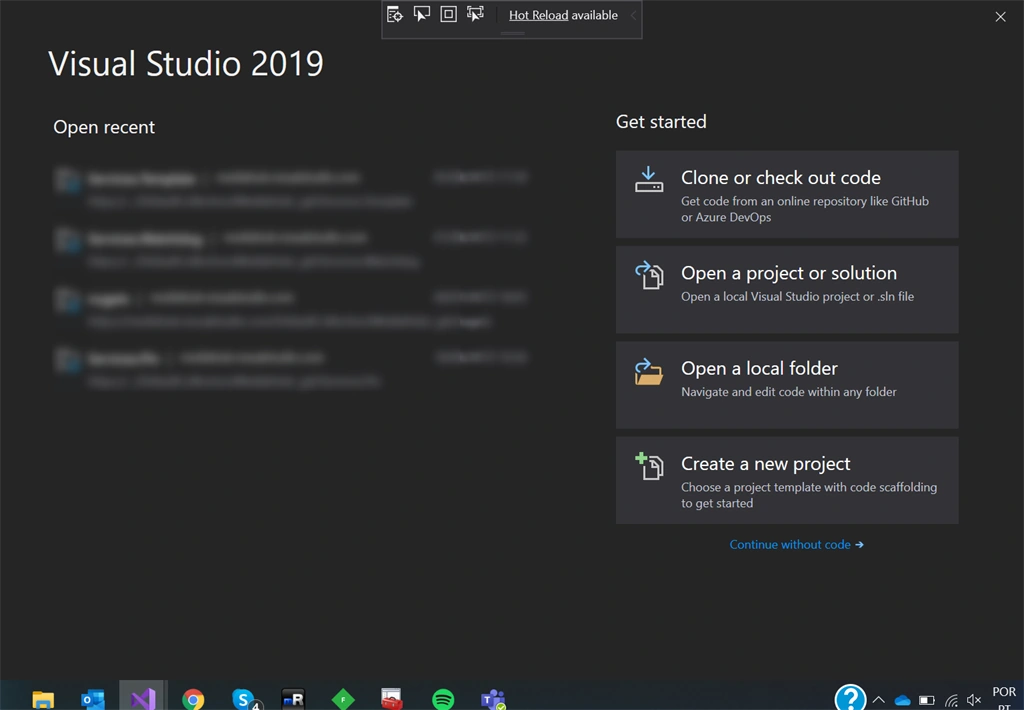
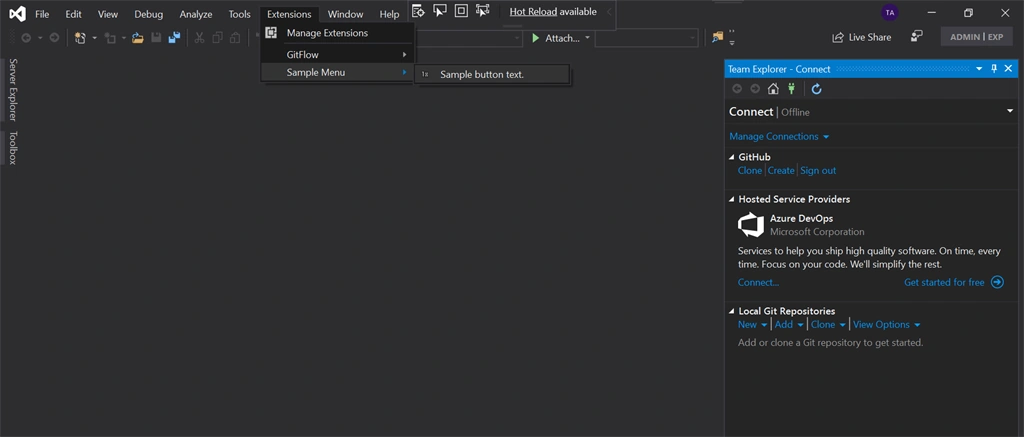
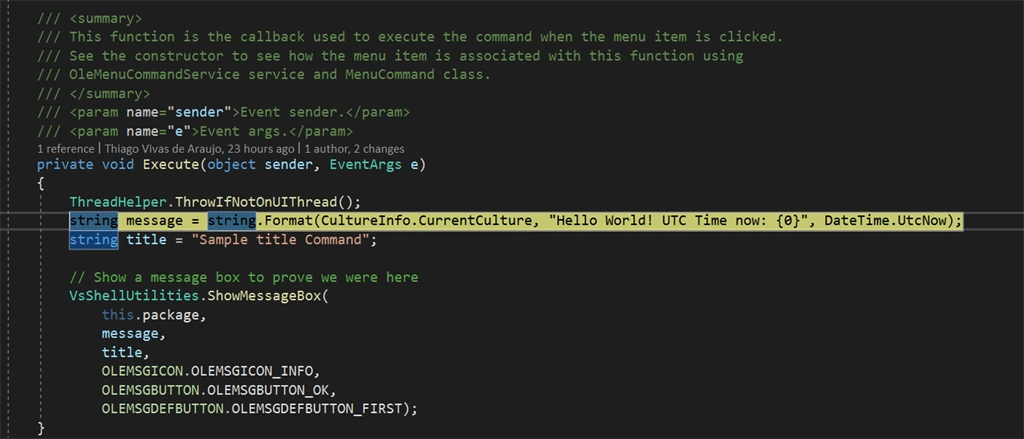
Debugging Visual Studio extensions works like debugging any kind of project, as our final product is a Visual Studio extension so when we push F5 it is going to open a new Visual Studio window simulating to have the extension installed as follows:
New Visual Studio Window result,
Publishing
it is free and anyone could publish your own extension at Visual Studio Marketplace.
Microsoft has a very nice tutorial explaining step-by-step on how to publish your Visual Studio extension into Visual Studio Marketplace here.
Congratulations, you have successfully created your first Visual Studio 2019 extension.
External References
Jesse ChunnPosted Oct 18, 2020, 10:46 AM
I can't follow this. In the "Understanding the project structure" section, new files suddenly show up in the solution with no explanation of how they got there... ???
Abubakr MahdiPosted Apr 28, 2020, 1:46 AM
Great work.
Pankajkumar PatelPosted Oct 22, 2019, 11:01 PM
Nice article
Sourav Kumar DasPosted Oct 22, 2019, 12:18 AM
Nice Article Sir.