

MVC provides an interesting
facility to use namespace to deal with different validations which plays a very important part in building
successful projects by making them more effective and efficient as it allows
user to customize the entities and to apply restrictions on any field by
defining the range or the required value.
To show the use of DataAnnotation Validations
To do so in ASP.NET MVC, first
develop a sample application as I have used a application of choosing software
to download it which contain various fields to get filled first than only user
can download the required software and the fields contain various restriction
like:
- Software name must be less than 5 characters
- Version range should be in between 1 to 5
- Company name should be entered
Various steps are required to do so, as are follows:
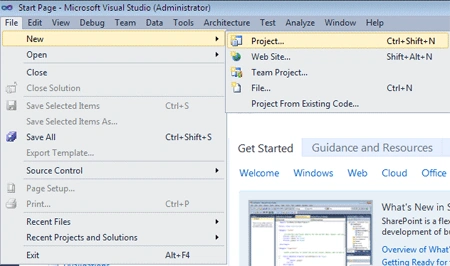
Step 1: Open Visual Studio 2010 so as to develop a new application >new>project
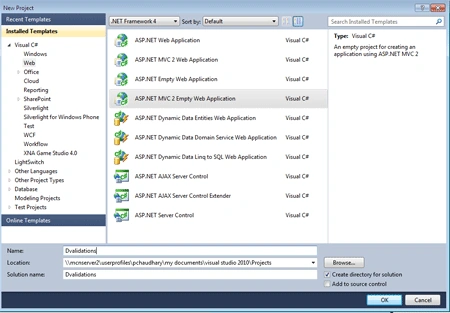
Step 2: Now choose ASP.NET MVC empty web application from the installed template along with it give the name to the new application as in this example name given to the application is Dvalidations after that click on OK.
Step 3: Now add the Model class first by right click on model > choose add > new >class and then manipulate the code according to the requirement as we are working on validations hence for that purpose user have to add System.ComponentModel.DataAnnotations to assembly so that we can use them as reference.
using
System;
using
System.Collections.Generic;
using
System.Linq;
using
System.Web;
using
System.ComponentModel.DataAnnotations;
namespace
Dvalidations.Models
{
public class
DV
{
[Required(ErrorMessage =
"Enter the Name of the Software")]
[StringLength(5,ErrorMessage="Doesn't
exist")]
public string
Software
{
get; set;
}
[Range(1,5,ErrorMessage =
"invalid version")]
public int
Version
{
get;
set;
}
public bool
Agree
{
get; set;
}
[Required(ErrorMessage =
"Company Name Required")]
public string
Company
{
get; set;
}
[Required(ErrorMessage =
"Enter ur Email")]
public string
Email
{
get; set;
}
public bool
RuActive
{
get; set;
}
}
}
Step 4: Next step will be to
add a new controller:
-
By right clicking on the controller folder > add controller > give name to controller
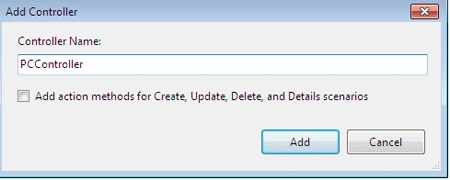
Now manipulate the code of controller to control the model class and then add a view to it.
using
System;
using
System.Collections.Generic;
using
System.Linq;
using System.Web;
using
System.Web.Mvc;
using
Dvalidations.Models;
namespace
Dvalidations.Controllers
{
public class
PCController :
Controller
{
//
// GET: /PC/Index
public
ActionResult Index()
{
DV pacific =
new DV();
return View(pacific);
}
[HttpPost]
public
ActionResult Index(DV pacific)
{
if(!ModelState.IsValid)
return View(pacific);
return View("Success");
}
}
}
Step 5: Last and final step is to add view to the action method.
-
Right click on action method
-
Give name to the view
-
Choose the data class and click on add
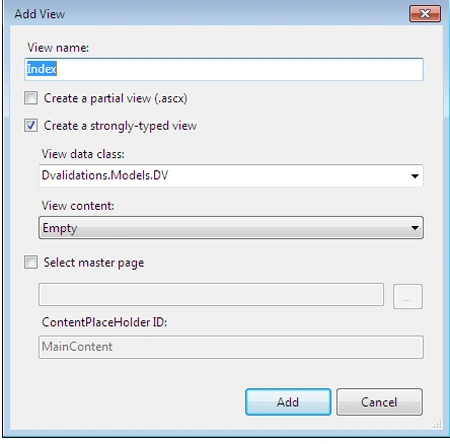
Now manipulate the view.aspx as per requirement:
<%@
Page Language="C#"
Inherits="System.Web.Mvc.ViewPage<Dvalidations.Models.DV>"
%>
<!DOCTYPE
html PUBLIC
"-//W3C//DTD XHTML 1.0 Transitional//EN"
"http://www.w3.org/TR/xhtml1/DTD/xhtml1-transitional.dtd">
<html
xmlns="http://www.w3.org/1999/xhtml"
>
<head
runat="server">
<title></title>
</head>
<body>
<div>
<h2>Choose
Software</h2>
<%=
Html.ValidationSummary("PLz Try Again")%>
<%
using (Html.BeginForm()) {%>
<fieldset>
<p>
<label
for="Software">Software:</label>
<%=
Html.TextBox("Software")
%>
<%=
Html.ValidationMessage("Software","*")
%>
</p>
<p>
<label
for="Version">Version:</label>
<%=
Html.TextBox("Version")
%>
<%=
Html.ValidationMessage("Version","*")
%>
</p>
<p>
<label
for="Agree">Agree:</label>
<%=
Html.CheckBox("Agree")
%>
<%=
Html.ValidationMessage("Agree","*")
%>
</p>
<p>
<label
for="Company">Company:</label>
<%=
Html.TextBox("Company")
%>
<%=
Html.ValidationMessage("Company","*")
%>
</p>
<p>
<label
for="Email">Email:</label>
<%=
Html.TextBox("Email")
%>
<%=
Html.ValidationMessage("Email","*")
%>
</p>
<p>
<label
for="RuActive">RuActive:</label>
<%=
Html.CheckBox("RuActive")
%>
<%=
Html.ValidationMessage("RuActive","*")
%>
</p>
<p>
<input
type=
"submit" value="Done"/>
</p>
</fieldset>
<%
} %>
</div>
</body>
</html>
After adding the
view you can run the application by pressing F5 and can see the effects of
DataAnnotation validations.
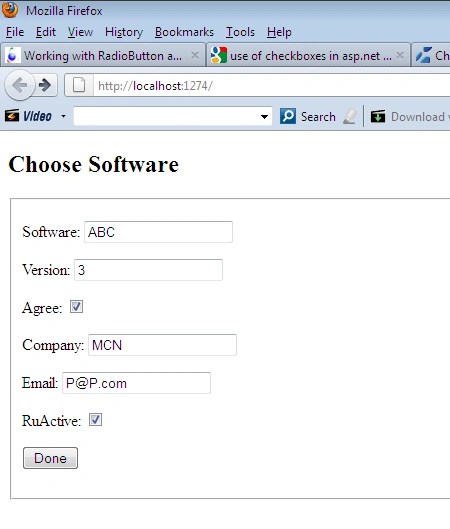
Screenshot
1: When all
fields are filled correctly as per requirements.
Screenshot 2: When filled fields violates the restriction applied on them:
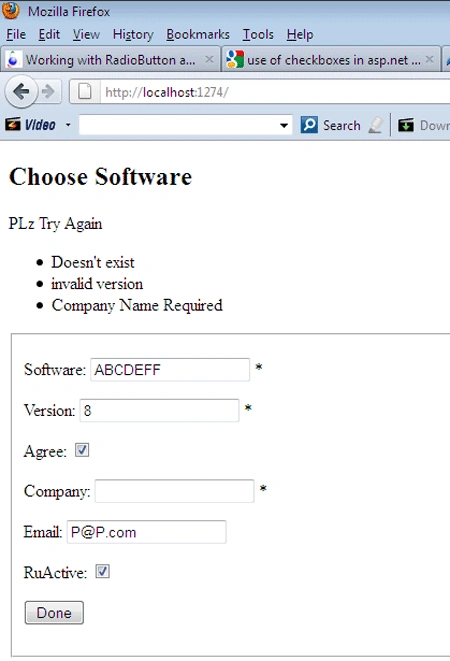
- As software is restricted to five characters
- Version range is from 1 to 5
- Company name left blank
Join the conversation! Your thoughts help the community grow.