

In this post, we are going to explore how a Single Page Application (SPA) sample can be put together using ASP.Net Core & Angular from scratch.
Table of Contents
- Introduction
- Work Plan
- Development Environment
- Core Description
- Summary
Introduction
We are going to use Angular6, TypeScript in the frontend and in the backend we'll be using ASP.NET Core WebAPI with Entity Framework Core database operations.

Work Plan
- Create New ASP.Net Core Project
- Configure Newly Created Project
- Serve Static Page
- Install Node Packages
- Manage Installed Packages
- Create Frontend Application
- HTML Templating
- Folder Structure
- Angular Dependencies
- TypeScript Configuration
- Root Component
- Root Module
- Bootstrapping Client app
- Creating Database
- Install Entity Framework Core
- Scaffolding MSSQL Database
- Configure Middleware
- Creating ASP.Net Core WebAPI
- Creating Client Services
- Perform CRUD Operation
- Test in Browser
Development Environment
Following are the prerequisites to develop our SPA sample.
- Visual Studio 2017
- NET Core 2.0 or later
- NodeJS and NPM
Visual Studio 2017
If you already have a copy of Visual Studio 2017 installed don’t worry, otherwise download Visual Studio Community 2017 for free.
.NET Core Downloads
Install the .NET Core SDK (Software Development Kit) 2.0 or later.
NodeJS and NPM
Install the latest NodeJS and NPM
Make sure the environment is ready before stepping into this.
Create ASP.Net Core Project
Let’s create a new project with Visual Studio 2017 > File > New > Project.
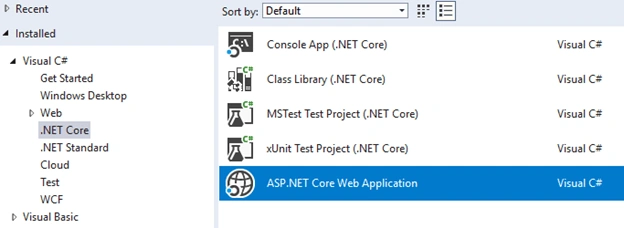
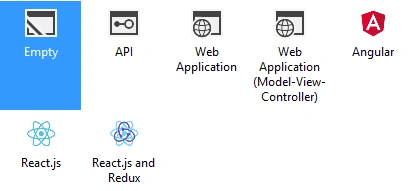
Choose empty template click > OK.
Here’s our new ASP.Net Core empty project with initial components.
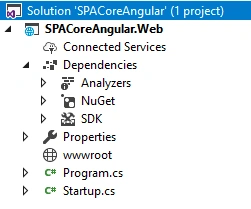
Configure ASP.Net Core Project
In this sample, we are going to serve the index.html page as our main page from app root folder, to serve the page we need to configure in Startup.cs file. Here is the code snippet which is going to serve the page.
- DefaultFilesOptions options = new DefaultFilesOptions();
- options.DefaultFileNames.Clear();
- options.DefaultFileNames.Add("/index.html");
- app.UseDefaultFiles(options);
- app.UseStaticFiles();
Middleware to Handle Client Side Routes Fallback
To avoid 404 error while reloading the page in AngularJS SPA app we need to add middleware to handle client side route fallback. The below code snippet will take care of that. Here’s the original post: https://code.msdn.microsoft.com/How-to-fix-the-routing-225ac90f
- app.Use(async (context, next) =>
- {
- await next();
- if (context.Response.StatusCode == 404 && !Path.HasExtension(context.Request.Path.Value))
- {
- context.Request.Path = "/index.html";
- context.Response.StatusCode = 200;
- await next();
- }
- });
Get more details on middleware here: https://docs.microsoft.com/en-us/aspnet/core/fundamentals/middleware/?tabs=aspnetcore2x
Install Node Packages
Let’s add frontend packages to our application. We need to add npm configuration file named package.json.
To do that right click the project then Goto > Add > New Item. From the new item add window choose npm Configuration File.
Here’s our list of frontend package dependencies.
- {
- "version": "1.0.0",
- "name": "asp.net",
- "private": true,
- "dependencies": {
- "@angular/common": "^6.0.2",
- "@angular/compiler": "^6.0.2",
- "@angular/core": "^6.0.2",
- "@angular/forms": "^6.0.2",
- "@angular/http": "^6.0.2",
- "@angular/platform-browser": "^6.0.2",
- "@angular/platform-browser-dynamic": "^6.0.2",
- "@angular/router": "^6.0.2",
- "@angular/upgrade": "^6.0.2",
- "bootstrap": "^4.1.1",
- "core-js": "^2.5.6",
- "reflect-metadata": "^0.1.12",
- "rxjs": "^6.1.0",
- "systemjs": "^0.21.3",
- "zone.js": "^0.8.26"
- },
- "devDependencies": {
- "@types/core-js": "^0.9.46",
- "typescript": "^2.8.3",
- "typings": "^2.1.1",
- "@types/node": "^10.0.4",
- "concurrently": "^3.5.1",
- "json-server": "^0.12.2",
- "gulp": "^3.9.1",
- "gulp-concat": "^2.6.1",
- "gulp-rename": "^1.2.2",
- "gulp-cssmin": "^0.2.0",
- "gulp-uglify": "^3.0.0",
- "gulp-htmlclean": "^2.7.20",
- "rimraf": "^2.6.2"
- }
- }
After installation of all packages let’s transfer the required libraries from node_modules folder to “wwwroot/lib” for calling it to the main HTML page.
Manage Installed Packages
We need to add a task runner like gulp file, then copy below code snippet and paste it into the newly added file.
- /// <binding AfterBuild='build-all' />
- var gulp = require("gulp"),
- rimraf = require("rimraf"),
- concat = require("gulp-concat"),
- cssmin = require("gulp-cssmin"),
- uglify = require("gulp-uglify"),
- rename = require("gulp-rename");
- var root_path = {
- webroot: "./wwwroot/"
- };
- //library source
- root_path.nmSrc = "./node_modules/";
- //library destination
- root_path.package_lib = root_path.webroot + "lib/";
- gulp.task('copy-lib-js', function () {
- gulp.src('./node_modules/core-js/**/*.js')
- .pipe(gulp.dest(root_path.package_lib + 'core-js'));
- gulp.src('./node_modules/@angular/**/*.js')
- .pipe(gulp.dest(root_path.package_lib + '@angular'));
- gulp.src('./node_modules/zone.js/**/*.js')
- .pipe(gulp.dest(root_path.package_lib + 'zone.js'));
- gulp.src('./node_modules/systemjs/**/*.js')
- .pipe(gulp.dest(root_path.package_lib + 'systemjs'));
- gulp.src('./node_modules/reflect-metadata/**/*.js')
- .pipe(gulp.dest(root_path.package_lib + 'reflect-metadata'));
- gulp.src('./node_modules/rxjs/**/*.js')
- .pipe(gulp.dest(root_path.package_lib + 'rxjs'));
- });
- gulp.task("copy-all", ["copy-lib-js"]);
- //Copy End
- gulp.task('min-js', function () {
- gulp.src(['./clientapp/**/*.js'])
- .pipe(uglify())
- .pipe(gulp.dest(root_path.webroot + 'app'))
- });
- gulp.task('copy-html', function () {
- gulp.src('clientapp/**/*.html')
- .pipe(gulp.dest(root_path.webroot + 'app'));
- });
- gulp.task("build-all", ["min-js", "copy-html"]);
- //Build End
Right click on gulpfile.js then go to “Task Runner Explorer”.
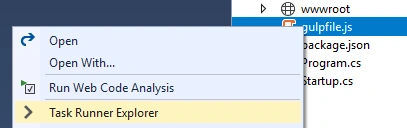
From the new window, refresh the task, then right click on the task to run it like the below screen.

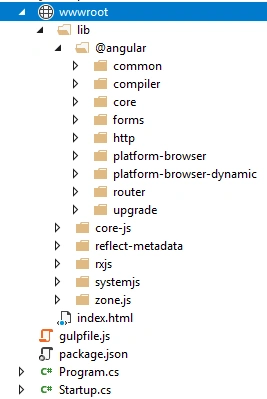
As we can see our required libraries are loaded in “wwwroot/lib” folder.
Frontend Application
HTML Templating
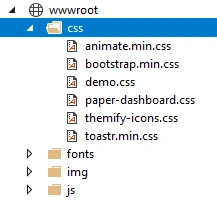
In this section, we are going to add a basic Bootstrap template to our main HTML page.
Folder Structure
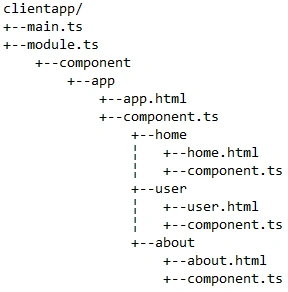
Below is our folder structure for the sample app. As we can see 'clientapp' is the root folder that consists of entry point file & root module. Root module has app component where other components are related to root module through app component.
Angular Dependencies
To enable an ES6 new feature we need to resolve dependencies.
- core-js: For es6 features to browsers.
- zone: Detect the changes.
- reflect-metadata: TypeScript annotations/decorator.
- SystemJS: Module loader
SystemJS Import
Here’s our application loading to the browser by System.import() function.
- System.import('app/main.js').catch(function (err) { console.error(err); });
Before importing module we need to configure SystemJS by using System.config() function we are going to define which package/file to load.
SystemJS Config - systemjs.config.js
- /**
- * System configuration for Angular samples
- * Adjust as necessary for your application needs.
- */
- (function (global) {
- System.config({
- paths: {
- // paths serve as alias
- 'npm:': '/lib/'
- },
- // map tells the System loader where to look for things
- map: {
- // our app is within the app folder
- 'app': 'app',
- // angular bundles
- '@angular/core': 'npm:@angular/core/bundles/core.umd.js',
- '@angular/common': 'npm:@angular/common/bundles/common.umd.js',
- '@angular/compiler': 'npm:@angular/compiler/bundles/compiler.umd.js',
- '@angular/platform-browser': 'npm:@angular/platform-browser/bundles/platform-browser.umd.js',
- '@angular/platform-browser-dynamic': 'npm:@angular/platform-browser-dynamic/bundles/platform-browser-dynamic.umd.js',
- '@angular/http': 'npm:@angular/http/bundles/http.umd.js',
- '@angular/router': 'npm:@angular/router/bundles/router.umd.js',
- '@angular/forms': 'npm:@angular/forms/bundles/forms.umd.js',
- // other libraries
- 'rxjs': 'npm:rxjs',
- 'rxjs-compat': 'npm:rxjs-compat',
- 'rxjs/operators': 'npm:rxjs/operators'
- },
- // packages tells the System loader how to load when no filename and/or no extension
- packages: {
- 'app': {
- main: 'main.js',
- defaultExtension: 'js',
- meta: {
- '': {
- format: 'cjs'
- }
- }
- },
- 'rxjs': {
- main: 'index.js',
- defaultExtension: 'js'
- },
- 'rxjs/operators': {
- main: 'index.js',
- defaultExtension: 'js'
- }
- }
- });
- })(this);
TypeScript Configuration
We need to convert our typescript code to JavaScript for browser support by configuring TypeScript compiler. The below code snippet is for tsconfig.json file.
Configure Typescript - tsconfig.json
- {
- "compileOnSave": false,
- "compilerOptions": {
- "baseUrl": "./",
- "sourceMap": true,
- "declaration": false,
- "moduleResolution": "node",
- "emitDecoratorMetadata": true,
- "experimentalDecorators": true,
- "target": "es5",
- "typeRoots": [
- "node_modules/@types"
- ],
- "lib": [
- "es2017",
- "dom"
- ],
- "types": [
- "core-js"
- ]
- },
- "includes": [
- "/**/*.ts"
- ]
- }
Root Component
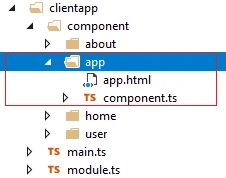
Every application has a root component which has two part annotation and definition. It has a selector to match with main HTML page to render.
- import { Component } from '@angular/core';
- @Component({
- selector: 'my-app',
- templateUrl: './app/component/app/app.html'
- })
- export class AppComponent {}
Root Module
This is where our application components are defined, a module may have multiple components. Every application has a root module.
- import { NgModule } from '@angular/core';
- import { BrowserModule } from '@angular/platform-browser';
- import { Routes, RouterModule } from '@angular/router';
- import { LocationStrategy, HashLocationStrategy } from '@angular/common';
- import { FormsModule, ReactiveFormsModule } from '@angular/forms';
- //Components
- import { AppComponent } from './component/app/component';
- import { HomeComponent } from './component/home/component';
- import { AboutComponent } from './component/about/component';
- import { UserComponent } from './component/user/component';
- //Routes
- const routes: Routes = [
- { path: '', redirectTo: 'home', pathMatch: 'full' },
- { path: 'home', component: HomeComponent },
- { path: 'about', component: AboutComponent },
- { path: 'user', component: UserComponent }
- ];
- @NgModule({
- declarations: [AppComponent, HomeComponent, AboutComponent, UserComponent],
- imports: [BrowserModule, FormsModule, ReactiveFormsModule, RouterModule.forRoot(routes)],
- bootstrap: [AppComponent]
- })
- export class AppModule { }
Bootstrapping Clientapp
Let’s create a main entry file, name it main.ts. Copy below code snippet paste it to newly created typescript file.
- import { platformBrowserDynamic } from '@angular/platform-browser-dynamic';
- import { AppModule } from './module';
- const platform = platformBrowserDynamic();
- platform.bootstrapModule(AppModule);
At this point our application is bootstrapped and launch the root module in browser. Here's how we are bootstrapping our application in index.html page.
Main Html Page
- <my-app>
- <img src="img/ajax_small.gif" /> Please wait ...
- </my-app>
- <!-- Core JS Files -->
- <script src="/js/jquery/jquery-1.10.2.js" type="text/javascript"></script>
- <script src="/js/bootstrap/tether.min.js"></script>
- <script src="/js/bootstrap/bootstrap.min.js" type="text/javascript"></script>
- <!-- App JS Files -->
- <!-- load the dependencies -->
- <script src="lib/core-js/client/shim.js" type="text/javascript"></script>
- <script src="lib/zone.js/dist/zone.js" type="text/javascript"></script>
- <script src="lib/reflect-metadata/Reflect.js" type="text/javascript"></script>
- <!-- load our angular app with systemjs -->
- <script src="lib/systemjs/dist/system.src.js" type="text/javascript"></script>
- <script src="systemjs.config.js" type="text/javascript"></script>
- <script type="text/javascript">
- System.import('app/main.js').catch(function (err) { console.error(err); });
- </script>
Let’s build and run the application.
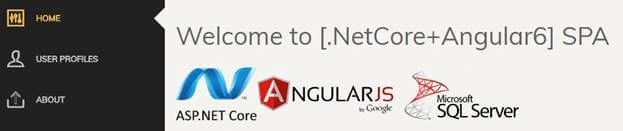
Our application is running, as we can see the upper screen is appearing with a welcome message. Next, we will create form then submit & validate after that we are going to perform CRUD operations with SQL Database.
Creating Database
Let’s Create a Database in MSSQL Server. Here is the table where we are storing data. Run the below script in a query window to create a new database.
CREATE DATABASE [dbCore]
Creating Table
- USE [dbCore]
- GO
- SET ANSI_NULLS ON
- GO
- SET QUOTED_IDENTIFIER ON
- GO
- CREATE TABLE [dbo].[User](
- [Id] [int] IDENTITY(1,1) NOT NULL,
- [FirstName] [nvarchar](250) NULL,
- [LastName] [nvarchar](250) NULL,
- [Email] [nvarchar](250) NULL,
- [Phone] [nvarchar](50) NULL,
- CONSTRAINT [PK_User] PRIMARY KEY CLUSTERED
- (
- [Id] ASC
- )WITH (PAD_INDEX = OFF, STATISTICS_NORECOMPUTE = OFF, IGNORE_DUP_KEY = OFF, ALLOW_ROW_LOCKS = ON, ALLOW_PAGE_LOCKS = ON) ON [PRIMARY]
- ) ON [PRIMARY]
- GO
Install Entity Framework Core
Entity Framework (EF) Core is data access technology which is targeted for cross-platform. Let’s right click on project then GoTo > Tools > NuGet Package Manager > Package Manager Console install below packages one by one.
- Install-Package Microsoft.EntityFrameworkCore.SqlServer
- Install-Package Microsoft.EntityFrameworkCore.SqlServer.Design
- Install-Package Microsoft.EntityFrameworkCore.Tools.DotNet
EntityFrameworkCore.SqlServer
Database Provider, that allows Entity Framework Core to be used with Microsoft SQL Server.
EntityFrameworkCore.SqlServer.Design
Design-time, that allows Entity Framework Core functionality (EF Core Migration) to be used with Microsoft SQL Server.
EntityFrameworkCore.Tools
Command line tool for EF Core that Includes Commands
Scaffolding MSSQL Database
We are going to generate EF models from existing database using reverse engineering using a command in Package Manager Console.

Command
Scaffold-DbContext "Server=DESKTOP-7OJNKVF;Database=dbCore;Trusted_Connection=True;" Microsoft.EntityFrameworkCore.SqlServer -Output serverapp/models
For Package Manager Console:
- Scaffold-DbContext
- Add-Migration
- Update-Database
For Command Window
- dotnet ef dbcontext scaffold
As we can see from solution explorer models folder is created with Context & Entities.
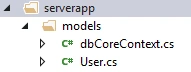
Now, open the DbContext file then add a constructor to pass configuration like connectionstring into the DbContext.
- public dbCoreContext(DbContextOptions<dbCoreContext> options) : base(options)
- {
- }
- protected override void OnConfiguring(DbContextOptionsBuilder optionsBuilder)
- {
- //if (!optionsBuilder.IsConfigured)
- //{
- // #warning To protect potentially sensitive information in your connection string, you should move it out of source code. See http://go.microsoft.com/fwlink/?LinkId=723263 for guidance on storing connection strings.
- // optionsBuilder.UseSqlServer(@"Server=DESKTOP-7OJNKVF;Database=dbCore;Trusted_Connection=True;");
- //}
- }
Configure Middleware
Register DbContext
In Startup.cs let’s add our DbContext as service to enable database connection.
- //Database Connection
- var connection = @"Server=DESKTOP-7OJNKVF;Database=dbCore;Trusted_Connection=True;";
- services.AddDbContext<dbCoreContext>(options => options.UseSqlServer(connection));
Creating ASP.Net Core WebAPI
Here’s our ASP.Net Core WebAPI Controller using specific RoutePrefix attribute globally. With this api controller class we are performing a database operation using Entity Framework DbContext.
- [Route("api/Values"), Produces("application/json"), EnableCors("AppPolicy")]
- public class ValuesController : Controller
- {
- private dbCoreContext _ctx = null;
- public ValuesController(dbCoreContext context)
- {
- _ctx = context;
- }
- // GET: api/Values/GetUser
- [HttpGet, Route("GetUser")]
- public async Task<object> GetUser()
- {
- List<User> users = null;
- object result = null;
- try
- {
- using (_ctx)
- {
- users = await _ctx.User.ToListAsync();
- result = new
- {
- User
- };
- }
- }
- catch (Exception ex)
- {
- ex.ToString();
- }
- return users;
- }
- // GET api/Values/GetByID/5
- [HttpGet, Route("GetByID/{id}")]
- public async Task<User> GetByID(int id)
- {
- User user = null;
- try
- {
- using (_ctx)
- {
- user = await _ctx.User.FirstOrDefaultAsync(x => x.Id == id);
- }
- }
- catch (Exception ex)
- {
- ex.ToString();
- }
- return user;
- }
- // POST api/Values/Save
- [HttpPost, Route("Save")]
- public async Task<object> Save([FromBody]vmUser model)
- {
- object result = null; string message = "";
- if (model == null)
- {
- return BadRequest();
- }
- using (_ctx)
- {
- using (var _ctxTransaction = _ctx.Database.BeginTransaction())
- {
- try
- {
- if (model.id > 0)
- {
- var entityUpdate = _ctx.User.FirstOrDefault(x => x.Id == model.id);
- if (entityUpdate != null)
- {
- entityUpdate.FirstName = model.firstName;
- entityUpdate.LastName = model.lastName;
- entityUpdate.Phone = model.phone;
- entityUpdate.Email = model.email;
- await _ctx.SaveChangesAsync();
- }
- }
- else
- {
- var UserModel = new User
- {
- FirstName = model.firstName,
- LastName = model.lastName,
- Email = model.email,
- Phone = model.phone
- };
- _ctx.User.Add(UserModel);
- await _ctx.SaveChangesAsync();
- }
- _ctxTransaction.Commit();
- message = "Saved Successfully";
- }
- catch (Exception e)
- {
- _ctxTransaction.Rollback();
- e.ToString();
- message = "Saved Error";
- }
- result = new
- {
- message
- };
- }
- }
- return result;
- }
- // DELETE api/Values/DeleteByID/5
- [HttpDelete, Route("DeleteByID/{id}")]
- public async Task<object> DeleteByID(int id)
- {
- object result = null; string message = "";
- using (_ctx)
- {
- using (var _ctxTransaction = _ctx.Database.BeginTransaction())
- {
- try
- {
- var idToRemove = _ctx.User.SingleOrDefault(x => x.Id == id);
- if (idToRemove != null)
- {
- _ctx.User.Remove(idToRemove);
- await _ctx.SaveChangesAsync();
- }
- _ctxTransaction.Commit();
- message = "Deleted Successfully";
- }
- catch (Exception e)
- {
- _ctxTransaction.Rollback(); e.ToString();
- message = "Error on Deleting!!";
- }
- result = new
- {
- message
- };
- }
- }
- return result;
- }
- }
All right, our WebAPI is ready to interact with the database. Our next step is to prepare client model, component and services to interact with WebAPI’s.
Perform CRUD Operation
Let’s get started with form design. There is two strategy of Angular6 form, in this sample, we have used Model-driven form.
- Template-driven
- Model-driven
UI: user.html
- <div class="container-fluid">
- <div class="row">
- <div class="col-sm-4">
- <h3>User Details</h3>
- <form [formGroup]="userForm" #f="ngForm" (ngSubmit)="save()">
- <div class="form-group">
- <label for="firstName">First Name</label><em *ngIf="userForm.controls['firstName'].hasError('required')" class="text-danger">*</em>
- <input type="text" id="firstName" name="firstName" formControlName="firstName" class="form-control" placeholder="First Name" required />
- </div>
- <div class="form-group">
- <label for="lastName">Last Name</label><em *ngIf="userForm.controls['lastName'].hasError('required')" class="text-danger">*</em>
- <input type="text" formControlName="lastName" class="form-control" placeholder="Last Name" required />
- </div>
- <div class="form-group">
- <label for="email">Email</label><em *ngIf="userForm.controls['email'].hasError('required')" class="text-danger">*</em>
- <input type="email" formControlName="email" class="form-control" placeholder="Email" required />
- <span *ngIf="userForm.controls['email'].hasError('pattern')" class="text-danger">
- Invalid Email
- </span>
- </div>
- <div class="form-group">
- <label for="phone">Phone</label><em *ngIf="userForm.controls['phone'].hasError('required')" class="text-danger">*</em>
- <input type="text" formControlName="phone" class="form-control" placeholder="Phone" required />
- </div>
- <div class="form-group">
- <button type="button" class="btn btn-danger" (click)="reset()">Reset</button>
- <button type="submit" class="btn btn-primary ml-10" [disabled]="!f.valid">Save</button>
- </div>
- </form>
- <span class="warning"></span>
- </div>
- <div class="col-sm-8">
- <h3>All User</h3>
- <table style="width:100%" class="table table-striped">
- <tr>
- <th>Sr.</th>
- <th>Name</th>
- <th>Email</th>
- <th>Phone</th>
- <th>Option</th>
- </tr>
- <tr *ngFor="let item of users;let sl = index">
- <td>{{sl+1}}</td>
- <td>{{item.firstName}} {{item.lastName}}</td>
- <td>{{item.email}}</td>
- <td>{{item.phone}}</td>
- <td>
- <a href="#" title="Edit Record" class="btn btn-primary btn-xs pull-right" (click)="edit($event, item)">
- Edit
- </a>
- <a href="#" title="Delete Record" class="btn btn-danger btn-xs pull-right" (click)="delete($event, item)">
- Delete
- </a>
- </td>
- </tr>
- </table>
- </div>
- </div>
- </div>
Let’s create a typescript model class, then use it in another component by importing like import { UserModel } from './model';
Typescript Model : UserModel
- export class UserModel {
- id: number;
- firstName: string;
- lastName: string;
- phone: string;
- email: string;
- }
Below is our UserComponent that is interacting with UI, validating form then sending/receiving data from service component.
Import the component function from Angular6 library; use of "export" means app component class can be imported from other components.
Component : UserComponent
- import { Component, OnInit } from '@angular/core';
- import { FormGroup, FormControl, Validators, FormBuilder } from '@angular/forms';
- import { UserModel } from './model';
- import { UserService } from './service';
- @Component({
- selector: 'user',
- templateUrl: './app/component/user/user.html',
- providers: [UserService]
- })
- export class UserComponent implements OnInit {
- public user: UserModel;
- public users: UserModel[];
- public resmessage: string;
- userForm: FormGroup;
- constructor(private formBuilder: FormBuilder, private userService: UserService) { }
- ngOnInit() {
- this.userForm = this.formBuilder.group({
- id: 0,
- firstName: new FormControl('', Validators.required),
- lastName: new FormControl('', Validators.required),
- email: new FormControl('', Validators.compose([
- Validators.required,
- Validators.pattern('^[a-zA-Z0-9_.+-]+@[a-zA-Z0-9-]+.[a-zA-Z0-9-.]+$')
- ])),
- phone: new FormControl('', Validators.required)
- });
- this.getAll();
- }
- onSubmit() {
- if (this.userForm.invalid) {
- return;
- }
- }
- //Get All User
- getAll() {
- //debugger
- this.userService.getall().subscribe(
- response => {
- //console.log(response)
- this.users = response;
- }, error => {
- console.log(error);
- }
- );
- }
- //Get by ID
- edit(e, m) {
- //debugger
- e.preventDefault();
- this.userService.getByID(m.id)
- .subscribe(response => {
- //console.log(response);
- this.user = response;
- this.userForm.setValue({
- id: this.user.id,
- firstName: this.user.firstName,
- lastName: this.user.lastName,
- email: this.user.email,
- phone: this.user.phone
- });
- }, error => {
- console.log(error);
- });
- }
- //Save Form
- save() {
- //debugger
- this.userService.save(this.userForm.value)
- .subscribe(response => {
- //console.log(response)
- this.resmessage = response;
- this.getAll();
- this.reset();
- }, error => {
- console.log(error);
- });
- }
- //Delete
- delete(e, m) {
- //debugger
- e.preventDefault();
- var IsConf = confirm('You are about to delete ' + m.firstName + '. Are you sure?');
- if (IsConf) {
- this.userService.delete(m.id)
- .subscribe(response => {
- //console.log(response)
- this.resmessage = response;
- this.getAll();
- }, error => {
- console.log(error);
- });
- }
- }
- reset() {
- this.userForm.setValue({
- id: 0,
- firstName: null,
- lastName: null,
- email: null,
- phone: null
- });
- }
- }
Below is service component which will get called for each operation performed by UserComponent.
In our UserService we have Http service [Get, Post, Put, Delete] that connect with WebAPI to perform Create, Read, Update & Delete operations.
Http Client Services - UserService
- import { Injectable, Component } from '@angular/core';
- import { HttpModule, Http, Request, RequestMethod, Response, RequestOptions, Headers } from '@angular/http';
- import { Observable, Subject, ReplaySubject } from 'rxjs';
- import { map, catchError } from 'rxjs/operators';
- //Model
- import { UserModel } from './model';
- @Component({
- providers: [Http]
- })
- @Injectable()
- export class UserService {
- public headers: Headers;
- public _getUrl: string = '/api/Values/GetUser';
- public _getByIdUrl: string = '/api/Values/GetByID';
- public _deleteByIdUrl: string = '/api/Values/DeleteByID';
- public _saveUrl: string = '/api/Values/Save';
- constructor(private _http: Http) { }
- //Get
- getall(): Observable<UserModel[]> {
- return this._http.get(this._getUrl)
- .pipe(map(res => <UserModel[]>res.json()))
- .pipe(catchError(this.handleError));
- }
- //GetByID
- getByID(id: string): Observable<UserModel> {
- var getByIdUrl = this._getByIdUrl + '/' + id;
- return this._http.get(getByIdUrl)
- .pipe(map(res => <UserModel>res.json()))
- .pipe(catchError(this.handleError));
- }
- //Post
- save(user: UserModel): Observable<string> {
- let body = JSON.stringify(user);
- let headers = new Headers({ 'Content-Type': 'application/json' });
- let options = new RequestOptions({ headers: headers });
- return this._http.post(this._saveUrl, body, options)
- .pipe(map(res => res.json().message))
- .pipe(catchError(this.handleError));
- }
- //Delete
- delete(id: string): Observable<string> {
- var deleteByIdUrl = this._deleteByIdUrl + '/' + id
- return this._http.delete(deleteByIdUrl)
- .pipe(map(response => response.json().message))
- .pipe(catchError(this.handleError));
- }
- private handleError(error: Response) {
- return Observable.throw(error.json().error || 'Opps!! Server error');
- }
- }
Test in Browser
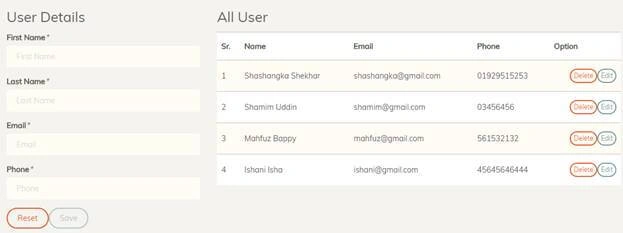
Now it’s time to build & run the application. Let’s try to perform the CRUD operation using the system. As we can see from the below screenshot data is loading in user page from database.
Summary
In this sample, we had to combine ASP.Net Core & Angular to create the sample SPA app without any CLI, and learned how to start with an empty ASP.Net Core application to serve static HTML page.
We also have taken a deep dive into the latest frontend technology like Angular6 from scratch to build a single page application. We had a short overview on Angular6 dependencies & also learned about the module and components. Then we have performed some database operation using our sample application. Hope this will help.
Hamid KhanPosted Nov 5, 2020, 12:19 AM
Very Well explain...........Thanks for sharing
Eldar IsmagilovPosted Feb 14, 2019, 5:41 PM
I would recommend to use common spa template from visual studio starting from core 2.1. Because it is more familiar for people. Check aspnetboilerplate project until you can to create it from scratch
Ben HayatPosted Aug 21, 2018, 2:53 AM
It would be very helpful if this post can also be replicated using Vue.js as it's much simpler to use than AG6 and is becoming very popular.
Ben HayatPosted Aug 21, 2018, 2:52 AM
Thanks for the series.
Salome NuñezPosted Jul 30, 2018, 5:51 PM
Hi, Congratulations for your post, so Im software developer .Net and Im learning .Net Core Rigth Now. I download this code projects but I have one problem. I run deploid in project and only show me the message [Please wait ...] and does not doing nothing. can you please help me. Im use VS 2017, I install Node, npm, .net core 2.1 and I have use SQL 2016. Thanks