

Introduction

Take a look at the final application.
Prerequisites
- Install .NET Core 2.1 Preview 2 SDK from here
- Install Visual Studio 2017 v15.7 or above from here
- Install ASP.NET Core Blazor Language Services extension from here
- SQL Server 2008 or above
Source Code
Get the source code from GitHub.
Creating Table
We will be using a DB table to store all the records of employees.
Open SQL Server and use the following script to create Employee table.- CREATE TABLE Employee (
- EmployeeID int IDENTITY(1,1) PRIMARY KEY,
- Name varchar(20) NOT NULL ,
- City varchar(20) NOT NULL ,
- Department varchar(20) NOT NULL ,
- Gender varchar(6) NOT NULL
- )
Create Blazor Web Application
Open Visual Studio and select File >> New >> Project.
After selecting the project, a "New Project" dialog will open. Select .NET Core inside Visual C# menu from the left panel. Then, select “ASP.NET Core Web Application” from available project types. Put the name of the project as BlazorSPA and press OK.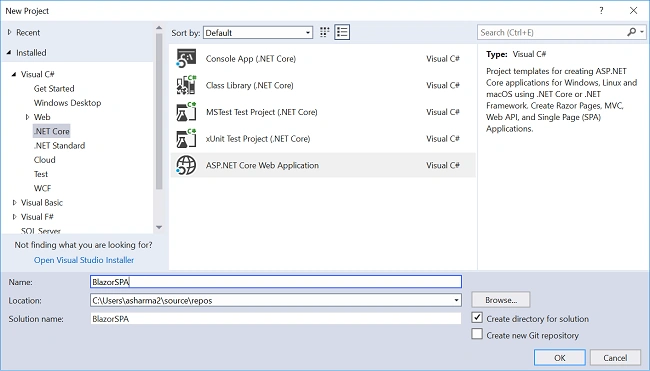
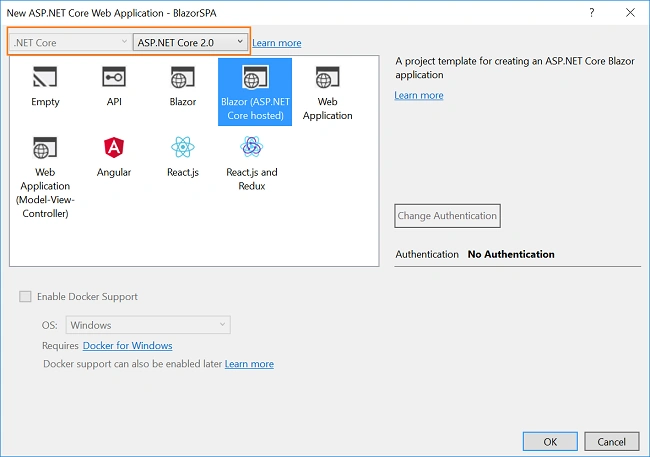
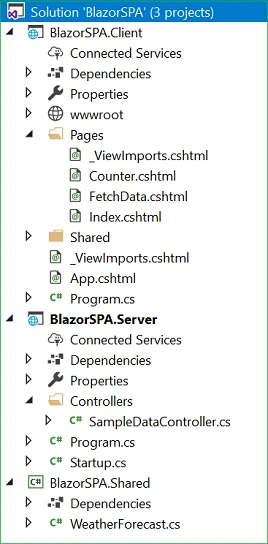
- BlazorSPA.Client – It has the client side code and contains the pages that will be rendered on the browser.
- BlazorSPA.Server – It has the server side codes such as DB related operations and web API.
- BlazorSPA.Shared – It contains the shared code that can be accessed by both client and server. It contains our Model classes.
Scaffolding the Model to the Application
We are using Entity Framework core database first approach to create our models. We will create our model class in BlazorSPA.Shared project so that it can be accessible to both client and server project.Navigate to Tools >> NuGet Package Manager >> Package Manager Console. Select “BlazorSPA.Shared” from Default project drop-down. Refer to image below,

First, we will install the package for the database provider that we are targeting which is SQL Server in this case. Hence, run the following command,
- Install-Package Microsoft.EntityFrameworkCore.SqlServer
- Install-Package Microsoft.EntityFrameworkCore.Tools
- Scaffold-DbContext "Your connection string here" Microsoft.EntityFrameworkCore.SqlServer -OutputDir Models -Tables Employee
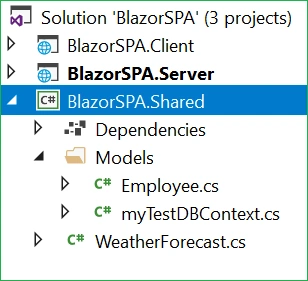
Creating Data Access Layer for the Application
Right-click on BlazorSPA.Server project and then select Add >> New Folder and name the folder as DataAccess. We will be adding our class to handle database related operations inside this folder only.Right click on DataAccess folder and select Add >> Class. Name your class EmployeeDataAccessLayer.cs.
Open EmployeeDataAccessLayer.cs and put the following code into it.
- using BlazorSPA.Shared.Models;
- using Microsoft.EntityFrameworkCore;
- using System;
- using System.Collections.Generic;
- using System.Linq;
- using System.Threading.Tasks;
- namespace BlazorSPA.Server.DataAccess
- {
- public class EmployeeDataAccessLayer
- {
- myTestDBContext db = new myTestDBContext();
- //To Get all employees details
- public IEnumerable<Employee> GetAllEmployees()
- {
- try
- {
- return db.Employee.ToList();
- }
- catch
- {
- throw;
- }
- }
- //To Add new employee record
- public void AddEmployee(Employee employee)
- {
- try
- {
- db.Employee.Add(employee);
- db.SaveChanges();
- }
- catch
- {
- throw;
- }
- }
- //To Update the records of a particluar employee
- public void UpdateEmployee(Employee employee)
- {
- try
- {
- db.Entry(employee).State = EntityState.Modified;
- db.SaveChanges();
- }
- catch
- {
- throw;
- }
- }
- //Get the details of a particular employee
- public Employee GetEmployeeData(int id)
- {
- try
- {
- Employee employee = db.Employee.Find(id);
- return employee;
- }
- catch
- {
- throw;
- }
- }
- //To Delete the record of a particular employee
- public void DeleteEmployee(int id)
- {
- try
- {
- Employee emp = db.Employee.Find(id);
- db.Employee.Remove(emp);
- db.SaveChanges();
- }
- catch
- {
- throw;
- }
- }
- }
- }
Adding the web API Controller to the Application
Right-click on BlazorSPA.Server/Controllers folder and select Add >> New Item. An “Add New Item” dialog box will open. Select Web from the left panel, then select “API Controller Class” from templates panel and put the name as EmployeeController.cs. Click Add.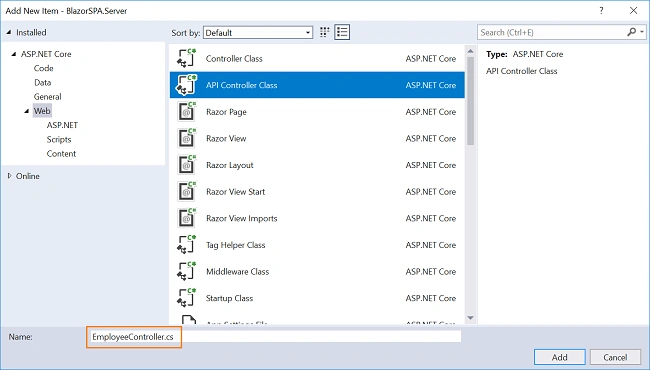
Open EmployeeController.cs file and put the following code into it.
- using System;
- using System.Collections.Generic;
- using System.Linq;
- using System.Threading.Tasks;
- using BlazorSPA.Server.DataAccess;
- using BlazorSPA.Shared.Models;
- using Microsoft.AspNetCore.Mvc;
- namespace BlazorSPA.Server.Controllers
- {
- public class EmployeeController : Controller
- {
- EmployeeDataAccessLayer objemployee = new EmployeeDataAccessLayer();
- [HttpGet]
- [Route("api/Employee/Index")]
- public IEnumerable<Employee> Index()
- {
- return objemployee.GetAllEmployees();
- }
- [HttpPost]
- [Route("api/Employee/Create")]
- public void Create([FromBody] Employee employee)
- {
- if (ModelState.IsValid)
- objemployee.AddEmployee(employee);
- }
- [HttpGet]
- [Route("api/Employee/Details/{id}")]
- public Employee Details(int id)
- {
- return objemployee.GetEmployeeData(id);
- }
- [HttpPut]
- [Route("api/Employee/Edit")]
- public void Edit([FromBody]Employee employee)
- {
- if (ModelState.IsValid)
- objemployee.UpdateEmployee(employee);
- }
- [HttpDelete]
- [Route("api/Employee/Delete/{id}")]
- public void Delete(int id)
- {
- objemployee.DeleteEmployee(id);
- }
- }
- }
At this point in time, our BlazorSPA.Server project has the following structure.
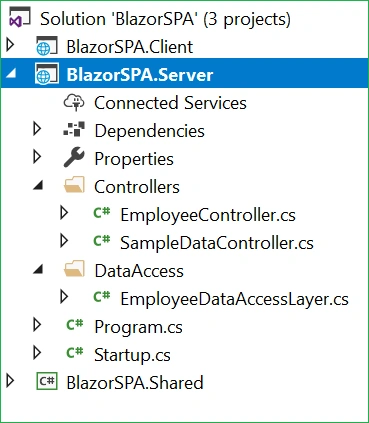
Adding Razor Page to the Application
We will add the Razor page in BlazorSPA.Client/Pages folder. By default, we have “Counter” and “Fetch Data” pages provided in our application. These default pages will not affect our application but for the sake of this tutorial, we will delete fetchdata and counter pages from BlazorSPA.Client/Pages folder.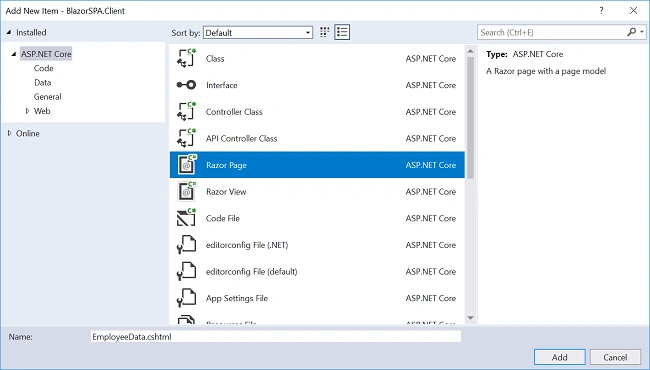
EmployeeData.cshtml and EmployeeData.cshtml.cs.
Now, we will add codes to these pages.
EmployeeData.cshtml.cs
Open EmployeeData.cshtml.cs and put the following code into it.- using System;
- using System.Collections.Generic;
- using System.Linq;
- using System.Net.Http;
- using System.Threading.Tasks;
- using BlazorSPA.Shared.Models;
- using Microsoft.AspNetCore.Blazor;
- using Microsoft.AspNetCore.Blazor.Components;
- using Microsoft.AspNetCore.Blazor.Services;
- namespace BlazorSPA.Client.Pages
- {
- public class EmployeeDataModel : BlazorComponent
- {
- [Inject]
- protected HttpClient Http { get; set; }
- [Inject]
- protected IUriHelper UriHelper { get; set; }
- [Parameter]
- protected string paramEmpID { get; set; } = "0";
- [Parameter]
- protected string action { get; set; }
- protected List<Employee> empList = new List<Employee>();
- protected Employee emp = new Employee();
- protected string title { get; set; }
- protected override async Task OnParametersSetAsync()
- {
- if (action == "fetch")
- {
- await FetchEmployee();
- this.StateHasChanged();
- }
- else if (action == "create")
- {
- title = "Add Employee";
- emp = new Employee();
- }
- else if (paramEmpID != "0")
- {
- if (action == "edit")
- {
- title = "Edit Employee";
- }
- else if (action == "delete")
- {
- title = "Delete Employee";
- }
- emp = await Http.GetJsonAsync<Employee>("/api/Employee/Details/" + Convert.ToInt32(paramEmpID));
- }
- }
- protected async Task FetchEmployee()
- {
- title = "Employee Data";
- empList = await Http.GetJsonAsync<List<Employee>>("api/Employee/Index");
- }
- protected async Task CreateEmployee()
- {
- if (emp.EmployeeId != 0)
- {
- await Http.SendJsonAsync(HttpMethod.Put, "api/Employee/Edit", emp);
- }
- else
- {
- await Http.SendJsonAsync(HttpMethod.Post, "/api/Employee/Create", emp);
- }
- UriHelper.NavigateTo("/employee/fetch");
- }
- protected async Task DeleteEmployee()
- {
- await Http.DeleteAsync("api/Employee/Delete/" + Convert.ToInt32(paramEmpID));
- UriHelper.NavigateTo("/employee/fetch");
- }
- protected void Cancel()
- {
- title = "Employee Data";
- UriHelper.NavigateTo("/employee/fetch");
- }
- }
- }
Open EmployeeData.cshtml page and put the following code into it.
- @page "/employee/{action}/{paramEmpID}"
- @page "/employee/{action}"
- @inherits EmployeeDataModel
- <h1>@title</h1>
- @if (action == "fetch")
- {
- <p>
- <a href="/employee/create">Create New</a>
- </p>
- }
- @if (action == "create" || action == "edit")
- {
- <form>
- <table class="form-group">
- <tr>
- <td>
- <label for="Name" class="control-label">Name</label>
- </td>
- <td>
- <input type="text" class="form-control" bind="@emp.Name" />
- </td>
- <td width="20"> </td>
- <td>
- <label for="Department" class="control-label">Department</label>
- </td>
- <td>
- <input type="text" class="form-control" bind="@emp.Department" />
- </td>
- </tr>
- <tr>
- <td>
- <label for="Gender" class="control-label">Gender</label>
- </td>
- <td>
- <select asp-for="Gender" class="form-control" bind="@emp.Gender">
- <option value="">-- Select Gender --</option>
- <option value="Male">Male</option>
- <option value="Female">Female</option>
- </select>
- </td>
- <td width="20"> </td>
- <td>
- <label for="City" class="control-label">City</label>
- </td>
- <td>
- <input type="text" class="form-control" bind="@emp.City" />
- </td>
- </tr>
- <tr>
- <td></td>
- <td>
- <input type="submit" class="btn btn-success" onclick="@(async () => await CreateEmployee())" style="width:220px;" value="Save" />
- </td>
- <td></td>
- <td width="20"> </td>
- <td>
- <input type="submit" class="btn btn-danger" onclick="@Cancel" style="width:220px;" value="Cancel" />
- </td>
- </tr>
- </table>
- </form>
- }
- else if (action == "delete")
- {
- <div class="col-md-4">
- <table class="table">
- <tr>
- <td>Name</td>
- <td>@emp.Name</td>
- </tr>
- <tr>
- <td>Gender</td>
- <td>@emp.Gender</td>
- </tr>
- <tr>
- <td>Department</td>
- <td>@emp.Department</td>
- </tr>
- <tr>
- <td>City</td>
- <td>@emp.City</td>
- </tr>
- </table>
- <div class="form-group">
- <input type="submit" class="btn btn-danger" onclick="@(async () => await DeleteEmployee())" value="Delete" />
- <input type="submit" value="Cancel" onclick="@Cancel" class="btn" />
- </div>
- </div>
- }
- @if (empList == null)
- {
- <p><em>Loading...</em></p>
- }
- else
- {
- <table class='table'>
- <thead>
- <tr>
- <th>ID</th>
- <th>Name</th>
- <th>Gender</th>
- <th>Department</th>
- <th>City</th>
- </tr>
- </thead>
- <tbody>
- @foreach (var emp in empList)
- {
- <tr>
- <td>@emp.EmployeeId</td>
- <td>@emp.Name</td>
- <td>@emp.Gender</td>
- <td>@emp.Department</td>
- <td>@emp.City</td>
- <td>
- <a href='/employee/edit/@emp.EmployeeId'>Edit</a> |
- <a href='/employee/delete/@emp.EmployeeId'>Delete</a>
- </td>
- </tr>
- }
- </tbody>
- </table>
- }
At the top, we have defined the routes for our page. There are two routes defined.
- /employee/{action}/{paramEmpID}
This will accept action name along with employee id. This route is invoked when we perform Edit or Delete operation. When we call edit or delete action on a particular employee data, the employee id is also passed as the URL parameter. - /employee/{action}
This will only accept the action name. This route is invoked when we create a new employee data or we fetch the records of all the employees.
After this, we are setting the title that will be displayed on our page. The title is dynamic; it changes as per the action that is being executed currently on the page.
We will show the “Create New” link only if the action is “fetch”. If the action is created or edited, then “Create New” link will be hidden and we will display the form to get the user input. Inside the form, we have also defined two buttons “Save” and “Cancel”. Clicking on Save will invoke the “CreateEmployee” method whereas clicking on Cancel will invoke the “Cancel” method.
If the action is "delete", then a table will be displayed with the data of the employee on which the delete action is invoked. We are also displaying two buttons – “Delete” and “Cancel”. On clicking of Delete button, “DeleteEmployee” method will be invoked and clicking on Cancel will invoke the “Cancel” method.In the end, we have a table to display all the employee data from the database. Each employee record will also have two action links, Edit to edit the employee record and Delete to delete the employee record. This table is always displayed on the page and we will update it after performing every action.
Adding Link to Navigation menu
- <div class="top-row pl-4 navbar navbar-dark">
- <a class="navbar-brand" href="/">BlazorSPA</a>
- <button class="navbar-toggler" onclick=@ToggleNavMenu>
- <span class="navbar-toggler-icon"></span>
- </button>
- </div>
- <div class=@(collapseNavMenu ? "collapse" : null) onclick=@ToggleNavMenu>
- <ul class="nav flex-column">
- <li class="nav-item px-3">
- <NavLink class="nav-link" href="/" Match=NavLinkMatch.All>
- <span class="oi oi-home" aria-hidden="true"></span> Home
- </NavLink>
- </li>
- <li class="nav-item px-3">
- <NavLink class="nav-link" href="/employee/fetch">
- <span class="oi oi-list-rich" aria-hidden="true"></span> Employee data
- </NavLink>
- </li>
- </ul>
- </div>
- @functions {
- bool collapseNavMenu = true;
- void ToggleNavMenu()
- {
- collapseNavMenu = !collapseNavMenu;
- }
- }
Hence, we have successfully created a Single Page Application (SPA) using Blazor with the help of Entity Framework Core database first approach.
Execution Demo
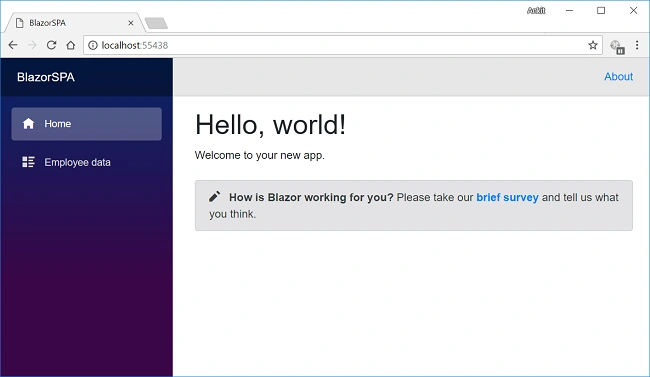
Launch the application.A web page will open as shown in the image below. The navigation menu on the left is showing navigation link for Employee data page.
Click on “Employee data” link, it will redirect to EmployeeData view. Here you can see all the employee data on the page. Notice the URL has “employee/fetch” appended to it.
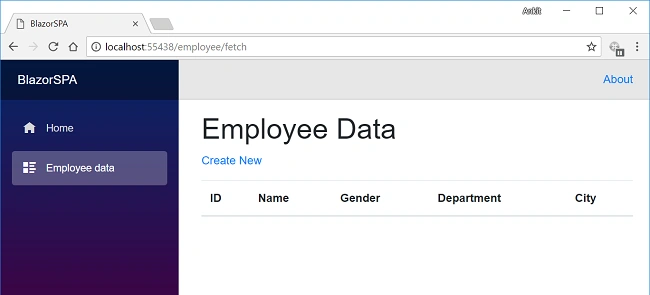
Since we have not added any data, hence it is empty. Click on CreateNew to open “Add Employee” form to add a new employee data. Notice the URL has “employee/create” appended to it.
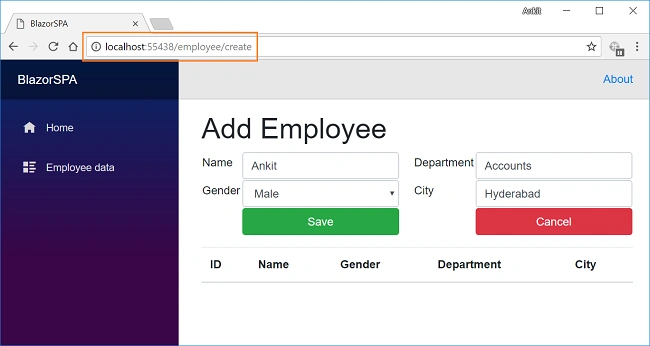
After inserting data in all the fields, click on "Save" button. The new employee record will be created and the Employee data table will get refreshed. The URL will also change to “/employee/fetch”.
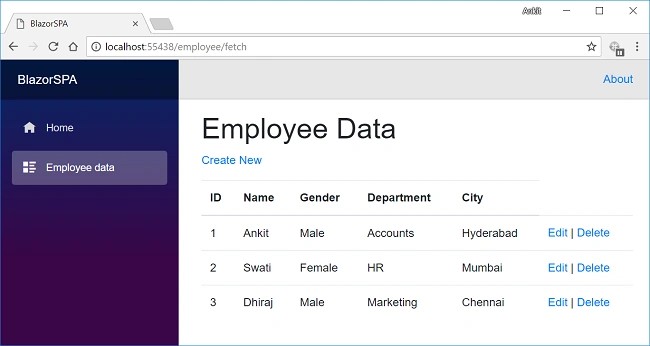
If we want to edit an existing employee record, then click on Edit action link. It will open Edit view as shown below. Here we can change the employee data. Notice that we have passed employee id in the URL parameter.
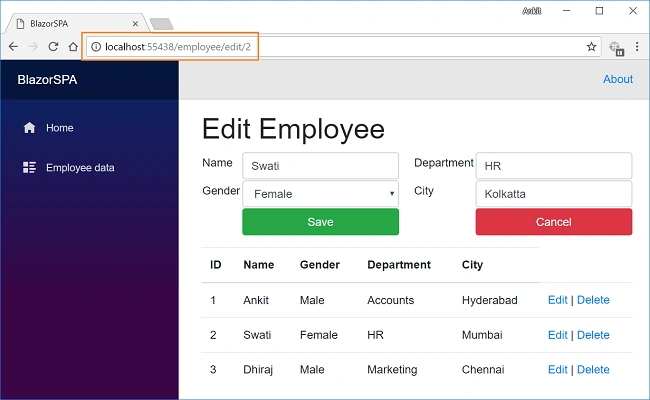
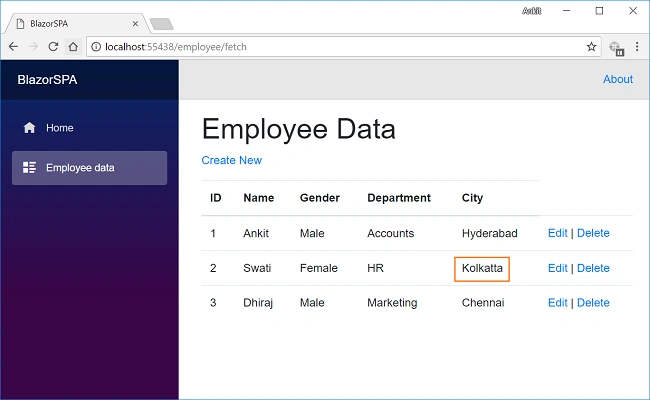
Here we have changed the City of employee Swati from Mumbai to Kolkatta. Click on "Save" to refresh the employee data table to view the updated changes as highlighted in the image below,
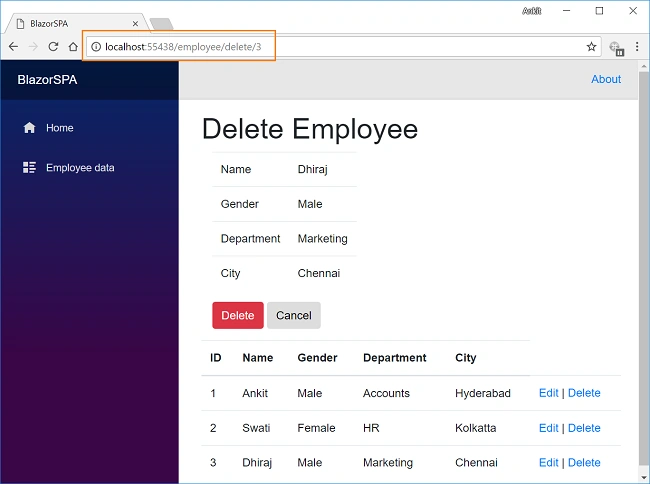
Now, we will perform Delete operation on the employee named Dhiraj. Click on Delete action link which will open Delete view asking for a confirmation to delete. Notice that we have passed employee id in the URL parameter.
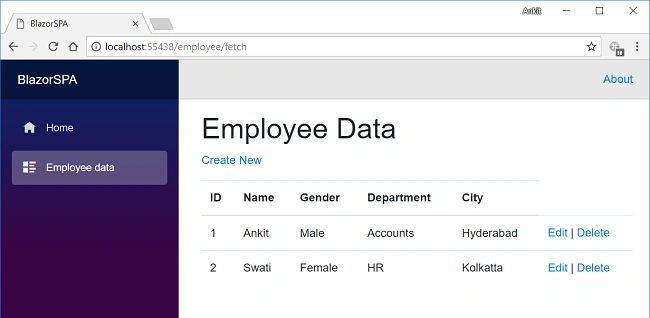
Once we click on the Delete button, it will delete the employee record and the employee data table will be refreshed. Here, we can see that the employee with name Dhiraj has been removed from our record.
Deploying the application
To learn how to deploy a Blazor application using IIS, refer to Deploying A Blazor Application On IISConclusion
We have created a Single Page Application with Razor pages in Blazor using the Entity Framework Core database first approach with the help of Visual Studio 2017 and SQL Server 2014. We have also performed the CRUD operations on our application.
Please get the source code from Github and play around to get a better understanding.
You can also read other articles on my personal blog here.See Also
Tridip BhattacharjeePosted Jun 7, 2018, 8:48 AM
Nice article. i found no code in this post which refresh the grid. would mind to point out how do you refresh tabular data when new data inserted. thanks