

Introduction
When a SharePoint site is created in the M365 cloud, by default, it has the following default groups which are associated.
- Owners
- Members
- Visitors
On top of this, if you want to create a custom SharePoint group using Power Automate, you can achieve it using the steps mentioned in this document.
I came across a scenario for a particular group where a site is created. They might want to have a specific SharePoint security group to be created as well, with ‘Contribute’ permissions assigned to this group. Let's see this in action.
For this article, I will create a custom SharePoint security group called “QAVinay Project Team Members”.
Prerequisites
- You should have an E3 subscription minimum.
- The account running the flow should have Site Collection admin rights to the SPO site where the custom security group needs to be created.
Steps to create SharePoint Security Group
Step 1. Go to the Power Automate maker portal: https://make.powerautomate.com
Step 2. Create an Instant cloud flow.
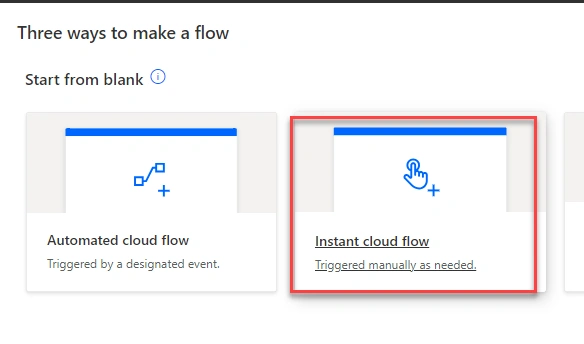
Step 3. Add a compose action and mention the site URL here. Here I am mentioned my QAVinay site URL.

Step 4. Add another compose action and mention the name of the SharePoint Security Group that needs to be created.

Step 5. Add the ‘Send http request to SharePoint’ action and configure it accordingly, as shown in the below screen capture.
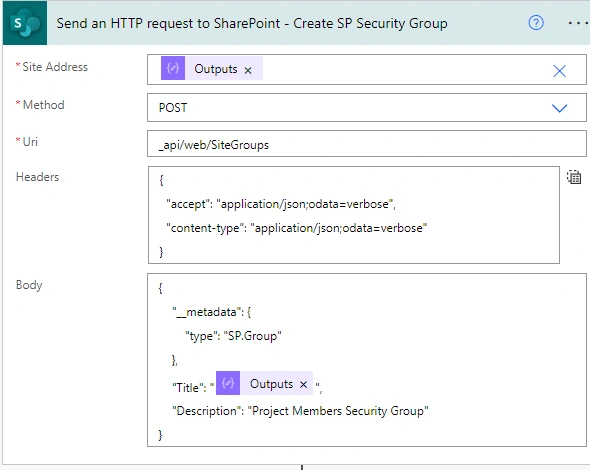
- Site Address: ‘Outputs’ from the ‘Compose-SiteUrl’ action
- Method: POST
- Uri: _api/web/SiteGroups
- Headers
{
  "Headers": {
    "accept": "application/json;odata=verbose",
    "content-type": "application/json;odata=verbose"
  },
  "Body": {
    "__metadata": {
      "type": "SP.Group"
    },
    "Title": "@{outputs('Compose-SPGroup')}",
    "Description": "Project Members Security Group"
  }
}
Step 6. Get the Group ID after the site gets created. This is required to assign permissions to the newly created SharePoint security group. This is another ‘Send http request to SharePoint’ action and configuration, as mentioned in the screen capture.
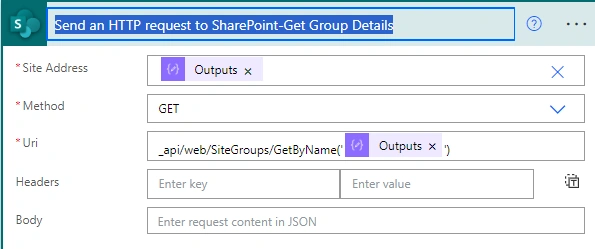
- Site Address: The outputs from the ‘Compose-SiteUrl’ action.
- Method: GET
- Uri: _api/web/SiteGroups/GetByName(‘NAME OF NEWLY CREATED SP GROUP’). Here is the output from the ‘Compose-SP Group’ action.
Note. Header and Body are not needed for this operation.
Step 7. Add another ‘Compose’ action to get the group ID. Update the compose action as below.
body('Send_an_HTTP_request_to_SharePoint-Get_Group_Details')?['d']?['Id']

Note. The Group Details from the send http action will be in a JSON format, and the group ID value will be present inside the ‘d’ member. To know more about parsing JSON values, please read the article Extracting JSON values in Power Automate in the references section.
Step 8. Next, add the ‘Send http request to SharePoint’ action to add the permission role to the newly created SharePoint security group.

- Site Address: Outputs from ‘Compose-SiteUrl’ action
- Method: POST
- Uri: here, you need to pass the Group ID and the role definition ID. The role definition ID for ‘Contribute’ permissions is 1073741827. More about the role definitions can be found in the references section. The Uri to be input in the field is /_api/web/roleassignments/addroleassignment(principalid=@{outputs('Compose-GroupId')}, roledefid=1073741827)
Step 9. Finally, save and run the flow. Validate the new requested group gets created in the respective SharePoint Site.

Step 10. In the SharePoint site, the newly created group should show with ‘Contribute’ rights.

Role Definition IDs
You can refer to the following role definition IDs that can be used while assigning permissions to SharePoint security groups.
- Full Control: 1073741829
- Design: 1073741828
- Edit: 1073741830
- Contribute: 1073741827
- Read: 1073741826
- Limited Access: 1073741825
- View Only: 1073741924
References
Join the conversation! Your thoughts help the community grow.