

Navigation drawer is a UI panel which shows your app's main navigation menu. The navigation drawer appears when the user touches the interface icon  in the app bar or when the user swipes a finger from the left edge on the screen. The navigation drawer slides show from the left and contain the navigation destinations for your app. You can see a complete description of navigation drawer Here. Before that we have been discussing about Face Detection In Flutter With MLKit And Firebase. Now, we will discuss how to create a navigation drawer in Flutter. Let's practice creating a menu drawer in flutter.
in the app bar or when the user swipes a finger from the left edge on the screen. The navigation drawer slides show from the left and contain the navigation destinations for your app. You can see a complete description of navigation drawer Here. Before that we have been discussing about Face Detection In Flutter With MLKit And Firebase. Now, we will discuss how to create a navigation drawer in Flutter. Let's practice creating a menu drawer in flutter.First, we must create new a project using Visual Studio Code software. Here's how to create a new project using Visual Studio Code:
- Invoke View > Command Palette.
- Type “flutter”, and select the Flutter: New Project.
- Enter a project name, such as myapp, and press Enter.
- Create or select the parent directory for the new project folder.
- Wait for project progress creation to complete and the main.dart file to appear.
- Add new folder path like this [projectname]/assets.
- name: navigation_drawer
- description: A new Flutter project.
- # The following defines the version and build number for your application.
- # A version number is three numbers separated by dots, like 1.2.43
- # followed by an optional build number separated by a +.
- # Both the version and the builder number may be overridden in flutter
- # build by specifying --build-name and --build-number, respectively.
- # In Android, build-name is used as versionName while build-number used as versionCode.
- # Read more about Android versioning at https://developer.android.com/studio/publish/versioning
- # In iOS, build-name is used as CFBundleShortVersionString while build-number used as CFBundleVersion.
- # Read more about iOS versioning at
- # https://developer.apple.com/library/archive/documentation/General/Reference/InfoPlistKeyReference/Articles/CoreFoundationKeys.html
- version: 1.0.0+1
- environment:
- sdk: ">=2.1.0 <3.0.0"
- dependencies:
- flutter:
- sdk: flutter
- # The following adds the Cupertino Icons font to your application.
- # Use with the CupertinoIcons class for iOS style icons.
- cupertino_icons: ^0.1.2
- dev_dependencies:
- flutter_test:
- sdk: flutter
- # For information on the generic Dart part of this file, see the
- # following page: https://www.dartlang.org/tools/pub/pubspec
- # The following section is specific to Flutter.
- flutter:
- # The following line ensures that the Material Icons font is
- # included with your application, so that you can use the icons in
- # the material Icons class.
- uses-material-design: true
- # To add assets to your application, add an assets section, like this:
- assets:
- - assets/camellab.png
- # - images/a_dot_burr.jpeg
- # - images/a_dot_ham.jpeg
- # An image asset can refer to one or more resolution-specific "variants", see
- # https://flutter.io/assets-and-images/#resolution-aware.
- # For details regarding adding assets from package dependencies, see
- # https://flutter.io/assets-and-images/#from-packages
- # To add custom fonts to your application, add a fonts section here,
- # in this "flutter" section. Each entry in this list should have a
- # "family" key with the font family name, and a "fonts" key with a
- # list giving the asset and other descriptors for the font. For
- # example:
- # fonts:
- # - family: Schyler
- # fonts:
- # - asset: fonts/Schyler-Regular.ttf
- # - asset: fonts/Schyler-Italic.ttf
- # style: italic
- # - family: Trajan Pro
- # fonts:
- # - asset: fonts/TrajanPro.ttf
- # - asset: fonts/TrajanPro_Bold.ttf
- # weight: 700
- #
- # For details regarding fonts from package dependencies,
- # see https://flutter.io/custom-fonts/#from-packages
- import 'package:flutter/material.dart';
- void main() => runApp(MyApp());
- class MyApp extends StatelessWidget {
- final appTitle = 'Camellabs Demo';
- @override
- Widget build(BuildContext context) {
- return MaterialApp(
- title: appTitle,
- home: MyHomePage(title: appTitle),
- );
- }
- }
- class MyHomePage extends StatelessWidget {
- final String title;
- MyHomePage({Key key, this.title}) : super(key: key);
- @override
- Widget build(BuildContext context) {
- return Scaffold(
- appBar: AppBar(title: Text(title)),
- body: Center(child: Text('My Page!')),
- drawer: Drawer(
- // Add a ListView to the drawer. This ensures the user can scroll
- // through the options in the Drawer if there isn't enough vertical
- // space to fit everything.
- child: ListView(
- // Important: Remove any padding from the ListView.
- padding: EdgeInsets.zero,
- children: <Widget>[
- DrawerHeader(
- child: Text(
- 'Drawer Header',
- style: TextStyle(color: Colors.white, fontSize: 22),),
- decoration: BoxDecoration(
- color: Colors.lightBlue[300],
- ),
- ),
- ListTile(
- title: Text('Menu 1', style: TextStyle(color: Colors.deepOrange),),
- onTap: () {
- // Update the state of the app
- // ...
- // Then close the drawer
- Navigator.push(
- context,
- MaterialPageRoute(builder: (context) => Menu1Page()),
- );
- },
- ),
- ListTile(
- title: Text('Menu 2', style: TextStyle(color: Colors.deepOrange),),
- onTap: () {
- // Update the state of the app
- // ...
- // Then close the drawer
- Navigator.push(
- context,
- MaterialPageRoute(builder: (context) => Menu2Page()),
- );
- },
- ),
- ],
- ),
- ),
- );
- }
- }
- class Menu1Page extends StatelessWidget {
- @override
- Widget build(BuildContext context) {
- return Scaffold(
- appBar: AppBar(
- title: Text("Menu 1 Page"),
- ),
- body: Center(
- child: RaisedButton(
- onPressed: () {
- Navigator.pop(context);
- },
- child: Text('Go back!'),
- ),
- ),
- );
- }
- }
- class Menu2Page extends StatelessWidget {
- @override
- Widget build(BuildContext context) {
- return Scaffold(
- appBar: AppBar(
- title: Text("Menu 2 Page"),
- ),
- body: Center(
- child: RaisedButton(
- onPressed: () {
- Navigator.pop(context);
- },
- child: Text('Go back!'),
- ),
- ),
- );
- }
- }
After you have finished copying the main.dart code, running the application will show the below output:
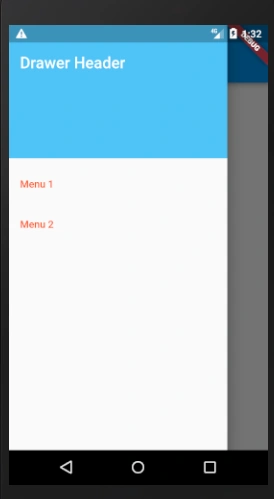
You can see a navigation drawer in Flutter example Here.
Thank you for reading this article about creating navigation drawer in Flutter, I hope this article is useful for you. Visit My Github about Flutter Here.
Join the conversation! Your thoughts help the community grow.