

Here, see how to create a Crystal Report using SQL View.
View
Why views are used in databases:
- A View is one type of virtual table
- A View joins and simplifies multiple tables into a single virtual table
- A View can hide the complexity of data
- A View uses very small space in the data store
- A View is updatable easily
The following is a step-by-step instructions for creating a Crystal Reports report.
Create Crystal Report for Employee Data information
First create an Employee Data Table in your SQL Database.
Now, follow the steps for creating a Crystal Report.
Step 1
Create a table in the database. Create an Employee table in the database.
Command
- create table Employee
- (
- Emp_ID int identity(1,1) constraint PK_Emp primary key,
- Emp_Name varchar(30),
- Emp_Contact nchar(15),
- Emp_Salary decimal(7,2)
- )
Now insert employee data into the Employee Table.
Command
- insert into Employee values ('Rakesh','9924194054','15000.22');
- insert into Employee values ('Amit','9824194555','17000');
- insert into Employee values ('Ketan','9824198245','14000');
- insert into Employee values ('Ketan','9994198245','12000');
- insert into Employee values ('Chirag','9824398245','10000');
- insert into Employee values ('Naren','9824398005','10000');
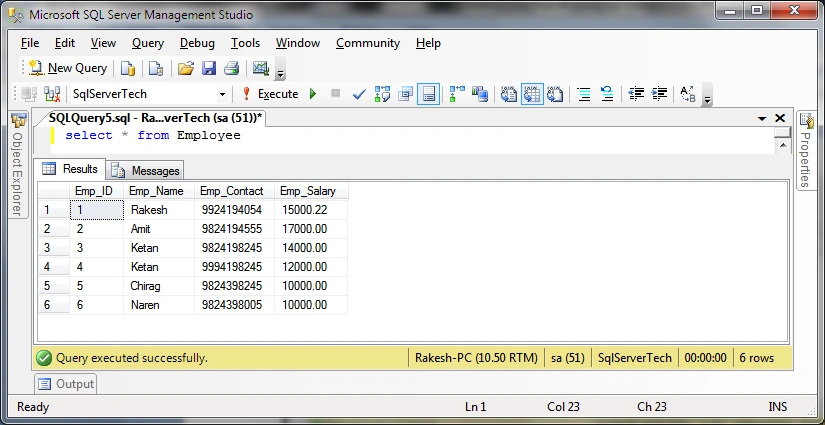
Now Employee data has been inserted into the table.
Let's see it with a SQL Select Command Query in the SQL Database.
Command
- Select * from Employee
Step 2
Create a VIEW in your database to display employee data information.
Command
- create view vw_Employee
- as
- Select Emp_ID,Emp_Name,Emp_Contact,Emp_Salary
- from Employee
- GO
Now, your Employee database view has been created.
Step 3
Go to Visual Studio.
Step 4
Go to the Solution Explorer and right-click on your project name and seelct Add -> New Item.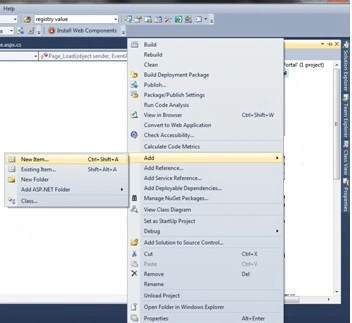
Step 5
Add New Item-> Crystal Report.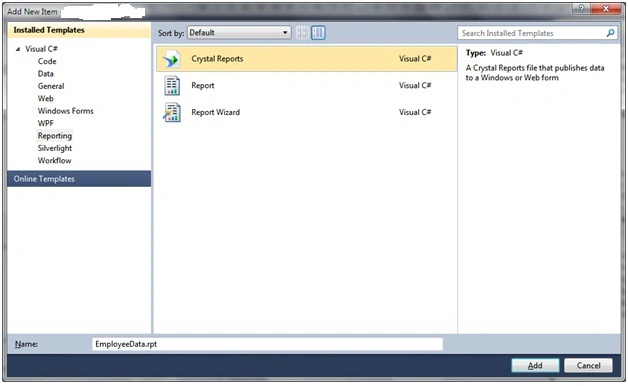
Step 6
Click the Ok Button.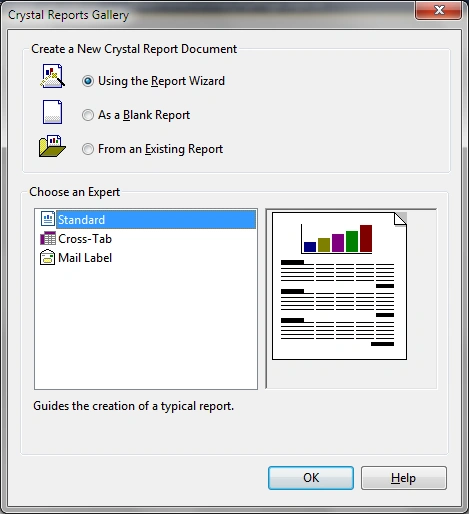
Step 7
Choose the data source as in the following: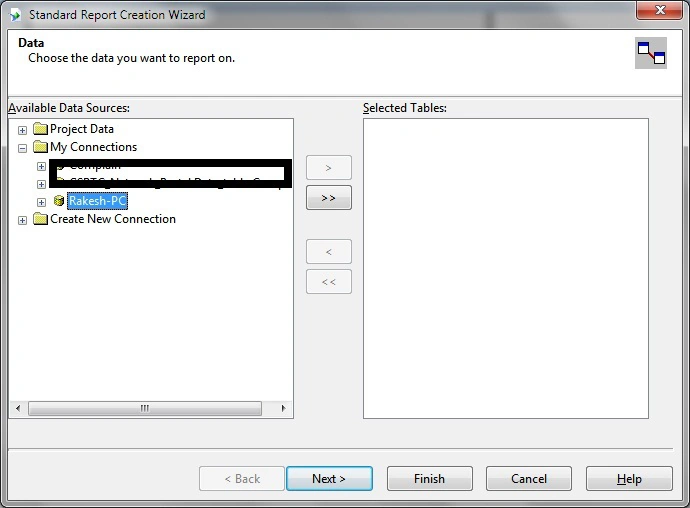
Click the Next Button.
Step 8
Select the data with OLEDB (ADO) as in the following: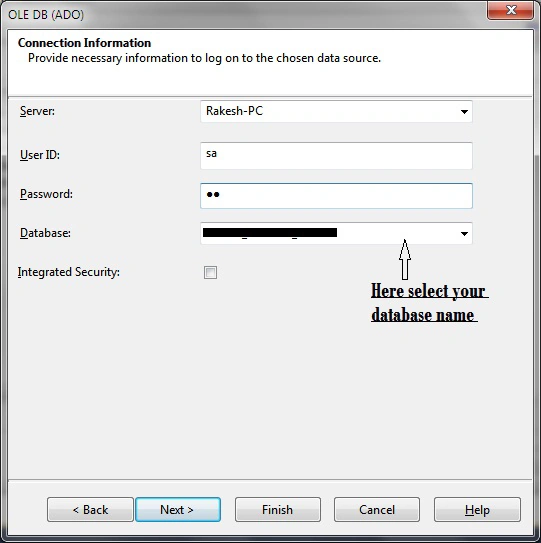
Click the Next button to open a new dialog.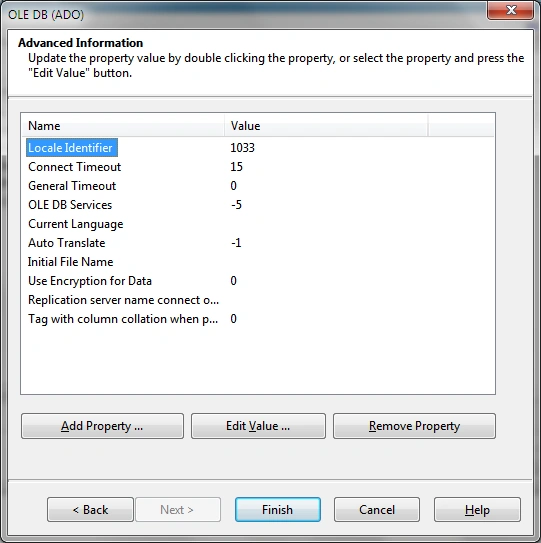
Click the Finish button and open a new dialog box. In this, select your new view.
Step 9
Select your view Employee view.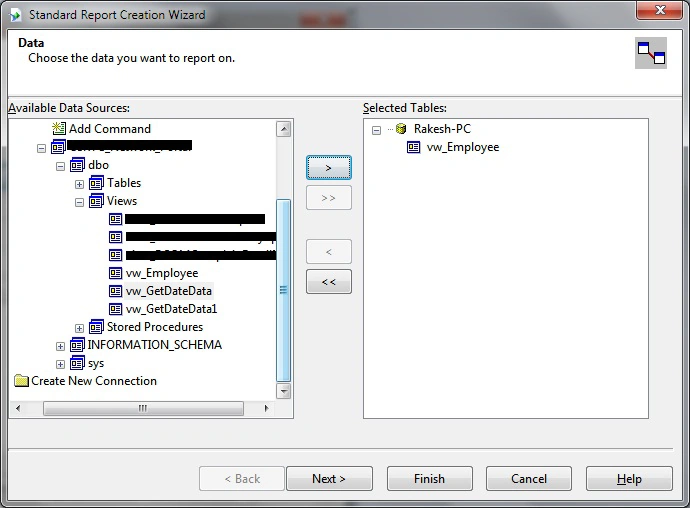
Step 10
Select the fields to display in the report area as in the following: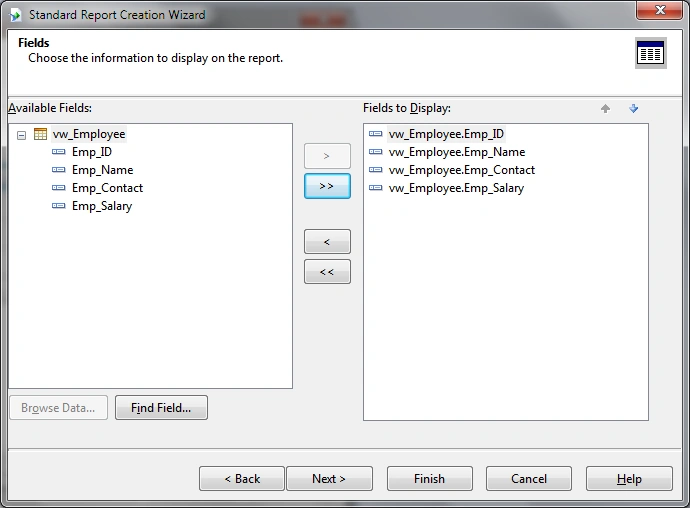
And click the Finish button.
Step 11
Select the report format as in the following: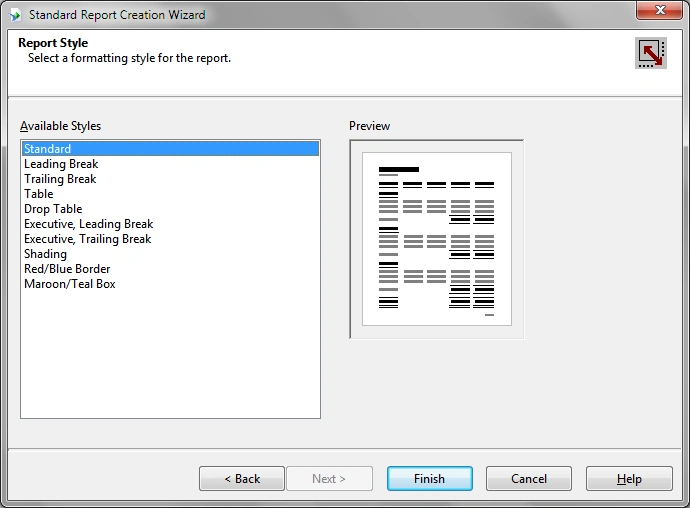
Click the Finish Button after selecting the format of the report.
Step 12
Now finally display your report in this format.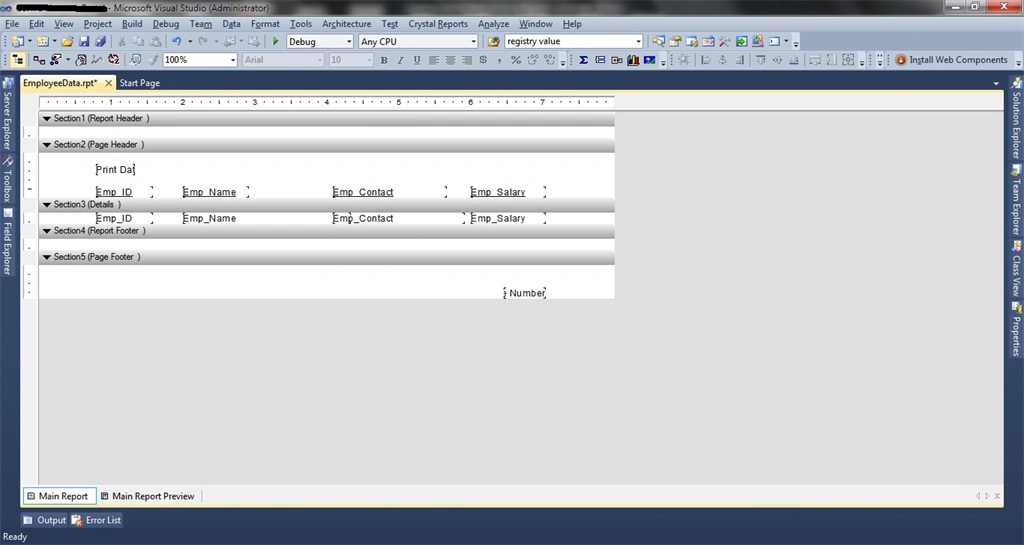
Step 13
Now add a new .aspx page to display the report as in the following: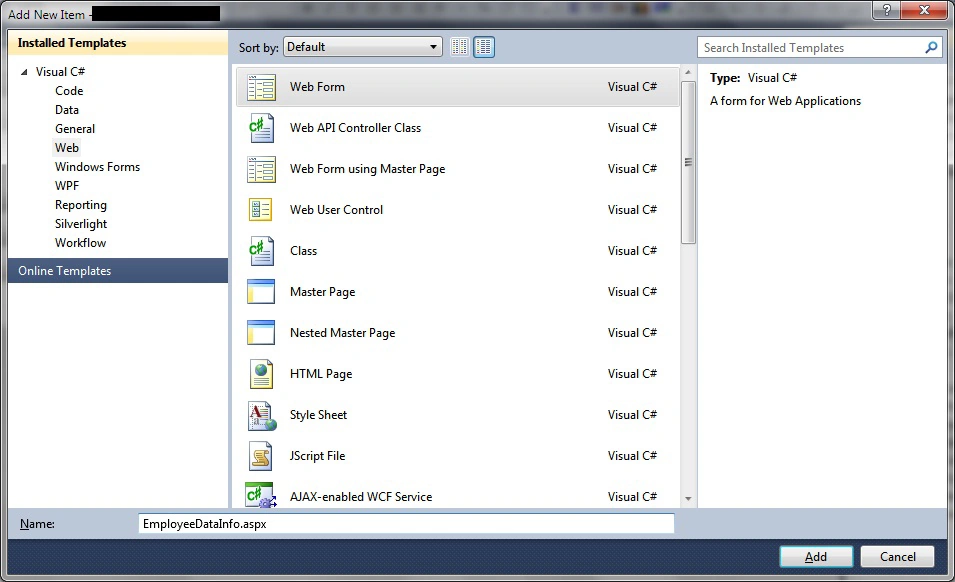
And provide the name EmployeeDataInfo.aspx.
Step 14
Now add a Crystal Report Viewer to EmployeeDataInfo.aspx as shown in the following screeshot: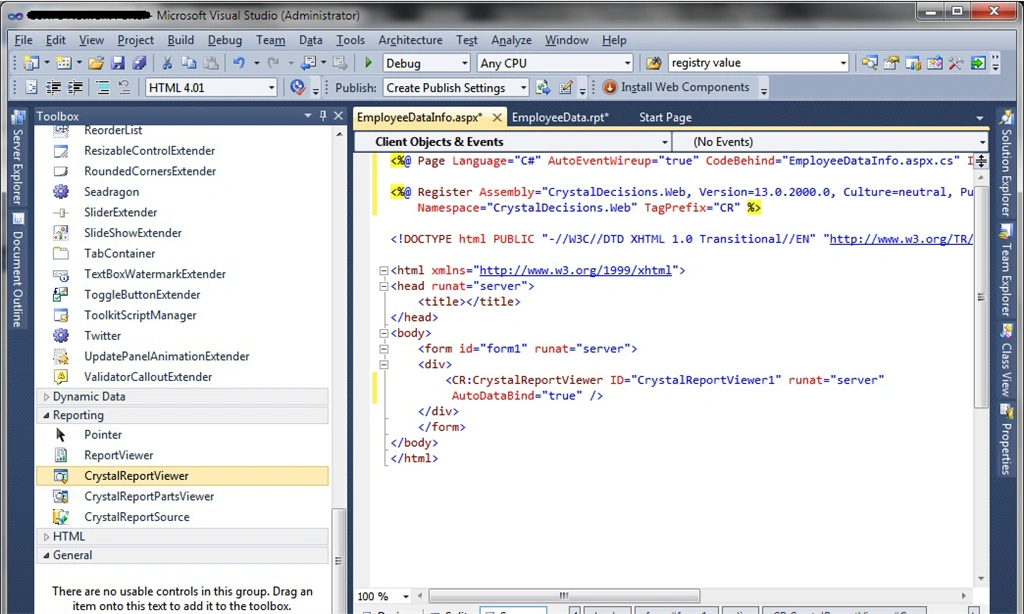
Step 15
Go to the aspx page code side as shown below: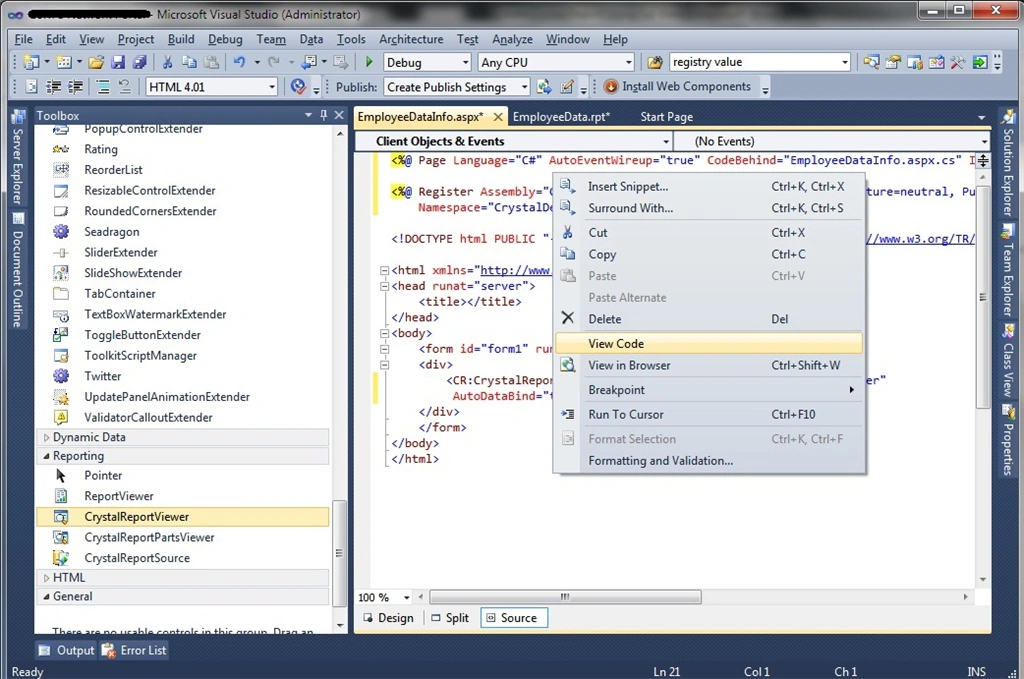
Step 16
Write the report code in the .aspx.cs page as follows:
- using System;
- using System.Collections.Generic;
- using System.Linq;
- using System.Web;
- using System.Web.UI;
- using System.Web.UI.WebControls;
- using CrystalDecisions.CrystalReports.Engine;
- using CrystalDecisions.Shared;
- namespace Network_Portal {
- public partial class EmployeeDataInfo: System.Web.UI.Page {
- protected void Page_Load(object sender, EventArgs e) {
- ReportDocument Report = new ReportDocument();
- Report.Load(Server.MapPath("~/EmployeeData.rpt"));
- Report.SetDatabaseLogon("sa", "sa123", "Rakesh-PC", "RakeshData");
- CrystalReportViewer1.ReportSource = Report;
- }
- }
- }
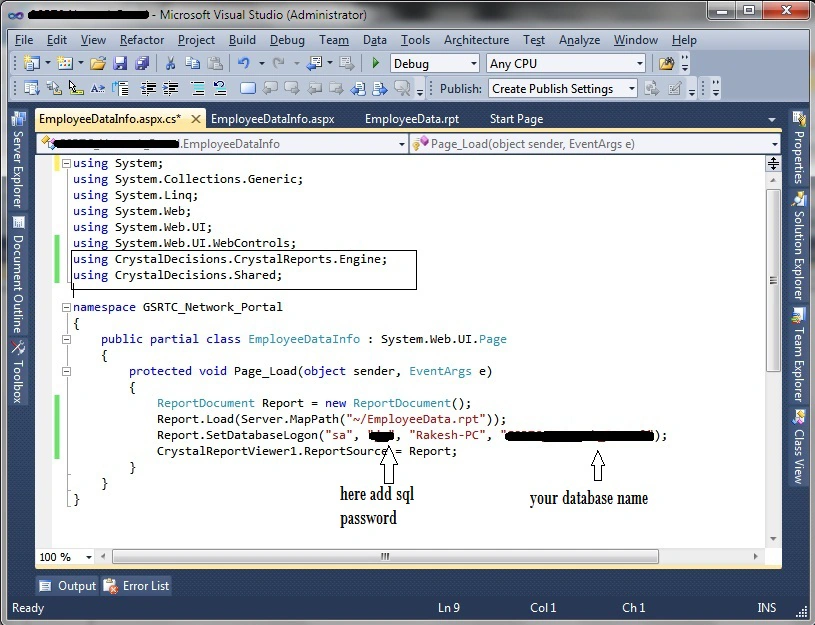
Step 17
Finally run your report and display the Employee Information.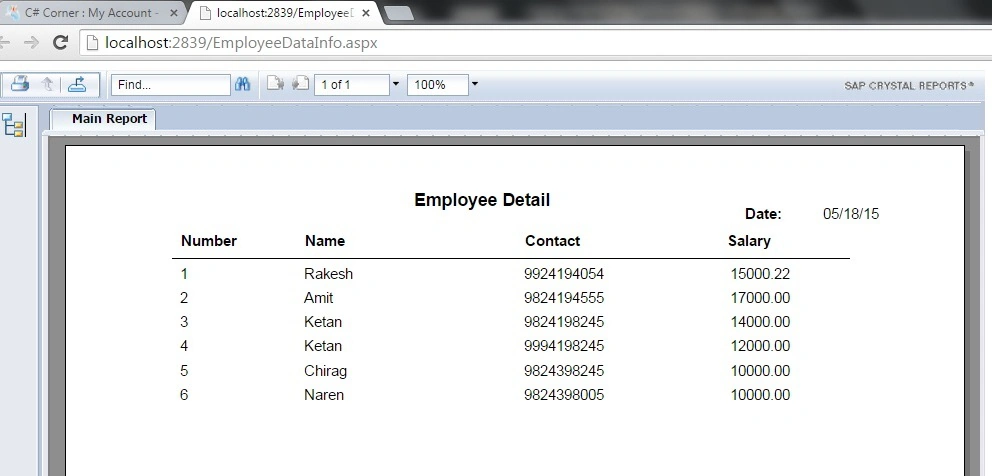
vinay myakalaPosted Aug 7, 2021, 2:34 PM
I don't have option to add crystal reports in my VS2019, can you share the crystal report addon installer?
Pavithra VPosted Aug 3, 2020, 11:22 AM
I cant create crystal report in VS2019 .. please help me
Redoy HossainPosted Jun 21, 2019, 7:26 AM
Step 13 i can't add a new .aspx HELP ME PLEASE
Bhavleen SinghPosted Jun 7, 2019, 3:14 AM
Error ---- Invalid report file path.
Rajitha RajjiPosted Apr 3, 2019, 7:32 AM
Hello Rakesh, I have created blank report but you took wizard and when i have generate the pdf then data is not displaying only it showing view page.
Husain SongadhwalaPosted Sep 15, 2018, 6:43 AM
I have drawn the design in Crystal report but how to get value in parameter wise in dataset can you send any link
Husain SongadhwalaPosted Sep 15, 2018, 6:39 AM
Hello my data from view is not showing
Shovan SahaPosted Jun 19, 2017, 1:21 PM
Easy to understand.
Akhil PalyalaPosted Jun 8, 2017, 2:55 AM
Can you suggest me with out using crystal report viewer in asp.net
Richard SimmonsPosted Mar 7, 2017, 12:15 PM
Im using windows authenticate, server name is JAZE, user name Jason or JAZE/Jason? , no password. report is generating without details . help me plz
Richard SimmonsPosted Mar 6, 2017, 10:01 AM
I cant add web form, its not there, help me
GokulPosted Jun 11, 2016, 6:08 AM
this help for windows application thank you...................................................................
Mohammed Zaid MerajPosted Apr 18, 2016, 1:08 AM
Very Helpful-:)
Asfend YarPosted Feb 27, 2016, 3:49 AM
nice
Masego ScotchPosted Feb 8, 2016, 6:59 AM
Unhandled exception at line 80, column 3 in http://localhost:56731/WebForm1.aspx 0x800a1391 - JavaScript runtime error: 'bobj' is undefined
Nikunj TrivediPosted Aug 18, 2015, 6:17 AM
Good One Article Sir....Its Very helpful to us.......But I have One Query Regarding Crystal Report..How to print crystal report programatically on button click ?? bcoz in Visual studio 2010 crystal report , there are so many problems on PRINT button and Export button.
Pankaj Kumar ChoudharyPosted May 23, 2015, 1:50 AM
Nice Article Sir................
Santhakumar MunuswamyPosted May 19, 2015, 12:43 AM
keep it up :)
Santhakumar MunuswamyPosted May 19, 2015, 12:43 AM
Thanks for good work
Rahul BansalPosted May 19, 2015, 12:25 AM
Simple way of explaination ..thanks
Khargesh RajputPosted May 19, 2015, 12:17 AM
thanx for sharing helpful article to learn crystal report