

In this article, we will see How Scully can help us to create a blogging site in angular?

Scully is the best option to create a blogging site in Angular, because
- It provides very good SEO support.
- Superfast performance as pages are prerendered
- Markdown support - Scully uses markdown files for blog content
- Various plugins are available for syntax highlighting, google analytics integration, and many more.
- Easy to create a new blog post : Once you have created the blog dashboard and blog page design setup in an angular application, you just need to add markdown files in your blog folder to create a new blog post
So let's get started
We will continue working on previous article example. If you want to start along then download/clone this GitHub repository.
- We will add the blog support using Scully.
- Create a Blog dashboard where it will show all the blogs.
Add Blog Support
Scully provides a schematic to add blog support in your existing angular application. execute the following command on command prompt or terminal.
(If you have not done Scully setup in your angular app, refer Getting Started With Scully.)
(If you have not done Scully setup in your angular app, refer Getting Started With Scully.)
- ng generate @scullyio/init:blog
- Update scully.[projectName].config.ts file
- // scully.portfolio.config.ts
- import { ScullyConfig } from '@scullyio/scully';
- export const config: ScullyConfig = {
- projectRoot: "./src",
- projectName: "portfolio",
- outDir: './dist/static',
- routes: {
- '/blog/:slug': {
- type: 'contentFolder',
- slug: {
- folder: "./blog"
- }
- },
- // Other Parameterized Route Config
- }
- }
- };
- Create a blog component where markdown content will be rendered.
- //blog.component.ts
- import {Component, OnInit, ViewEncapsulation} from '@angular/core';
- import {ActivatedRoute, Router, ROUTES} from '@angular/router';
- declare var ng: any;
- @Component({
- selector: 'app-blog',
- templateUrl: './blog.component.html',
- styleUrls: ['./blog.component.scss'],
- preserveWhitespaces: true,
- encapsulation: ViewEncapsulation.Emulated
- })
- export class BlogComponent implements OnInit {
- ngOnInit() {}
- constructor(private router: Router, private route: ActivatedRoute) {
- }
- }
<scully-content> is a predefined component. Our blog content will be projected here. We can update the header and footer part as per our requirements.- <!-- blog.component.html -->
- <h3>ScullyIo content</h3>
- <hr>
- <!-- This is where Scully will inject the static HTML -->
- <scully-content></scully-content>
- <hr>
- <h4>End of content</h4>
- Create blog.module.ts and blog-routing.module.ts for blog component route
- // blog-routing.module.ts
- import {NgModule} from '@angular/core';
- import {Routes, RouterModule} from '@angular/router';
- import {BlogComponent} from './blog.component';
- const routes: Routes = [
- {
- path: ':slug',
- component: BlogComponent,
- },
- {
- path: '**',
- component: BlogComponent,
- }
- ];
- @NgModule({
- imports: [RouterModule.forChild(routes)],
- exports: [RouterModule],
- })
- export class BlogRoutingModule {}
- // blog.module.ts
- import {CommonModule} from '@angular/common';
- import {NgModule} from '@angular/core';
- import {ScullyLibModule} from '@scullyio/ng-lib';
- import {BlogRoutingModule} from './blog-routing.module';
- import {BlogComponent} from './blog.component';
- @NgModule({
- declarations: [BlogComponent],
- imports: [CommonModule, BlogRoutingModule, ScullyLibModule],
- })
- export class BlogModule {}
- Update the app-routing.module.ts to add the blog module route.
- Add one sample blog markdown file with [current date] blog.md name in /blog folder
title, description, and published are meta details for this blog. These details can be used while we show the blog details on the blog dashboard. This can be accessible with the ScullyRoutesService. We can also add other meta properties as per our requirement, for example, authorName, authorTwitterId etc.- ---
- title: 2021-04-03-blog
- description: blog description
- published: false
- ---
- # 2021-04-03-blog
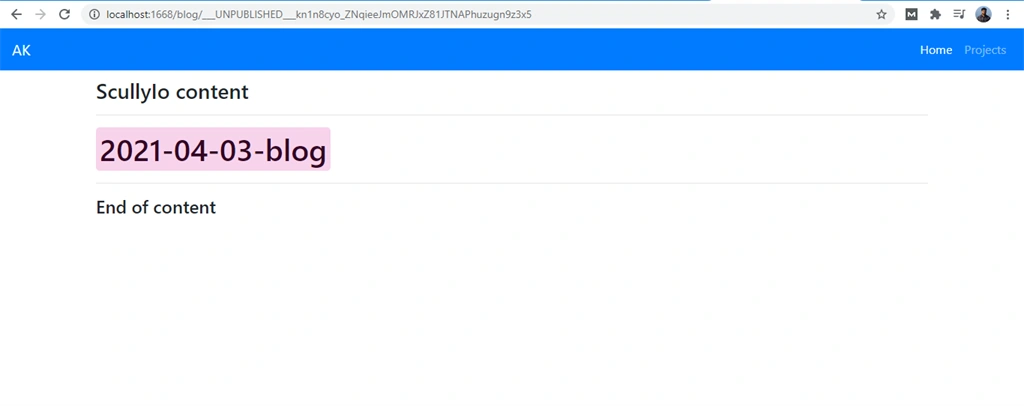
Test The Default Blog
We have added new components and modules. So we have to take a new angular build
- ng build --prod
- npm run scully -- --scanRoutes
When published flag is false in a markdown file, and you take a Scully build it will add slugs property with ___UNPUBLISHED___[random-string]in markdown file and generate a blog HTML page in dist/static/blog folder with ___UNPUBLISHED___[random-string].

When you want to publish this blog, set the published flag to true. and take a Scully build again with npm run scully.
Now serve the prerendered pages with npm run scully:serve and open the blog path in the browser.
Change The Blog Layout
We can customize the blog layout by doing related changes in BlogComponent. I have removed the default header and footer provided by Scully. I am using Bootstrap to apply some styling. You can do more customization as per your requirement.
- // blog.component.html
- <div class="row">
- <div class="col-md-12">
- <div class="card shadow-sm">
- <div class="card-body">
- <!-- This is where Scully will inject the static HTML -->
- <scully-content></scully-content>
- </div>
- </div>
- </div>
- </div>
Create Blog Dashboard
In BlogModule we will create BlogsComponent, In this component, we will show the list of blogs. We will update the route in blog-routing.module.ts to open BlogsComponent when the user open the /blog/ route.
- ng generate component blog/blogs
- //blogs.component.ts
- import { Component, OnInit } from '@angular/core';
- import { ScullyRoute, ScullyRoutesService } from '@scullyio/ng-lib';
- import { map } from 'rxjs/operators';
- @Component({
- selector: 'app-blogs',
- templateUrl: './blogs.component.html',
- styleUrls: ['./blogs.component.scss']
- })
- export class BlogsComponent implements OnInit {
- blogs$ = this.scullyService.allRoutes$.pipe(
- map(routes => routes.filter(r=> r.route.startsWith('/blog/')))
- );
- constructor(private scullyService: ScullyRoutesService) {
- }
- ngOnInit(): void {
- }
- }
We can access all routes details with ScullyRoutesService. We will filter the blog routes and render them on template.
- <!-- blogs.component.html -->
- <h1 class="text-center">Blogs</h1>
- <hr>
- <div class="row">
- <div class="col-md-12 p-2" *ngFor="let blog of blogs$|async">
- <div class="card shadow-sm">
- <div class="card-body">
- <h4 class="card-title">{{blog.title}}</h4>
- <p class="card-title">{{blog.description}}</p>
- <div>
- <span class="badge" [ngClass]="{'badge-info': blog.published, 'badge-dark': !blog.published}" >{{blog.published ? 'PUBLISHED' : 'DRAFT'}}</span>
- </div>
- <a class="btn btn-primary" [routerLink]="[blog.route]" >Read More</a>
- </div>
- </div>
- </div>
- </div>
We are done with our blog dashboard implementation. Now let's create few sample blogs and Test our blogging site.
Create A New Blog Post
We can create a new blog by creating a new markdown file in /blog folder. In this markdown file, we also have to mention the meta properties which is specified in about sample. We can do this manually, but instead of this Scully provides a schematic to create a new post, which will generate the file with meta properties.
- ng generate @scullyio/init:post
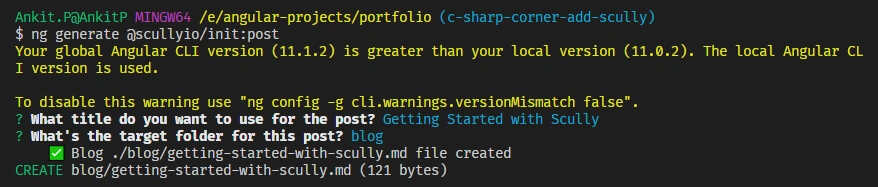
It will generate the markdown file with the following content,
- ---
- title: Getting Started with Scully
- description: blog description
- published: false
- ---
- # Getting Started with Scully
Final Output
I have added a few other blogs and changed all blog post published flags to true. Remove unpublished slug from markdown.
Take a new angular build and Scully build and start the scully static server.
- ng build --prod
- npm run scully -- --scanRoutes
- npm run scully:serve
Great !!! We have successfully created a blogging site with Angular and Scully.
Get the Source Code at this GitHub Repository
Summary
In this article, We have seen how to create a blogging site with angular and Scully.
I hope you like this article, please provide your valuable feedback and suggestions🙂.
Join the conversation! Your thoughts help the community grow.