

Introduction
In our previous article, we learned how to Create and Connect a chatbot with Azure Bot Service. In this article, we are going to create an intelligent bot application using Microsoft Bot Framework.
ngrok Software
So first we need to download ngrok software. What is ngrok ?
"ngrok" is a network tunneling software. The Bot Framework Emulator works with ngrok to communicate with bots hosted remotely. Click this link https://ngrok.com/download to download ngrok network tunneling software.
Bot Framework Emulator
The Bot Framework Emulator is a desktop application that allows bot developers to test and debug their bots on localhost or running remotely through a tunnel. So we need to download Bot Framework Emulator for both local and server testing. So please go through this link to download Bot Framework Emulator click here.
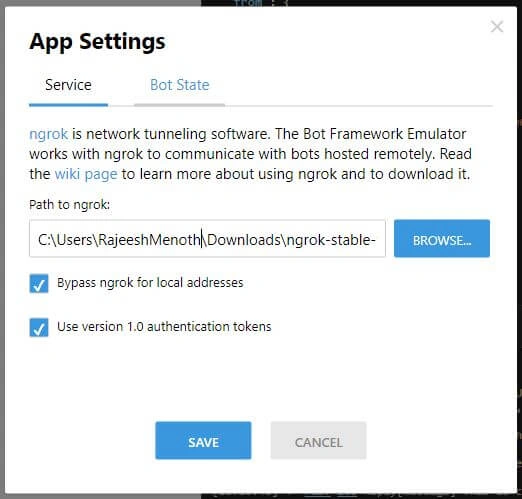
After successful download please run the exe file for Bot Framework Emulator. Then first time it will open a "App Settings Window" there we need to provide the exact path of ngrok in our system ( Provide "ngrok" saved folder path in our system ).
The following screenshot "ngrok" saved into C drive Downloads folder ( C:\Users\RajeeshMenoth\Downloads\ngrok ).
Web.config
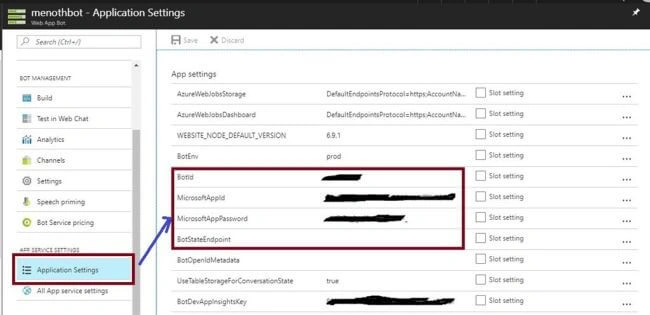
When you are connecting to remote server or anything other than local host then we need to provide the following credentials "BotId" & "MicrosoftAppId" & "MicrosoftAppPassword" in Web.Config and Bot Framework Emulator. This we will get it from azure "AppSettings" in our created Web App Bot.
- <configuration>
- <appSettings>
- <!-- update these with your BotId, Microsoft App Id and your Microsoft App Password-->
- <add key="BotId" value="YourBotId" />
- <add key="MicrosoftAppId" value="" />
- <add key="MicrosoftAppPassword" value="" />
- </appSettings>
- </configuration>
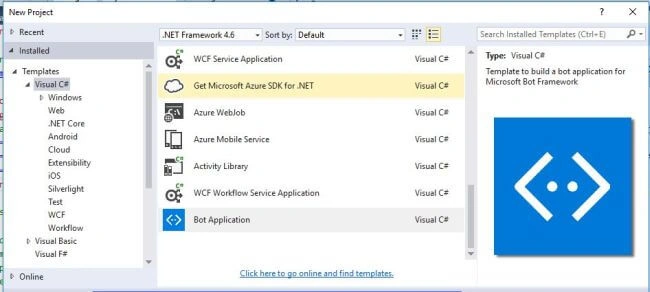
Click on "File -> New -> Project -> Visual C# -> Bot Application"
Note
If the Bot Application Template is not present in the Visual Studio 2015 then please go to "Tools -> Extensions and Updates". Then search and Install the "Bot Application" in our Visual Studio.
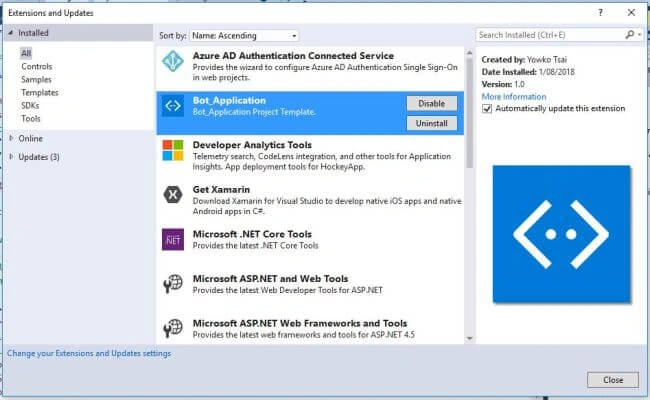
If the Bot Application Template is not present in the Visual Studio 2015 then please go to "Tools -> Extensions and Updates". Then search and Install the "Bot Application" in our Visual Studio.
Code
I just changed the default code for Web App Bot. Then we added our own logic into this C# Code in Bot Application.
- using System;
- using System.Linq;
- using System.Net;
- using System.Net.Http;
- using System.Threading.Tasks;
- using System.Web.Http;
- using Microsoft.Bot.Connector;
- namespace Bot_App
- {
- [BotAuthentication]
- public class MessagesController : ApiController
- {
- ///
- <summary>
- /// POST: api/Messages
- /// Receive a message from a user and reply to it
- /// </summary>
- public async Task<HttpResponseMessage> Post([FromBody]Activity activity)
- {
- if (activity.Type == ActivityTypes.Message)
- {
- ConnectorClient connector = new ConnectorClient(new Uri(activity.ServiceUrl));
- // calculate something for us to return
- int length = (activity.Text ?? string.Empty).Length;
- Activity reply = activity.CreateReply("");
- // return our reply to the user
- switch (activity.Text)
- {
- case "hi":
- case "hello":
- reply = activity.CreateReply($"{activity.Text} buddy, How may I assist you ?");
- break;
- case "how are you":
- reply = activity.CreateReply($"Fine , What about you ?");
- break;
- case "Where are you ?":
- reply = activity.CreateReply($"Bangalore , What about you ?");
- break;
- case "bye":
- reply = activity.CreateReply($"Bye , Thank you !!");
- break;
- default:
- reply = activity.CreateReply($"This is chat bot using Bot Framework !!");
- break;
- }
- await connector.Conversations.ReplyToActivityAsync(reply);
- }
- else
- {
- HandleSystemMessage(activity);
- }
- var response = Request.CreateResponse(HttpStatusCode.OK);
- return response;
- }
- private Activity HandleSystemMessage(Activity message)
- {
- if (message.Type == ActivityTypes.DeleteUserData)
- {
- // Implement user deletion here
- // If we handle user deletion, return a real message
- }
- else if (message.Type == ActivityTypes.ConversationUpdate)
- {
- // Handle conversation state changes, like members being added and removed
- // Use Activity.MembersAdded and Activity.MembersRemoved and Activity.Action for info
- // Not available in all channels
- IConversationUpdateActivity update = message;
- var client = new ConnectorClient(new Uri(message.ServiceUrl), new MicrosoftAppCredentials());
- if (update.MembersAdded != null && update.MembersAdded.Any())
- {
- foreach (var newMember in update.MembersAdded)
- {
- if (newMember.Id != message.Recipient.Id)
- {
- var reply = message.CreateReply();
- reply.Text = $"Welcome {newMember.Name}!";
- client.Conversations.ReplyToActivityAsync(reply);
- }
- }
- }
- }
- else if (message.Type == ActivityTypes.ContactRelationUpdate)
- {
- // Handle add/remove from contact lists
- // Activity.From + Activity.Action represent what happened
- }
- else if (message.Type == ActivityTypes.Typing)
- {
- // Handle knowing tha the user is typing
- }
- else if (message.Type == ActivityTypes.Ping)
- {
- }
- return null;
- }
- }
- }
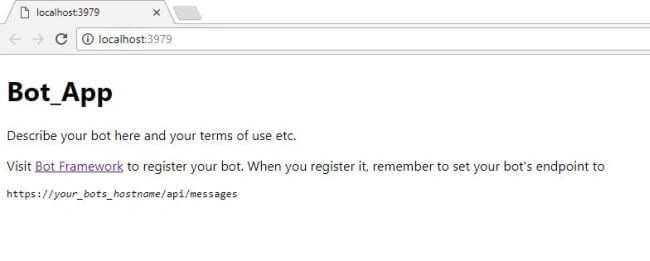
Run our Bot Application in local then it will open our application with a localhost port number. So we can use this in our "Bot Framework Emulator".
The bot endpoint like this : "http://your_bots_hostname/api/messages"
Bot Endpoint
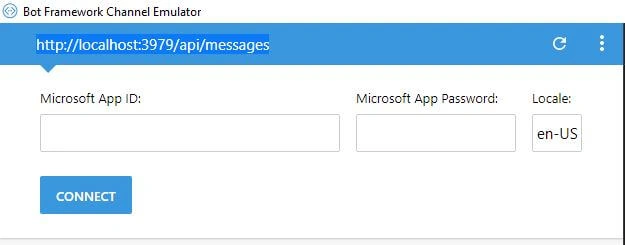
In the Bot Framework Emulator we can add our localhost or remote server "bot end point". We can directly connect localhost port number in Bot Framework Emulator. But note that in the actual server endpoint we need to given "Microsoft App ID" and "Microsoft App Password".
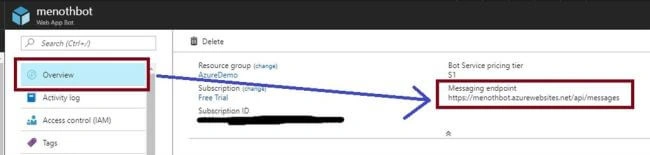
Actual endpoint of our chat bot is getting from Apps Setting ( for this we need to create a Web Chat Bot in Azure Using Bot Service ).
Application Settings
We will get all the credentials of our Web Chat Bot App ( Azure ) in Apps Setting ( for this we need to create a Web Chat Bot in Azure Using Bot Service ).
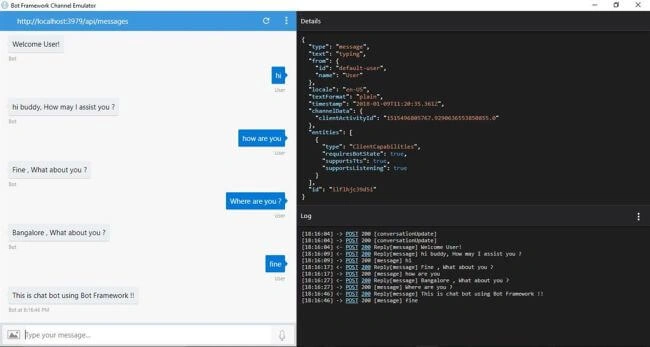
Output
Click on the "Connect" then it will trigger our Bot Application.
Download
Summary
We learned how to Create An Intelligent Bot Application Using Microsoft Bot Framework. I hope this article is useful for all Azure chat bot beginners.
Reference
- Docs for Create a bot with the Bot Framework
- Docs In Git hub BotFramework-Emulator
- Microsoft Docs for Bot Framework Emulator
See Also
You can download other ASP.NET Core source codes from MSDN Code, using the link, mentioned below.
You can download other ASP.NET Core source codes from MSDN Code, using the link, mentioned below.
Jitendra WaghalePosted Aug 26, 2018, 2:39 PM
This is very helpful, Thanks for sharing!!
Paul CookPosted Jun 22, 2018, 7:38 AM
Very nice article. The guidence which is required to give is given here. I have also read one good article https://bit.ly/2JZw8nt which is related to chatbot. Hope people may find helpful.
Sagar Pandurang KapPosted Jan 15, 2018, 12:27 AM
Amazing article.Helpful.Keep Posting..
Gupta AnirudhaPosted Jan 12, 2018, 12:26 PM
@Rajesh can you make a demo with Luis.ai intent? That's would be great.