

Introduction
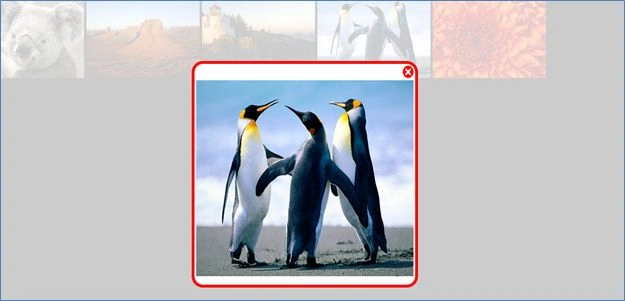
In this example, we create a LightBox using JavaScript and CSS. So when we click on the image the following LightBox will be shown:
 Step 1
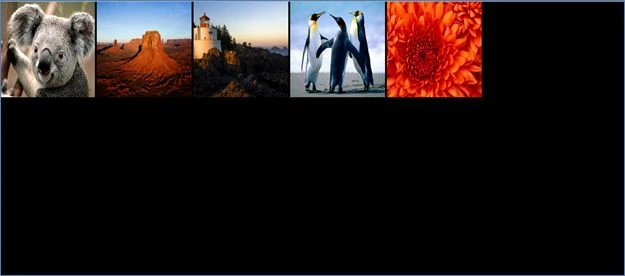
First, we take some images (when we click on the images the LightBox will be shown). We will place this image in a <div> tag like this:
Step 1
First, we take some images (when we click on the images the LightBox will be shown). We will place this image in a <div> tag like this:
- <div id="fade" class="back">
- <img id="img1" src="Koala.jpg" height="150px" width="200px" onclick="document.getElementById('light').style.display='block';Show();document.getElementById('fade').style.display='block';
- document.getElementById('fade').style.opacity='0.2';ShowImage1();" />
- <img id="img2" src="Desert.jpg" height="150px" width="200px" onclick="document.getElementById('fade').style.display='block';
- document.getElementById('light').style.display='block';document.getElementById('fade').style.opacity='0.2';ShowImage2();Show();document.getElementById('light').style.display='block';" />
- <img id="img3" src="Lighthouse.jpg" height="150px" width="200px" onclick="document.getElementById('fade').style.display='block';
- document.getElementById('fade').style.opacity='0.2';document.getElementById('light').style.opacity='1';ShowImage3();Show();document.getElementById('light').style.display='block';" />
- <img id="img4" src="Penguins.jpg" height="150px" width="200px" onclick="document.getElementById('fade').style.display='block';
- document.getElementById('fade').style.opacity='0.2';document.getElementById('light').style.opacity='1';ShowImage4();Show();document.getElementById('light').style.display='block';" />
- <img id="img5" src="Chrysanthemum.jpg" height="150px" width="200px" onclick="document.getElementById('fade').style.display='block';
- document.getElementById('fade').style.opacity='0.2';document.getElementById('light').style.opacity='1';ShowImage5();Show();document.getElementById('light').style.display='block';" />
- </div>
- <style type="text/css">
- .back
- {
- position: absolute;
- top: 0%;
- left: 0%;
- width: 100%;
- height: 100%;
- background-color: black;
- z-index: 1001;
- -moz-opacity: 0.8;
- filter: alpha(opacity=80);
- }
- </style>
- <div id="light" class="overlay">
- <table>
- <tr>
- <td height="10%" width="10%" align="right">
- <img src="Close.jpg" height="10%" width="5%" onclick="document.getElementById('fade').style.display='block';
- .getElementById('fade').style.opacity='1';document.getElementById('light').style.display='none';" />
- </td>
- </tr>
- <tr>
- <td>
- <img id="imgMain" src="Koala.jpg" height="45%" width="100%" />
- </td>
- </tr>
- </table>
- </div>
Now we will set the CSS of that Div:
- <style type="text/css">
- .overlay
- {
- display: none;
- position: absolute;
- -webkit-border-radius: 20px;
- border: 5px solid red;
- background-color: white;
- z-index: 1002;
- overflow: auto;
- }
- </style>
The output will be:
 Step 3
After that we will write the code for the click event of the images so when we click on that the LightBox will be shown:
Here we call two JavaScript Functions:
Step 3
After that we will write the code for the click event of the images so when we click on that the LightBox will be shown:
Here we call two JavaScript Functions:
- <img id="img1" src="Koala.jpg" height="150px" width="200px" onclick="document.getElementById('light').style.display='block'; document.getElementById('fade').style.display='block';
- document.getElementById('fade').style.opacity='0.2'; Show();ShowImage1();" />
- <script language="javascript">
- var x = 10;
- var l = 10;
- var t = 10;
- function ShowImage1() {
- document.getElementById('imgMain').src = "Koala.jpg";
- }
- function Show() {
- document.getElementById('light').style.width = "0px";
- document.getElementById('light').style.height = "0px";
- setTimeout("Show1()", 500);
- }
- function Show1() {
- if ((x < 400) && (l < 500)) {
- if (t < 150) {
- document.getElementById('light').style.top = t + "px";
- }
- else {
- document.getElementById('light').style.top = "120px";
- }
- document.getElementById('light').style.left = l + "px";
- document.getElementById('light').style.width = x + "px";
- document.getElementById('light').style.height = x + "px";
- x = x + 10;
- l = l + 10;
- t = t + 10;
- setTimeout("Show1()", 10);
- }
- else {
- x = 0
- l = 0;
- t = 0;
- }
- }
- </script>
In this code we will set the image source of the LighBox image and using the Show Function, the LightBox will be shown in a different style.
Step 4
Now we will write code for the Close button:
Here we will set the opacity of the fade and light div so the fade <div> will be visible.
- <img src="Close.jpg" height="10%" width="5%" onclick="document.getElementById('fade').style.display='block';
- document.getElementById('fade').style.opacity='1';document.getElementById('light').style.display='none';" />
Ken HPosted Apr 16, 2014, 12:44 PM
Good article, but it does not work in Microsoft IE. Thank for you. :)