

We will discuss ContentChild and ContentChildren decorators in angular and their practical implementation.
Overview
- Content Child and Content Children are used to getting the reference of the projected content.
- Projected content means the content that the component receives from the parent component.
Implementation
Let’s start with practical implementation
App Component TypeScript File
import { Component } from '@angular/core';

@Component({
  selector: 'app-root',
  templateUrl: './app.component.html',
  styleUrls: ['./app.component.css']
})
export class AppComponent {
  title = 'ContentChildAndConetntChildrenDemo';

  student1 = [
    {'Id' : 1, 'Name': 'Piysuh Deshmukh', 'Address': 'Pune', 'Age': 26}
  ]

  student2 = [
    {'Id' : 2, 'Name': 'Vivek Patil', 'Address': 'Nashik', 'Age': 28}
  ]

  student3 = [
    {'Id' : 2, 'Name': 'Rajeshwar Ahire', 'Address': 'Mumbai', 'Age': 25}
  ]

}
Line 11:21 – We can see three student arrays that we declared inside the app component. Now, we will pass this array to the student detail component using the Input decorator.
If you don’t have any idea about Input decorators, check my blog related to that.
App Component HTML File
<nav class="navbar navbar-light bg-light" style="padding: 30px;margin: 40px; justify-content:center">
  <span class="navbar-brand mb-0 h1">Angular Demo</span>
</nav>

<app-studentsdetail [students]="student1">
<h5 #color>Student Internship Project: ABC</h5>
<h5>Student Contact No: 1111567890</h5>
</app-studentsdetail>

<app-studentsdetail [students]="student2">
  <h5 #color>Student Internship Project: PQR</h5>
  <h5>Student Contact No: 2222567890</h5>
</app-studentsdetail>

<app-studentsdetail [students]="student3">
  <h5 #color>Student Internship Project: XYZ</h5>
  <h5>Student Contact No: 3333567890</h5>
</app-studentsdetail>
- In the above file, we rendered students’ detail component three times and passed students’ array inside each selector. We reused the student component using content projection.
- We also put some HTML content inside each selector that we will display inside the student details component by using ng-content directives. So, if we pass content like this using ng-content, then that DOM element we can access using only the content child, and that’s not possible by using the ViewChild decorator.
- Also, we used one template reference variable in the first heading of each selector and named it a color with a hash sign. We can access that DOM element inside the student component using this reference variable. Also, access and change a few DOM properties related to that.
Student’s detail component
Students Detail Component TypeScript File
import { AfterContentInit, Component, ContentChild, ElementRef, Input } from '@angular/core';

@Component({
  selector: 'app-studentsdetail',
  templateUrl: './studentsdetail.component.html',
  styleUrls: ['./studentsdetail.component.css']
})
export class StudentsdetailComponent implements AfterContentInit {

  @Input() students! : any

  //Content Child
  @ContentChild("color") contentColor!  : ElementRef

  ngAfterContentInit(): void {

    //Content Child
    console.log(this.contentColor);
    this.contentColor.nativeElement.setAttribute('style','color: blue')
  }

}
- Line 10 – Use the input decorator to fetch student details from the parent app component, which we passed earlier.
- Line 13 – Next, use the content child to access the DOM element, which we projected using ng content directives and template reference variable color with a hash sign.
- Line 15 – We need to use ngContentAfterInit angular lifecycle hooks, which will trigger after our view is initialized and the content is projected.
- Line 18 – The console Logs the content child property to see the DOM element details if we want.
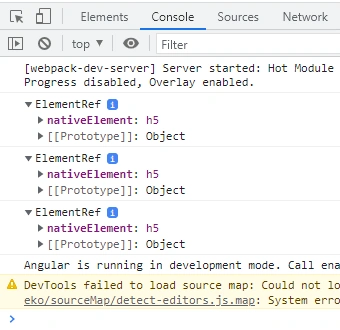
Line 19 – Now, we can access the DOM element and change different properties per our needs. Here we change the color of the heading.
Students Detail Component HTML File
<div *ngFor="let student of students"  class ="alert alert-secondary" role="alert" style="padding: 30px;margin: 40px;">
    <h3>Student Detail</h3>
    <h5>Student ID: {{student.Id}}</h5>
    <h5>Student Name: {{student.Name}}</h5>

    <ng-content></ng-content>

    <h5>Student Address: {{student.Address}}</h5>
    <h5>Student Age: {{student.Age}}</h5>

</div>
- Here, we iterate the students’ arrays and display the information.
- We also used the ng-content directive to display HTML Content which we passed through the parent app component file inside the student component selector.
Suppose we have two heading elements with the same template reference variable, then we need to use ContentChildren to access them because ContentChild only points to the first matching element when we project content using ng-content directives and want to access them, as I have shown below.

So, in this case, we need to use ContentChildren, which returns the type QueryList, and we can access the first and last property of the native element using that.t As I have shown below


As shown in the above image, we fetch the first and last native elements with the same template reference variable. But, using QueryList type and ContentChildren, we can easily access and use them.
Next, suppose we want to use multiple content projections inside the same template and need to render them at a particular place. In that case, we need to put some extra keywords, as I showed below.

Next, inside the student’s detail component, we project student contact after its name and student project after age using select keywords and special variables, which we passed earlier and named project and communication. So, it depends on us where we want to project our content.
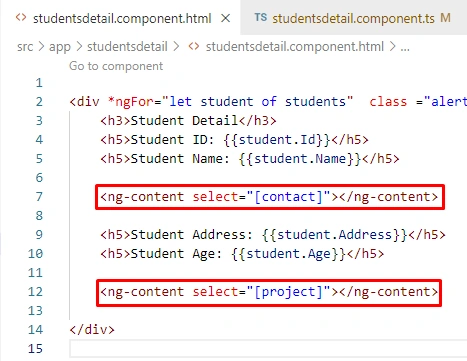
And we can see the output in sequence, as I have shown below

Let’s run the application and check the final output.
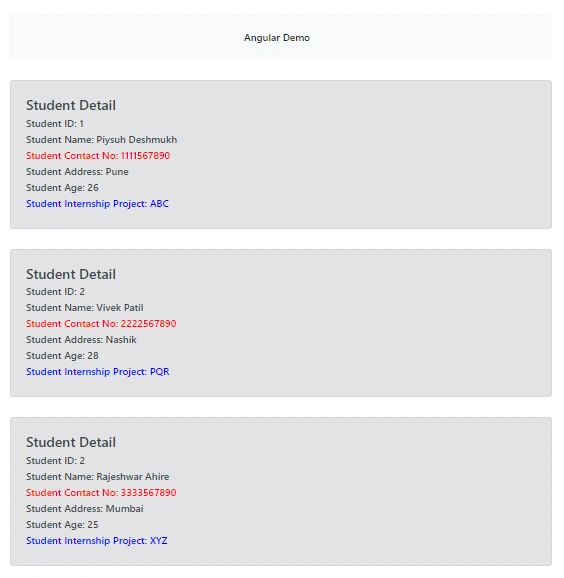
So, this is all about ContentChild and ContentChildren.
GitHub Link
https://github.com/Jaydeep-007/ContentChildAndConetntChildrenDemo
Happy Coding!!!
Join the conversation! Your thoughts help the community grow.