

Introduction
In this article, we are going to discuss the step-by-step implementation and containerization of the .NET Core 7 Console Application with the help of Docker.
Agenda
- What is Docker?
- Why use Docker?
- Benefits of Docker
- Step-by-step implementation of the .NET Core Console Application
- Containerization of Applications
Prerequisites
- Visual Studio 2022
- Docker Desktop
- .NET Core 7 SDK
What is Docker?
Docker is an open-source containerization platform that enables developers to build, run, and deploy applications quickly. Docker package application, including all its libraries, configurations, and dependencies.
Its primary focus is to automate the deployment of applications inside containers that boot up in seconds.
Why use Docker?
In the tech world, I think you heard the phrase “It works on my machine,” and mostly, this happens because of the different libraries, configurations, and dependencies required for the application to run under the operating system.
Managing application dependencies and configuration is a crucial task for the DevOps team, and Docker has all the capabilities to handle this kind of problem in the software development lifecycle.
Docker helps us build and deploy distributed microservice applications with the help of continuous integration and a continuous deployment pipeline, which saves a lot of time.
Docker uses the container as a unit of software that packages application code with all its dependencies so the application can run quickly in isolated environments.
Benefits of Docker
- Application portability: Docker is the container platform and allows running containers on a physical machine, virtual machine, or any other cloud provider in less time without modification
- Faster delivery and deployment: Docker enables us to build and deploy application images across every step of the deployment phase efficiently.
- Scalability: Docker is scalable because it has the ability to increase and decrease the number of application instances easily in different environments.
- Isolation: Docker containerizes and runs the application in an isolated environment with all dependencies and configurations.
- Security: Docker ensures the applications running inside the different containers are isolated from each other, and it has different security layers and tools to manage that.
- High Performance: Docker is generally faster and takes fewer resources than VMs.
- Version Control Management: Docker provides versioning-related things that can track container versions and roll back the same if required.
Step-by-step implementation of .NET Core Console Application
Let’s create one console application.
Step 1. Open Visual Studio and create a new console application.


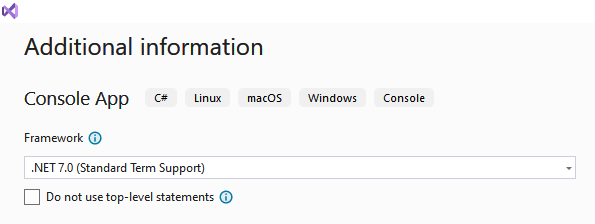
Step 2. Update the program class.
// See https://aka.ms/new-console-template for more information
Console.WriteLine("Welcome to Docker World!");
Step 3. Run and verify the newly created application.

Containerization of Applications
Note. Please make sure Docker is running on your system.
Step 1. Create a Docker image for our newly created application.
# Use the official .NET Core SDK image as the base image
FROM mcr.microsoft.com/dotnet/sdk:7.0 AS build
WORKDIR /app

# Copy the .csproj and restore as distinct layers
COPY *.csproj ./
RUN dotnet restore

# Copy the remaining source code and build the application
COPY . ./
RUN dotnet publish -c Release -o out

# Build the runtime image
FROM mcr.microsoft.com/dotnet/runtime:7.0
WORKDIR /app
COPY --from=build /app/out .

# Entry point when the container starts
ENTRYPOINT ["dotnet", "ConsoleAppDockerDemo.dll"]
Explanation
# Use the official .NET Core SDK image as the base image
FROM mcr.microsoft.com/dotnet/sdk:7.0 AS build
# Set the working directory in the container
WORKDIR /app
Start with the base image for your Docker container, which is specified as mcr.microsoft.com/dotnet/sdk:7.0. This image uses the official & .NET Core SDK 7.0 as its starting point. To later refer to this stage, it is given the alias “build”.
Next, set the working directory within the container to /app. This is where your application files will be copied and built.
# Copy the .csproj files to the container
COPY *.csproj ./
# Restore the project dependencies
RUN dotnet restore
To copy the project files (*.csproj) from your computer to the /app directory in the container, you need to use the command “COPY *.csproj./”. This step is separate from the one to optimize Docker’s layer caching. It ensures that when there are changes in your project file, the subsequent steps will be executed.
To restore the project’s dependencies and make sure that all required packages are downloaded and available for building the application, you can use the command “RUN dotnet restore”. This command will take care of restoring all dependencies.
# Copy the remaining source code into the container
COPY. ./
# Build the application in Release configuration and output to the 'out' directory
RUN dotnet publish -c Release -o out
Next, Copy the remaining source code and files from the local directory to the app directory and build the application
“RUN dotnet publish -c Release -o out” This command restores project dependencies and all required packages.
The above command builds the .NET Core Console Application in Release mode and publishes the output to the out directory. The -o out flag specifies the output directory.
# Build the runtime image
FROM mcr.microsoft.com/dotnet/runtime:7.0
# Set the working directory in the container
WORKDIR /app
# Copy the published application from the build stage
COPY --from=build /app/out .
FROM mcr.microsoft.com/dotnet/runtime:7.0: This section starts a new phase using the runtime image. This image is small and contains only the runtime needed to run .NET Core applications, unlike the SDK image, which is used for builds.
WORKDIR /app: Set the working directory as /app in this new section.
COPY — from=build /app/out .: Copies the compiled application from the build component to the current runtime component. This ensures that only necessary features are added to the final runtime image.
# Entry point when the container starts
ENTRYPOINT ["dotnet", "ConsoleAppDockerDemo.dll"]
ENTRYPOINT [“dotnet”, “ConsoleAppDockerDemo.dll”]: Specifies the command to be executed when an object based on this image is started. In this case, it creates your .NET Core Console Application by calling dotnet ConsoleAppDockerDemo.dll.
Step 2. Build the Docker image.
docker build -t console-app-demo .
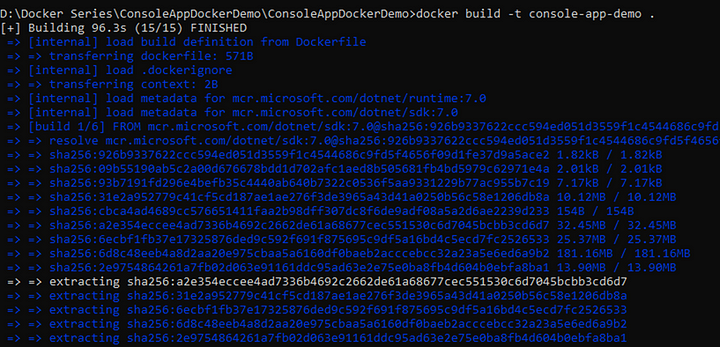
The docker build command is used to build a Docker image from a Docker file. It includes a variety of options, including the -t option to specify a tag for an image.
This command creates a Docker image that uses the Dockerfile in the current directory (.) and marks it as console-app-demo.
Step 3. Run the Docker image inside a Docker container.
docker run -p 5000:80 console-app-demo

- docker run: This is a command to run a Docker container based on the specified image.
- -p 5000:80: This part of the command defines the port mapping. It tells Docker to map 5000 on your host machine to port 80 of the Docker container.
- console-app-demo: This is the name or ID of the Docker image from which you want to create and deploy the object. You should replace this with the actual name or ID of your Docker image.
GitHub: https://github.com/Jaydeep-007/ConsoleAppDockerDemo
Conclusion
In this article, we discussed the basics of docker and the step-by-step implementation of the .NET Core console application and containerization with the help of docker.
epPosted Mar 1, 2024, 1:54 AM
If the console App writes an output file whould I use'*.exe' on the ENTRYPOINT of the dockerfile instead *.dll?