

Introduction
FTP server is used to transfer the files to the internet. If we have an FTP hostname, FTP username, and FTP password, we can transfer our local files to the Internet. In this demo, we will learn how to configure FTP Server in Microsoft Azure. Before we start this demo, we have already installed Microsoft Server 2016 on Microsoft Azure.
Step 1
Log into your account on Azure Portal here.
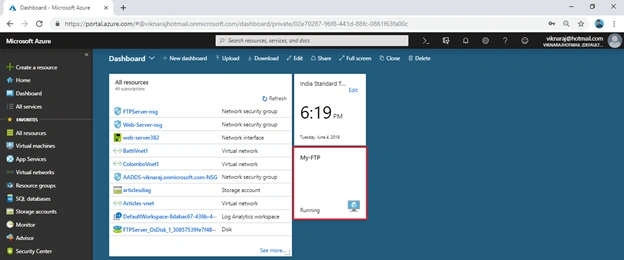
In the dashboard, click to “My-FTP” Server that we have already installed.
Step 2
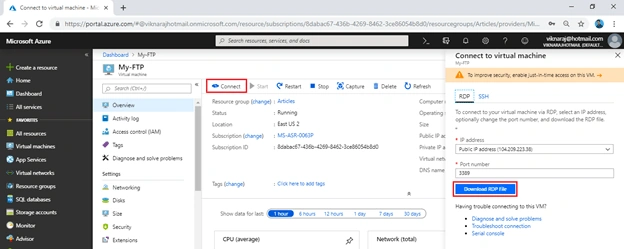
Click the “Connect” on the top of the “My-FTP” Server window, and then select RDP and click Download RDP File. Read the previous article to learn the process of connecting our Server using RDP, click here.
Step 3
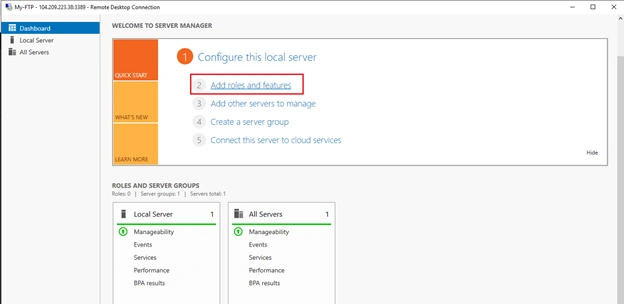
After successfully login the My-FTP server. In Windows Server Manager go to Dashboard and click “Add Roles and Features”.
Step 4
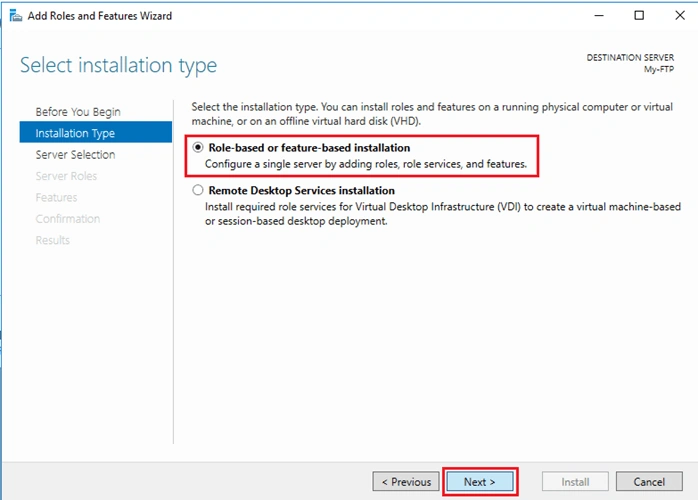
In "Add Roles and Features" wizard select the "Proceed to Installation" option and confirm “Role-based or feature-based installation”, and then click “Next”.
Step 5
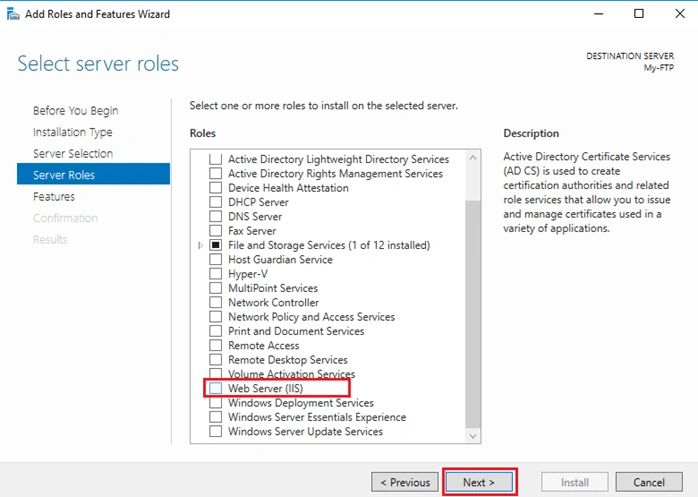
Click the “Web Server (IIS)” role.
Step 6
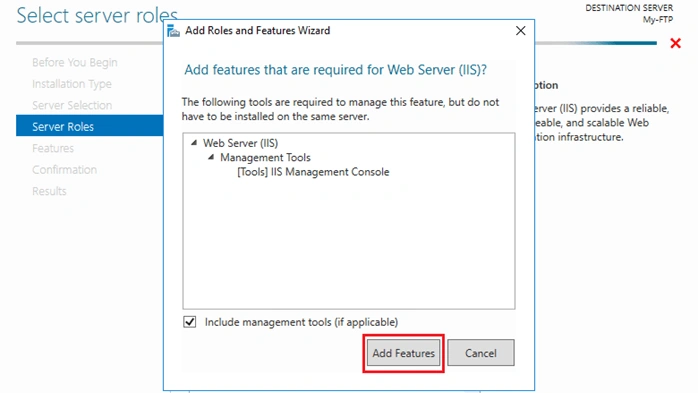
Click "Add Features" on the pop-up window.
Step 7
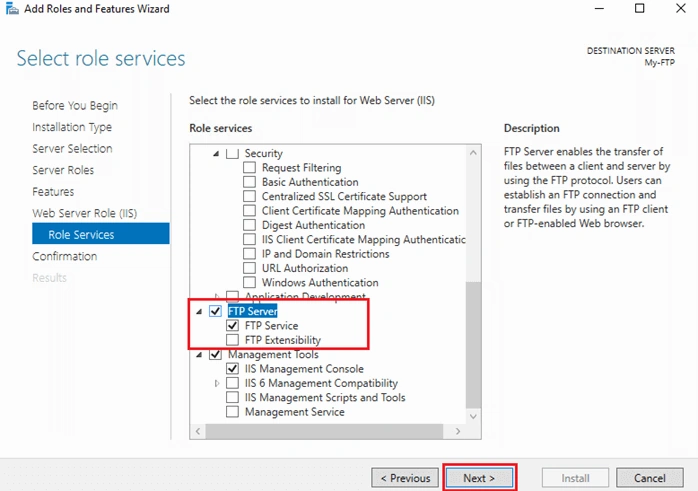
In the “Role Services” step, check the FTP Server role service. Uncheck Web Server role service, if you do not need it. Click “Next”.
Step 8
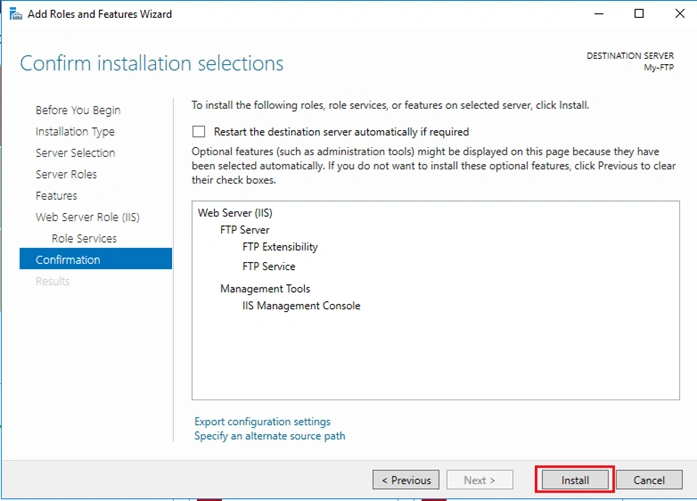
Proceed to the end of the wizard and click "Install".
Wait for the installation to complete.
Step 9
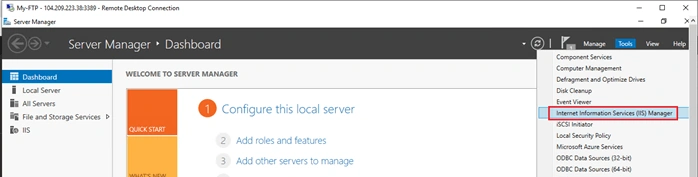
Go to “Server Manager” and select “Tools” and open “Internet Information Services (IIS) Manager”.
Step 10
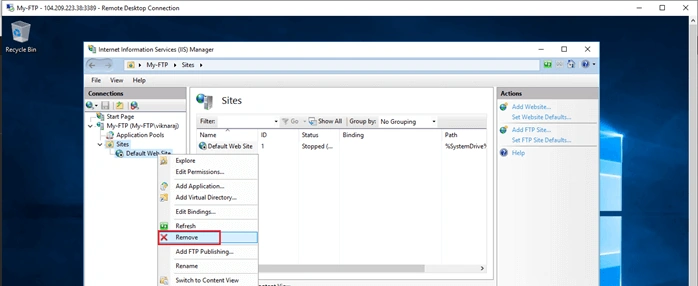
In the IIS Manager, expand the “Sites” and Remove “Default Web Site”.
Step 11
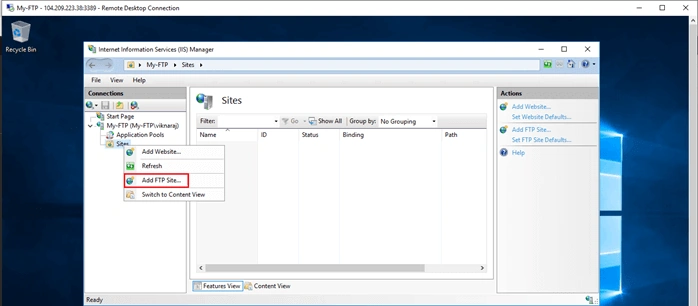
Right-click the “Sites” and click “Add FTP Site”.
Step 12
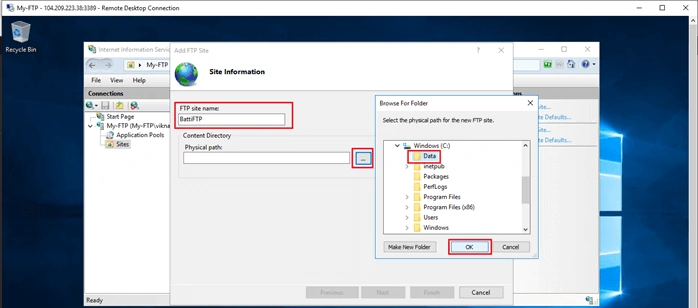
In the "Add FTP Site" wizard.
- FTP site name: BattiFTP
- Physical path: in the C: Drive, I already have created a folder named “Data”. So, select the “Data” folder and click “Ok”.
Step 13
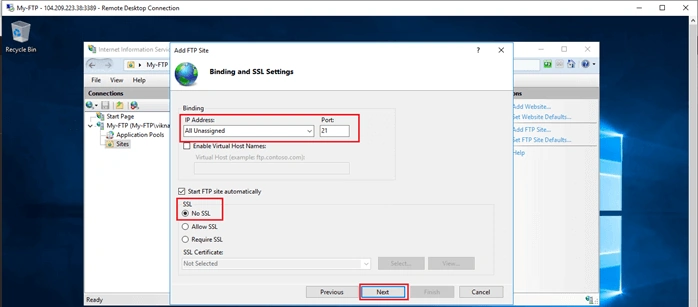
In the Binding and SSL Settings,
- IP Address: Choose All Unassigned
- Port: by default, it’s 21
- SSL: Click No SSL (In this demo we skip the SSL Certification configuration)
Click “Next”.
Step 14
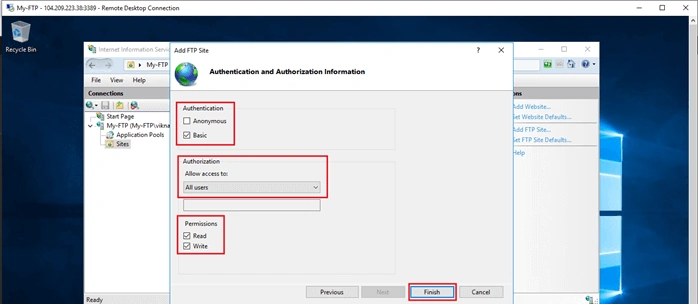
In the Authentication and Authorization Information,
- Authentication: Select Basic
- Authorization: Select All Users
- Permission: Select Read and Write
Click Finish.
Step 15
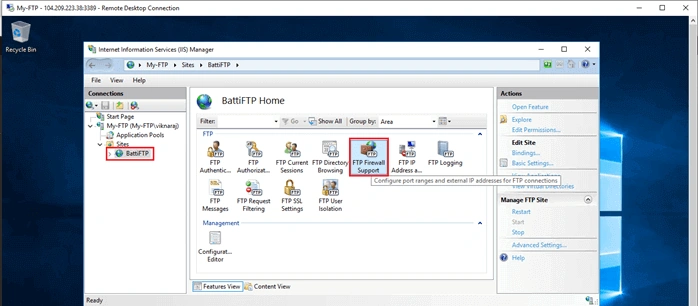
After successfully deployed the FTP site. Click the “BattiFTP” site, and then Open “FTP Firewall Support”.
Step 16
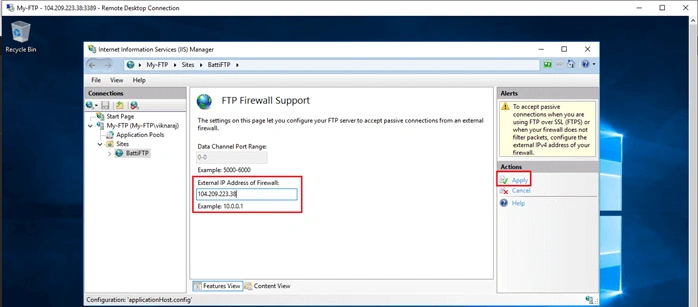
In the External IP Address of Firewall Enter your Azure Server Public IP Address, in our demo our Public Address is 104.209.223.38, and in this case we can’t add the “Data Channel Port Range”, and Click “Apply”.
Step 17
For configuring the “Data Channel Port Range”, Select My-FTP (My-FTP\viknaraj), and then select “FTP Firewall Support”.
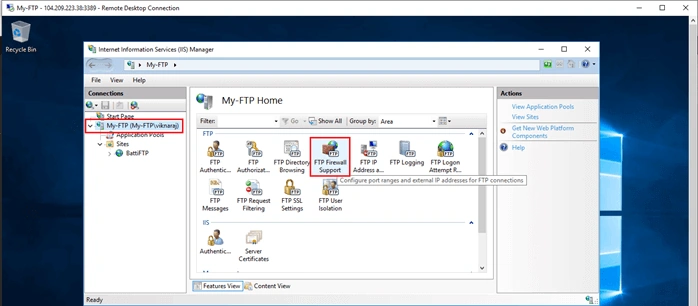
Step 18
In the Data Channel Port Range, enter “9000 to 9999”, and Click “Apply”, in this section we don’t need to enter the External IP Address of Firewall.
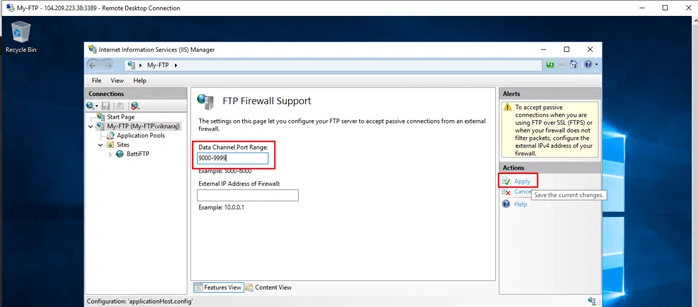
Step 19
After having successfully configured it, we must Restart the “FTP Service”. Click the start button and type “Services”.
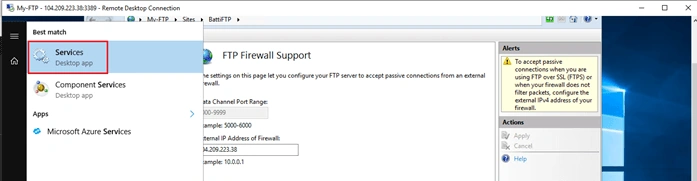
Step 20
Select the “Microsoft FTP Services”. Right-click and press “Restart”. This will apply all the FTP settings and firewall changes we made.
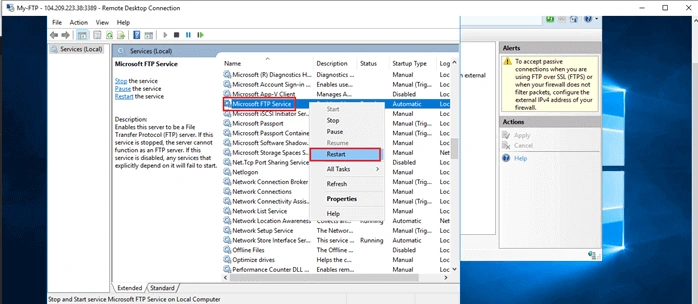
Step 21
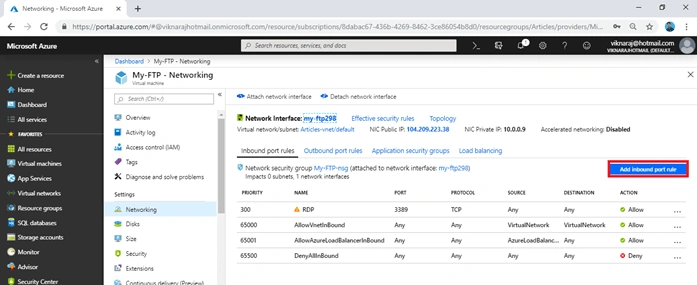
After successfully deployed FTP server, we must configure “Inbound Port Rule”. Open “My-FTP” virtual machine and Click “Networking”, then Click “Add Inbound Port Rule”.
Step 22
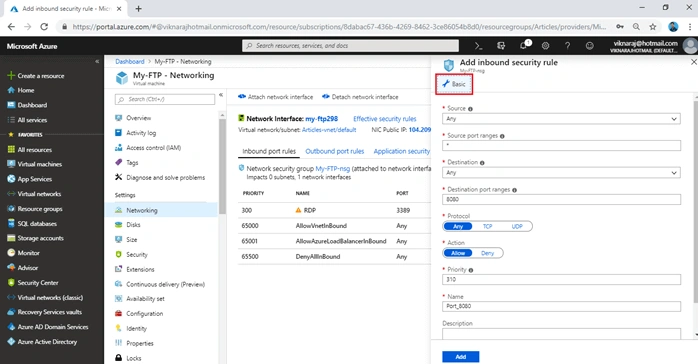
In the Add inbound security rule, we can change the “Basic” to “Advance”, it’s easy to create the port rule. So click “Basic”.
Step 23
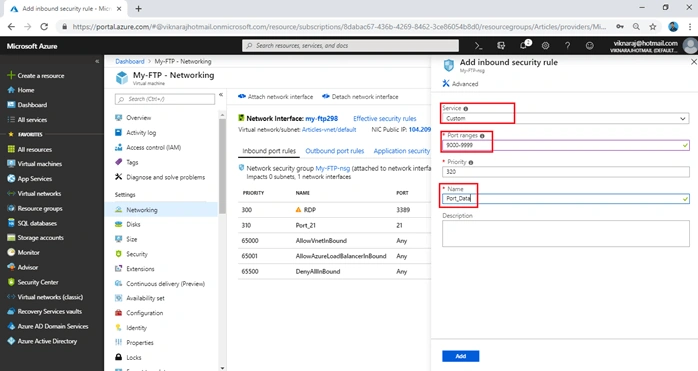
Enter the inbound security rule are bellow,
- Service: Custom
- Port Ranges: 9000-9999 (Data Port Range)
- Priority: It will automatically be assigned
- Name: Port_Data
Click the “Add” button.
Step 24
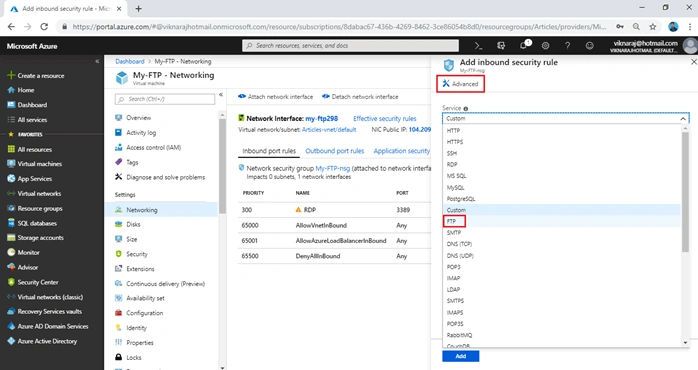
Again Add the “FTP” inbound security rule, Just select “FTP” under the Service, it will automatically be assigned Port Ranges “21”, and other configuration, so click “Add”.
Step 25
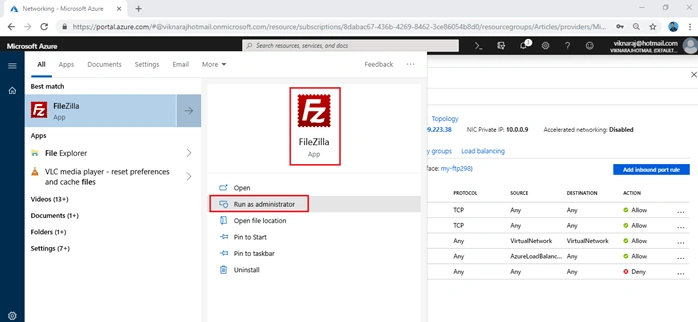
Now, we can test our FTP server using FTP Software. In this demo, we can use “FileZilla”, open the FileZilla as Administrator.
Step 26
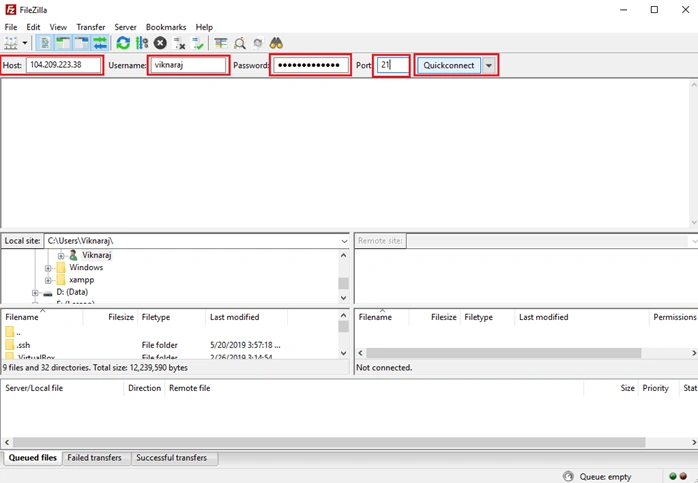
In the Host, enter our Azure Virtual machine Public IP Address, Username our virtual machine Username and the Password, click “Quick connect”.
Step 27
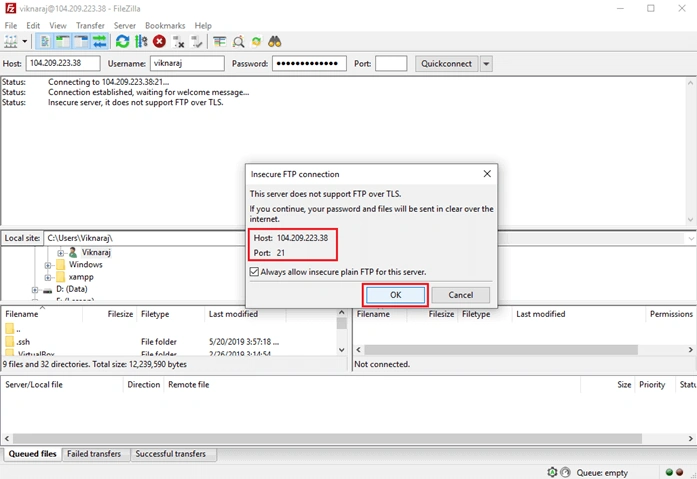
The pop-up message will display, so click OK to continue.
Step 28
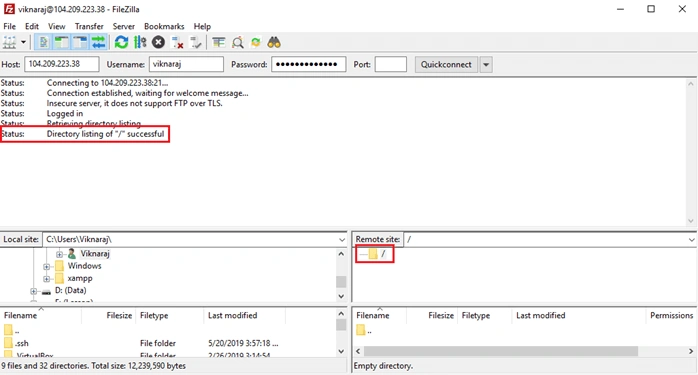
Now, our Azure FTP Server is successfully connected.
Step 29
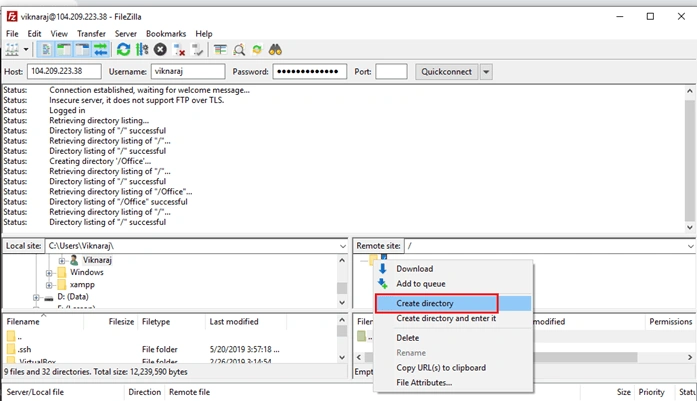
Now, we can create the Directory under our FTP location. Right-click the Main Directory and click “Create directory”.
Step 30
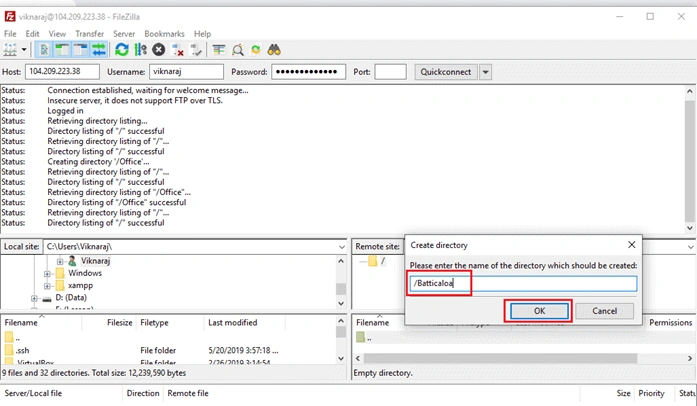
Enter the Directory name (in this demo, our directory name is “Batticaloa”) and click “Ok”.
Step 31
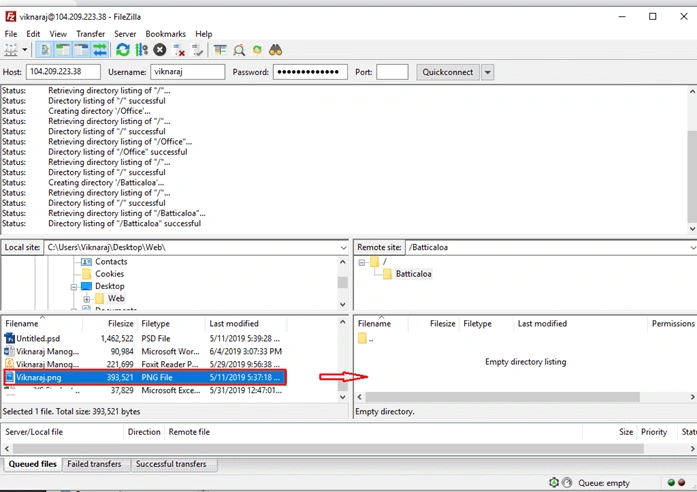
Now, we can transfer the files to our FTP location, just drag and dropped the file into the Batticaloa directory.
Step 32
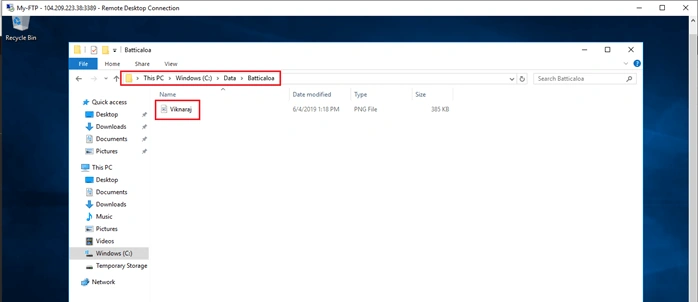
Now, we can verify our file successfully uploaded to our Batticaloa FTP directory.
Summary
In this demo, we learned FTP server configuration in Microsoft Azure. In our next demo, we will how to create Secure FTP connection using SSL certificate. If you have any questions, feel free to comment under the comment box.
Indunil AluviharePosted Aug 11, 2021, 7:57 AM
Nice article about FTP server
sunil itagiPosted Feb 11, 2021, 9:01 AM
Can you please let me know can we set FTP and SFTP server without creating any inbound rules in azure portal?
Gagan BarjatyaPosted Dec 10, 2019, 7:35 AM
Good Stuff thanks I made successful FTP Connection but I'am unable to see given directory
Ankur MistryPosted Jun 9, 2019, 11:06 PM
Good stuff Viknaraj Manogararajah
Hadshana KamalanathanPosted Jun 8, 2019, 7:32 PM
Good one, Thanks for sharing