

Introduction of Collection View
In this article, we will learn how to implement the collection view in iOS app development. The Collection View is similar to Table View but there is a wonderful change in its user interface.
Step 1
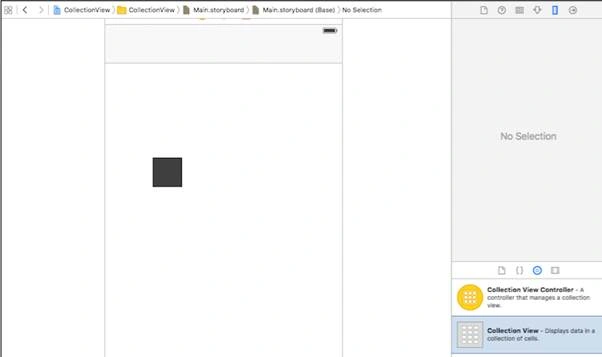
Open Xcode IDE and choose the “Single Page Application”. Then, click on next and give the name of project. Select the Universal Application, and then create on project. After project is created, go to the Main storyboard file. When you see the view controller, go to the object library, drag the collection view, and drop into the view controller. In this image, I show you how I dragged the image and dropped into the view controller.
Step 2
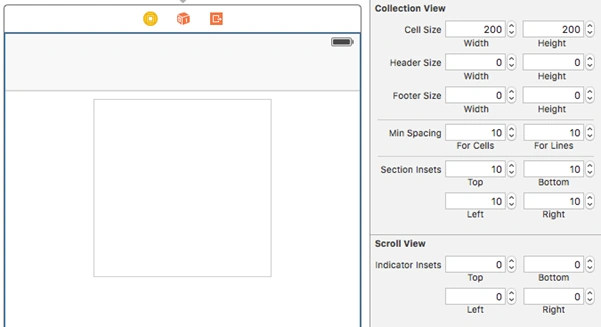
Click on the Collection View cell and change the cell height and width to 200, 200. After that, click on Min Spacing and increase it for cells as well as for lines to 10, 10. Similarly, increase the Section Insets to size 10, 10, 10, 10, as shown in the image.
Step 3
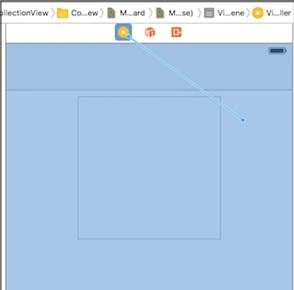
After this, click on the Collection View and connect with the View Controller like this.
Step 4
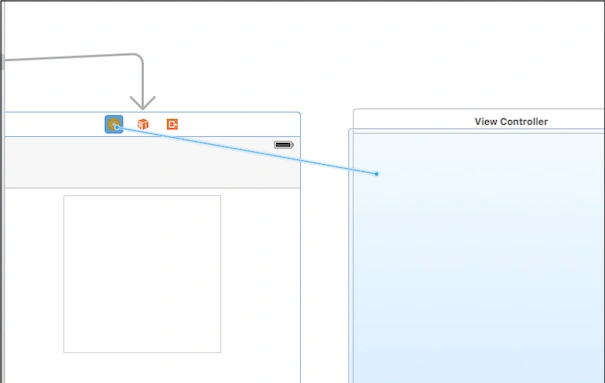
Go to the Main Storyboard file, drag the new view controller, and drop into the storyboard file. Now, you have two View Controllers; one is previous which has your collection and next controller is this new one which is empty. Now, connect the Collection View Controller to this new View Controller like this.
Step 5
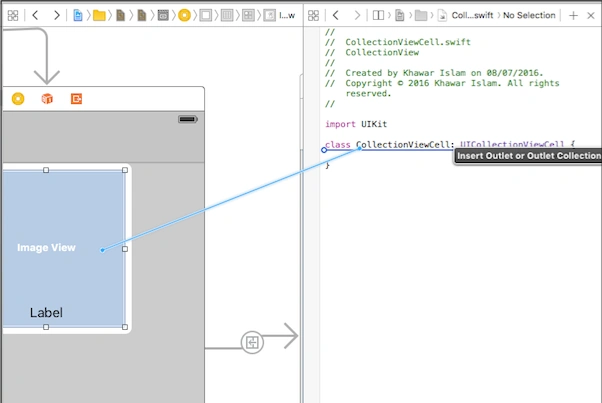
Go to the Main Storyboard file first, drag the image view, and drop into the Collection View cell. Now, repeat the same step for label. Drag the label ad drop into cell. After this, create new class. Select the “Cocoa Touch Class” and give the name CollectionViewCell and extend with subclass “UICollectionViewCell”. After that, click on the Collection View cell. You will see the class textbox, at the right side, which is empty. Bind this class which is “CollectionViewCell”. After that, click open the assistant mode. In left side, open the new class. Now, press ctrl and click and drop into the class. Give the image view the similar steps for label and name as label,
Step 6
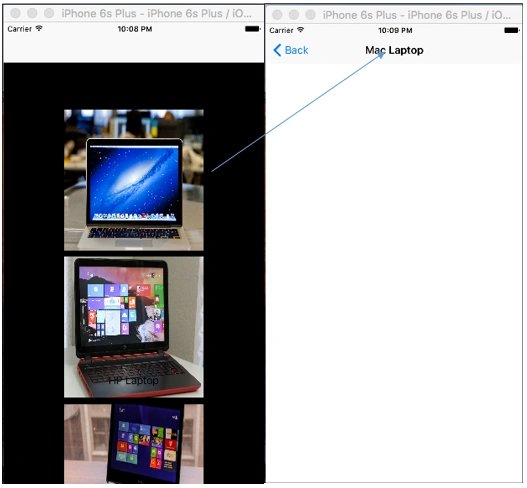
Go to the Storyboard. You will see the that first View Controller and second View Controller is connected and between them, there is a circle. Click on circle. At the right top you will see the identifier textbox. Give the “showImage” to it. Go to the View Controller and paste the following code:
Code
Open Xcode IDE and choose the “Single Page Application”. Then, click on next and give the name of project. Select the Universal Application, and then create on project. After project is created, go to the Main storyboard file. When you see the view controller, go to the object library, drag the collection view, and drop into the view controller. In this image, I show you how I dragged the image and dropped into the view controller.
Step 2
Click on the Collection View cell and change the cell height and width to 200, 200. After that, click on Min Spacing and increase it for cells as well as for lines to 10, 10. Similarly, increase the Section Insets to size 10, 10, 10, 10, as shown in the image.
Step 3
After this, click on the Collection View and connect with the View Controller like this.
Step 4
Go to the Main Storyboard file, drag the new view controller, and drop into the storyboard file. Now, you have two View Controllers; one is previous which has your collection and next controller is this new one which is empty. Now, connect the Collection View Controller to this new View Controller like this.
Step 5
Go to the Main Storyboard file first, drag the image view, and drop into the Collection View cell. Now, repeat the same step for label. Drag the label ad drop into cell. After this, create new class. Select the “Cocoa Touch Class” and give the name CollectionViewCell and extend with subclass “UICollectionViewCell”. After that, click on the Collection View cell. You will see the class textbox, at the right side, which is empty. Bind this class which is “CollectionViewCell”. After that, click open the assistant mode. In left side, open the new class. Now, press ctrl and click and drop into the class. Give the image view the similar steps for label and name as label,
Step 6
Go to the Storyboard. You will see the that first View Controller and second View Controller is connected and between them, there is a circle. Click on circle. At the right top you will see the identifier textbox. Give the “showImage” to it. Go to the View Controller and paste the following code:
Code
- //
- // ViewController.swift
- // CollectionView
- //
- // Created by Khawar Islam on 08/07/2016.
- // Copyright © 2016 Khawar Islam. All rights reserved.
- //
- class ViewController: UIViewController,UICollectionViewDataSource,UICollectionViewDelegate {
- @IBOutlet weak var collectionView: UICollectionView!
- let products = ["Mac Laptop","HP Laptop","Dell Laptop","Acer Laptop"]
- let images = [UIImage(named: "mac"),UIImage(named:"hp"),UIImage(named:"dell"),UIImage(named:"acer")]
- func collectionView(collectionView: UICollectionView, numberOfItemsInSection section: Int) -> Int {
- return self.products.count
- }
- func collectionView(collectionView: UICollectionView, cellForItemAtIndexPath indexPath: NSIndexPath) -> UICollectionViewCell {
- let cell = collectionView.dequeueReusableCellWithReuseIdentifier("cell", forIndexPath: indexPath)
- as! CollectionViewCell
- cell.imageView?.image=self.images[indexPath.row]
- cell.Label?.text=self.products[indexPath .row]
- return cell
- }
- func collectionView(collectionView: UICollectionView, didSelectItemAtIndexPath indexPath: NSIndexPath) {
- self.performSegueWithIdentifier("showImage", sender: self)
- }
- override func prepareForSegue(segue: UIStoryboardSegue, sender: AnyObject?) {
- if segue.identifier == "showImage"
- {
- let indexpaths = self.collectionView!.indexPathsForSelectedItems()!
- let indexpath=indexpaths[0] as NSIndexPath
- let vc = segue.destinationViewController as! NewViewController
- vc.image=self.images[indexpath.row]!
- vc.title=self.products[indexpath.row]
- }
- }
- override func viewDidLoad() {
- super.viewDidLoad()
- // Do any additional setup after loading the view, typically from a nib.
- }
- override func didReceiveMemoryWarning() {
- super.didReceiveMemoryWarning()
- // Dispose of any resources that can be recreated.
- }
- }
kalu singh raoPosted Jul 19, 2016, 1:27 AM
Nice...