

Introduction
In this article, we are going to create a cascading dropdown list in Blazor using Entity Framework Core database first approach. We will create two dropdown lists – Country and City. On selecting the value from country dropdown, we will change the value of City dropdown.
We will be using Visual Studio 2017 and SQL Server 2014.

Take a look at the final application.
Prerequisites
Source Code
Before proceeding, I would recommend you to get the source code from GitHub.
Creating Tables
We will be using two tables to store our data.
- Country
Used to store the name of Country. It contains two fields – CountryId and CountryName. - Cities
This contains the list of cities for the Countries we insert in Country table. It contains three fields – CityId, CountryId and CityName. The CountryId column is a foreign key referring to CountryId in Country table.
- CREATE TABLE Country
- (
- CountryId VARCHAR(5) PRIMARY KEY,
- CountryName VARCHAR(20) NOT NULL
- )
- GO
- CREATE TABLE Cities
- (
- CityId VARCHAR(5) PRIMARY KEY,
- CountryId VARCHAR(5) FOREIGN KEY REFERENCES Country(CountryId),
- CityName VARCHAR(20) NOT NULL
- )
- GO
- INSERT INTO Country VALUES ('C1', 'India')
- INSERT INTO Country VALUES ('C2', 'China')
- INSERT INTO Country VALUES ('C3', 'USA')
- INSERT INTO Cities VALUES ('P1','C1','New Delhi')
- INSERT INTO Cities VALUES ('P2','C1','Mumbai')
- INSERT INTO Cities VALUES ('P3','C1','Chennai')
- INSERT INTO Cities VALUES ('P4','C1','Hyderabad')
- INSERT INTO Cities VALUES ('P5','C1','Bengaluru')
- INSERT INTO Cities VALUES ('P6','C2','Beijing')
- INSERT INTO Cities VALUES ('P7','C2','Shanghai')
- INSERT INTO Cities VALUES ('P8','C2','Hong Kong')
- INSERT INTO Cities VALUES ('P9','C2','Macau')
- INSERT INTO Cities VALUES ('P10','C3','New York')
- INSERT INTO Cities VALUES ('P11','C3','Chicago')
- INSERT INTO Cities VALUES ('P12','C3','Las Vegas')
Create Blazor Web Application
Open Visual Studio and select File >> New >> Project.
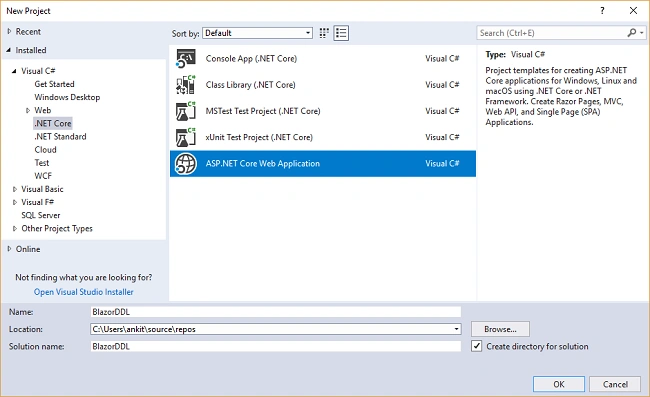
After selecting the project, a "New Project" dialog will open. Select .NET Core inside Visual C# menu from the left panel. Then, select “ASP.NET Core Web Application” from available project types. Put the name of the project as BlazorDDL and press OK.
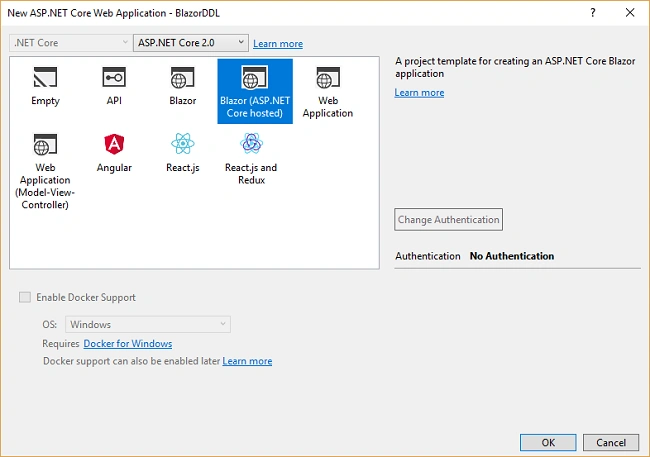
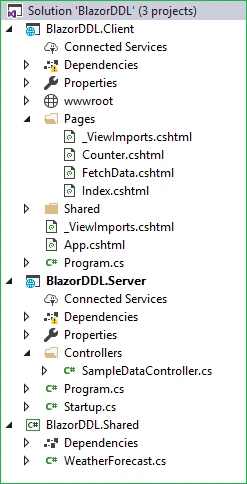
You can observe that we have three project files created inside this solution.
- BlazorDDL.Client – It has the client side code and contains the pages that will be rendered on the browser.
- BlazorDDL.Server – It has the server side codes such as DB related operations and web API.
- BlazorDDL.Shared – It contains the shared code that can be accessed by both client and server. It contains out Model classes.
Scaffolding the Model to the Application
We are using Entity Framework core database first approach to create our models. We will create our model class in BlazorDDL.Shared project so that it can be accessible to both client and server project.
First, we will install the package for the database provider that we are targeting which is SQL Server in this case. Hence, run the following command,
- Install-Package Microsoft.EntityFrameworkCore.SqlServer
- Install-Package Microsoft.EntityFrameworkCore.Tools
- Scaffold-DbContext "Your connection string here" Microsoft.EntityFrameworkCore.SqlServer -OutputDir Models -Tables Country, Cities
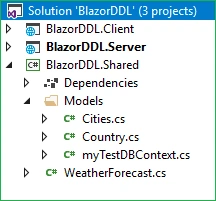
At this point in time, the Models folder will have the following structure.
Creating Data Access Layer for the Application
Right-click on BlazorDDL.Server project and then select Add >> New Folder and name the folder as DataAccess. We will be adding our class to handle database related operations inside this folder only.
Right click on DataAccess folder and select Add >> Class. Name your class DataAccessLayer.cs. This class will handle our database related operations.
Open DataAccessLayer.cs and put the following code into it.
- using BlazorDDL.Shared.Models;
- using System;
- using System.Collections.Generic;
- using System.Linq;
- using System.Threading.Tasks;
- namespace BlazorDDL.Server.DataAcces
- {
- public class DataAccessLayer
- {
- myTestDBContext db = new myTestDBContext();
- public IEnumerable<Country> GetAllCountries()
- {
- try
- {
- return db.Country.ToList();
- }
- catch
- {
- throw;
- }
- }
- public IEnumerable<Cities> GetCityData(string id)
- {
- try
- {
- List<Cities> lstCity = new List<Cities>();
- lstCity = (from CityName in db.Cities where CityName.CountryId == id select CityName).ToList();
- return lstCity;
- }
- catch
- {
- throw;
- }
- }
- }
- }
Here we have defined two methods
- GetAllCountries – It will fetch all the country data from the country table.
- GetCityData – It will fetch the city data corresponding to the country id provided to it.
Adding the web API Controller to the Application
Right click on BlazorDDL.Server/Controllers folder and select Add >> New Item. An “Add New Item” dialog box will open. Select ASP.NET from the left panel, then select “API Controller Class” from templates panel and put the name as CountriesController.cs. Click Add.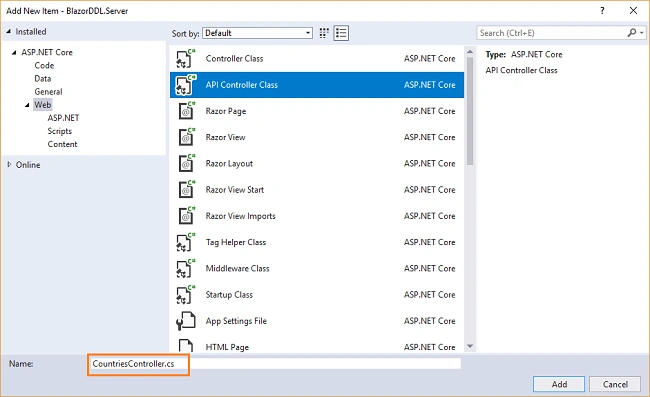
This will create our API CountriesController class. We will call the methods of DataAccessLayer class to fetch data and pass on the data to the client side.
- using System;
- using System.Collections.Generic;
- using System.Linq;
- using System.Threading.Tasks;
- using BlazorDDL.Server.DataAcces;
- using BlazorDDL.Shared.Models;
- using Microsoft.AspNetCore.Mvc;
- using Microsoft.AspNetCore.Http;
- namespace BlazorDDL.Server.Controllers
- {
- public class CountriesController : Controller
- {
- DataAccessLayer objCountry= new DataAccessLayer();
- [HttpGet]
- [Route("api/Countries/GetCountryList")]
- public IEnumerable<Country> GetCountryList()
- {
- return objCountry.GetAllCountries();
- }
- [HttpGet]
- [Route("api/Countries/GetCities/{id}")]
- public IEnumerable<Cities> GetCities(string id)
- {
- return objCountry.GetCityData(id);
- }
- }
- }
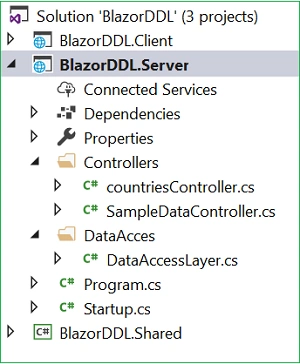
At this point of time, our BlazorDDL.Server project has the following structure.
Adding Razor View to the Application
Right click on BlazorDDL.Client/Pages folder and then select Add >> New Item. An “Add New Item” dialog box will open, select Web from the left panel, then select “Razor View” from templates panel and name it CountryData.cshtml. Click Add.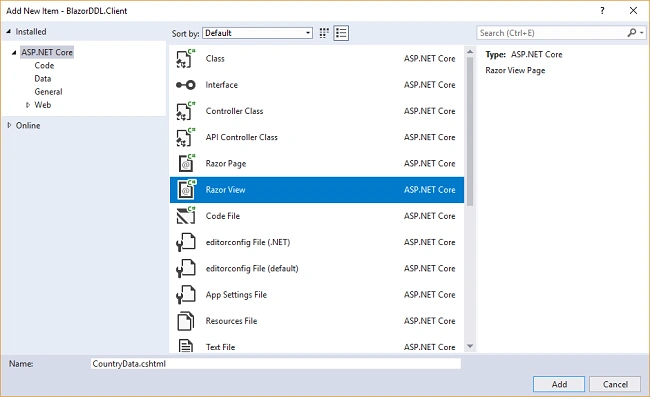
This will add a CountryData.cshtmlpage to our BlazorDDL.Client/Pages folder.
Open CountryData.cshtml page and put the following code into it.- @using BlazorDDL.Shared.Models
- @page "/country"
- @inject HttpClient Http
- <h1>Country Data</h1>
- <p>This component demonstrates cascading dropdownlist using EntityFrameWork Core</p>
- <hr />
- @if (countryList == null)
- {
- <p><em>Loading...</em></p>
- }
- else
- {
- <div class="row">
- <div class="col-md-4">
- <label for="Country" class="control-label">Country</label>
- </div>
- <div class="col-md-4">
- <label asp-for="Cities" class="control-label">Cities</label>
- </div>
- </div>
- <div class="row" style="padding-top:10px">
- <div class="col-md-4">
- <select class="form-control" onchange="@CountryClicked">
- <option value="">-- Select Country --</option>
- @foreach (var country in countryList)
- {
- <option value="@country.CountryId">@country.CountryName</option>
- }
- </select>
- </div>
- <div class="col-md-4">
- <select class="form-control" onchange="@CityClicked">
- <option value="">-- Select City --</option>
- @if (cityList != null)
- {
- @foreach (var city in cityList)
- {
- <option value="@city.CityName">@city.CityName</option>
- }
- }
- </select>
- </div>
- </div>
- <div class="row" style="padding-top:50px">
- <div class="col-md-4">
- <label class="control-label">Country Name: @countryName</label>
- </div>
- <div class="col-md-4">
- <label class="control-label">City Name: @cityName</label>
- </div>
- </div>
- }
- @functions {
- List<Country> countryList = new List<Country>();
- List<Cities> cityList = new List<Cities>();
- string countryId { get; set; }
- string countryName { get; set; }
- string cityName { get; set; }
- protected override async Task OnInitAsync()
- {
- countryList = await Http.GetJsonAsync<List<Country>>("api/Countries/GetCountryList");
- }
- protected async void CountryClicked(UIChangeEventArgs countryEvent)
- {
- cityList.Clear();
- cityName = string.Empty;
- countryId = countryEvent.Value.ToString();
- countryName = countryList.FirstOrDefault(s => s.CountryId == countryId).CountryName;
- cityList = await Http.GetJsonAsync<List<Cities>>("api/Countries/GetCities/" + countryId);
- this.StateHasChanged();
- }
- void CityClicked(UIChangeEventArgs cityEvent)
- {
- cityName = cityEvent.Value.ToString();
- this.StateHasChanged();
- }
- }
Let’s understand this code.
On the top, we have included BlazorDDL.Shared.Models namespace so that we can use our Country and Cities model class in this page. We are defining the route of this page using @page directive. So, in this application, if we append “/country” to base URL then we will be redirected to this page. We are also injecting HttpClient service to enable web API call.
Similarly, we have another dropdown list to display city data corresponding to each country. On the onchange event of Cities dropdown, we are setting the value of cityName property to the selected city.
We are also displaying the selected country name and city name value on the webpage.
The @functions section has all our properties and methods. We have defined two variables – countryList of type Country and cityList of type City to handle the countries and cities data respectively. We have also declared three properties to handle countryId, countryName, and cityName data.
Inside the OnInitAsync method, we are calling the GetCountryList web API method to populate countryList. This variable is used to bind the data to Country dropdown list on page load.Adding Link to Navigation menu
The last step is to add the link to our “CountryData” page in the navigation menu, open BlazorDDL.Client/Shared/NavMenu.cshtml page and put the following code into it.
- <div class="top-row pl-4 navbar navbar-dark">
- <a class="navbar-brand" href="/">BlazorDDL</a>
- <button class="navbar-toggler" onclick=@ToggleNavMenu>
- <span class="navbar-toggler-icon"></span>
- </button>
- </div>
- <div class=@(collapseNavMenu ? "collapse" : null) onclick=@ToggleNavMenu>
- <ul class="nav flex-column">
- <li class="nav-item px-3">
- <NavLink class="nav-link" href="/" Match=NavLinkMatch.All>
- <span class="oi oi-home" aria-hidden="true"></span> Home
- </NavLink>
- </li>
- <li class="nav-item px-3">
- <NavLink class="nav-link" href="/counter">
- <span class="oi oi-plus" aria-hidden="true"></span> Counter
- </NavLink>
- </li>
- <li class="nav-item px-3">
- <NavLink class="nav-link" href="/fetchdata">
- <span class="oi oi-list-rich" aria-hidden="true"></span> Fetch data
- </NavLink>
- </li>
- <li class="nav-item px-3">
- <NavLink class="nav-link" href="/country">
- <span class="oi oi-list-rich" aria-hidden="true"></span> Country
- </NavLink>
- </li>
- </ul>
- </div>
- @functions {
- bool collapseNavMenu = true;
- void ToggleNavMenu()
- {
- collapseNavMenu = !collapseNavMenu;
- }
- }
Hence, we have completed our cascading dropdown list application.
Execution Demo
Launch the application.
A web page will open as shown in the image below. The navigation menu on the left is showing navigation link for CountryData page.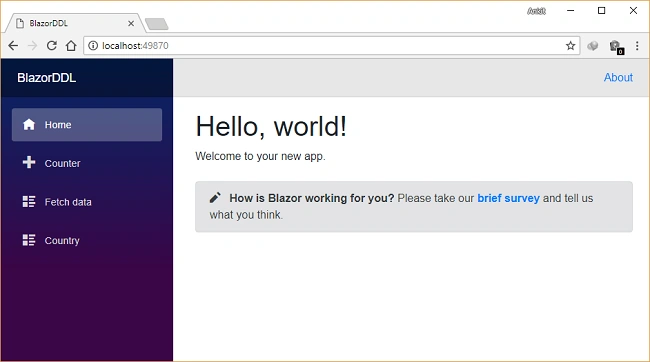
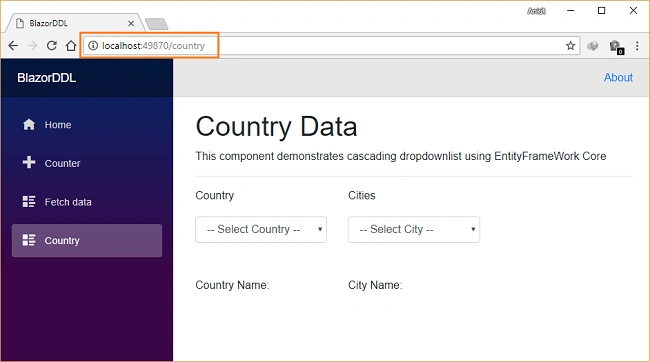
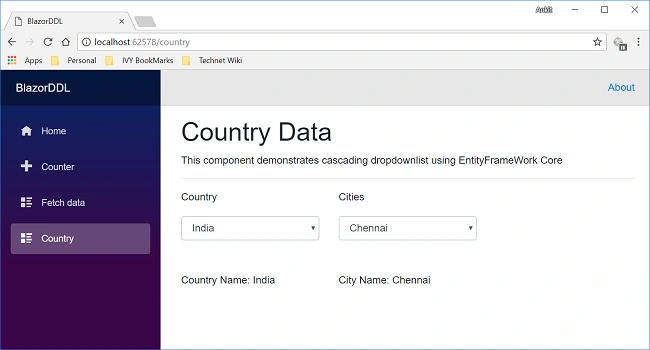
To learn how to deploy a Blazor application using IIS , refer to Deploying a Blazor Application on IIS.
Conclusion
We have learned how to create cascading dropdown lists in Blazor using the Entity Framework Core database first approach with the help of Visual Studio 2017 and SQL Server 2014.Please get the source code from Github and play around to get a better understanding.
See Also
GowthamPosted Feb 15, 2023, 12:12 PM
Hi, you can check Syncfusion Blazor Dropdown List https://www.syncfusion.com/blazor-components/blazor-dropdown-list
S!vA Boy!D!Posted May 26, 2020, 9:15 AM
Hello everyone.... Is it possible to have CountryId as Integer? If Yes, How can we do that? Thanks in advance...
Tridip BhattacharjeePosted Jun 11, 2018, 9:10 AM
From the name "protected override async Task OnInitAsync() " it seems it fire first when page load....am i right?
Tridip BhattacharjeePosted Jun 11, 2018, 9:08 AM
We are also setting the value of countryName property to the selected country. The “StateHasChanged” method is invoked to refresh the UI. how we can inform to refresh a specific control in page instead of whole page....any idea?
Tridip BhattacharjeePosted Jun 11, 2018, 9:00 AM
I found no code to populate city dropdown when user select country....where it is ? where is the magic code which populate city dropdown.
Naresh SinghalPosted May 16, 2018, 12:37 AM
Fantastic Bro ...........