

Introduction
In the previous article, "Singleton Pattern: Ensuring a Single Instance in.NET Core," we learned that a class has only one object and provides a global point to use with it. This pattern is especially useful for managing shared resources like configuration settings, logging mechanisms, or database connections. In multithreaded environments, it’s crucial to implement Singleton properly to prevent race conditions.
In this article, we’ll explore the Builder Pattern, a step-by-step design process for building complex objects. We will illustrate this example with examples of computers. Following this approach, we can manage the complexity of producing these products, ensuring their cleanliness and simplicity of products.
Understanding the Builder Pattern
The Builder Pattern is a creational design pattern that separates the construction of a complex object from its final representation. Unlike other patterns, which might require different constructors or configuration methods, the Builder allows the object to be created step by step, each part configurable and replaceable. This pattern is ideal when an object needs to be created with various configurations or when the construction process involves multiple steps.
Key Components of Builder Pattern
- Builder: Defines the abstract methods for creating different parts of the product.
- Concrete Builder: Implements the builder interface to assemble the product.
- Product: The complex object being constructed.
- Director: Manages the construction process, ensuring the correct sequence of steps.
- Client: Uses the director and builder to construct the product.
Example in C#
Let's illustrate the Builder Pattern with a practical example of constructing computer objects with various configurations.
1. Define the Product Class
Computer.cs
namespace Builder_Pattern_Demo
{
    public class Computer
    {
        public string CPU { get; set; }
        public int RAM { get; set; }
        public int Storage { get; set; }
        public bool HasGraphicsCard { get; set; }

        public override string ToString()
        {
            return $"Computer with CPU: {CPU}, RAM: {RAM}GB, Storage: {Storage}GB, Graphics Card: {HasGraphicsCard}";
        }
    }
}
Explanation
- The Computer class represents the product being built. It includes properties like CPU, RAM, Storage, HasGraphicsCard, and a ToString method for displaying the computer's configuration.
2. Define the Builder Interface
IComputerBuilder.cs
namespace Builder_Pattern_Demo
{
    public interface IComputerBuilder
    {
        void SetCPU(string cpu);
        void SetRAM(int ram);
        void SetStorage(int storage);
        void SetGraphicsCard(bool hasGraphicsCard);
        Computer GetComputer();
    }
}
Explanation
- The IComputerBuilder interface defines methods for setting different computer attributes. It includes methods for configuring the CPU, RAM, storage, and graphics card, as well as a GetComputer method to retrieve the constructed computer.
3. Implement the Concrete Builder
ComputerBuilder.cs
namespace Builder_Pattern_Demo
{
    public class ComputerBuilder : IComputerBuilder
    {
        private Computer _computer = new Computer();

        public void SetCPU(string cpu)
        {
            _computer.CPU = cpu;
        }

        public void SetRAM(int ram)
        {
            _computer.RAM = ram;
        }

        public void SetStorage(int storage)
        {
            _computer.Storage = storage;
        }

        public void SetGraphicsCard(bool hasGraphicsCard)
        {
            _computer.HasGraphicsCard = hasGraphicsCard;
        }

        public Computer GetComputer()
        {
            return _computer;
        }
    }

}
Explanation
- The ComputerBuilder class implements the IComputerBuilder interface. It holds a private Computer instance and provides methods to configure its attributes. The GetComputer method returns the fully constructed Computer object.
4. Define the Director
ComputerDirector.cs
namespace Builder_Pattern_Demo
{
    public class ComputerDirector
    {
        private readonly IComputerBuilder _builder;

        public ComputerDirector(IComputerBuilder builder)
        {
            _builder = builder;
        }

        public void BuildGamingPC()
        {
            _builder.SetCPU("Intel i9");
            _builder.SetRAM(32);
            _builder.SetStorage(1024);
            _builder.SetGraphicsCard(true);
        }

        public void BuildWorkstation()
        {
            _builder.SetCPU("Intel Xeon");
            _builder.SetRAM(64);
            _builder.SetStorage(2048);
            _builder.SetGraphicsCard(false);
        }
    }

}
Explanation
- The ComputerDirector class manages the building process. It uses the ICarBuilder to construct different types of computers, such as a gaming PC and a workstation, by calling specific methods to configure the attributes.
5. Client Code
Program.cs
using Builder_Pattern_Demo;

class Program
{
    static void Main(string[] args)
    {
        IComputerBuilder builder = new ComputerBuilder();
        ComputerDirector director = new ComputerDirector(builder);

        // Build a gaming PC
        director.BuildGamingPC();
        Computer gamingPC = builder.GetComputer();
        Console.WriteLine("Uday Dodiya's Gaming PC: " + gamingPC);

        // Build a workstation
        director.BuildWorkstation();
        Computer workstation = builder.GetComputer();
        Console.WriteLine("Uday Dodiya's Workstation: " + workstation);
    }
}
Explanation
- The Program.cs file contains the Main method. It demonstrates how to use the Builder Pattern to create different types of computers. The ComputerBuilder and ComputerDirector are used to build and configure a gaming PC and a workstation.
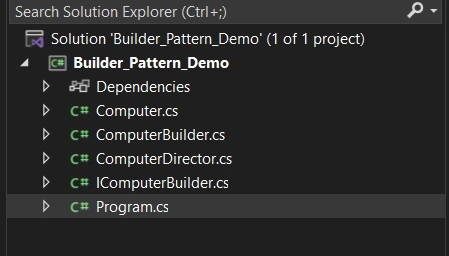
File Structure For the Above Example.
Output

Real-World Use Cases
- Computer Assembly: Building computers with different configurations for gaming, business, or personal use.
- Meal Preparation: Creating custom meal packages with various ingredients and options.
- Website Configuration: Setting up websites with different modules or plugins depending on user requirements
Benefits of the builder pattern
- Modularity: Separates the construction process from the product representation, making it easier to manage.
- Flexibility: Allows for different configurations of the same product without changing the code.
- Clarity: Reduces complexity by managing the construction process in a controlled manner.
Summary
The Builder Pattern provides a structured approach to constructing complex objects. By breaking down the construction process into manageable steps, we can create different configurations of objects efficiently. In this article, we demonstrated how to build various types of computers using the Builder Pattern.
Next Steps
In the next article,"Prototype Pattern: Cloning Objects in C#", we will explore the Prototype Pattern and its use in creating new objects by cloning existing ones. This pattern is particularly useful when object creation is expensive or involves complex initialization.
If you find this article valuable, please consider liking it and sharing your thoughts in the comments.
Thank you, and happy coding.
Join the conversation! Your thoughts help the community grow.